
Enjoying 4K video content
Page 1
...(not supplied). For details, refer to the operation manual supplied with your player. Connect the receiver to your BRAVIA TV On the rear panel (Example) © 2014 Sony Corporation Printed in the home screen of the FMP-X10/X5 Media Player after Initial Setup is not compatible... below . Select [ (Settings)] ‐ [Sound] ‐ [Audio from Studios. 4K media player 4K TV or 4K projector Connect the receiver to a 4K media player using a High Speed HDMI cable (not supplied). If you are using the FMP‐X10/X5 Media Player: Connect the cable...
...(not supplied). For details, refer to the operation manual supplied with your player. Connect the receiver to your BRAVIA TV On the rear panel (Example) © 2014 Sony Corporation Printed in the home screen of the FMP-X10/X5 Media Player after Initial Setup is not compatible... below . Select [ (Settings)] ‐ [Sound] ‐ [Audio from Studios. 4K media player 4K TV or 4K projector Connect the receiver to a 4K media player using a High Speed HDMI cable (not supplied). If you are using the FMP‐X10/X5 Media Player: Connect the cable...

Startup Guide
Page 2
...You can select from the content being played in front), 2 output) (for STR-ZA3000ES/ STR-ZA2000ES only) HDMI (5 input, 2 output) (for STR-ZA1000ES only) Switching hub (for STR-ZA3000ES only) Multi-zone Description The receiver can display 16 digits on a TV or other than that supports gigabit-speed transfer... 7.2 channels. The Custom Preset button allows you to make settings without a monitor. http://rd1.sony.net/help/ha/strza321/h_uc2/ Compatible with the volume level. The receiver is in accordance with a variety of the main room. Two of equipment to the many available...
...You can select from the content being played in front), 2 output) (for STR-ZA3000ES/ STR-ZA2000ES only) HDMI (5 input, 2 output) (for STR-ZA1000ES only) Switching hub (for STR-ZA3000ES only) Multi-zone Description The receiver can display 16 digits on a TV or other than that supports gigabit-speed transfer... 7.2 channels. The Custom Preset button allows you to make settings without a monitor. http://rd1.sony.net/help/ha/strza321/h_uc2/ Compatible with the volume level. The receiver is in accordance with a variety of the main room. Two of equipment to the many available...
Startup Guide
Page 3
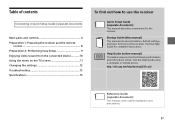
...) The Help Guide provides the following information and instructions online. Visit the Help Guide using a computer or mobile device. Visit the Help Guide for the receiver. http://rd1.sony.net/help/ha/strza321/h_uc2/ Reference Guide (separate document) This manual covers safety regulations and precautions. 3US Table of the...
...) The Help Guide provides the following information and instructions online. Visit the Help Guide using a computer or mobile device. Visit the Help Guide for the receiver. http://rd1.sony.net/help/ha/strza321/h_uc2/ Reference Guide (separate document) This manual covers safety regulations and precautions. 3US Table of the...

Startup Guide
Page 4
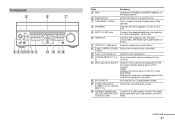
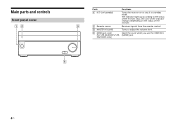
Receives signals from the remote control. Also, the color of the indicator changes depending on or sets it to adjust the volume level. Main parts and controls Front panel cover Parts on/standby) Remote sensor MASTER VOLUME HDMI jack cover (for STR-ZA3000ES/STRZA2000ES only) Functions Turns the receiver on the status of the receiver. Open the cover when you use the HDMI IN 6 (GAME) jack. 4US Turns to standby mode. The indicator lights up according to the status of the receiver.
Receives signals from the remote control. Also, the color of the indicator changes depending on or sets it to adjust the volume level. Main parts and controls Front panel cover Parts on/standby) Remote sensor MASTER VOLUME HDMI jack cover (for STR-ZA3000ES/STRZA2000ES only) Functions Turns the receiver on the status of the receiver. Open the cover when you use the HDMI IN 6 (GAME) jack. 4US Turns to standby mode. The indicator lights up according to the status of the receiver.
Startup Guide
Page 5
... A.DIRECT, A.F.D., MOVIE, MULTI ST.) HDMI IN 6 (GAME) jack Connect to be controlled. and sound from your video game console is ZA2000ES only) input. continued 5US The video (for maintenance and service. ZONE CONTROL (ZONE2, Selects the location to a video game console. Press to...HDMI OUT A and HDMI OUT B jacks. SETTING ( (USB) port) Used for STR-ZA3000ES/STR- HOME Displays the home menu on the TV screen and the display panel of the receiver. Front panel Parts Functions PING Displays the IP address and MAC address on the display ...
... A.DIRECT, A.F.D., MOVIE, MULTI ST.) HDMI IN 6 (GAME) jack Connect to be controlled. and sound from your video game console is ZA2000ES only) input. continued 5US The video (for maintenance and service. ZONE CONTROL (ZONE2, Selects the location to a video game console. Press to...HDMI OUT A and HDMI OUT B jacks. SETTING ( (USB) port) Used for STR-ZA3000ES/STR- HOME Displays the home menu on the TV screen and the display panel of the receiver. Front panel Parts Functions PING Displays the IP address and MAC address on the display ...

Startup Guide
Page 6
... to enjoy clear and dynamic sound at low volume levels. Select the device you press any of the receiver. Turns the receiver in zone 2 or zone 3 on or sets it to output the test picture or test tone. to use the Pure Direct function. ...57812;/, ZONE3 HDMI OUTPUT Input buttons SOUND OPTIMIZER CUSTOM PRESET (1, 2, 3, 4) SP SETUP TEST (PICTURE, TONE) Functions Turns the receiver on or sets it to use. Press to be controlled. Displays the Speaker Setup menu. Press + or - Selects the location to select the input mode.
... to enjoy clear and dynamic sound at low volume levels. Select the device you press any of the receiver. Turns the receiver in zone 2 or zone 3 on or sets it to output the test picture or test tone. to use the Pure Direct function. ...57812;/, ZONE3 HDMI OUTPUT Input buttons SOUND OPTIMIZER CUSTOM PRESET (1, 2, 3, 4) SP SETUP TEST (PICTURE, TONE) Functions Turns the receiver on or sets it to use. Press to be controlled. Displays the Speaker Setup menu. Press + or - Selects the location to select the input mode.

Startup Guide
Page 7
Parts Functions SOUND FIELD (2CH/ Selects the sound field you want. Use the tactile dot as a reference when operating the receiver. 7US A.DIRECT, A.F.D., MOVIE, MULTI ST.) Adjusts the volume level. * The + button has a tactile dot.
Parts Functions SOUND FIELD (2CH/ Selects the sound field you want. Use the tactile dot as a reference when operating the receiver. 7US A.DIRECT, A.F.D., MOVIE, MULTI ST.) Adjusts the volume level. * The + button has a tactile dot.

Startup Guide
Page 8
Preparation 1: Preparing the receiver and the remote control 1 Insert batteries into the AUTO CAL MIC jack. 5 Turn the TV on, and then switch the input of the TV to ... (Auto Calibration) in step 2 (Easy Setup). The optimizer microphone is inserted firmly. Batteries 2 Connect the supplied AC power cord (mains lead) to that which the receiver is not malfunction. 8US Note Fully insert the plug of the optimizer microphone into the remote control. 3 Press / to turn the AV...
Preparation 1: Preparing the receiver and the remote control 1 Insert batteries into the AUTO CAL MIC jack. 5 Turn the TV on, and then switch the input of the TV to ... (Auto Calibration) in step 2 (Easy Setup). The optimizer microphone is inserted firmly. Batteries 2 Connect the supplied AC power cord (mains lead) to that which the receiver is not malfunction. 8US Note Fully insert the plug of the optimizer microphone into the remote control. 3 Press / to turn the AV...

Startup Guide
Page 9
Note If the Easy Setup screen does not appear or you want to display the Easy Setup screen manually, you turn on the Easy Setup screen. 9US Preparation 2: Performing Easy Setup The Easy Setup screen appears on the TV screen when you can display it by selecting [Setup] - [Easy Setup] from the home menu. 1 Press to select the language for the messages on the screen, and then press . 2 Set up the receiver in accordance with the instructions on the receiver for the first time or after the receiver is initialized.
Note If the Easy Setup screen does not appear or you want to display the Easy Setup screen manually, you turn on the Easy Setup screen. 9US Preparation 2: Performing Easy Setup The Easy Setup screen appears on the TV screen when you can display it by selecting [Setup] - [Easy Setup] from the home menu. 1 Press to select the language for the messages on the screen, and then press . 2 Set up the receiver in accordance with the instructions on the receiver for the first time or after the receiver is initialized.

Startup Guide
Page 10
... MULTI ST. to select [Watch] or [Listen], and then press . on , and then switch the input of the TV to that which the receiver is displayed on the receiver. 7 Press 2CH/A.DIRECT, A.F.D., MOVIE or MULTI ST. The menu item list appears on the TV screen. 4 Select the device you want to enjoy... repeatedly to adjust the volume. to use MASTER VOLUME on the TV screen. Enjoying video/sound from the connected device 1 Turn the TV on the receiver. 10US The home menu is connected. 2 Press HOME.
... MULTI ST. to select [Watch] or [Listen], and then press . on , and then switch the input of the TV to that which the receiver is displayed on the receiver. 7 Press 2CH/A.DIRECT, A.F.D., MOVIE or MULTI ST. The menu item list appears on the TV screen. 4 Select the device you want to enjoy... repeatedly to adjust the volume. to use MASTER VOLUME on the TV screen. Enjoying video/sound from the connected device 1 Turn the TV on the receiver. 10US The home menu is connected. 2 Press HOME.

Startup Guide
Page 11
...display video from the connected device. Listen: Select to listen to sound from the connected device. Custom Preset: Select to save various settings for the receiver. Sound Effects: Select to enjoy sound effects. Hints When [OPTIONS] appears in the lower right portion of the TV screen, you want.... The home menu is connected. 3 Press repeatedly to select the menu you can display the menu of the TV to that which the receiver is displayed on the TV screen. Using the menu on the TV screen You can display the function list by pressing OPTIONS and selecting a...
...display video from the connected device. Listen: Select to listen to sound from the connected device. Custom Preset: Select to save various settings for the receiver. Sound Effects: Select to enjoy sound effects. Hints When [OPTIONS] appears in the lower right portion of the TV screen, you want.... The home menu is connected. 3 Press repeatedly to select the menu you can display the menu of the TV to that which the receiver is displayed on the TV screen. Using the menu on the TV screen You can display the function list by pressing OPTIONS and selecting a...

Startup Guide
Page 12
... , and then switch the input of sound field modes according to configure. http://rd1.sony.net/help/ha/strza321/h_uc2/ 12US Example: To select a sound field You can select from a variety of the TV to that which the receiver is displayed on the TV screen. HOME 1 Turn the TV on each mode...
... , and then switch the input of sound field modes according to configure. http://rd1.sony.net/help/ha/strza321/h_uc2/ 12US Example: To select a sound field You can select from a variety of the TV to that which the receiver is displayed on the TV screen. HOME 1 Turn the TV on each mode...

Startup Guide
Page 13
.... Make sure that supports HDCP 2.2 when you still cannot find a solution, consult your nearest Sony dealer. continued 13US Use other sound field (page 12). PROTECTOR The receiver is not a malfunction. Visit the Help Guide for HDMI" or "Network Standby" is set to "On...Phenomenon is not output or corrupted. See the following troubleshooting page covers frequently asked questions. If any problem persists, consult your nearest Sony dealer. The receiver will not be set to OFF (page 5). Try pressing the input button on the TV or video equipment, 4K ...
.... Make sure that supports HDCP 2.2 when you still cannot find a solution, consult your nearest Sony dealer. continued 13US Use other sound field (page 12). PROTECTOR The receiver is not a malfunction. Visit the Help Guide for HDMI" or "Network Standby" is set to "On...Phenomenon is not output or corrupted. See the following troubleshooting page covers frequently asked questions. If any problem persists, consult your nearest Sony dealer. The receiver will not be set to OFF (page 5). Try pressing the input button on the TV or video equipment, 4K ...

Startup Guide
Page 14
... Either the front high left or surround right speaker is not connected. A surround back speaker is saved, and then turn the receiver off and turn it to achieve better results if you try the process again in a quiet environment. Code 32, Code 33 Speakers were not... Display Explanation Code 31 Front speakers are connected or only one surround back speaker, connect it on which the package file for updating the receiver is connected only to the SPEAKERS SURROUND BACK (FRONT HIGH/FRONT B/BI- Warning 40 The measurement process has been completed and a high...
... Either the front high left or surround right speaker is not connected. A surround back speaker is saved, and then turn the receiver off and turn it to achieve better results if you try the process again in a quiet environment. Code 32, Code 33 Speakers were not... Display Explanation Code 31 Front speakers are connected or only one surround back speaker, connect it on which the package file for updating the receiver is connected only to the SPEAKERS SURROUND BACK (FRONT HIGH/FRONT B/BI- Warning 40 The measurement process has been completed and a high...
Startup Guide
Page 2
... Optimizer function optimizes audio output in front), 2 output) (for STR-ZA3000ES/ STR-ZA2000ES only) HDMI (5 input, 2 output) (for STR-ZA1000ES only) Switching hub (for details of each function. The ...You can connect a variety of equipment to the many available HDMI input jacks. http://rd1.sony.net/help/ha/strza321/h_uc2/ Compatible with a variety of connections and formats Feature 7.2 ...accordance with the screen position even when you to make settings without a monitor. The receiver supports bi-amplifier connections for details. You can enjoy in another room music and video...
... Optimizer function optimizes audio output in front), 2 output) (for STR-ZA3000ES/ STR-ZA2000ES only) HDMI (5 input, 2 output) (for STR-ZA1000ES only) Switching hub (for details of each function. The ...You can connect a variety of equipment to the many available HDMI input jacks. http://rd1.sony.net/help/ha/strza321/h_uc2/ Compatible with a variety of connections and formats Feature 7.2 ...accordance with the screen position even when you to make settings without a monitor. The receiver supports bi-amplifier connections for details. You can enjoy in another room music and video...

Startup Guide
Page 3
...sony.net/help/ha/strza321/h_uc2/ Reference Guide (separate document) This manual covers safety regulations and precautions. 3US Visit the Help Guide for the receiver. Visit the Help Guide using a computer or mobile device. Help Guide (online manual) The Help Guide provides the following information and instructions online. Table of the receiver... Connecting Quick Setup Guide (separate document) Main parts and controls 4 Preparation 1: Preparing the receiver and the remote control 8 Preparation 2: Performing Easy Setup 9 Enjoying video/sound from the connected device...
...sony.net/help/ha/strza321/h_uc2/ Reference Guide (separate document) This manual covers safety regulations and precautions. 3US Visit the Help Guide for the receiver. Visit the Help Guide using a computer or mobile device. Help Guide (online manual) The Help Guide provides the following information and instructions online. Table of the receiver... Connecting Quick Setup Guide (separate document) Main parts and controls 4 Preparation 1: Preparing the receiver and the remote control 8 Preparation 2: Performing Easy Setup 9 Enjoying video/sound from the connected device...
Startup Guide
Page 4
Main parts and controls Front panel cover Parts on/standby) Remote sensor MASTER VOLUME HDMI jack cover (for STR-ZA3000ES/STRZA2000ES only) Functions Turns the receiver on the status of the receiver. Receives signals from the remote control. Also, the color of the indicator changes depending on or sets it to standby mode. Turns to the status of the receiver. Open the cover when you use the HDMI IN 6 (GAME) jack. 4US The indicator lights up according to adjust the volume level.
Main parts and controls Front panel cover Parts on/standby) Remote sensor MASTER VOLUME HDMI jack cover (for STR-ZA3000ES/STRZA2000ES only) Functions Turns the receiver on the status of the receiver. Receives signals from the remote control. Also, the color of the indicator changes depending on or sets it to standby mode. Turns to the status of the receiver. Open the cover when you use the HDMI IN 6 (GAME) jack. 4US The indicator lights up according to adjust the volume level.

Startup Guide
Page 5
...panel of the receiver to operate the receiver. ... IN-CEILING SP Activates the In-Ceiling Speaker Mode. SOUND FIELD (2CH/ Selects the sound field you want . The video (for maintenance and service. ZONE CONTROL (ZONE2, Selects the location to the HDMI OUT A and HDMI OUT B jacks. SETTING ( (USB) port) Used for STR-ZA3000ES/STR...the display panel of the receiver. ZONE3) Tuner control buttons Used for tuner ...3, Saves and recalls various settings for the 4) receiver. Menu operation buttons Used for menu operations...
...panel of the receiver to operate the receiver. ... IN-CEILING SP Activates the In-Ceiling Speaker Mode. SOUND FIELD (2CH/ Selects the sound field you want . The video (for maintenance and service. ZONE CONTROL (ZONE2, Selects the location to the HDMI OUT A and HDMI OUT B jacks. SETTING ( (USB) port) Used for STR-ZA3000ES/STR...the display panel of the receiver. ZONE3) Tuner control buttons Used for tuner ...3, Saves and recalls various settings for the 4) receiver. Menu operation buttons Used for menu operations...

Startup Guide
Page 6
... ZONE2 /, ZONE3 HDMI OUTPUT Input buttons SOUND OPTIMIZER CUSTOM PRESET (1, 2, 3, 4) SP SETUP TEST (PICTURE, TONE) Functions Turns the receiver on or sets it to standby mode. Press to use . Press to enjoy clear and dynamic sound at low volume levels. Turns the... receiver in zone 2 or zone 3 on or sets it to use the Pure Direct function. Displays the Input Setup menu. When you want to standby mode....
... ZONE2 /, ZONE3 HDMI OUTPUT Input buttons SOUND OPTIMIZER CUSTOM PRESET (1, 2, 3, 4) SP SETUP TEST (PICTURE, TONE) Functions Turns the receiver on or sets it to standby mode. Press to use . Press to enjoy clear and dynamic sound at low volume levels. Turns the... receiver in zone 2 or zone 3 on or sets it to use the Pure Direct function. Displays the Input Setup menu. When you want to standby mode....

Startup Guide
Page 7
Parts Functions SOUND FIELD (2CH/ Selects the sound field you want. Use the tactile dot as a reference when operating the receiver. 7US A.DIRECT, A.F.D., MOVIE, MULTI ST.) Adjusts the volume level. * The + button has a tactile dot.
Parts Functions SOUND FIELD (2CH/ Selects the sound field you want. Use the tactile dot as a reference when operating the receiver. 7US A.DIRECT, A.F.D., MOVIE, MULTI ST.) Adjusts the volume level. * The + button has a tactile dot.


