
Operating Instructions
Page 4
...the doubleD symbol are trademarks of Sony Corporation. 4US All Rights Reserved. "BRAVIA" is a trademark of Sony Computer Entertainment Inc. and worldwide patents issued & pending. This receiver incorporates High-Definition Multimedia Interface (HDMITM) technology. "S-AIR" and its logo are trademarks of... High-Definition Multimedia Interface are for model HT-SF370 and HT-SS370. "PLAYSTATION" is a trademark of Sony Corporation. On Copyrights This receiver incorporates Dolby* Digital and Pro Logic Surround and the DTS** Digital Surround System. * Manufactured under U.S. About...
...the doubleD symbol are trademarks of Sony Corporation. 4US All Rights Reserved. "BRAVIA" is a trademark of Sony Computer Entertainment Inc. and worldwide patents issued & pending. This receiver incorporates High-Definition Multimedia Interface (HDMITM) technology. "S-AIR" and its logo are trademarks of... High-Definition Multimedia Interface are for model HT-SF370 and HT-SS370. "PLAYSTATION" is a trademark of Sony Corporation. On Copyrights This receiver incorporates Dolby* Digital and Pro Logic Surround and the DTS** Digital Surround System. * Manufactured under U.S. About...
Operating Instructions
Page 5
... movies with the optimum sound field (Theater Mode 46 S-AIR Operations About S-AIR products 47 Setting up an S-AIR product 48 Enjoying the system's sound in another room 52 Stabilizing S-AIR reception 54 Changing the channel for better sound transmission 55 Enjoying the S-AIR receiver while the S-AIR main unit is in standby mode ......56 Advanced Settings...
... movies with the optimum sound field (Theater Mode 46 S-AIR Operations About S-AIR products 47 Setting up an S-AIR product 48 Enjoying the system's sound in another room 52 Stabilizing S-AIR reception 54 Changing the channel for better sound transmission 55 Enjoying the S-AIR receiver while the S-AIR main unit is in standby mode ......56 Advanced Settings...

Operating Instructions
Page 8
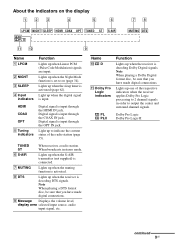
... set to off (on and DSPL is set to playback (page 29, 31, 32, 35, 37, 38). Amber: The receiver is in standby mode, and Control for HDMI and/or S-AIR standby mode are set to off when "PASS THRU" is in DISPLAY function (page 62). C Display Note If the POWER/ACTIVE... STANDBY indicator is turned on . G Remote sensor H MASTER VOLUME Function Lights up as follows: Green: The receiver is flashing, see page 71. Lights...
... set to off (on and DSPL is set to playback (page 29, 31, 32, 35, 37, 38). Amber: The receiver is in standby mode, and Control for HDMI and/or S-AIR standby mode are set to off when "PASS THRU" is in DISPLAY function (page 62). C Display Note If the POWER/ACTIVE... STANDBY indicator is turned on . G Remote sensor H MASTER VOLUME Function Lights up as follows: Green: The receiver is flashing, see page 71. Lights...
Operating Instructions
Page 9
... is decoding DTS signals. Lights up when Linear PCM (Pulse Code Modulation) signals are input. Light up when the receiver is input. Digital signal is activated (page 62). F S-AIR Lights up when the sleep timer is input through the OPT IN jack. Lights up when the... S-AIR transmitter (not supplied) is decoding Dolby Digital signals. I Message Displays the volume level, display area selected input source, audio input signal, etc. G MUTING Lights up when the receiver is connected. Name J D K Dolby Pro Logic indicators...
... is decoding DTS signals. Lights up when Linear PCM (Pulse Code Modulation) signals are input. Light up when the receiver is input. Digital signal is activated (page 62). F S-AIR Lights up when the sleep timer is input through the OPT IN jack. Lights up when the... S-AIR transmitter (not supplied) is decoding Dolby Digital signals. I Message Displays the volume level, display area selected input source, audio input signal, etc. G MUTING Lights up when the receiver is connected. Name J D K Dolby Pro Logic indicators...

Operating Instructions
Page 10
.../and speakers connected to a Super Audio CD player, CD player, etc. (page 19, 20). E AUDIO INPUT section AUDIO IN White (L) jacks Red (R) Connects to this receiver (page 21). F DIGITAL INPUT/OUTPUT section COAX IN Connects to a wireless transmitter (not supplied) (page 48...
.../and speakers connected to a Super Audio CD player, CD player, etc. (page 19, 20). E AUDIO INPUT section AUDIO IN White (L) jacks Red (R) Connects to this receiver (page 21). F DIGITAL INPUT/OUTPUT section COAX IN Connects to a wireless transmitter (not supplied) (page 48...

Operating Instructions
Page 25
... room. The volume of the speakers is designed to obtain proper sound balance in the path between each speaker and the receiver. • Adjust the speaker level. • Measure the distance of noise and to get a more than 96 kHz. Doing so...performed correctly. Notes • If the muting function has been activated before you use the S-AIR product, disconnect the headphones. Getting Started 7: Calibrating the appropriate settings automatically (AUTO CALIBRATION) This receiver is equipped with a sampling frequency of more accurate measurement. • If there are any ...
... room. The volume of the speakers is designed to obtain proper sound balance in the path between each speaker and the receiver. • Adjust the speaker level. • Measure the distance of noise and to get a more than 96 kHz. Doing so...performed correctly. Notes • If the muting function has been activated before you use the S-AIR product, disconnect the headphones. Getting Started 7: Calibrating the appropriate settings automatically (AUTO CALIBRATION) This receiver is equipped with a sampling frequency of more accurate measurement. • If there are any ...
Operating Instructions
Page 27
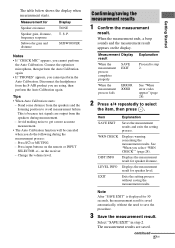
... When Auto Calibration starts: - on the display. When the measurement ends, a beep sounds and the measurement result appears on the receiver. - Item Explanation SAVE EXIT Saves the measurement results and exits the setting process. DIST INFO Displays the measurement result for 50 seconds,... optimizer microphone, then perform the Auto Calibration again. • If "PHONES" appears, you are saved. Disconnect the headphones from the S-AIR product you cannot perform the Auto Calibration. Press input buttons on the remote or INPUT SELECTOR +/- The table below shows the display when ...
... When Auto Calibration starts: - on the display. When the measurement ends, a beep sounds and the measurement result appears on the receiver. - Item Explanation SAVE EXIT Saves the measurement results and exits the setting process. DIST INFO Displays the measurement result for 50 seconds,... optimizer microphone, then perform the Auto Calibration again. • If "PHONES" appears, you are saved. Disconnect the headphones from the S-AIR product you cannot perform the Auto Calibration. Press input buttons on the remote or INPUT SELECTOR +/- The table below shows the display when ...
Operating Instructions
Page 33
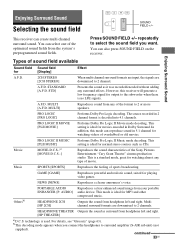
...press SOUND FIELD on the receiver. STANDARD [A.F.D. In addition, this receiver will generate a low frequency signal for [Display] Effect A.F.D. 2CH STEREO [2CH STEREO] When multi channel surround formats are input, the signals are downmixed to surround amplifier (S-AIR sub unit) (not supplied... any type of the optimized sound fields from your portable audio device. Music SPORTS [SPORTS] Reproduces the feeling of the Sony Pictures Entertainment "Cary Grant Theater" cinema production studio. GAME [GAME] Reproduces powerful and realistic sound, suited for movies encoded...
...press SOUND FIELD on the receiver. STANDARD [A.F.D. In addition, this receiver will generate a low frequency signal for [Display] Effect A.F.D. 2CH STEREO [2CH STEREO] When multi channel surround formats are input, the signals are downmixed to surround amplifier (S-AIR sub unit) (not supplied... any type of the optimized sound fields from your portable audio device. Music SPORTS [SPORTS] Reproduces the feeling of the Sony Pictures Entertainment "Cary Grant Theater" cinema production studio. GAME [GAME] Reproduces powerful and realistic sound, suited for movies encoded...

Operating Instructions
Page 34
... AUDIO". • The movie and music mode do not work when: - the multi channel Linear PCM signals are received via an HDMI IN jack. • The sound is automatically selected. The AMP menu turns off as the optimum ...1 Press AMP MENU. Tip You can enjoy sound effects and hear the dialog clearly even at a low volume level using the S-AIR receiver (not supplied), sound from the surround speakers. • Multi channel Linear PCM is input. - Enjoying the sound at low volume ... you will not be able to hear any sound coming directly from the S-AIR receiver (not supplied) may skip.
... AUDIO". • The movie and music mode do not work when: - the multi channel Linear PCM signals are received via an HDMI IN jack. • The sound is automatically selected. The AMP menu turns off as the optimum ...1 Press AMP MENU. Tip You can enjoy sound effects and hear the dialog clearly even at a low volume level using the S-AIR receiver (not supplied), sound from the surround speakers. • Multi channel Linear PCM is input. - Enjoying the sound at low volume ... you will not be able to hear any sound coming directly from the S-AIR receiver (not supplied) may skip.

Operating Instructions
Page 47
... on the use a radio frequency of S-AIR product. • S-AIR main unit (this receiver): This is used S-AIR products use environment.) • S-AIR sub unit (not supplied): This is compatible with the S-AIR function (page 64), which allows wireless sound transmission between S-AIR products. Room B Room A POWER/ ACTIVE STANDBY S-AIR sub unit (S-AIR receiver) S-AIR main unit (this operating instructions is...
... on the use a radio frequency of S-AIR product. • S-AIR main unit (this receiver): This is used S-AIR products use environment.) • S-AIR sub unit (not supplied): This is compatible with the S-AIR function (page 64), which allows wireless sound transmission between S-AIR products. Room B Room A POWER/ ACTIVE STANDBY S-AIR sub unit (S-AIR receiver) S-AIR main unit (this operating instructions is...

Operating Instructions
Page 48
Inserting the wireless transmitter/transceiver To make use of the S-AIR function, you need to disconnect the AC power cord. • Do not insert/detach the wireless transmitter/ transceiver (not supplied) while the receiver is turned on. • Do not touch the terminals of the wireless transmitter.../transceiver. 48US Materials or structures, such as possible from the above electronic equipment, or place where S-AIR reception is placed When using an S-AIR product, be sure to ...
Inserting the wireless transmitter/transceiver To make use of the S-AIR function, you need to disconnect the AC power cord. • Do not insert/detach the wireless transmitter/ transceiver (not supplied) while the receiver is turned on. • Do not touch the terminals of the wireless transmitter.../transceiver. 48US Materials or structures, such as possible from the above electronic equipment, or place where S-AIR reception is placed When using an S-AIR product, be sure to ...

Operating Instructions
Page 49
...V marks are aligned. • Do not insert other than the wireless transmitter into the S-AIR sub unit Refer to the operating instructions of the S-AIR sub unit. EZW-T100 slot EZW-T100 S-AIR Operations Wireless transmitter Notes • Insert the wireless transmitter with marks. Note Do not use ...screws. 2 Insert the wireless transmitter. EZW-T100 EZW-T100 DC5V AUTO CAL MIC 0.7A MAX DMPORT Note Remove the screws pointed with the S-AIR logo facing up. • Insert the wireless transmitter so that you removed from step 1 to fasten the wireless transmitter. To insert the ...
...V marks are aligned. • Do not insert other than the wireless transmitter into the S-AIR sub unit Refer to the operating instructions of the S-AIR sub unit. EZW-T100 slot EZW-T100 S-AIR Operations Wireless transmitter Notes • Insert the wireless transmitter with marks. Note Do not use ...screws. 2 Insert the wireless transmitter. EZW-T100 EZW-T100 DC5V AUTO CAL MIC 0.7A MAX DMPORT Note Remove the screws pointed with the S-AIR logo facing up. • Insert the wireless transmitter so that you removed from step 1 to fasten the wireless transmitter. To insert the ...

Operating Instructions
Page 50
.... Sound transmission is established as follows: S-AIR main unit (this receiver) POWER/ ACTIVE STANDBY MASTER VOLUME ID A Other S-AIR main unit ID B 50US ID A ID A S-AIR sub unit S-AIR sub unit ID B S-AIR sub unit For details on the display. 2 Press V/v repeatedly until "S-AIR SET" appears, then press or b. 3 Press V/v repeatedly until "S-AIR ID" appears, then press or...
.... Sound transmission is established as follows: S-AIR main unit (this receiver) POWER/ ACTIVE STANDBY MASTER VOLUME ID A Other S-AIR main unit ID B 50US ID A ID A S-AIR sub unit S-AIR sub unit ID B S-AIR sub unit For details on the display. 2 Press V/v repeatedly until "S-AIR SET" appears, then press or b. 3 Press V/v repeatedly until "S-AIR ID" appears, then press or...

Operating Instructions
Page 51
...4 Press V/v repeatedly until "S-AIR SET" appears, then press or b. continued 51US Your room S-AIR main unit (this receiver) POWER/ ACTIVE STANDBY MASTER VOLUME ID A Neighbor No transmission ID A S-AIR sub unit ID A S-AIR sub unit Pairing To perform pairing 1 Place the S-AIR sub unit that you want...set the ID of your S-AIR main unit and S-AIR sub unit. S-AIR Operations Pairing the S-AIR main unit with the S-AIR sub unit. 3 Press AMP MENU. To prevent this, you need to pair near the S-AIR main unit. Your room S-AIR main unit (this receiver) POWER/ ACTIVE STANDBY MASTER ...
...4 Press V/v repeatedly until "S-AIR SET" appears, then press or b. continued 51US Your room S-AIR main unit (this receiver) POWER/ ACTIVE STANDBY MASTER VOLUME ID A Neighbor No transmission ID A S-AIR sub unit ID A S-AIR sub unit Pairing To perform pairing 1 Place the S-AIR sub unit that you want...set the ID of your S-AIR main unit and S-AIR sub unit. S-AIR Operations Pairing the S-AIR main unit with the S-AIR sub unit. 3 Press AMP MENU. To prevent this, you need to pair near the S-AIR main unit. Your room S-AIR main unit (this receiver) POWER/ ACTIVE STANDBY MASTER ...

Operating Instructions
Page 52
.... Notes • When you select "START" in step 6. Note Perform the pairing within several minutes after you are using the S-AIR receiver. You can check the current ID. Note Sources with copyright protection may not be placed in another room by using another room for ... MENU 1 Set the ID of the S-AIR receiver to match the S-AIR main unit. • To set the ID of the S-AIR sub unit" (page 50). Set the ID of the S-AIR receiver to match the ID of the S-AIR receiver, refer to the operating instructions supplied with S-AIR receiver. The AMP menu turns off. Enjoying the...
.... Notes • When you select "START" in step 6. Note Perform the pairing within several minutes after you are using the S-AIR receiver. You can check the current ID. Note Sources with copyright protection may not be placed in another room by using another room for ... MENU 1 Set the ID of the S-AIR receiver to match the S-AIR main unit. • To set the ID of the S-AIR sub unit" (page 50). Set the ID of the S-AIR receiver to match the ID of the S-AIR receiver, refer to the operating instructions supplied with S-AIR receiver. The AMP menu turns off. Enjoying the...

Operating Instructions
Page 53
..., refer to 2 channel. 7 Adjust the volume on the S-AIR main unit. • SEPARATE: You can select the input you can control the system from the S-AIR receiver You can only select the same band for the S-AIR receiver while the input of the system. When "SEPARATE" is downmixed to... the operating instructions of the S-AIR receiver. To control the system from the S-AIR receiver by using the following buttons. When ...
..., refer to 2 channel. 7 Adjust the volume on the S-AIR main unit. • SEPARATE: You can select the input you can control the system from the S-AIR receiver You can only select the same band for the S-AIR receiver while the input of the system. When "SEPARATE" is downmixed to... the operating instructions of the S-AIR receiver. To control the system from the S-AIR receiver by using the following buttons. When ...

Operating Instructions
Page 54
...0.7A MAX DMPORT • Keep as much space as possible around S-AIR products. - POWER/ ACTIVE STANDBY MASTER VOLUME EZW-T100 CAAULTMOIC DC5V 0.7A MAX DMPORT - Place so that S-AIR products are closer. Stabilizing S-AIR reception Read the following . • Keep cords that the wireless adapters... from metal doors or tables. Avoid placing S-AIR products on top of S-AIR products until reception is poor or unstable. When S-AIR reception is poor Check the following when S-AIR reception is the most stable. - Avoid placing S-AIR products in the room) of or directly below...
...0.7A MAX DMPORT • Keep as much space as possible around S-AIR products. - POWER/ ACTIVE STANDBY MASTER VOLUME EZW-T100 CAAULTMOIC DC5V 0.7A MAX DMPORT - Place so that S-AIR products are closer. Stabilizing S-AIR reception Read the following . • Keep cords that the wireless adapters... from metal doors or tables. Avoid placing S-AIR products on top of S-AIR products until reception is poor or unstable. When S-AIR reception is poor Check the following when S-AIR reception is the most stable. - Avoid placing S-AIR products in the room) of or directly below...

Operating Instructions
Page 55
...channel for transmitting. • RF OFF: The system transmits sound by changing the following channels. - S-AIR ID A: equivalent channel for IEEE 802.11b/g channel 6 - S-AIR ID C: equivalent channel for IEEE 802.11b/g channel 11 • The transmission may be improved by changing... the transmission channel (frequency) of S-AIR products or other wireless systems may be unstable. "LEVEL" appears on the display. 2 Press V/v repeatedly until "S-AIR SET" appears, then press or b. 3 Press V/v repeatedly until "RF CHANGE" appears, then...
...channel for transmitting. • RF OFF: The system transmits sound by changing the following channels. - S-AIR ID A: equivalent channel for IEEE 802.11b/g channel 6 - S-AIR ID C: equivalent channel for IEEE 802.11b/g channel 11 • The transmission may be improved by changing... the transmission channel (frequency) of S-AIR products or other wireless systems may be unstable. "LEVEL" appears on the display. 2 Press V/v repeatedly until "S-AIR SET" appears, then press or b. 3 Press V/v repeatedly until "RF CHANGE" appears, then...
Operating Instructions
Page 56
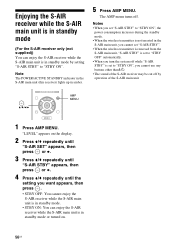
...press . • STBY OFF: You cannot enjoy the S-AIR receiver while the S-AIR main unit is in standby mode. • STBY ON: You can enjoy the S-AIR receiver while the S-AIR main unit is in standby mode by operation of the S-AIR receiver may be cut off . "LEVEL" appears on . 56US...The POWER/ACTIVE STANDBY indicator in the S-AIR main unit (this receiver) lights up in amber. 5 Press AMP MENU. Enjoying the S-AIR receiver while the S-AIR main unit is in standby mode (For the S-AIR receiver only (not supplied)) You can enjoy the S-AIR receiver while the S-AIR main unit is set to "STBY OFF...
...press . • STBY OFF: You cannot enjoy the S-AIR receiver while the S-AIR main unit is in standby mode. • STBY ON: You can enjoy the S-AIR receiver while the S-AIR main unit is in standby mode by operation of the S-AIR receiver may be cut off . "LEVEL" appears on . 56US...The POWER/ACTIVE STANDBY indicator in the S-AIR main unit (this receiver) lights up in amber. 5 Press AMP MENU. Enjoying the S-AIR receiver while the S-AIR main unit is in standby mode (For the S-AIR receiver only (not supplied)) You can enjoy the S-AIR receiver while the S-AIR main unit is set to "STBY OFF...

Operating Instructions
Page 59
... CTRL OFF LIMIT MAX, LIMIT 49, ...LIMIT 1, LIMIT MIN THRU AUTO THRU ON ARC ON ARC OFF SYSTEM SP SETUP A.CAL MENUh) S-AIR SETj) DIMMER DIMMER ON DIMMER OFF DISPLAY DSPL ON DSPL OFF SLEEP SLEEP OFF, SLEEP 90M, ...SLEEP 10M AUTO STBY STBY ON STBY OFF...,... TONE OFF FL +6.0,... SL -6.0 SW +6.0,... SW 0.0,... SW 0FEET A.CAL START A.CAL CLEARi) S-AIR ID S-AIR ID A S-AIR ID B S-AIR ID C PAIRING START CONDITION S-AIR MODE PARTY SEPARATE RF CHANGE RF AUTO RF ON RF OFF S-AIR STBY STBY ON STBY OFF Advanced Settings continued 59US The default settings are underlined. For details...
... CTRL OFF LIMIT MAX, LIMIT 49, ...LIMIT 1, LIMIT MIN THRU AUTO THRU ON ARC ON ARC OFF SYSTEM SP SETUP A.CAL MENUh) S-AIR SETj) DIMMER DIMMER ON DIMMER OFF DISPLAY DSPL ON DSPL OFF SLEEP SLEEP OFF, SLEEP 90M, ...SLEEP 10M AUTO STBY STBY ON STBY OFF...,... TONE OFF FL +6.0,... SL -6.0 SW +6.0,... SW 0.0,... SW 0FEET A.CAL START A.CAL CLEARi) S-AIR ID S-AIR ID A S-AIR ID B S-AIR ID C PAIRING START CONDITION S-AIR MODE PARTY SEPARATE RF CHANGE RF AUTO RF ON RF OFF S-AIR STBY STBY ON STBY OFF Advanced Settings continued 59US The default settings are underlined. For details...