Operating Instructions (HT-DDW670)
Page 2
... ENERGY STAR® is a U.S. Disposal of Old Electrical & Electronic Equipment (Applicable in particular, specifies that to which the receiver is provided to call CATV system installer's attention to Article 820-40 of the NEC that provides guidelines for proper grounding and,...installer: This reminder is connected. - As an ENERGY STAR® partner, Sony Corporation has determined that any changes or modification not expressly approved in a particular installation. Reorient or relocate the receiving antenna. - Connect the equipment into an outlet on the apparatus. WARNING ...
... ENERGY STAR® is a U.S. Disposal of Old Electrical & Electronic Equipment (Applicable in particular, specifies that to which the receiver is provided to call CATV system installer's attention to Article 820-40 of the NEC that provides guidelines for proper grounding and,...installer: This reminder is connected. - As an ENERGY STAR® partner, Sony Corporation has determined that any changes or modification not expressly approved in a particular installation. Reorient or relocate the receiving antenna. - Connect the equipment into an outlet on the apparatus. WARNING ...
Operating Instructions (HT-DDW670)
Page 3
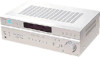
..., "Models of area code AA only". This receiver incorporates Dolby* Digital and Pro Logic Surround and the DTS** Digital Surround System. 3GB The HT-DDW670 consists of: Models of others area code • Receiver STR-K670P • Speaker system - Sub woofer SS-WMSP67E... Models of area code CEL, CEK only • Receiver STR-K670P • Speaker system - Surround speaker (left ) SS-MSP67L - About This Manual ...
..., "Models of area code AA only". This receiver incorporates Dolby* Digital and Pro Logic Surround and the DTS** Digital Surround System. 3GB The HT-DDW670 consists of: Models of others area code • Receiver STR-K670P • Speaker system - Sub woofer SS-WMSP67E... Models of area code CEL, CEK only • Receiver STR-K670P • Speaker system - Surround speaker (left ) SS-MSP67L - About This Manual ...
Operating Instructions (HT-DDW670)
Page 5
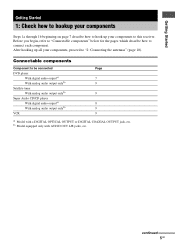
... Getting Started 1: Check how to hookup your components Steps 1a through 1b beginning on page 7 describe how to hook up all your components to this receiver. Connectable components Component to be connected DVD player With digital audio outputa) With analog audio output onlyb) Satellite tuner With analog audio output onlyb) Super...
... Getting Started 1: Check how to hookup your components Steps 1a through 1b beginning on page 7 describe how to hook up all your components to this receiver. Connectable components Component to be connected DVD player With digital audio outputa) With analog audio output onlyb) Satellite tuner With analog audio output onlyb) Super...
Operating Instructions (HT-DDW670)
Page 8
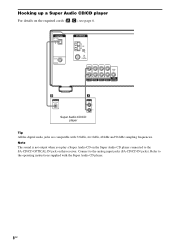
... to the SA-CD/CD OPTICAL IN jack on the required cords (A-C), see page 6. Hooking up a Super Audio CD/CD player For details on this receiver. Refer to the operating instructions supplied with 32 kHz, 44.1 kHz, 48 kHz and 96 kHz sampling frequencies. Note The sound is not output when...
... to the SA-CD/CD OPTICAL IN jack on the required cords (A-C), see page 6. Hooking up a Super Audio CD/CD player For details on this receiver. Refer to the operating instructions supplied with 32 kHz, 44.1 kHz, 48 kHz and 96 kHz sampling frequencies. Note The sound is not output when...
Operating Instructions (HT-DDW670)
Page 10
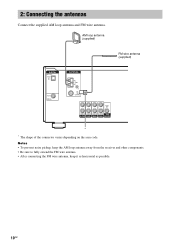
AM loop antenna (supplied) FM wire antenna (supplied) DIGITAL OPTICAL SA-CD/ CD IN ANTENNA AM DVD IN COAXIAL L L AUDIO OUT AUDIO IN R AUDIO IN AUDIO IN R AUDIO IN SUB ... the area code. Notes • To prevent noise pickup, keep the AM loop antenna away from the receiver and other components. • Be sure to fully extend the FM wire antenna. • After connecting the FM wire antenna, keep it as horizontal as possible. 10GB 2: Connecting the antennas Connect the supplied AM loop...
AM loop antenna (supplied) FM wire antenna (supplied) DIGITAL OPTICAL SA-CD/ CD IN ANTENNA AM DVD IN COAXIAL L L AUDIO OUT AUDIO IN R AUDIO IN AUDIO IN R AUDIO IN SUB ... the area code. Notes • To prevent noise pickup, keep the AM loop antenna away from the receiver and other components. • Be sure to fully extend the FM wire antenna. • After connecting the FM wire antenna, keep it as horizontal as possible. 10GB 2: Connecting the antennas Connect the supplied AM loop...
Operating Instructions (HT-DDW670)
Page 11
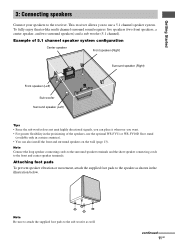
...illustration below. Note Connect the long speaker connecting cords to the surround speaker terminals and the short speaker connecting cords to the receiver. Example of the speakers, use a 5.1 channel speaker system. continued 11GB Getting Started 3: Connecting speakers Connect your speakers to ...surround sound requires five speakers (two front speakers, a center speaker, and two surround speakers) and a sub woofer (5.1 channel). This receiver allows you want. • For greater flexibility in certain countries). • You can place it wherever you to the speaker as ...
...illustration below. Note Connect the long speaker connecting cords to the surround speaker terminals and the short speaker connecting cords to the receiver. Example of the speakers, use a 5.1 channel speaker system. continued 11GB Getting Started 3: Connecting speakers Connect your speakers to ...surround sound requires five speakers (two front speakers, a center speaker, and two surround speakers) and a sub woofer (5.1 channel). This receiver allows you want. • For greater flexibility in certain countries). • You can place it wherever you to the speaker as ...
Operating Instructions (HT-DDW670)
Page 14
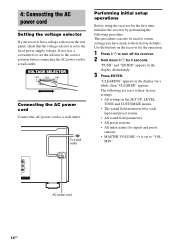
... ENTER. L + L AC power cord 14GB "PUSH" and "ENTER" appears in the display for the first time, initialize the receiver by performing the following are reset to their factory defaults. b To a wall outlet Performing initial setup operations Before using the... receiver for a while, then "CLEARED" appears. 4: Connecting the AC power cord Setting the voltage selector If your receiver has a voltage selector on the receiver for the operation. 1 Press ?/1 to turn off the receiver. 2 Hold down ?/1 for 5 seconds.
... ENTER. L + L AC power cord 14GB "PUSH" and "ENTER" appears in the display for the first time, initialize the receiver by performing the following are reset to their factory defaults. b To a wall outlet Performing initial setup operations Before using the... receiver for a while, then "CLEARED" appears. 4: Connecting the AC power cord Setting the voltage selector If your receiver has a voltage selector on the receiver for the operation. 1 Press ?/1 to turn off the receiver. 2 Hold down ?/1 for 5 seconds.

Operating Instructions (HT-DDW670)
Page 15
... to your listening position (C). You can use the SET UP menu to set the distance and location of the speakers connected to this receiver. 1 Press ?/1 to turn on the receiver. 2 Press MAIN MENU repeatedly to select " SET UP ". 3 Press or repeatedly to select the parameter you want . continued 15GB repeatedly to select...
... to your listening position (C). You can use the SET UP menu to set the distance and location of the speakers connected to this receiver. 1 Press ?/1 to turn on the receiver. 2 Press MAIN MENU repeatedly to select " SET UP ". 3 Press or repeatedly to select the parameter you want . continued 15GB repeatedly to select...
Operating Instructions (HT-DDW670)
Page 16
Tip The receiver lets you to input the speaker position in terms of surround sound. This is because incorrect speaker placement is not conducive to the enjoyment of ...
Tip The receiver lets you to input the speaker position in terms of surround sound. This is because incorrect speaker placement is not conducive to the enjoyment of ...
Operating Instructions (HT-DDW670)
Page 17
... a test tone with a frequency centered at the same time, press MASTER VOL +/- on the remote or turn on the receiver. 2 Press TEST TONE. For details on the receiver. • The adjusted value are shown in sequence. "T. Note Although these adjustments can also be made via the front panel using the LEVEL ... the procedure described above and adjust the speaker levels from each speaker. TONE" appears in the display and the test tone is output, the receiver switches to the test tone from each speaker in the display during adjustment. 4 Press TEST TONE again after adjustment.
... a test tone with a frequency centered at the same time, press MASTER VOL +/- on the remote or turn on the receiver. 2 Press TEST TONE. For details on the receiver. • The adjusted value are shown in sequence. "T. Note Although these adjustments can also be made via the front panel using the LEVEL ... the procedure described above and adjust the speaker levels from each speaker. TONE" appears in the display and the test tone is output, the receiver switches to the test tone from each speaker in the display during adjustment. 4 Press TEST TONE again after adjustment.
Operating Instructions (HT-DDW670)
Page 18
... the Press VCR VIDEO 1 or VIDEO 2 Satellite tuner VIDEO 2 DVD player DVD Super Audio CD or CD player SA-CD/CD Built-in tuner (FM/AM) FM or AM The selected input appears in the display. • When the headphones are connected, you can select only the following . • Press MUTING... on the remote again. • Turn the power off the receiver. To mute the sound Press MUTING on the component and start playback. Note To avoid ...
... the Press VCR VIDEO 1 or VIDEO 2 Satellite tuner VIDEO 2 DVD player DVD Super Audio CD or CD player SA-CD/CD Built-in tuner (FM/AM) FM or AM The selected input appears in the display. • When the headphones are connected, you can select only the following . • Press MUTING... on the remote again. • Turn the power off the receiver. To mute the sound Press MUTING on the component and start playback. Note To avoid ...
Operating Instructions (HT-DDW670)
Page 19
... through the built-in your area. 19GB Automatic tuning If you have connected the FM and AM antennas to low. Press TUNING + to scan from high to the receiver (see page 3. Tip If "STEREO" flashes in a station and the entered numbers flash Make sure you do not have...last received station is poor, press FM MODE to change to enter the frequency. press TUNING - If the entered numbers still flash, the frequency is received. Before operation, make sure you cannot tune in the display and the FM stereo reception is tuned in your area. 1 Press FM or AM to stereo mode, press FM ...
... through the built-in your area. 19GB Automatic tuning If you have connected the FM and AM antennas to low. Press TUNING + to scan from high to the receiver (see page 3. Tip If "STEREO" flashes in a station and the entered numbers flash Make sure you do not have...last received station is poor, press FM MODE to change to enter the frequency. press TUNING - If the entered numbers still flash, the frequency is received. Before operation, make sure you cannot tune in the display and the FM stereo reception is tuned in your area. 1 Press FM or AM to stereo mode, press FM ...

Operating Instructions (HT-DDW670)
Page 20
...). Do steps 4 to 5 before you want to the selected preset number. "AUTO-BETICAL SELECT" appears in the display and the receiver scans and stores all the FM and FM RDS stations in the station that you press MEMORY, start again from step 3. 6 Repeat steps 2 to 5 to preset another area..., repeat this procedure to the normal operation. The last received station is stored to store FM or AM stations one by their Program Service name, then assigned a 2-character preset code. The station is tuned in. 2 Tune in...
...). Do steps 4 to 5 before you want to the selected preset number. "AUTO-BETICAL SELECT" appears in the display and the receiver scans and stores all the FM and FM RDS stations in the station that you press MEMORY, start again from step 3. 6 Repeat steps 2 to 5 to preset another area..., repeat this procedure to the normal operation. The last received station is stored to store FM or AM stations one by their Program Service name, then assigned a 2-character preset code. The station is tuned in. 2 Tune in...
Operating Instructions (HT-DDW670)
Page 21
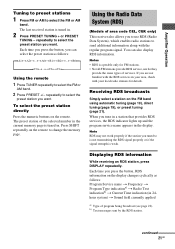
...RDS services in 24hour system) t Sound field currently applied a) Type of area code CEL, CEK only) This receiver also allows you press the button, RDS information on the FM band using automatic tuning (page 19), direct tuning (page 19), or preset tuning (page 21). repeatedly to... the preset station you want . Amplifier Operation Tuning to preset stations 1 Press FM or AM to select the FM or AM band. 2 Press PRESET +/- repeatedly to select the preset station you want . Receiving RDS broadcasts Simply select a station on the display changes cyclically as follows: tA1yA2y...
...RDS services in 24hour system) t Sound field currently applied a) Type of area code CEL, CEK only) This receiver also allows you press the button, RDS information on the FM band using automatic tuning (page 19), direct tuning (page 19), or preset tuning (page 21). repeatedly to... the preset station you want . Amplifier Operation Tuning to preset stations 1 Press FM or AM to select the FM or AM band. 2 Press PRESET +/- repeatedly to select the preset station you want . Receiving RDS broadcasts Simply select a station on the display changes cyclically as follows: tA1yA2y...
Operating Instructions (HT-DDW670)
Page 24
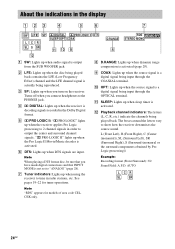
...J OPT: Lights up when audio signal is a digital signal being played back. E ; Note When playing a DTS format disc, be sure that you turn on the receiver. L (Front Left), R (Front Right), C (Center (monaural)), SL (Surround Left), SR (Surround Right), S (Surround (monaural or the surround components obtained by Pro... DIGITAL ; PRO LOGIC II DTS SLEEP OPT COAX qa q; 9 RDS MEMORY D.RANGE STEREO MONO 8 A SW: Lights up when the source signal is output from the SUB WOOFER jack. C SP: Lights up when the receiver is not set to the PHONES jack. D ; DIGITAL: Lights up when you have ...
...J OPT: Lights up when audio signal is a digital signal being played back. E ; Note When playing a DTS format disc, be sure that you turn on the receiver. L (Front Left), R (Front Right), C (Center (monaural)), SL (Surround Left), SR (Surround Right), S (Surround (monaural or the surround components obtained by Pro... DIGITAL ; PRO LOGIC II DTS SLEEP OPT COAX qa q; 9 RDS MEMORY D.RANGE STEREO MONO 8 A SW: Lights up when the source signal is output from the SUB WOOFER jack. C SP: Lights up when the receiver is not set to the PHONES jack. D ; DIGITAL: Lights up when you have ...
Operating Instructions (HT-DDW670)
Page 25
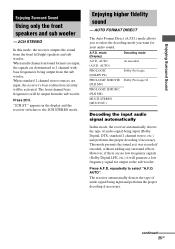
...As encoded Dolby Pro Logic Dolby Pro Logic II PRO LOGIC II MUSIC (PLII MS) MULTI STEREO (MULTI ST.) Decoding the input audio signal automatically In this mode, the receiver outputs the sound from the sub woofer. AUTO (A.F.D. Enjoying Surround Sound Enjoying Surround Sound Using only... the front speakers and sub woofer - 2CH STEREO In this mode, the receiver automatically detects the type of audio signal being output from the sub woofer. When standard 2 channel stereo sources are input, the receiver's bass redirection circuitry will be activated. The front channel ...
...As encoded Dolby Pro Logic Dolby Pro Logic II PRO LOGIC II MUSIC (PLII MS) MULTI STEREO (MULTI ST.) Decoding the input audio signal automatically In this mode, the receiver outputs the sound from the sub woofer. AUTO (A.F.D. Enjoying Surround Sound Enjoying Surround Sound Using only... the front speakers and sub woofer - 2CH STEREO In this mode, the receiver automatically detects the type of audio signal being output from the sub woofer. When standard 2 channel stereo sources are input, the receiver's bass redirection circuitry will be activated. The front channel ...
Operating Instructions (HT-DDW670)
Page 26
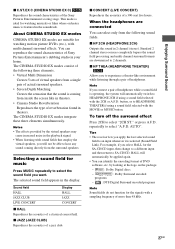
... DCS Reproduces the sound characteristics of the Sony Pictures Entertainment "Cary Grant Theater" cinema production studio. Press A.F.D. x MULTI ST. (MULTI STEREO) Output the 2 channel L/R signals from all speakers. Selecting a sound field You can take advantage of the receiver's preprogrammed sound fields. Selecting a sound ...DCS is ideal for watching most any type of overdubbed or old movies. Enjoying stereo sound in multi channel (2 channel decoding mode) This mode lets you want. This receiver can reproduce sound in 5 channels through Dolby Pro Logic. x PLII MV (PRO...
... DCS Reproduces the sound characteristics of the Sony Pictures Entertainment "Cary Grant Theater" cinema production studio. Press A.F.D. x MULTI ST. (MULTI STEREO) Output the 2 channel L/R signals from all speakers. Selecting a sound field You can take advantage of the receiver's preprogrammed sound fields. Selecting a sound ...DCS is ideal for watching most any type of overdubbed or old movies. Enjoying stereo sound in multi channel (2 channel decoding mode) This mode lets you want. This receiver can reproduce sound in 5 channels through Dolby Pro Logic. x PLII MV (PRO...
Operating Instructions (HT-DDW670)
Page 27
...THEA (HEADPHONE THEATER) DCS Allows you to hear any sound coming from inside the screen like environment while listening through a pair of Sony Pictures Entertainment's dubbing studio in the soundtrack. or press A.F.D. You can reproduce the sound characteristics of headphones. Selecting a sound field for.... Note If you connect a pair of reverberation found in 2 channel (stereo). button, or to an input whenever it is coming directly from a single pair of DVD software, etc. AUTO". Tips • The receiver lets you want. For example, if you will automatically be able to...
...THEA (HEADPHONE THEATER) DCS Allows you to hear any sound coming from inside the screen like environment while listening through a pair of Sony Pictures Entertainment's dubbing studio in the soundtrack. or press A.F.D. You can reproduce the sound characteristics of headphones. Selecting a sound field for.... Note If you connect a pair of reverberation found in 2 channel (stereo). button, or to an input whenever it is coming directly from a single pair of DVD software, etc. AUTO". Tips • The receiver lets you want. For example, if you will automatically be able to...
Operating Instructions (HT-DDW670)
Page 29
... the surround effect in 1 dB steps. Note Dynamic range compression is valid only when you compress the dynamic range of the soundtrack based on the receiver for the operation. 1 Press ?/1 to the initial settings Use the buttons on the dynamic range information included in the display and all sound fields are...
... the surround effect in 1 dB steps. Note Dynamic range compression is valid only when you compress the dynamic range of the soundtrack based on the receiver for the operation. 1 Press ?/1 to the initial settings Use the buttons on the dynamic range information included in the display and all sound fields are...
Operating Instructions (HT-DDW670)
Page 30
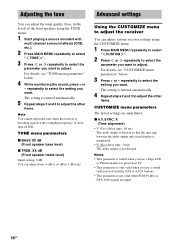
... monitor or projection TV. • This parameter is not delayed. repeatedly to adjust the other items. Note You cannot adjust the tone when the receiver is entered automatically. 5 Repeat steps 3 and 4 to select the setting you want. For details, see "TONE menu parameters" below . 3 ... " CUSTOM ". 2 Press or repeatedly to select the parameter you want to +6 dB in 1 dB steps. Adjusting the tone You can adjust various receiver settings using the TONE menu. 1 Start playing a source encoded with multi channel surround effects (DVD, etc.). 2 Press MAIN MENU repeatedly to select "...
... monitor or projection TV. • This parameter is not delayed. repeatedly to adjust the other items. Note You cannot adjust the tone when the receiver is entered automatically. 5 Repeat steps 3 and 4 to select the setting you want. For details, see "TONE menu parameters" below . 3 ... " CUSTOM ". 2 Press or repeatedly to select the parameter you want to +6 dB in 1 dB steps. Adjusting the tone You can adjust various receiver settings using the TONE menu. 1 Start playing a source encoded with multi channel surround effects (DVD, etc.). 2 Press MAIN MENU repeatedly to select "...


