Operating Instructions
Page 9
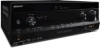
...) C INPUT SELECTOR (page 42, 48, 60, 61) D Display panel (page 10) E Remote control sensor Receives signals from iPhone/iPod. H MASTER VOLUME (page 41, 42, 66) I MUTING (page 42) J VIDEO 2 IN jacks (page 29) K iPhone/iPod terminals (page 28) Connects the (USB) port and the video jack to operate a tuner (FM/AM...
...) C INPUT SELECTOR (page 42, 48, 60, 61) D Display panel (page 10) E Remote control sensor Receives signals from iPhone/iPod. H MASTER VOLUME (page 41, 42, 66) I MUTING (page 42) J VIDEO 2 IN jacks (page 29) K iPhone/iPod terminals (page 28) Connects the (USB) port and the video jack to operate a tuner (FM/AM...
Operating Instructions
Page 14
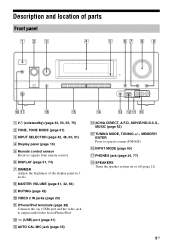
...(page 68). E INPUT MODE Selects the input mode when the same equipment is louder than the TV programs. N SOUND FIELD +**/- Press MUTING or again to both digital and analog jacks. X AUTO VOL Adjusts the volume automatically depending on the display panel. To use the buttons ...display changes cyclically as follows: 0-30-00 t 1-00-00 t 1-30-00 t 2-00-00 t OFF When Sleep Timer is set to control Sony equipment. K TOOLS/OPTIONS Displays and selects items from the connected equipment (ADVANCED AUTO VOLUME function). C Input buttons** Selects the equipment you press any...
...(page 68). E INPUT MODE Selects the input mode when the same equipment is louder than the TV programs. N SOUND FIELD +**/- Press MUTING or again to both digital and analog jacks. X AUTO VOL Adjusts the volume automatically depending on the display panel. To use the buttons ...display changes cyclically as follows: 0-30-00 t 1-00-00 t 1-30-00 t 2-00-00 t OFF When Sleep Timer is set to control Sony equipment. K TOOLS/OPTIONS Displays and selects items from the connected equipment (ADVANCED AUTO VOLUME function). C Input buttons** Selects the equipment you press any...
Operating Instructions
Page 15
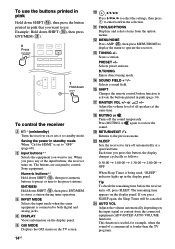
... the color buttons are being received. - c**/C Selects the next or previous page while in "GUI MODE". or +/- R MUTING or Activates the TV's muting function. The function of more than 48 kHz are being received. Follow the operation guide to the previous TV menu. V ... S RETURN/EXIT O Returns to perform a selected operation. Scans for more than five seconds). / (Text) Displays text information. To control a Sony TV Hold down TV (P), then press the button printed in yellow to select the function you press the input buttons (C). **The 5/VIDEO 2, AUDIO/...
... the color buttons are being received. - c**/C Selects the next or previous page while in "GUI MODE". or +/- R MUTING or Activates the TV's muting function. The function of more than 48 kHz are being received. Follow the operation guide to the previous TV menu. V ... S RETURN/EXIT O Returns to perform a selected operation. Scans for more than five seconds). / (Text) Displays text information. To control a Sony TV Hold down TV (P), then press the button printed in yellow to select the function you press the input buttons (C). **The 5/VIDEO 2, AUDIO/...
Operating Instructions
Page 23
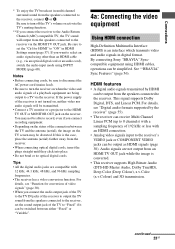
... When connecting optical digital cords, insert the plugs straight until they click into place. • Do not bend or tie optical digital cords. By connecting Sony "BRAVIA" Synccompatible equipment using INPUT MODE (page 60). For details, see "Function for HDMI" to "ON" in multi channel surround sound from the ...cords, be sure to disconnect the AC power cord (mains lead). • Be sure to turn off the TV's volume or activate the TV's muting function. **If you connect the audio output jack of the TV to the TV IN jacks of the connection between either "Fixed" or "Variable". 4a...
... When connecting optical digital cords, insert the plugs straight until they click into place. • Do not bend or tie optical digital cords. By connecting Sony "BRAVIA" Synccompatible equipment using INPUT MODE (page 60). For details, see "Function for HDMI" to "ON" in multi channel surround sound from the ...cords, be sure to disconnect the AC power cord (mains lead). • Be sure to turn off the TV's volume or activate the TV's muting function. **If you connect the audio output jack of the TV to the TV IN jacks of the connection between either "Fixed" or "Variable". 4a...
Operating Instructions
Page 35
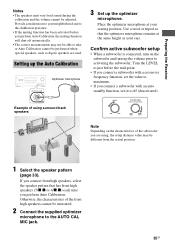
... position. 1 Select the speaker pattern (page 33). Provide consideration to your neighborhood and to the children in presence. • If the muting function has been activated before the mid-point. • If you connect a subwoofer with a crossover frequency function, set the value to maximum.... • If you perform Auto Calibration, the muting function will shut off automatically. • The correct measurements may not be able to off (deactivated). Place the optimizer microphone at the ...
... position. 1 Select the speaker pattern (page 33). Provide consideration to your neighborhood and to the children in presence. • If the muting function has been activated before the mid-point. • If you connect a subwoofer with a crossover frequency function, set the value to maximum.... • If you perform Auto Calibration, the muting function will shut off automatically. • The correct measurements may not be able to off (deactivated). Place the optimizer microphone at the ...
Operating Instructions
Page 36
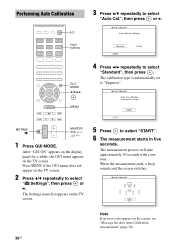
... MENU if the GUI menu does not appear on the TV screen. Performing Auto Calibration ?/1 Input buttons 3 Press V/v repeatedly to select "Standard", then press . MENU MUTING/ MASTER VOL +/-/ 2 +/- 1 Press GUI MODE. The Settings menu list appears on the screen, see "Message list after Auto Calibration measurement" (page 38). 36GB Note If...
... MENU if the GUI menu does not appear on the TV screen. Performing Auto Calibration ?/1 Input buttons 3 Press V/v repeatedly to select "Standard", then press . MENU MUTING/ MASTER VOL +/-/ 2 +/- 1 Press GUI MODE. The Settings menu list appears on the screen, see "Message list after Auto Calibration measurement" (page 38). 36GB Note If...
Operating Instructions
Page 37
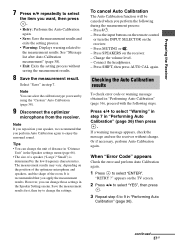
... 36) then press . Or if necessary, perform Auto Calibration again. Note If you reposition your speaker, we recommend that you apply the measurement results. Press MUTING or . - Press V/v to enjoy the surround sound. Preparing the Receiver 7 Press V/v repeatedly to select the item you want by the low frequency characteristics. Press SPEAKERS...
... 36) then press . Or if necessary, perform Auto Calibration again. Note If you reposition your speaker, we recommend that you apply the measurement results. Press MUTING or . - Press V/v to enjoy the surround sound. Preparing the Receiver 7 Press V/v repeatedly to select the item you want by the low frequency characteristics. Press SPEAKERS...

Operating Instructions
Page 41
... equipment and start playback. 5 Press MASTER VOL +/- Basic Operations Basic Operations Playing an input source equipment ?/1 Input buttons RETURN/ EXIT O GUI MODE V/v/B/b, TOOLS/ OPTIONS MENU MUTING/ MASTER VOL +/-/ 2 +/- or 2 +/-
... equipment and start playback. 5 Press MASTER VOL +/- Basic Operations Basic Operations Playing an input source equipment ?/1 Input buttons RETURN/ EXIT O GUI MODE V/v/B/b, TOOLS/ OPTIONS MENU MUTING/ MASTER VOL +/-/ 2 +/- or 2 +/-
Operating Instructions
Page 42
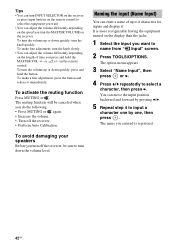
... a character one by one, then press . You can enter a name of time you press and hold the button. To activate the muting function Press MUTING or . To turn the MASTER VOLUME on the receiver. To make fine adjustment: turn down the volume level. The name you entered is... equipment you want to name from " Input" screen. 2 Press TOOLS/OPTIONS. To avoid damaging your speakers Before you do the following. • Press MUTING or again. • Increase the volume. • Turn off the receiver. • Perform Auto Calibration. To make a fine adjustment: press the button...
... a character one by one, then press . You can enter a name of time you press and hold the button. To activate the muting function Press MUTING or . To turn the MASTER VOLUME on the receiver. To make fine adjustment: turn down the volume level. The name you entered is... equipment you want to name from " Input" screen. 2 Press TOOLS/OPTIONS. To avoid damaging your speakers Before you do the following. • Press MUTING or again. • Increase the volume. • Turn off the receiver. • Perform Auto Calibration. To make a fine adjustment: press the button...
Operating Instructions
Page 78
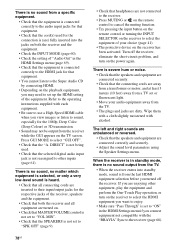
...; Check that the speakers and equipment are connected securely. • Check that headphones are not connected to the receiver. • Press MUTING or on the remote control to cancel the muting function. • Try pressing the input button on the remote control or turning the INPUT SELECTOR on the receiver has been...
...; Check that the speakers and equipment are connected securely. • Check that headphones are not connected to the receiver. • Press MUTING or on the remote control to cancel the muting function. • Try pressing the input button on the remote control or turning the INPUT SELECTOR on the receiver has been...


