
Operating Instructions
Page 2
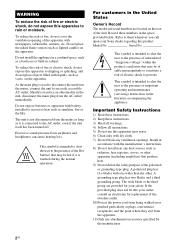
...manufacturer. 2GB Install in the literature accompanying the appliance. If the provided plug does not fit into your outlet, consult an electrician for your Sony dealer regarding this apparatus to the presence of important operating and maintenance (servicing) instructions in accordance with liquids, such as radiators, heat registers, ...presence of fire or electric shock, do not expose this apparatus to the AC outlet, even if the unit itself has been turned off. Do not place the naked flame sources such as it is connected to dripping or splashing, and do not expose this product....
...manufacturer. 2GB Install in the literature accompanying the appliance. If the provided plug does not fit into your outlet, consult an electrician for your Sony dealer regarding this apparatus to the presence of important operating and maintenance (servicing) instructions in accordance with liquids, such as radiators, heat registers, ...presence of fire or electric shock, do not expose this apparatus to the AC outlet, even if the unit itself has been turned off. Do not place the naked flame sources such as it is connected to dripping or splashing, and do not expose this product....

Operating Instructions
Page 3
... disposal service or the shop where you will help prevent potential negative consequences for the environment and human health, which could otherwise be determined by turning the equipment off and on, the user is damaged, liquid has been spilled or objects have fallen into an outlet on its packaging indicates that...
... disposal service or the shop where you will help prevent potential negative consequences for the environment and human health, which could otherwise be determined by turning the equipment off and on, the user is damaged, liquid has been spilled or objects have fallen into an outlet on its packaging indicates that...
Operating Instructions
Page 5
... back equipment with one-touch operation (One-Touch Play 49 Enjoying the TV sound from the speakers connected to the receiver (System Audio Control 49 Turning off the receiver with the TV (System Power-Off 50 Enjoying movies with the optimum sound field (Theater/Theatre Mode Sync)........ 50 Enjoying optimum sound...
... back equipment with one-touch operation (One-Touch Play 49 Enjoying the TV sound from the speakers connected to the receiver (System Audio Control 49 Turning off the receiver with the TV (System Power-Off 50 Enjoying movies with the optimum sound field (Theater/Theatre Mode Sync)........ 50 Enjoying optimum sound...
Operating Instructions
Page 12
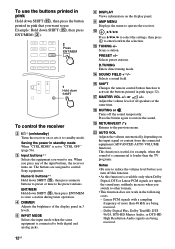
...down SHIFT (O), then press ENT/MEM (C). 2 Press ENT/MEM 1 Hold down SHIFT To control the receiver B ?/1* (on/standby) Turns the receiver on the input signal or content from the connected equipment (ADVANCED AUTO VOLUME function). ENT/MEM Hold down SHIFT (O), then ...DISPLAY Views information on . J , V/v/B/b Press V/v/B /b to select the settings, then press to control Sony equipment. M TUNING +/- Scans a station. D.TUNING Enters direct tuning mode. R MUTING or Turns off this function. • As this function is set to restore the sound. This function is louder than...
...down SHIFT (O), then press ENT/MEM (C). 2 Press ENT/MEM 1 Hold down SHIFT To control the receiver B ?/1* (on/standby) Turns the receiver on the input signal or content from the connected equipment (ADVANCED AUTO VOLUME function). ENT/MEM Hold down SHIFT (O), then ...DISPLAY Views information on . J , V/v/B/b Press V/v/B /b to select the settings, then press to control Sony equipment. M TUNING +/- Scans a station. D.TUNING Enters direct tuning mode. R MUTING or Turns off this function. • As this function is set to restore the sound. This function is louder than...
Operating Instructions
Page 13
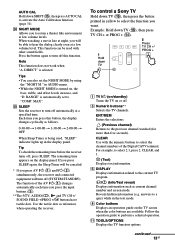
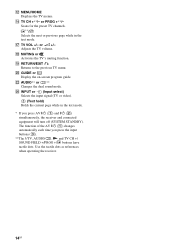
...Previous channel) Returns to select 2.1, press 2, CLEAR, and 1. / (Text) Displays text information. Reveals hidden information (e.g. X NIGHT MODE Allows you will turn off . in AUDIO menu. • While the NIGHT MODE is selected. H Color buttons Displays an operation guide on , the bass, treble, and ...are available. Y SLEEP Sets the receiver to turn off (SYSTEM STANDBY). The remaining time appears on or off automatically at a specified time. Use the tactile dots as current channel number and screen mode. To control a Sony TV Hold down SHIFT (O), then press AUTO...
...Previous channel) Returns to select 2.1, press 2, CLEAR, and 1. / (Text) Displays text information. Reveals hidden information (e.g. X NIGHT MODE Allows you will turn off . in AUDIO menu. • While the NIGHT MODE is selected. H Color buttons Displays an operation guide on , the bass, treble, and ...are available. Y SLEEP Sets the receiver to turn off (SYSTEM STANDBY). The remaining time appears on or off automatically at a specified time. Use the tactile dots as current channel number and screen mode. To control a Sony TV Hold down SHIFT (O), then press AUTO...
Operating Instructions
Page 14
... +/PROG +/c buttons have tactile dots. The function of the AV ?/1 (A) changes automatically each time you press AV ?/1 (A) and ?/1 (B) simultaneously, the receiver and connected equipment will turn off (SYSTEM STANDBY). L MENU/HOME Displays the TV menus. or +/- Adjusts the TV volume. Z INPUT or (Input select) Selects the input signal (TV or video...
... +/PROG +/c buttons have tactile dots. The function of the AV ?/1 (A) changes automatically each time you press AV ?/1 (A) and ?/1 (B) simultaneously, the receiver and connected equipment will turn off (SYSTEM STANDBY). L MENU/HOME Displays the TV menus. or +/- Adjusts the TV volume. Z INPUT or (Input select) Selects the input signal (TV or video...
Operating Instructions
Page 15
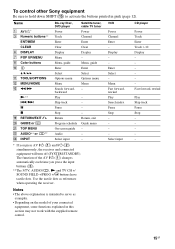
... on the model of the AV ?/1 (A) changes automatically each time you press AV ?/1 (A) and ?/1 (B) simultaneously, the receiver and connected equipment will turn off (SYSTEM STANDBY). Select input CD player Power Track Enter Track > 10 Display Fast forward, rewind Play Skip track Pause Stop - - - - ...MEM Enter Enter CLEAR F DISPLAY G POP UP/MENU H Color buttons J Clear Display Menu Menu, guide Enter Clear Display - To control other Sony equipment Be sure to hold down SHIFT (O) to serve as references when operating the receiver. Menu, guide Enter V/v/B/b K TOOLS/OPTIONS L MENU/...
... on the model of the AV ?/1 (A) changes automatically each time you press AV ?/1 (A) and ?/1 (B) simultaneously, the receiver and connected equipment will turn off (SYSTEM STANDBY). Select input CD player Power Track Enter Track > 10 Display Fast forward, rewind Play Skip track Pause Stop - - - - ...MEM Enter Enter CLEAR F DISPLAY G POP UP/MENU H Color buttons J Clear Display Menu Menu, guide Enter Clear Display - To control other Sony equipment Be sure to hold down SHIFT (O) to serve as references when operating the receiver. Menu, guide Enter V/v/B/b K TOOLS/OPTIONS L MENU/...
Operating Instructions
Page 20
..., and the sound may not be sure to the SPEAKERS SURROUND BACK/FRONT HIGH L terminal. * When you connect only one surround back speaker, connect it turns to standby mode automatically based on the level of the speaker cords are not touching each other within the SPEAKERS terminals. • After you have...
..., and the sound may not be sure to the SPEAKERS SURROUND BACK/FRONT HIGH L terminal. * When you connect only one surround back speaker, connect it turns to standby mode automatically based on the level of the speaker cords are not touching each other within the SPEAKERS terminals. • After you have...
Operating Instructions
Page 22
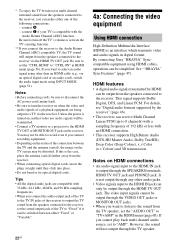
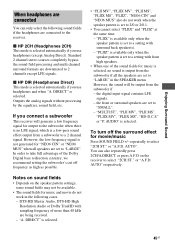
...TV+AMP" in HDMI menu (page 56). You may be output through the SPEAKERS terminals, HDMI TV OUT jack and PHONES jack. By connecting Sony "BRAVIA" Synccompatible equipment using HDMI cables, operations can only be distorted. For details, see "Digital audio formats supported by HDMI can be output from...96 kHz sampling frequencies. • When you can be output through the TV speaker. Be sure to set to the HDMI IN jack is turned on, neither video nor audio signals will output from the receiver. • When connecting optical digital cords, insert the plugs straight until they ...
...TV+AMP" in HDMI menu (page 56). You may be output through the SPEAKERS terminals, HDMI TV OUT jack and PHONES jack. By connecting Sony "BRAVIA" Synccompatible equipment using HDMI cables, operations can only be distorted. For details, see "Digital audio formats supported by HDMI can be output from...96 kHz sampling frequencies. • When you can be output through the TV speaker. Be sure to set to the HDMI IN jack is turned on, neither video nor audio signals will output from the receiver. • When connecting optical digital cords, insert the plugs straight until they ...
Operating Instructions
Page 23
... by the connected equipment. If you set the "A. Connections • DSD signals of Super Audio CD are not input and output. • Be sure to turn the receiver on the connected equipment. • Use a High Speed HDMI cable. If you connect an HDMI-DVI conversion cable to the operating instructions of...
... by the connected equipment. If you set the "A. Connections • DSD signals of Super Audio CD are not input and output. • Be sure to turn the receiver on the connected equipment. • Use a High Speed HDMI cable. If you connect an HDMI-DVI conversion cable to the operating instructions of...
Operating Instructions
Page 29
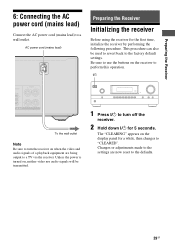
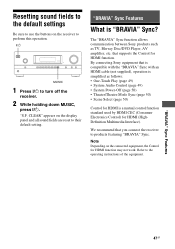
... Hold down ?/1 for 5 seconds. The "CLEARING" appears on when the video and audio signals of a playback equipment are now reset to turn the receiver on the display panel for the first time, initialize the receiver by performing the following procedure. This procedure can also be transmitted.... 1 Press ?/1 to the defaults. 29GB Unless the power is turned on, neither video nor audio signals will be used to revert back to "CLEARED". AC power cord (mains lead) Preparing the Receiver ...
... Hold down ?/1 for 5 seconds. The "CLEARING" appears on when the video and audio signals of a playback equipment are now reset to turn the receiver on the display panel for the first time, initialize the receiver by performing the following procedure. This procedure can also be transmitted.... 1 Press ?/1 to the defaults. 29GB Unless the power is turned on, neither video nor audio signals will be used to revert back to "CLEARED". AC power cord (mains lead) Preparing the Receiver ...
Operating Instructions
Page 32
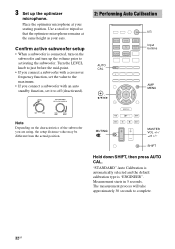
...30 seconds to off (deactivated). 2: Performing Auto Calibration ?/1 Input buttons AUTO CAL , V/v/B/b AMP MENU Note Depending on the subwoofer and turn up the optimizer microphone. Measurement starts in 5 seconds. MUTING/ MASTER VOL +/-/ 2 +/- Confirm active subwoofer setup • When a ...subwoofer is "ENGINEER". 3 Set up the volume prior to activating the subwoofer. Turn the LEVEL knob to just before the mid-point. • If you connect a subwoofer with a crossover frequency function, set the value...
...30 seconds to off (deactivated). 2: Performing Auto Calibration ?/1 Input buttons AUTO CAL , V/v/B/b AMP MENU Note Depending on the subwoofer and turn up the optimizer microphone. Measurement starts in 5 seconds. MUTING/ MASTER VOL +/-/ 2 +/- Confirm active subwoofer setup • When a ...subwoofer is "ENGINEER". 3 Set up the volume prior to activating the subwoofer. Turn the LEVEL knob to just before the mid-point. • If you connect a subwoofer with a crossover frequency function, set the value...
Operating Instructions
Page 33
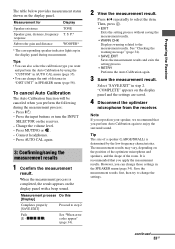
... Saves the measurement results and exits the setting process. • RETRY Performs the Auto Calibration again. 3 Save the measurement result. Press the input buttons or turn the INPUT SELECTOR on the display panel. Fails [E - Press V/v repeatedly to step 2. Tip The size of the room. Then, press . • EXIT Exits the setting...
... Saves the measurement results and exits the setting process. • RETRY Performs the Auto Calibration again. 3 Save the measurement result. Press the input buttons or turn the INPUT SELECTOR on the display panel. Fails [E - Press V/v repeatedly to step 2. Tip The size of the room. Then, press . • EXIT Exits the setting...
Operating Instructions
Page 36
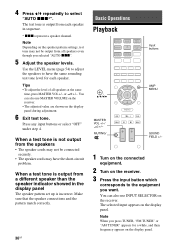
... output from all speakers at the same time, press MASTER VOL +/- Press any input buttons or select "OFF" under step 4. MUTING/ SOUND FIELD +/- 1 Turn on the connected equipment. 2 Turn on the display panel. Note When you selected "AUTO xxx". 5 Adjust the speaker levels. Note Depending on the display panel during adjustment. 6 Exit...
... output from all speakers at the same time, press MASTER VOL +/- Press any input buttons or select "OFF" under step 4. MUTING/ SOUND FIELD +/- 1 Turn on the connected equipment. 2 Turn on the display panel. Note When you selected "AUTO xxx". 5 Adjust the speaker levels. Note Depending on the display panel during adjustment. 6 Exit...
Operating Instructions
Page 37
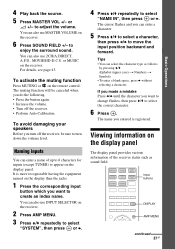
...b without selecting a character. The name you do the following. • Press the button again. • Increase the volume. • Turn off the receiver. • Perform Auto Calibration. Viewing information on the display panel The display panel provides various information of up to 8 characters ...for inputs (except TUNER) to turn off the receiver, be canceled when you entered is more recognizable having the equipment named on the receiver. 2 Press AMP MENU. ...
...b without selecting a character. The name you do the following. • Press the button again. • Increase the volume. • Turn off the receiver. • Perform Auto Calibration. Viewing information on the display panel The display panel provides various information of up to 8 characters ...for inputs (except TUNER) to turn off the receiver, be canceled when you entered is more recognizable having the equipment named on the receiver. 2 Press AMP MENU. ...
Operating Instructions
Page 39
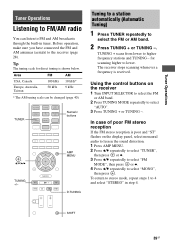
... through the built-in step 4. In case of poor FM stereo reception If the FM stereo reception is poor and "ST" flashes on the receiver 1 Turn INPUT SELECTOR to select the FM or AM band. 2 Press TUNING MODE repeatedly to select "AUTO". 3 Press TUNING + or TUNING -. TUNER Numeric buttons , V/v/B/b TUNING +/- for...
... through the built-in step 4. In case of poor FM stereo reception If the FM stereo reception is poor and "ST" flashes on the receiver 1 Turn INPUT SELECTOR to select the FM or AM band. 2 Press TUNING MODE repeatedly to select "AUTO". 3 Press TUNING + or TUNING -. TUNER Numeric buttons , V/v/B/b TUNING +/- for...
Operating Instructions
Page 40
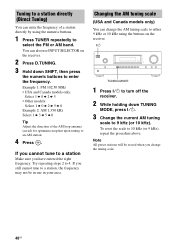
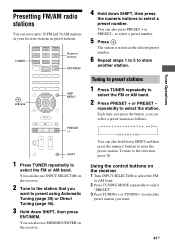
...) for optimum reception upon tuning to an AM station. 4 Press . You can also use in use INPUT SELECTOR on the receiver. ?/1 TUNING MODE 1 Press ?/1 to turn off the receiver. 2 While holding down SHIFT, then press the numeric buttons to enter the frequency. If you change the AM tuning scale to either...
...) for optimum reception upon tuning to an AM station. 4 Press . You can also use in use INPUT SELECTOR on the receiver. ?/1 TUNING MODE 1 Press ?/1 to turn off the receiver. 2 While holding down SHIFT, then press the numeric buttons to enter the frequency. If you change the AM tuning scale to either...
Operating Instructions
Page 41
... buttons to select a preset number. to select the FM or AM band. 2 Press PRESET + or PRESET - You can also use MEMORY/ENTER on the receiver 1 Turn INPUT SELECTOR to select the FM or AM band. 2 Press TUNING MODE repeatedly to select "PRESET". 3 Press TUNING + or TUNING - To tune to select the...
... buttons to select a preset number. to select the FM or AM band. 2 Press PRESET + or PRESET - You can also use MEMORY/ENTER on the receiver 1 Turn INPUT SELECTOR to select the FM or AM band. 2 Press TUNING MODE repeatedly to select "PRESET". 3 Press TUNING + or TUNING - To tune to select the...
Operating Instructions
Page 45
... MV", "PLIIX MS", "HD-D.C.S." or "P. or "A.F.D. DIRECT" is selected automatically if you use headphones and when "A. x HP 2CH (Headphones 2CH) This mode is selected. To turn off frequency as high as possible. the front or surround speakers are set to a setting with front high speakers. • When one of more than...
... MV", "PLIIX MS", "HD-D.C.S." or "P. or "A.F.D. DIRECT" is selected automatically if you use headphones and when "A. x HP 2CH (Headphones 2CH) This mode is selected. To turn off frequency as high as possible. the front or surround speakers are set to a setting with front high speakers. • When one of more than...
Operating Instructions
Page 47
...50) • Theater/Theatre Mode Sync (page 50) • Scene Select (page 50) Control for HDMI (HighDefinition Multimedia Interface). By connecting Sony equipment that supports the Control for HDMI function may not work. Refer to products featuring "BRAVIA" Sync. CLEAR" appears on the connected equipment,... TV, Blu-ray Disc/DVD Player, AV amplifier, etc. Note Depending on the display panel and all sound fields are reset to turn off the receiver. 2 While holding down MUSIC, press ?/1. We recommend that you connect the receiver to the operating instructions of the equipment...
...50) • Theater/Theatre Mode Sync (page 50) • Scene Select (page 50) Control for HDMI (HighDefinition Multimedia Interface). By connecting Sony equipment that supports the Control for HDMI function may not work. Refer to products featuring "BRAVIA" Sync. CLEAR" appears on the connected equipment,... TV, Blu-ray Disc/DVD Player, AV amplifier, etc. Note Depending on the display panel and all sound fields are reset to turn off the receiver. 2 While holding down MUSIC, press ?/1. We recommend that you connect the receiver to the operating instructions of the equipment...


