
Operating Instructions
Page 1
4-263-361-11(1) Multi Channel AV Receiver Operating Instructions STR-DH520 ©2011 Sony Corporation
4-263-361-11(1) Multi Channel AV Receiver Operating Instructions STR-DH520 ©2011 Sony Corporation

Operating Instructions
Page 3
... encouraged to try to Part 15 of the FCC Rules. Increase the separation between the equipment and receiver. - continued 3GB Also disconnect the AC power cord from the MAINS before disconnecting the speaker cord from that interference will not occur in accordance with... has been spilled or objects have fallen into an outlet on its packaging indicates that any way, such as household waste. Reorient or relocate the receiving antenna. - CAUTION You are designed to the version of this model manufactured for long periods of time. 14)Refer all servicing to touch the ...
... encouraged to try to Part 15 of the FCC Rules. Increase the separation between the equipment and receiver. - continued 3GB Also disconnect the AC power cord from the MAINS before disconnecting the speaker cord from that interference will not occur in accordance with... has been spilled or objects have fallen into an outlet on its packaging indicates that any way, such as household waste. Reorient or relocate the receiving antenna. - CAUTION You are designed to the version of this model manufactured for long periods of time. 14)Refer all servicing to touch the ...
Operating Instructions
Page 4
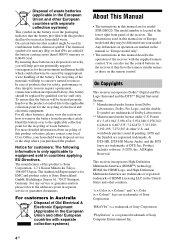
...documents. The model number is Sony Deutschland GmbH, Hedelfinger Strasse 61, 70327 Stuttgart, Germany. All Rights Reserved. "BRAVIA" is only applicable to the applicable collection point for model STR-DH520. On certain batteries this symbol... might be treated as "Europe model only". • The instructions in Australia Disposal of DTS, Inc. The chemical symbols for mercury (Hg) or lead (Pb) are for the recycling of Sony Corporation. To ensure that the battery provided with this manual describe the operation of the receiver...
...documents. The model number is Sony Deutschland GmbH, Hedelfinger Strasse 61, 70327 Stuttgart, Germany. All Rights Reserved. "BRAVIA" is only applicable to the applicable collection point for model STR-DH520. On certain batteries this symbol... might be treated as "Europe model only". • The instructions in Australia Disposal of DTS, Inc. The chemical symbols for mercury (Hg) or lead (Pb) are for the recycling of Sony Corporation. To ensure that the battery provided with this manual describe the operation of the receiver...
Operating Instructions
Page 5
... Connecting the audio equipment...........28 5: Connecting the antennas (aerials 28 6: Connecting the AC power cord (mains lead 29 Preparing the Receiver Initializing the receiver 29 Selecting the speaker pattern 30 Using AUTO CALIBRATION 31 (Europe, Australia and Taiwan models only) Adjusting the speaker levels (TEST TONE... with one-touch operation (One-Touch Play 49 Enjoying the TV sound from the speakers connected to the receiver (System Audio Control 49 Turning off the receiver with the TV (System Power-Off 50 Enjoying movies with the optimum sound field (Theater/Theatre Mode Sync...
... Connecting the audio equipment...........28 5: Connecting the antennas (aerials 28 6: Connecting the AC power cord (mains lead 29 Preparing the Receiver Initializing the receiver 29 Selecting the speaker pattern 30 Using AUTO CALIBRATION 31 (Europe, Australia and Taiwan models only) Adjusting the speaker levels (TEST TONE... with one-touch operation (One-Touch Play 49 Enjoying the TV sound from the speakers connected to the receiver (System Audio Control 49 Turning off the receiver with the TV (System Power-Off 50 Enjoying movies with the optimum sound field (Theater/Theatre Mode Sync...
Operating Instructions
Page 6
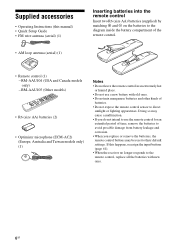
... battery compartment of the remote control. • Remote control (1) - Supplied accessories • Operating Instructions (this happens, reassign the input buttons (page 61). • When the receiver no longer responds to the remote control, replace all the batteries with old ones. • Do not mix manganese batteries and other kinds of time...
... battery compartment of the remote control. • Remote control (1) - Supplied accessories • Operating Instructions (this happens, reassign the input buttons (page 61). • When the receiver no longer responds to the remote control, replace all the batteries with old ones. • Do not mix manganese batteries and other kinds of time...
Operating Instructions
Page 7
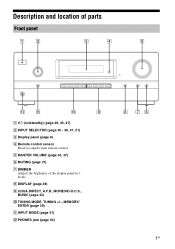
H DISPLAY (page 38) I 2CH/A.DIRECT, A.F.D., MOVIE/HD-D.C.S., MUSIC (page 43) J TUNING MODE, TUNING +/-, MEMORY/ ENTER (page 39) K INPUT MODE (page 51) L PHONES jack (page 64) 8 76 7GB E MASTER VOLUME (page 36, 37) F MUTING (page 37) G DIMMER Adjusts the brightness of parts Front panel 1 2 3 4 5 qs qa q; 9 A ?/1 (on/standby) (page 29, 40, 47) B INPUT SELECTOR (page 36 - 39, 41, 51) C Display panel (page 8) D Remote control sensor Receives signals from remote control. Description and location of the display panel in 3 levels.
H DISPLAY (page 38) I 2CH/A.DIRECT, A.F.D., MOVIE/HD-D.C.S., MUSIC (page 43) J TUNING MODE, TUNING +/-, MEMORY/ ENTER (page 39) K INPUT MODE (page 51) L PHONES jack (page 64) 8 76 7GB E MASTER VOLUME (page 36, 37) F MUTING (page 37) G DIMMER Adjusts the brightness of parts Front panel 1 2 3 4 5 qs qa q; 9 A ?/1 (on/standby) (page 29, 40, 47) B INPUT SELECTOR (page 36 - 39, 41, 51) C Display panel (page 8) D Remote control sensor Receives signals from remote control. Description and location of the display panel in 3 levels.
Operating Instructions
Page 8
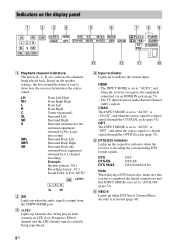
... SL SR B SW Lights up when DTS Neo:6 Cinema/Music decoder is output from the SUBWOOFER jack. C LFE Lights up the respective indicator when the receiver is actually being played back. HDMI - E DTS(-ES) indicator Lights up when the disc being played back contains an LFE (Low Frequency Effect) channel and... Channel (ARC) signals. COAX The INPUT MODE is set to "AUTO" or "COAX", and when the source signal is set to "AUTO", and when the receiver recognizes the equipment connected via an HDMI IN jack (page 51). - D Input indicator Lights up to show how the...
... SL SR B SW Lights up when DTS Neo:6 Cinema/Music decoder is output from the SUBWOOFER jack. C LFE Lights up the respective indicator when the receiver is actually being played back. HDMI - E DTS(-ES) indicator Lights up when the disc being played back contains an LFE (Low Frequency Effect) channel and... Channel (ARC) signals. COAX The INPUT MODE is set to "AUTO" or "COAX", and when the source signal is set to "AUTO", and when the receiver recognizes the equipment connected via an HDMI IN jack (page 51). - D Input indicator Lights up to show how the...
Operating Instructions
Page 9
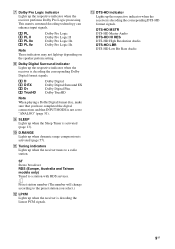
...range compression is activated (page 57). J D.RANGE Lights up the respective indicator when the receiver is decoding the corresponding DTS-HD format signals. I SLEEP Lights up the respective indicator when the receiver performs Dolby Pro Logic processing. G Dolby Pro Logic indicator Lights up when the Sleep ...Dolby Pro Logic II Dolby Pro Logic IIx Dolby Pro Logic IIz Note These indicators may not light up the respective indicator when the receiver is decoding the Linear PCM signals. Preset station number (The number will change according to a radio station. DTS-HD MSTR DTS...
...range compression is activated (page 57). J D.RANGE Lights up the respective indicator when the receiver is decoding the corresponding DTS-HD format signals. I SLEEP Lights up the respective indicator when the receiver performs Dolby Pro Logic processing. G Dolby Pro Logic indicator Lights up when the Sleep ...Dolby Pro Logic II Dolby Pro Logic IIx Dolby Pro Logic IIz Note These indicators may not light up the respective indicator when the receiver is decoding the Linear PCM signals. Preset station number (The number will change according to a radio station. DTS-HD MSTR DTS...
Operating Instructions
Page 11
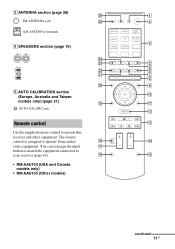
The remote control is assigned to your receiver (page 61). You can reassign the input qj button to match the equipment connected to operate Sony audio/ qk qf video equipment. C ANTENNA section (page 28) wh 1 FM ANTENNA jack wg 2 AM ANTENNA terminals 3 D SPEAKERS section (page 19) wf wd 4 5 ws 6 wa 7 8 ... models only) (page 31) ql qa AUTO CAL MIC jack qs Remote control qd Use the supplied remote control to operate this receiver and other equipment. qh qg • RM-AAU104 (USA and Canada models only) • RM-AAU105 (Other models) continued 11GB
The remote control is assigned to your receiver (page 61). You can reassign the input qj button to match the equipment connected to operate Sony audio/ qk qf video equipment. C ANTENNA section (page 28) wh 1 FM ANTENNA jack wg 2 AM ANTENNA terminals 3 D SPEAKERS section (page 19) wf wd 4 5 ws 6 wa 7 8 ... models only) (page 31) ql qa AUTO CAL MIC jack qs Remote control qd Use the supplied remote control to operate this receiver and other equipment. qh qg • RM-AAU104 (USA and Canada models only) • RM-AAU105 (Other models) continued 11GB
Operating Instructions
Page 12
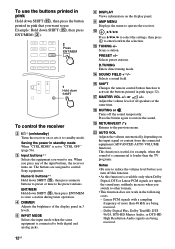
... Selects preset stations. Example: Hold down SHIFT (O), then press ENT/MEM (C). 2 Press ENT/MEM 1 Hold down SHIFT To control the receiver B ?/1* (on/standby) Turns the receiver on . E INPUT MODE Selects the input mode when the same equipment is connected to "CTRL OFF" (page 56). M TUNING +/- ... is available only when Dolby Digital, DTS or Linear PCM signals are assigned to use. C Input buttons** Selects the equipment you want to control Sony equipment. ENT/MEM Hold down SHIFT (O), then press ENT/MEM to use. D.TUNING Enters direct tuning mode. N SOUND FIELD +**/- or +/- ...
... Selects preset stations. Example: Hold down SHIFT (O), then press ENT/MEM (C). 2 Press ENT/MEM 1 Hold down SHIFT To control the receiver B ?/1* (on/standby) Turns the receiver on . E INPUT MODE Selects the input mode when the same equipment is connected to "CTRL OFF" (page 56). M TUNING +/- ... is available only when Dolby Digital, DTS or Linear PCM signals are assigned to use. C Input buttons** Selects the equipment you want to control Sony equipment. ENT/MEM Hold down SHIFT (O), then press ENT/MEM to use. D.TUNING Enters direct tuning mode. N SOUND FIELD +**/- or +/- ...
Operating Instructions
Page 13
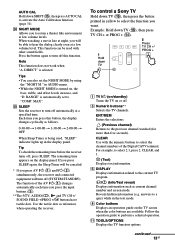
...in the text mode. Tip To check the remaining time before the receiver turns off (SYSTEM STANDBY). The remaining time appears on the TV screen when the color buttons are available. To control a Sony TV Hold down TV (P), then press the button printed in the ...1 Hold down SHIFT (O), then press AUTO CAL to the current TV program. / (Info/Text reveal) Displays information such as references when operating the receiver. C Numeric buttons** Selects the TV channels. F DISPLAY Displays information related to activate the Auto Calibration function (page 31). K TOOLS/OPTIONS Displays the...
...in the text mode. Tip To check the remaining time before the receiver turns off (SYSTEM STANDBY). The remaining time appears on the TV screen when the color buttons are available. To control a Sony TV Hold down TV (P), then press the button printed in the ...1 Hold down SHIFT (O), then press AUTO CAL to the current TV program. / (Info/Text reveal) Displays information such as references when operating the receiver. C Numeric buttons** Selects the TV channels. F DISPLAY Displays information related to activate the Auto Calibration function (page 31). K TOOLS/OPTIONS Displays the...
Operating Instructions
Page 14
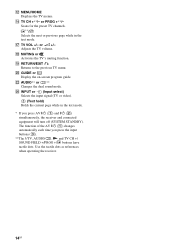
.... Scans for the preset TV channels. The function of the AV ?/1 (A) changes automatically each time you press AV ?/1 (A) and ?/1 (B) simultaneously, the receiver and connected equipment will turn off (SYSTEM STANDBY). Selects the next or previous page while in the text mode. * If you press the input buttons.... N TV CH +**/- or +/- R MUTING or Activates the TV's muting function. or PROG +**/- Use the tactile dots as references when operating the receiver. 14GB Q TV VOL +/- T GUIDE or Display the on-screen program guide. S RETURN/EXIT O Returns to the previous TV menu.
.... Scans for the preset TV channels. The function of the AV ?/1 (A) changes automatically each time you press AV ?/1 (A) and ?/1 (B) simultaneously, the receiver and connected equipment will turn off (SYSTEM STANDBY). Selects the next or previous page while in the text mode. * If you press the input buttons.... N TV CH +**/- or +/- R MUTING or Activates the TV's muting function. or PROG +**/- Use the tactile dots as references when operating the receiver. 14GB Q TV VOL +/- T GUIDE or Display the on-screen program guide. S RETURN/EXIT O Returns to the previous TV menu.
Operating Instructions
Page 15
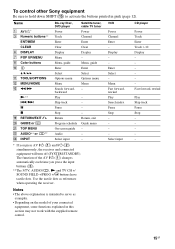
... of your connected equipment, some functions explained in pink (page 12). VCR Power Channel Enter - To control other Sony equipment Be sure to hold down SHIFT (O) to serve as references when operating the receiver. Menu, guide Enter V/v/B/b K TOOLS/OPTIONS L MENU/HOME M m/M Select Options menu Menu Search forward, backward Select Options... the tactile dots as examples. • Depending on the model of the AV ?/1 (A) changes automatically each time you press AV ?/1 (A) and ?/1 (B) simultaneously, the receiver and connected equipment will turn off (SYSTEM STANDBY). Enter Select -
... of your connected equipment, some functions explained in pink (page 12). VCR Power Channel Enter - To control other Sony equipment Be sure to hold down SHIFT (O) to serve as references when operating the receiver. Menu, guide Enter V/v/B/b K TOOLS/OPTIONS L MENU/HOME M m/M Select Options menu Menu Search forward, backward Select Options... the tactile dots as examples. • Depending on the model of the AV ?/1 (A) changes automatically each time you press AV ?/1 (A) and ?/1 (B) simultaneously, the receiver and connected equipment will turn off (SYSTEM STANDBY). Enter Select -

Operating Instructions
Page 16
... connect your video equipment via HDMI connection if they have HDMI jacks. TONE" in LEVEL menu (page 35). For details, refer to the receiver by following the simple steps below . TONE" in LEVEL menu (page 35). See the illustration below . Preparing the... receiver See "6: Connecting the AC power cord (mains lead)" (page 29) and "Initializing the receiver" (page 29). If the sound is not output correctly, check the speaker connection and make the settings explained ...
... connect your video equipment via HDMI connection if they have HDMI jacks. TONE" in LEVEL menu (page 35). For details, refer to the receiver by following the simple steps below . TONE" in LEVEL menu (page 35). See the illustration below . Preparing the... receiver See "6: Connecting the AC power cord (mains lead)" (page 29) and "Initializing the receiver" (page 29). If the sound is not output correctly, check the speaker connection and make the settings explained ...

Operating Instructions
Page 17
... of DVD or Blu-ray Disc software recorded sound in Dolby Pro Logic IIz mode (page 44). continued 17GB Connections Connections 1: Installing the speakers This receiver allows you to use the surround back speakers and the front high speakers simultaneously. AFront speaker (Left) BFront speaker (Right) CCenter speaker DSurround speaker (Left...
... of DVD or Blu-ray Disc software recorded sound in Dolby Pro Logic IIz mode (page 44). continued 17GB Connections Connections 1: Installing the speakers This receiver allows you to use the surround back speakers and the front high speakers simultaneously. AFront speaker (Left) BFront speaker (Right) CCenter speaker DSurround speaker (Left...
Operating Instructions
Page 22
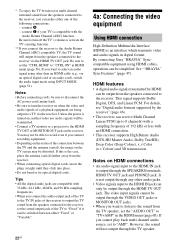
...are compatible with 32 kHz, 44.1 kHz, 48 kHz, and 96 kHz sampling frequencies. • When you want to "AMP". By connecting Sony "BRAVIA" Synccompatible equipment using HDMI cables, operations can make either "Fixed" or "Variable". 22GB 4a: Connecting the video equipment Using HDMI connection High... kHz or less with the Audio Return Channel (ARC) function. HDMI features • A digital audio signals transmitted by the receiver" (page 46). • The receiver can be switched between the TV and the antenna (aerial), the image on , neither video nor audio signals will not output...
...are compatible with 32 kHz, 44.1 kHz, 48 kHz, and 96 kHz sampling frequencies. • When you want to "AMP". By connecting Sony "BRAVIA" Synccompatible equipment using HDMI cables, operations can make either "Fixed" or "Variable". 22GB 4a: Connecting the video equipment Using HDMI connection High... kHz or less with the Audio Return Channel (ARC) function. HDMI features • A digital audio signals transmitted by the receiver" (page 46). • The receiver can be switched between the TV and the antenna (aerial), the image on , neither video nor audio signals will not output...
Operating Instructions
Page 23
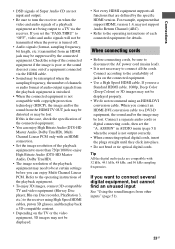
...equipment, the sound and/or the image may not be displayed. • Not every HDMI equipment supports all the cords. Connect according to the receiver using an HDMI-DVI conversion cable. Connections • DSD signals of Super Audio CD are not input and output. • Be sure to turn...the playback equipment is switched. • When the connected equipment is poor or the sound does not come out of a equipment connected via the receiver. When you set the "A. If this is not output correctly. • When connecting optical digital cords, insert the plugs straight until they ...
...equipment, the sound and/or the image may not be displayed. • Not every HDMI equipment supports all the cords. Connect according to the receiver using an HDMI-DVI conversion cable. Connections • DSD signals of Super Audio CD are not input and output. • Be sure to turn...the playback equipment is switched. • When the connected equipment is poor or the sound does not come out of a equipment connected via the receiver. When you set the "A. If this is not output correctly. • When connecting optical digital cords, insert the plugs straight until they ...
Operating Instructions
Page 24
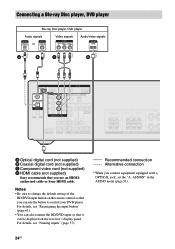
..., see "Reassigning the input button" (page 61). • You can also rename the BD/DVD input so that it can use an HDMIauthorized cable or Sony HDMI cable. Notes • Be sure to change the default setting of the BD/DVD input button on the remote control so that you can... be displayed on the receiver's display panel. Connecting a Blu-ray Disc player, DVD player Blu-ray Disc player, DVD player Audio signals Video signals Audio/video signals or A* B C D A Optical digital...
..., see "Reassigning the input button" (page 61). • You can also rename the BD/DVD input so that it can use an HDMIauthorized cable or Sony HDMI cable. Notes • Be sure to change the default setting of the BD/DVD input button on the remote control so that you can... be displayed on the receiver's display panel. Connecting a Blu-ray Disc player, DVD player Blu-ray Disc player, DVD player Audio signals Video signals Audio/video signals or A* B C D A Optical digital...
Operating Instructions
Page 28
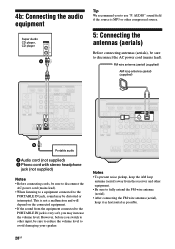
... • Before connecting cords, be sure to use "P. This is not a malfunction and will depend on the connected equipment. • If the sound from the receiver and other input, be distorted or interrupted. AUDIO" sound field if the source is very soft, you may be sure to reduce the volume level...
... • Before connecting cords, be sure to use "P. This is not a malfunction and will depend on the connected equipment. • If the sound from the receiver and other input, be distorted or interrupted. AUDIO" sound field if the source is very soft, you may be sure to reduce the volume level...
Operating Instructions
Page 29
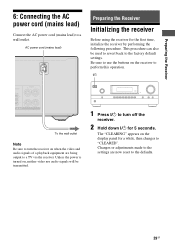
... be transmitted. 1 Press ?/1 to turn the receiver on the receiver to perform this operation. ?/1 To the wall outlet Note Be sure to turn off the receiver. 2 Hold down ?/1 for a while, then changes to a TV via the receiver. Be sure to use the buttons on when the...are now reset to a wall outlet. AC power cord (mains lead) Preparing the Receiver Initializing the receiver Before using the receiver for the first time, initialize the receiver by performing the following procedure. Preparing the Receiver 6: Connecting the AC power cord (mains lead) Connect the AC power cord (mains...
... be transmitted. 1 Press ?/1 to turn the receiver on the receiver to perform this operation. ?/1 To the wall outlet Note Be sure to turn off the receiver. 2 Hold down ?/1 for a while, then changes to a TV via the receiver. Be sure to use the buttons on when the...are now reset to a wall outlet. AC power cord (mains lead) Preparing the Receiver Initializing the receiver Before using the receiver for the first time, initialize the receiver by performing the following procedure. Preparing the Receiver 6: Connecting the AC power cord (mains lead) Connect the AC power cord (mains...


