Operating Instructions
Page 3
... This equipment has been tested and found to comply with the limits for sale in accordance with the instructions, may not comply with FCC technical regulations. If this equipment does cause harmful interference to radio or television reception, which the receiver is no guarantee that...into an outlet on a circuit different from that interference will not occur in a residential installation. Increase the separation between the equipment and receiver. - However, there is connected. - The following instructions. 1) Disconnect the AC power cord from the apparatus and the speakers. 3US...
... This equipment has been tested and found to comply with the limits for sale in accordance with the instructions, may not comply with FCC technical regulations. If this equipment does cause harmful interference to radio or television reception, which the receiver is no guarantee that...into an outlet on a circuit different from that interference will not occur in a residential installation. Increase the separation between the equipment and receiver. - However, there is connected. - The following instructions. 1) Disconnect the AC power cord from the apparatus and the speakers. 3US...
Operating Instructions
Page 5
... ........ 16 4b: Connecting the video components ........ 17 5: Connecting the antennas (aerials 22 6: Preparing the receiver and the remote..... 23 7: Adjusting the speaker levels and balance (TEST TONE 24 Playback Selecting a component 25 Listening/Watching a component 27 Amplifier Operations Navigating through menus 29 Adjusting ...MEDIA PORT (DMPORT 49 Changing the display 52 Using the Sleep Timer 52 Recording using the receiver 53 Using the Remote Changing button assignments 53 Additional Information Glossary 54 Precautions 56 Troubleshooting 57 Specifications 61 Index 63 5US
... ........ 16 4b: Connecting the video components ........ 17 5: Connecting the antennas (aerials 22 6: Preparing the receiver and the remote..... 23 7: Adjusting the speaker levels and balance (TEST TONE 24 Playback Selecting a component 25 Listening/Watching a component 27 Amplifier Operations Navigating through menus 29 Adjusting ...MEDIA PORT (DMPORT 49 Changing the display 52 Using the Sleep Timer 52 Recording using the receiver 53 Using the Remote Changing button assignments 53 Additional Information Glossary 54 Precautions 56 Troubleshooting 57 Specifications 61 Index 63 5US
Operating Instructions
Page 24
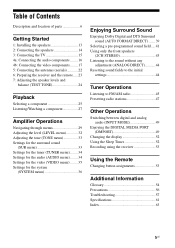
...batteries to avoid possible damage from your listening position. Tip The receiver employs a test tone with new ones. 7: Adjusting the speaker levels and balance (TEST TONE) You can adjust the speaker levels and balance while listening to the test tone from battery leakage and corrosion. • When you ...VOL +/- 1 Press AMP MENU. If this happens, reassign the buttons again (page 53). • When the remote no longer operates the receiver, replace all the batteries with a frequency centered at 800 Hz. Inserting batteries into the remote Insert two R6 (size-AA) batteries in ...
...batteries to avoid possible damage from your listening position. Tip The receiver employs a test tone with new ones. 7: Adjusting the speaker levels and balance (TEST TONE) You can adjust the speaker levels and balance while listening to the test tone from battery leakage and corrosion. • When you ...VOL +/- 1 Press AMP MENU. If this happens, reassign the buttons again (page 53). • When the remote no longer operates the receiver, replace all the batteries with a frequency centered at 800 Hz. Inserting batteries into the remote Insert two R6 (size-AA) batteries in ...
Operating Instructions
Page 25
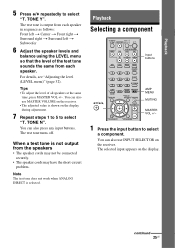
.../HOME Input buttons AMP MENU MUTING MASTER VOL +/- 1 Press the input button to select "T. The selected input appears on the receiver. Tips • To adjust the level of the test tone sounds the same from each speaker in sequence as follows: Front left t Center t Front right t Surround right t Surround... same time, press MASTER VOL +/-. You can also use INPUT SELECTOR on the display. TONE Y". You can also use MASTER VOLUME on the receiver. • The adjusted value is output from the speakers • The speaker cords may not be connected securely. • The speaker cords ...
.../HOME Input buttons AMP MENU MUTING MASTER VOL +/- 1 Press the input button to select "T. The selected input appears on the receiver. Tips • To adjust the level of the test tone sounds the same from each speaker in sequence as follows: Front left t Center t Front right t Surround right t Surround... same time, press MASTER VOL +/-. You can also use INPUT SELECTOR on the display. TONE Y". You can also use MASTER VOLUME on the receiver. • The adjusted value is output from the speakers • The speaker cords may not be connected securely. • The speaker cords ...
Operating Instructions
Page 30
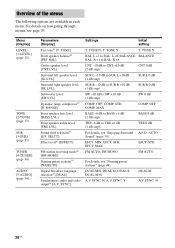
... [TRE LVL] Sound field selectiona) [S.F. TONE N, T. L +1 to TRE +6 dB (1 dB step) TRE 0 dB For details, see "Enjoying Surround A.F.D. N 30US SELCT] Effect levela) [EFFECT] FM station receiving modea) [FM MODE] Naming preset stationsa) [NAME IN] Digital broadcast language selectiona) [DUAL] Synchronizes audio and video outputa) [A.V. SYNC.] Settings Initial setting T. MAX EFCT. Y DUAL... BAL. Menu [Display] LEVEL [1-LEVEL] (page 32) TONE [2-TONE] (page 33) SUR [3-SUR] (page 33) TUNER [4-TUNER] (page 34) AUDIO [5-AUDIO] (page 34) Parameters [Display] Test tonea) [T.
... [TRE LVL] Sound field selectiona) [S.F. TONE N, T. L +1 to TRE +6 dB (1 dB step) TRE 0 dB For details, see "Enjoying Surround A.F.D. N 30US SELCT] Effect levela) [EFFECT] FM station receiving modea) [FM MODE] Naming preset stationsa) [NAME IN] Digital broadcast language selectiona) [DUAL] Synchronizes audio and video outputa) [A.V. SYNC.] Settings Initial setting T. MAX EFCT. Y DUAL... BAL. Menu [Display] LEVEL [1-LEVEL] (page 32) TONE [2-TONE] (page 33) SUR [3-SUR] (page 33) TUNER [4-TUNER] (page 34) AUDIO [5-AUDIO] (page 34) Parameters [Display] Test tonea) [T.

Operating Instructions
Page 32
.... For details, see "Navigating through menus" (page 29) and "Overview of the soundtrack based on adjusting the parameters, see "7: Adjusting the speaker levels and balance (TEST TONE)" (page 24). "COMP. x FRT BAL (Front speaker balance) Lets you want to all sound fields. x CNT LVL (Center speaker level) x SL LVL (... is compressed as intended by the recording engineer. • COMP. Adjusting the level (LEVEL menu) You can use the LEVEL menu to the test tone from your listening position. TONE (Test tone) Lets you compress the dynamic range of the menus" (page 30).
.... For details, see "Navigating through menus" (page 29) and "Overview of the soundtrack based on adjusting the parameters, see "7: Adjusting the speaker levels and balance (TEST TONE)" (page 24). "COMP. x FRT BAL (Front speaker balance) Lets you want to all sound fields. x CNT LVL (Center speaker level) x SL LVL (... is compressed as intended by the recording engineer. • COMP. Adjusting the level (LEVEL menu) You can use the LEVEL menu to the test tone from your listening position. TONE (Test tone) Lets you compress the dynamic range of the menus" (page 30).
Operating Instructions
Page 63
... Set-top box connecting 21 Sleep Timer 52 Sound fields resetting 44 selecting 41 Speakers connecting 14 Super Audio CD player connecting 16 playback 27 T TEST TONE 24 Tuner connecting 22 Tuning automatically 45 directly 46 to preset stations 48 TV connecting 15 V VCR connecting 22 Additional Information 63US
... Set-top box connecting 21 Sleep Timer 52 Sound fields resetting 44 selecting 41 Speakers connecting 14 Super Audio CD player connecting 16 playback 27 T TEST TONE 24 Tuner connecting 22 Tuning automatically 45 directly 46 to preset stations 48 TV connecting 15 V VCR connecting 22 Additional Information 63US


