Operating Instructions
Page 4
...speakers 16 3a: Connecting the audio components.........17 3b: Connecting the video components ........23 4: Connecting the antennas 32 5: Preparing the receiver and the remote .....33 6: Selecting the speaker system 35 7: Calibrating the appropriate settings automatically (AUTO CALIBRATION 35 8: Adjusting the speaker... levels and balance (TEST TONE 39 Playback Selecting a component 40 Listening/Watching a component 42 Amplifier Operations Navigating through menus 46 Adjusting the level (LEVEL menu 51 Adjusting the equalizer (EQ menu 52 Settings for the ...
...speakers 16 3a: Connecting the audio components.........17 3b: Connecting the video components ........23 4: Connecting the antennas 32 5: Preparing the receiver and the remote .....33 6: Selecting the speaker system 35 7: Calibrating the appropriate settings automatically (AUTO CALIBRATION 35 8: Adjusting the speaker... levels and balance (TEST TONE 39 Playback Selecting a component 40 Listening/Watching a component 42 Amplifier Operations Navigating through menus 46 Adjusting the level (LEVEL menu 51 Adjusting the equalizer (EQ menu 52 Settings for the ...

Operating Instructions
Page 9
... with this receiver (page 32). S-VIDEO IN/ OUT jack* continued 9US CENTER L R IN IN PHONO SA-CD/CD R OUT IN MD/TAPE R R SUR FRONT SURROUND BACK MULTI CH IN SUB WOOFER R OUT ZONE 2 CENTER R SURROUND BACK SPEAKERS L + - White (L) Red (R) MULTI CHANNEL INPUT jack ...jack sound (page 26, 28). HDMI IN/ MONITOR OUT jack Connects to an external power amplifier. B ANTENNA section FM ANTENNA AM ANTENNA XM Connects to the AM loop antenna supplied with this receiver) (page 72). R SURROUND L + - The COAXIAL jack provides a better COAXIAL IN...
... with this receiver (page 32). S-VIDEO IN/ OUT jack* continued 9US CENTER L R IN IN PHONO SA-CD/CD R OUT IN MD/TAPE R R SUR FRONT SURROUND BACK MULTI CH IN SUB WOOFER R OUT ZONE 2 CENTER R SURROUND BACK SPEAKERS L + - White (L) Red (R) MULTI CHANNEL INPUT jack ...jack sound (page 26, 28). HDMI IN/ MONITOR OUT jack Connects to an external power amplifier. B ANTENNA section FM ANTENNA AM ANTENNA XM Connects to the AM loop antenna supplied with this receiver) (page 72). R SURROUND L + - The COAXIAL jack provides a better COAXIAL IN...
Operating Instructions
Page 15
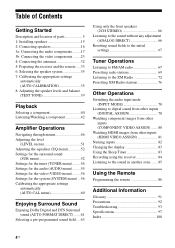
... want. • If you connect the SUR PRE OUT jack to another power amplifier, you are recommended to connect the surround speakers to this receiver. 15US Example of a 7.1 channel speaker system configuration AFront speaker (L) BFront speaker (R) CCenter speaker DSurround speaker (L) ESurround... sub woofer does not emit highly directional signals, you can enjoy high fidelity reproduction of that amplifier. Enjoying a 5.1/7.1 channel system To fully enjoy theater-like multi channel surround sound requires five speakers (two front speakers, a center speaker, and two surround speakers) and...
... want. • If you connect the SUR PRE OUT jack to another power amplifier, you are recommended to connect the surround speakers to this receiver. 15US Example of a 7.1 channel speaker system configuration AFront speaker (L) BFront speaker (R) CCenter speaker DSurround speaker (L) ESurround... sub woofer does not emit highly directional signals, you can enjoy high fidelity reproduction of that amplifier. Enjoying a 5.1/7.1 channel system To fully enjoy theater-like multi channel surround sound requires five speakers (two front speakers, a center speaker, and two surround speakers) and...
Operating Instructions
Page 46
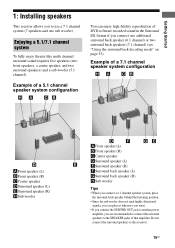
... 3 Press the control button or control button b to enter the menu. 4 Press control button V/v repeatedly to select the parameter you want . Amplifier Operations Navigating through menus By using the amplifier menus, you want to adjust. 5 Press the control button or control button b to enter the parameter. 6 Press control button V/v repeatedly to ... button B. However, if the AMP button is entered automatically. TUNING + m H M DISC SKIP X x TOOLS 1 1 Press AMP and then press MENU. To return to customize the receiver. 2-6 DISPLAY V TOOLS < B B v RETURN/ EXIT MENU -
... 3 Press the control button or control button b to enter the menu. 4 Press control button V/v repeatedly to select the parameter you want . Amplifier Operations Navigating through menus By using the amplifier menus, you want to adjust. 5 Press the control button or control button b to enter the parameter. 6 Press control button V/v repeatedly to ... button B. However, if the AMP button is entered automatically. TUNING + m H M DISC SKIP X x TOOLS 1 1 Press AMP and then press MENU. To return to customize the receiver. 2-6 DISPLAY V TOOLS < B B v RETURN/ EXIT MENU -

Operating Instructions
Page 47
LEVEL] SW -10 dB to SB RIGHT +10 dB (1 dB step) SB RIGHT 0 dB Sub woofer level [SW LEVEL] Dynamic range compressora) [COMP. Amplifier Operations Overview of the menus The following options are available in each menu. OFF, COMP. STD, COMP. MAX SW 0 dB COMP. For details on /off [...
LEVEL] SW -10 dB to SB RIGHT +10 dB (1 dB step) SB RIGHT 0 dB Sub woofer level [SW LEVEL] Dynamic range compressora) [COMP. Amplifier Operations Overview of the menus The following options are available in each menu. OFF, COMP. STD, COMP. MAX SW 0 dB COMP. For details on /off [...
Operating Instructions
Page 49
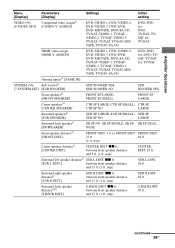
Amplifier Operations Menu [Display] VIDEO (56) [6-VIDEO SET] Parameters [Display] Component video assigna) [COMPO V. ASSIGN] Settings DVD-VIDEO 1, DVD-VIDEO 2, DVD-VIDEO 3, DVD-DVD, DVD-MD/...
Amplifier Operations Menu [Display] VIDEO (56) [6-VIDEO SET] Parameters [Display] Component video assigna) [COMPO V. ASSIGN] Settings DVD-VIDEO 1, DVD-VIDEO 2, DVD-VIDEO 3, DVD-DVD, DVD-MD/...
Operating Instructions
Page 51
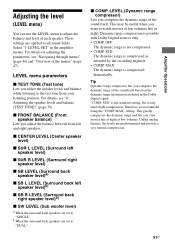
...47). OFF The dynamic range is possible with Dolby Digital sources only. • COMP. For details on the dynamic range information included in the amplifier menus. b When the surround back speakers are applied to all sound fields. Therefore, we recommend using the "COMP. For details, see "...dynamic range of each speaker. Select "1-LEVEL SET" in the Dolby Digital signal. Dynamic range compression is not compressed. • COMP. Amplifier Operations Adjusting the level (LEVEL menu) You can use the LEVEL menu to adjust the balance and level of the sound track. x CENTER...
...47). OFF The dynamic range is possible with Dolby Digital sources only. • COMP. For details on the dynamic range information included in the amplifier menus. b When the surround back speakers are applied to all sound fields. Therefore, we recommend using the "COMP. For details, see "...dynamic range of each speaker. Select "1-LEVEL SET" in the Dolby Digital signal. Dynamic range compression is not compressed. • COMP. Amplifier Operations Adjusting the level (LEVEL menu) You can use the LEVEL menu to adjust the balance and level of the sound track. x CENTER...
Operating Instructions
Page 52
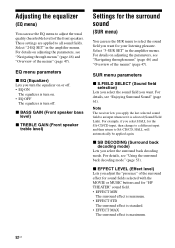
... Sound" (page 61). For details on adjusting the parameters, see "Navigating through menus" (page 46) and "Overview of the menus" (page 47). Note The receiver lets you select HALL for the SA-CD/CD input, then change to a different input and then return to SA-CD/CD, HALL will automatically... you select the sound field you select the surround back decoding mode. These settings are applied to all sound fields. Select "2-EQ SET" in the amplifier menus. Adjusting the equalizer (EQ menu) You can use the EQ menu to adjust the tonal quality (bass/treble level) of the front speakers. ...
... Sound" (page 61). For details on adjusting the parameters, see "Navigating through menus" (page 46) and "Overview of the menus" (page 47). Note The receiver lets you select HALL for the SA-CD/CD input, then change to a different input and then return to SA-CD/CD, HALL will automatically... you select the sound field you select the surround back decoding mode. These settings are applied to all sound fields. Select "2-EQ SET" in the amplifier menus. Adjusting the equalizer (EQ menu) You can use the EQ menu to adjust the tonal quality (bass/treble level) of the front speakers. ...
Operating Instructions
Page 53
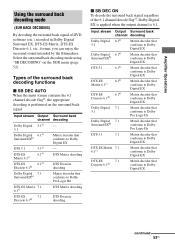
... back signal. Input stream Dolby Digital 5.1 Dolby Digital Surround EXb) DTS 5.1 DTS-ES Matrix 6.1c) DTS-ES Discrete 6.1d) Output Surround back channel decoding 5.1e) - 6.1e) Matrix decoder that conforms to Dolby Digital EX 5.1e) - 6.1e) DTS Matrix decoding 6.1e) DTS Discrete decoding... AUTO When the input stream contains the 6.1 channel decode flaga), the appropriate decoding is 6.1. Types of the 6.1 channel decode flaga), Dolby Digital EX is applied when the output channel is performed on the SUR menu (page 52). Amplifier Operations Using the surround back decoding mode (SUR...
... back signal. Input stream Dolby Digital 5.1 Dolby Digital Surround EXb) DTS 5.1 DTS-ES Matrix 6.1c) DTS-ES Discrete 6.1d) Output Surround back channel decoding 5.1e) - 6.1e) Matrix decoder that conforms to Dolby Digital EX 5.1e) - 6.1e) DTS Matrix decoding 6.1e) DTS Discrete decoding... AUTO When the input stream contains the 6.1 channel decode flaga), the appropriate decoding is 6.1. Types of the 6.1 channel decode flaga), Dolby Digital EX is applied when the output channel is performed on the SUR menu (page 52). Amplifier Operations Using the surround back decoding mode (SUR...

Operating Instructions
Page 54
... signal. e)When two surround back speakers are DVD specific signals not used in the amplifier menus. In this case, select "SB DEC ON". • You can help you set the FM station receiving mode and to denote it has both 5.1 channel signals and an extension stream designed for returning those signals to 6.1 discrete...
... signal. e)When two surround back speakers are DVD specific signals not used in the amplifier menus. In this case, select "SB DEC ON". • You can help you set the FM station receiving mode and to denote it has both 5.1 channel signals and an extension stream designed for returning those signals to 6.1 discrete...
Operating Instructions
Page 55
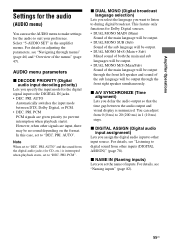
..., see "Listening to during digital broadcast. For details, see "Navigating through the front right speaker simultaneously. Amplifier Operations Settings for the audio (AUDIO menu) You can adjust from 0 (0 ms) to 20 (200 ms) in the amplifier menus. AUDIO menu parameters x DECODE PRIORITY (Digital audio input decoding priority) Lets you specify the input...
..., see "Listening to during digital broadcast. For details, see "Navigating through the front right speaker simultaneously. Amplifier Operations Settings for the audio (AUDIO menu) You can adjust from 0 (0 ms) to 20 (200 ms) in the amplifier menus. AUDIO menu parameters x DECODE PRIORITY (Digital audio input decoding priority) Lets you specify the input...
Operating Instructions
Page 56
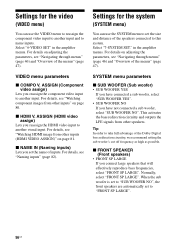
... sub woofer is set to "SUB WOOFER NO", the front speakers are automatically set to set the name of inputs. Select "6-VIDEO SET" in the amplifier menus. For details, see "Navigating through menus" (page 46) and "Overview of the Dolby Digital bass redirection circuitry, we recommend setting the sub woofer's cut... "FRONT SP LARGE". Normally, select "FRONT SP LARGE". x NAME IN (Naming inputs) Lets you reassign the HDMI video input to another visual input. in the amplifier menus.
... sub woofer is set to "SUB WOOFER NO", the front speakers are automatically set to set the name of inputs. Select "6-VIDEO SET" in the amplifier menus. For details, see "Navigating through menus" (page 46) and "Overview of the Dolby Digital bass redirection circuitry, we recommend setting the sub woofer's cut... "FRONT SP LARGE". Normally, select "FRONT SP LARGE". x NAME IN (Naming inputs) Lets you reassign the HDMI video input to another visual input. in the amplifier menus.
Operating Instructions
Page 57
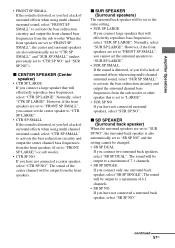
...The sound will be output to "CTR SP NO" and "SUR SP NO"). Amplifier Operations • FRONT SP SMALL If the sound is distorted, or you feel a lack of surround effects when using multi channel surround sound, select "SUR SP SMALL" to activate the bass redirection circuitry and ... SP NO" and the setting cannot be output to a maximum of surround effects when using multi channel surround sound, select "FRONT SP SMALL" to activate the bass redirection circuitry and output the front channel bass frequencies from the front speakers. x CENTER SPEAKER (Center speaker) • CTR SP LARGE...
...The sound will be output to "CTR SP NO" and "SUR SP NO"). Amplifier Operations • FRONT SP SMALL If the sound is distorted, or you feel a lack of surround effects when using multi channel surround sound, select "SUR SP SMALL" to activate the bass redirection circuitry and ... SP NO" and the setting cannot be output to a maximum of surround effects when using multi channel surround sound, select "FRONT SP SMALL" to activate the bass redirection circuitry and output the front channel bass frequencies from the front speakers. x CENTER SPEAKER (Center speaker) • CTR SP LARGE...
Operating Instructions
Page 59
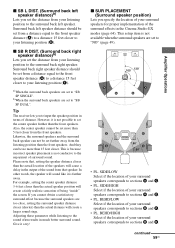
... item is further away. BEHD/HIGH Select if the location of your listening position to the surround back left speaker. Tip The receiver lets you cannot obtain a satisfactory surround effect because the surround speakers are set from your surround speakers corresponds to sections A and... front speaker distance (A) to a distance 15 feet closer to your surround speakers corresponds to sections B and C. • PL. continued 59US Amplifier Operations SIDE/HIGH Select if the location of your listening position (F). x SB L DIST. (Surround back left speaker distance)b) Lets you set ...
... item is further away. BEHD/HIGH Select if the location of your listening position to the surround back left speaker. Tip The receiver lets you cannot obtain a satisfactory surround effect because the surround speakers are set from your surround speakers corresponds to sections A and... front speaker distance (A) to a distance 15 feet closer to your surround speakers corresponds to sections B and C. • PL. continued 59US Amplifier Operations SIDE/HIGH Select if the location of your listening position (F). x SB L DIST. (Surround back left speaker distance)b) Lets you set ...

Operating Instructions
Page 60
... a stereo amplifier in 3 steps. If you adjust the brightness in another room or zone. x DIMMER (Brightness of the display) Lets you are located to the immediate left and right of the Cinema Studio EX modes. x ZONE 2 SELECT (Zone 2 source selection) Lets you select the analog audio signals you playback multi channel surround encoded...
... a stereo amplifier in 3 steps. If you adjust the brightness in another room or zone. x DIMMER (Brightness of the display) Lets you are located to the immediate left and right of the Cinema Studio EX modes. x ZONE 2 SELECT (Zone 2 source selection) Lets you select the analog audio signals you playback multi channel surround encoded...

Operating Instructions
Page 85
... Main Zone A STR-DG800 DIGITAL HDMI ANTENNA + - XM MONITOR L L L L COMPONENT VIDEO SPEAKERS R R TV/SAT DVD VIDEO 2 R R VIDEO 1 PRE OUT L L L L + - + - + - AUDIO ROUTR SURR SUB FRONT SURROUND BACK WOOFER MULTI CH IN R OUT ZONE 2 CENTER C Zone 2 C B A Audio component B Sony's Amplifier/Receiver C Speaker Press ...than the main room. L R R PHONO SA-CD/CD MD/TAPE R R MULTI CH IN R ZONE 2 SPEAKERS + - No signals are output from a component connected to the receiver in the Zone 2. For example, you want to only the digital input jacks. ...
... Main Zone A STR-DG800 DIGITAL HDMI ANTENNA + - XM MONITOR L L L L COMPONENT VIDEO SPEAKERS R R TV/SAT DVD VIDEO 2 R R VIDEO 1 PRE OUT L L L L + - + - + - AUDIO ROUTR SURR SUB FRONT SURROUND BACK WOOFER MULTI CH IN R OUT ZONE 2 CENTER C Zone 2 C B A Audio component B Sony's Amplifier/Receiver C Speaker Press ...than the main room. L R R PHONO SA-CD/CD MD/TAPE R R MULTI CH IN R ZONE 2 SPEAKERS + - No signals are output from a component connected to the receiver in the Zone 2. For example, you want to only the digital input jacks. ...
Operating Instructions
Page 97
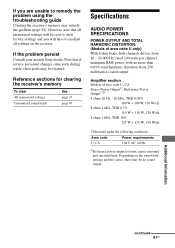
... continued 97US Amplifier section Models of area code U only) With 8 ohm loads, both channels driven, from 250 milliwatts to readjust all memorized settings will be reset to their factory settings and you are unable to remedy the problem using the troubleshooting guide Clearing the receiver's memory may... the problem (page 25). If the problem persist Consult your nearest Sony dealer. However, note that if service personnel changes some parts during repair, these parts may be retained. Depending on the receiver. Note that all settings on the sound field settings and the source...
... continued 97US Amplifier section Models of area code U only) With 8 ohm loads, both channels driven, from 250 milliwatts to readjust all memorized settings will be reset to their factory settings and you are unable to remedy the problem using the troubleshooting guide Clearing the receiver's memory may... the problem (page 25). If the problem persist Consult your nearest Sony dealer. However, note that if service personnel changes some parts during repair, these parts may be retained. Depending on the receiver. Note that all settings on the sound field settings and the source...


