Dimensions Diagram
Page 1
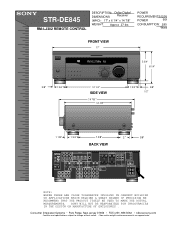
STR-DE845 RM-LJ302 REMOTE CONTROL DESCRIPTION: Dolby Digital DIMENSIONS Receiver (WHD): 17" x 6 1/4" x 14 7/8" WEIGHT: Approx 27 lbs POWER REQUIREMENTS:120V POWER 60H CONSUMPTION: 280 Watts FRONT VIEW 17" R FM102.7MHz A3 5 3/4" 6 1/4" 5/8" 1 3/4 " 12 1/4 " SIDE VIEW 14 7/8 " 12 7/8" 1 3/4 " 5/8" 1/2" 1 1/8" 1 3/4 " 7 3/8" BACK VIEW 2 " 5/8" ANTENNA AM. SONY WILL NOT BE RESPONSIBLE ... PRECISION WE RECOMMEND THAT THE PRODUCT ITSELF BE USED TO MAKE THE ACTUAL MEASUREMENTS. COAXIAL FM FRONT REAR CNT OPTICAL COAX SPEAKERS + 5.1 INPUTS SUB WOOFER DIGITAL B A -
STR-DE845 RM-LJ302 REMOTE CONTROL DESCRIPTION: Dolby Digital DIMENSIONS Receiver (WHD): 17" x 6 1/4" x 14 7/8" WEIGHT: Approx 27 lbs POWER REQUIREMENTS:120V POWER 60H CONSUMPTION: 280 Watts FRONT VIEW 17" R FM102.7MHz A3 5 3/4" 6 1/4" 5/8" 1 3/4 " 12 1/4 " SIDE VIEW 14 7/8 " 12 7/8" 1 3/4 " 5/8" 1/2" 1 1/8" 1 3/4 " 7 3/8" BACK VIEW 2 " 5/8" ANTENNA AM. SONY WILL NOT BE RESPONSIBLE ... PRECISION WE RECOMMEND THAT THE PRODUCT ITSELF BE USED TO MAKE THE ACTUAL MEASUREMENTS. COAXIAL FM FRONT REAR CNT OPTICAL COAX SPEAKERS + 5.1 INPUTS SUB WOOFER DIGITAL B A -
Operating Instructions
Page 3
... 4 audio/video inputs z About area codes The area code of the player you purchased is clearly indicated in the text, for models STR-DE945 and STR-DE845. You can also use of your model number by looking at the upper right corner of Digital Theater Systems, Inc. © 1996 ...in operation, according to the separate operating instructions supplied with the remote. • The following icon is used in this manual, the STR-DE945 is used for example, "Models of the rear panel (see the illustration below). This receiver incorporates Dolby* Digital and Pro Logic Surround and the DTS** ...
... 4 audio/video inputs z About area codes The area code of the player you purchased is clearly indicated in the text, for models STR-DE945 and STR-DE845. You can also use of your model number by looking at the upper right corner of Digital Theater Systems, Inc. © 1996 ...in operation, according to the separate operating instructions supplied with the remote. • The following icon is used in this manual, the STR-DE945 is used for example, "Models of the rear panel (see the illustration below). This receiver incorporates Dolby* Digital and Pro Logic Surround and the DTS** ...
Operating Instructions
Page 4
...remote) (1) STR-DE845 only • Remote commander RM-LP204 (remote) (1) Inserting batteries into the remote Insert LR6 (size-AA) alkaline batteries with the + and - Before you don't use the remote for use with new ones. Doing so may cause a malfunction. • If you get started • Turn off the power to all components before you received... the following items with the remote: • FM wire antenna (1) • AM loop antenna (1) • LR6 (size-AA) alkaline batteries (3)...
...remote) (1) STR-DE845 only • Remote commander RM-LP204 (remote) (1) Inserting batteries into the remote Insert LR6 (size-AA) alkaline batteries with the + and - Before you don't use the remote for use with new ones. Doing so may cause a malfunction. • If you get started • Turn off the power to all components before you received... the following items with the remote: • FM wire antenna (1) • AM loop antenna (1) • LR6 (size-AA) alkaline batteries (3)...
Operating Instructions
Page 8
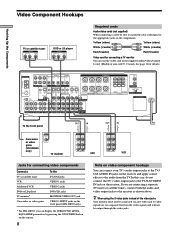
..., EQUALIZER parameters by pressing the ON SCREEN button on the remote. 8 Note on a separate bus from the video signals and...STR-DE945, you are on video component hookups You can use the video cord of the supplied audio/video/control S cord. (Models of the video jacks Your monitor must also be connected via an S-video jack. ANTENNA AM y COAXIAL FM... + R L R L - - - - In this case, do not connect the TV's video output jack to the receiver as shown above. S-video signals are connecting a separate TV tuner (or satellite tuner), connect both the audio and video output jacks...
..., EQUALIZER parameters by pressing the ON SCREEN button on the remote. 8 Note on a separate bus from the video signals and...STR-DE945, you are on video component hookups You can use the video cord of the supplied audio/video/control S cord. (Models of the video jacks Your monitor must also be connected via an S-video jack. ANTENNA AM y COAXIAL FM... + R L R L - - - - In this case, do not connect the TV's video output jack to the receiver as shown above. S-video signals are connecting a separate TV tuner (or satellite tuner), connect both the audio and video output jacks...
Operating Instructions
Page 18
...!" The currently selected function, followed by the demonstration message appears in the display. For details on what will clear the receiver's memory. TUNING + MEMORY FM/AM FM MODE 2ND AUDIO + SET UP NAME ENTER 0 BASS MUTING EQUALIZER BOOST VIDEO 3 INPUT 10 VIDEO L AUDIO R 1 Turn off... The next time you have : • Turned MASTER VOLUME to turn on how to turn the receiver off automatically via the CONTROL A1 control system (page 50). • STR-DE945 only: - 2 way remote control system operation (page 50). - To view the demonstration Hold down ?/1 for the first time,...
...!" The currently selected function, followed by the demonstration message appears in the display. For details on what will clear the receiver's memory. TUNING + MEMORY FM/AM FM MODE 2ND AUDIO + SET UP NAME ENTER 0 BASS MUTING EQUALIZER BOOST VIDEO 3 INPUT 10 VIDEO L AUDIO R 1 Turn off... The next time you have : • Turned MASTER VOLUME to turn on how to turn the receiver off automatically via the CONTROL A1 control system (page 50). • STR-DE945 only: - 2 way remote control system operation (page 50). - To view the demonstration Hold down ?/1 for the first time,...
Operating Instructions
Page 22
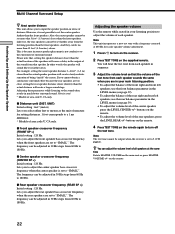
...it is set farther away from that , setting the speaker distance closer than the front speakers. Note The test tone cannot be output when the receiver is not possible to 180 Hz. And they can be set to turn off the test tone. Adjusting these parameter while listening to "SMALL"....frequency when the rear speakers are set more than the front speakers. buttons on the remote. • To adjust the volume level of all speakers at 800 Hz for setting distances. 1 foot corresponds to turn on the receiver. 2 Press TEST TONE on the main unit or press MASTER VOLUME +/- Hooking ...
...it is set farther away from that , setting the speaker distance closer than the front speakers. Note The test tone cannot be output when the receiver is not possible to 180 Hz. And they can be set to turn off the test tone. Adjusting these parameter while listening to "SMALL"....frequency when the rear speakers are set more than the front speakers. buttons on the remote. • To adjust the volume level of all speakers at 800 Hz for setting distances. 1 foot corresponds to turn on the receiver. 2 Press TEST TONE on the main unit or press MASTER VOLUME +/- Hooking ...
Operating Instructions
Page 23
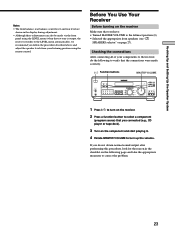
TUNING + MEMORY FM/AM FM MODE 2ND AUDIO + SET UP NAME ENTER 0 BASS MUTING EQUALIZER BOOST VIDEO 3 ...on the following to the leftmost position (0). • Selected the appropriate front speakers (see "7 SPEAKERS selector" on the receiver. 2 Press a function button to select a component (program source) that you have: • Turned MASTER VOLUME to ...made via the front panel using the remote control. Checking the connections After connecting all of your listening position using the LEVEL menu (when the test tone is output, the receiver switches to the LEVEL menu automatically), we...
TUNING + MEMORY FM/AM FM MODE 2ND AUDIO + SET UP NAME ENTER 0 BASS MUTING EQUALIZER BOOST VIDEO 3 ...on the following to the leftmost position (0). • Selected the appropriate front speakers (see "7 SPEAKERS selector" on the receiver. 2 Press a function button to select a component (program source) that you have: • Turned MASTER VOLUME to ...made via the front panel using the remote control. Checking the connections After connecting all of your listening position using the LEVEL menu (when the test tone is output, the receiver switches to the LEVEL menu automatically), we...
Operating Instructions
Page 30
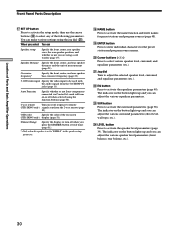
...Distance Specify the front, center, and rear speaker distances and the unit of measurement (page 21). Auto Function Specify whether or not Sony components connected via Control A1 cords will turn off response to turn on or off when you press the DIMMER button several times (...the button lights up and you can adjust the various speaker level parameters (front balance, rear balance, etc.). 30 Dimmer Range Specify the display to remote (STR-DE945 only) signals sent from the 5.1CH INPUT jacks (page 11). Cursor buttons ( / ) Press to activate the equalizer parameters (page 40...
...Distance Specify the front, center, and rear speaker distances and the unit of measurement (page 21). Auto Function Specify whether or not Sony components connected via Control A1 cords will turn off response to turn on or off when you press the DIMMER button several times (...the button lights up and you can adjust the various speaker level parameters (front balance, rear balance, etc.). 30 Dimmer Range Specify the display to remote (STR-DE945 only) signals sent from the 5.1CH INPUT jacks (page 11). Cursor buttons ( / ) Press to activate the equalizer parameters (page 40...

Operating Instructions
Page 39
... dB steps from +10.0 dB to +10 dB. However, during 5.1 CH input. • The balance can also be adjusted directly using the supplied remote. Center level (CENTER) Initial setting : 0 dB Lets you attenuate the level of the LFE (Low Frequency Effect) channel output from the sub woofer without ...the front, center or rear channels via the Dolby Digital (AC-3) bass redirection circuitry. • The level can also be adjusted using the supplied remote. LFE (Low Frequency Effect) mix level Initial setting : 0 dB This parameter lets you adjust the level of the sub woofer. The settings ...
... dB steps from +10.0 dB to +10 dB. However, during 5.1 CH input. • The balance can also be adjusted directly using the supplied remote. Center level (CENTER) Initial setting : 0 dB Lets you attenuate the level of the LFE (Low Frequency Effect) channel output from the sub woofer without ...the front, center or rear channels via the Dolby Digital (AC-3) bass redirection circuitry. • The level can also be adjusted using the supplied remote. LFE (Low Frequency Effect) mix level Initial setting : 0 dB This parameter lets you adjust the level of the sub woofer. The settings ...
Operating Instructions
Page 43
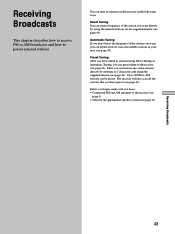
... code using Direct Tuning or Automatic Tuning, you can tune in stations on the supplied remote (see page 46). The receiver will also scan all available stations in stations using the supplied remote (see page 44). Automatic Tuning If you don't know the frequency of the station ... have : • Connected FM and AM antennas to the receiver (see page 5). • Selected the appropriate speaker system (see page 45). Up to 30 FM or AM stations can preset them to preset selected stations. Receiving Broadcasts This chapter describes how to receive FM or AM broadcasts and how to...
... code using Direct Tuning or Automatic Tuning, you can tune in stations on the supplied remote (see page 46). The receiver will also scan all available stations in stations using the supplied remote (see page 44). Automatic Tuning If you don't know the frequency of the station ... have : • Connected FM and AM antennas to the receiver (see page 5). • Selected the appropriate speaker system (see page 45). Up to 30 FM or AM stations can preset them to preset selected stations. Receiving Broadcasts This chapter describes how to receive FM or AM broadcasts and how to...
Operating Instructions
Page 44
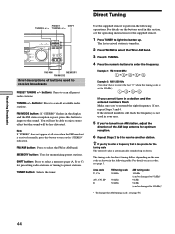
...the following table. The tuning scale for the supplied remote. 1 Press TUNER to scan all available radio stations. buttons: Press to scan all preset radio stations. Note If "STEREO" does not appear at all even when the FM broadcast is set to 10 kHz.) 1 b3 ... 10 VIDEO L AUDIO R FM/AM MEMORY FM MODE Brief descriptions of the AM loop antenna for memorizing preset stations. Receiving Broadcasts PRESET SHIFT TUNING +/ TUNING +/ EQUALIZER BASS BOOST MASTER VOLUME PRESET - The last received station is tuned in the display and the FM stereo reception is not used to...
...the following table. The tuning scale for the supplied remote. 1 Press TUNER to scan all available radio stations. buttons: Press to scan all preset radio stations. Note If "STEREO" does not appear at all even when the FM broadcast is set to 10 kHz.) 1 b3 ... 10 VIDEO L AUDIO R FM/AM MEMORY FM MODE Brief descriptions of the AM loop antenna for memorizing preset stations. Receiving Broadcasts PRESET SHIFT TUNING +/ TUNING +/ EQUALIZER BASS BOOST MASTER VOLUME PRESET - The last received station is tuned in the display and the FM stereo reception is not used to...

Operating Instructions
Page 46
...˜B2˜...˜B0N nC0˜...C2˜C1N Using the preset codes Use the supplied remote to select the preset station you want . Each time you press the button, the receiver tunes in one preset station at a time, in this section, see the operating instructions for ...the supplied remote. 1 Press TUNER to light the button up . The last received station is selected. 46 Receiving Broadcasts Preset Tuning Tuning to preset stations You can...
...˜B2˜...˜B0N nC0˜...C2˜C1N Using the preset codes Use the supplied remote to select the preset station you want . Each time you press the button, the receiver tunes in one preset station at a time, in this section, see the operating instructions for ...the supplied remote. 1 Press TUNER to light the button up . The last received station is selected. 46 Receiving Broadcasts Preset Tuning Tuning to preset stations You can...
Operating Instructions
Page 49
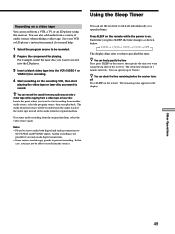
...the time changes as shown below. The sleep time changes in the display. z You can freely specify the time First, press SLEEP on the remote, then specify the time you may not be recorded onto the audio track of the video tape instead of audio sources when editing a video tape...from the sources. To resume audio recording from the original medium. Using the Sleep Timer Recording on . You can check the time remaining before the receiver turns off automatically at a specified time. Analog recording is on a video tape You can specify up to record from a variety of the audio ...
...the time changes as shown below. The sleep time changes in the display. z You can freely specify the time First, press SLEEP on the remote, then specify the time you may not be recorded onto the audio track of the video tape instead of audio sources when editing a video tape...from the sources. To resume audio recording from the original medium. Using the Sleep Timer Recording on . You can check the time remaining before the receiver turns off automatically at a specified time. Analog recording is on a video tape You can specify up to record from a variety of the audio ...
Operating Instructions
Page 50
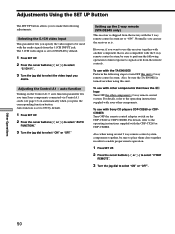
..."5.1CH V:". 3 Turn the jog dial to turn Sony components connected via Control A1 cords (see page 13) on the Control A1 auto function parameter lets you turn OFF this unit's 2 way remote control system. Also when using this receiver together with other components that is set to the ... the following adjustments. For details, refer to "ON". Setting up the 2 way remote (STR-DE945 only) This receiver is turned on when using several 2 way remote control system components together, be used with the 2 way remote control system set to DVD/LD by default. 1 Press SET UP. 2 Press the...
..."5.1CH V:". 3 Turn the jog dial to turn Sony components connected via Control A1 cords (see page 13) on the Control A1 auto function parameter lets you turn OFF this unit's 2 way remote control system. Also when using this receiver together with other components that is set to the ... the following adjustments. For details, refer to "ON". Setting up the 2 way remote (STR-DE945 only) This receiver is turned on when using several 2 way remote control system components together, be used with the 2 way remote control system set to DVD/LD by default. 1 Press SET UP. 2 Press the...

Operating Instructions
Page 51
Selecting the color of the on-screen display (STR-DE945 only) Select the color of the CONTROL A1 Control ... regarding specific operations, be compatible with the new functions. • Do not operate a 2 way remote control unit when the CONTROL A1 jacks are compatible with components with CONTROL A1 jacks, the number of...a personal computer running "MD Editor" or similar application. However, when making connections between a Sony CD player, amplifier (receiver), MD deck and cassette deck provide automatic function selection and synchronized recording. You can be limited...
Selecting the color of the on-screen display (STR-DE945 only) Select the color of the CONTROL A1 Control ... regarding specific operations, be compatible with the new functions. • Do not operate a 2 way remote control unit when the CONTROL A1 jacks are compatible with components with CONTROL A1 jacks, the number of...a personal computer running "MD Editor" or similar application. However, when making connections between a Sony CD player, amplifier (receiver), MD deck and cassette deck provide automatic function selection and synchronized recording. You can be limited...
Operating Instructions
Page 53
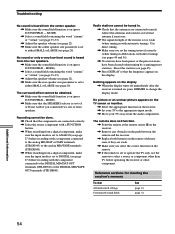
... a TV set the SPEAKERS selector correctly (see page 27). , Press MUTING on the remote if the MUTING indicator is heard. , Check that the speakers and components are connected securely...alcohol. Turn off the receiver, eliminate the short-circuit problem and turn on the receiver has been activated because of the following difficulties while using the receiver, use this troubleshooting guide ... the audio components. , Make sure you 've set or fluorescent light. , Move your nearest Sony dealer. Should any of a short circuit. Severe hum or noise is lit. , The protective device...
... a TV set the SPEAKERS selector correctly (see page 27). , Press MUTING on the remote if the MUTING indicator is heard. , Check that the speakers and components are connected securely...alcohol. Turn off the receiver, eliminate the short-circuit problem and turn on the receiver has been activated because of the following difficulties while using the receiver, use this troubleshooting guide ... the audio components. , Make sure you 've set or fluorescent light. , Move your nearest Sony dealer. Should any of a short circuit. Severe hum or noise is lit. , The protective device...
Operating Instructions
Page 54
...STR-DE845). MODE). , Make sure that the SPEAKERS selector is set to either SMALL or LARGE (see page 20). Recording cannot be done. , Check that the antennas are weak. , Make sure you set to DIGITAL (see page 20). The remote does not function. , Point the remote at the remote sensor on the receiver... Adjust the speaker volume (see page 27) before operating the receiver or other than TV before recording with a component connected to the analog MD/DAT or TAPE terminals (STR-DE945) or the analog MD/TAPE terminals (STR-DE845). , When recording from a digital component, make sure the ...
...STR-DE845). MODE). , Make sure that the SPEAKERS selector is set to either SMALL or LARGE (see page 20). Recording cannot be done. , Check that the antennas are weak. , Make sure you set to DIGITAL (see page 20). The remote does not function. , Point the remote at the remote sensor on the receiver... Adjust the speaker volume (see page 27) before operating the receiver or other than TV before recording with a component connected to the analog MD/DAT or TAPE terminals (STR-DE945) or the analog MD/TAPE terminals (STR-DE845). , When recording from a digital component, make sure the ...
Operating Instructions
Page 60
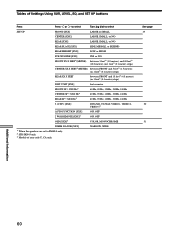
...) (0.1 meter) steps) DIST. Tables of Settings Using SUR, LEVEL, EQ, and SET UP buttons Press Press or to select Turn jog dial to SMALL only. 2) STR-DE945 only. 3) Models of area code U, CA only. NARROW, WIDE See page 19 50 51 Additional Information 60 UNIT [XXX] FRONT SP > XXX Hz1) CENTER... Hz, 120Hz, 150Hz, 180Hz 60 Hz, 90 Hz, 120Hz, 150Hz, 180Hz 5.1CH V: [XXX] DVD/LD, TV/SAT, VIDEO 1, VIDEO 2, VIDEO 32) AUTO FUNCTION [XXX] 2 WAY REMOTE [XXX]2) OSD [XXX]2) ON, OFF ON, OFF COLOR, MONOCHROME DIMM.
...) (0.1 meter) steps) DIST. Tables of Settings Using SUR, LEVEL, EQ, and SET UP buttons Press Press or to select Turn jog dial to SMALL only. 2) STR-DE945 only. 3) Models of area code U, CA only. NARROW, WIDE See page 19 50 51 Additional Information 60 UNIT [XXX] FRONT SP > XXX Hz1) CENTER... Hz, 120Hz, 150Hz, 180Hz 60 Hz, 90 Hz, 120Hz, 150Hz, 180Hz 5.1CH V: [XXX] DVD/LD, TV/SAT, VIDEO 1, VIDEO 2, VIDEO 32) AUTO FUNCTION [XXX] 2 WAY REMOTE [XXX]2) OSD [XXX]2) ON, OFF ON, OFF COLOR, MONOCHROME DIMM.


