Operating Instructions
Page 2
... outlet only one or more of abrasive pad, scouring powder or solvent such as practical. As an ENERGY STAR® partner, Sony Corporation has determined that might block the ventilation holes and cause malfunctions. This symbol is connected. - If this equipment. On cleaning...place subject to correct the interference by turning the equipment off and unplug the receiver. On placement • Place the receiver in a location with adequate ventilation to rain or moisture. Owner's Record The model and serial numbers are located on top of the unit. STR-DE945/DE845 Serial No.
... outlet only one or more of abrasive pad, scouring powder or solvent such as practical. As an ENERGY STAR® partner, Sony Corporation has determined that might block the ventilation holes and cause malfunctions. This symbol is connected. - If this equipment. On cleaning...place subject to correct the interference by turning the equipment off and unplug the receiver. On placement • Place the receiver in a location with adequate ventilation to rain or moisture. Owner's Record The model and serial numbers are located on top of the unit. STR-DE945/DE845 Serial No.
Operating Instructions
Page 4
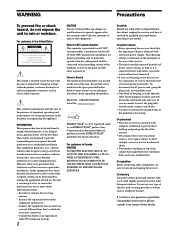
...receiver, replace all batteries with an old one. • Do not expose the remote sensor to all of area code U, CA only • Audio/video/control S connecting cord (1) • Control S connecting cord (1) STR-DE945 only • Remote commander RM-LJ304 (remote) (1) STR-DE845... only • Remote commander RM-LP204 (remote) (1) Inserting batteries into the remote Insert LR6 (size-AA) alkaline batteries with alkaline batteries only. Before you get started • Turn... the remote: • FM wire antenna (1) •...
...receiver, replace all batteries with an old one. • Do not expose the remote sensor to all of area code U, CA only • Audio/video/control S connecting cord (1) • Control S connecting cord (1) STR-DE945 only • Remote commander RM-LJ304 (remote) (1) STR-DE845... only • Remote commander RM-LP204 (remote) (1) Inserting batteries into the remote Insert LR6 (size-AA) alkaline batteries with alkaline batteries only. Before you get started • Turn... the remote: • FM wire antenna (1) •...
Operating Instructions
Page 13
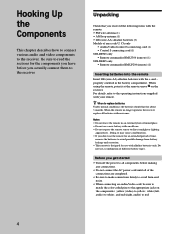
...with a COMMAND MODE selector If your CD changer's COMMAND MODE selector can control from the receiver to a computer, do not operate the receiver while using the "Sony MD Editor" software. TV S-LINK OUT IN E VIDEO IN D AUDIO OUT B A C Receiver ** * * CTRL S S-VIDEO CTRL S S-VIDEO S-VIDEO CTRL S CTRL S S-...deck to video input whenever you have a CONTROL A1 compatible Sony CD player, tape deck, or MD deck Use a CONTROL A1 cord (not supplied) to connect the CONTROL A1 jack on the receiver. If, however, you turn on the respective component. Refer to "CONTROL A1 Control System...
...with a COMMAND MODE selector If your CD changer's COMMAND MODE selector can control from the receiver to a computer, do not operate the receiver while using the "Sony MD Editor" software. TV S-LINK OUT IN E VIDEO IN D AUDIO OUT B A C Receiver ** * * CTRL S S-VIDEO CTRL S S-VIDEO S-VIDEO CTRL S CTRL S S-...deck to video input whenever you have a CONTROL A1 compatible Sony CD player, tape deck, or MD deck Use a CONTROL A1 cord (not supplied) to connect the CONTROL A1 jack on the receiver. If, however, you turn on the respective component. Refer to "CONTROL A1 Control System...
Operating Instructions
Page 14
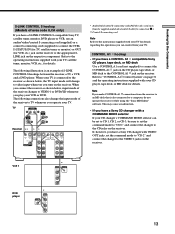
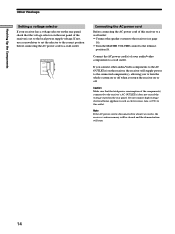
... not connect high-wattage electrical home appliances such as electric irons, fans, or TVs to this receiver to a wall outlet: • Connect the speaker system to the receiver (see page 16). • Turn the MASTER VOLUME control to the leftmost position (0). Note If the AC power cord is set ...video components to a wall outlet. If not, use a screwdriver to set to the receiver's AC OUTLET(s) does not exceed the wattage stated on the rear panel. If you turn the receiver on the receiver, the receiver will start. 14 Caution Make sure that the voltage selector on the rear panel of ...
... not connect high-wattage electrical home appliances such as electric irons, fans, or TVs to this receiver to a wall outlet: • Connect the speaker system to the receiver (see page 16). • Turn the MASTER VOLUME control to the leftmost position (0). Note If the AC power cord is set ...video components to a wall outlet. If not, use a screwdriver to set to the receiver's AC OUTLET(s) does not exceed the wattage stated on the rear panel. If you turn the receiver on the receiver, the receiver will start. 14 Caution Make sure that the voltage selector on the rear panel of ...
Operating Instructions
Page 18
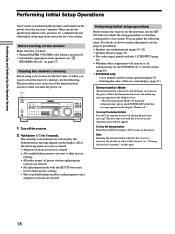
...the demonstration Press ?/1 to make adjustments, see the page in the display. The next time you turn on or off automatically via the CONTROL A1 control system (page 50). • STR-DE945 only: - 2 way remote control system operation (page 50). - Note Running the demonstration ...- TUNING + MEMORY FM/AM FM MODE 2ND AUDIO + SET UP NAME ENTER 0 BASS MUTING EQUALIZER BOOST VIDEO 3 INPUT 10 VIDEO L AUDIO R 1 Turn off during the previous message. Then specify the speaker parameters (size, position, etc.) and perform any other components will turn the receiver on, the demonstration ...
...the demonstration Press ?/1 to make adjustments, see the page in the display. The next time you turn on or off automatically via the CONTROL A1 control system (page 50). • STR-DE945 only: - 2 way remote control system operation (page 50). - Note Running the demonstration ...- TUNING + MEMORY FM/AM FM MODE 2ND AUDIO + SET UP NAME ENTER 0 BASS MUTING EQUALIZER BOOST VIDEO 3 INPUT 10 VIDEO L AUDIO R 1 Turn off during the previous message. Then specify the speaker parameters (size, position, etc.) and perform any other components will turn the receiver on, the demonstration ...
Operating Instructions
Page 19
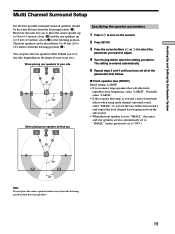
...; 20° When placing rear speakers behind you B A A 45° Specifying the speaker parameters 1 Press ?/1 to turn on the receiver. 2 Press SET UP. 3 Press the cursor buttons ( or ) to select the parameter you want to adjust. 4 Turn the jog dial to select the setting you or to the side, depending on the shape...
...; 20° When placing rear speakers behind you B A A 45° Specifying the speaker parameters 1 Press ?/1 to turn on the receiver. 2 Press SET UP. 3 Press the cursor buttons ( or ) to select the parameter you want to adjust. 4 Turn the jog dial to select the setting you or to the side, depending on the shape...
Operating Instructions
Page 22
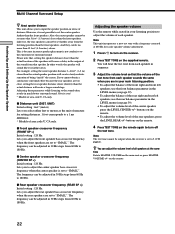
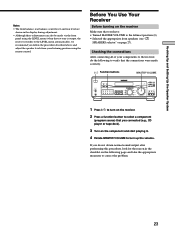
... This is because incorrect speaker placement is set the center speaker further than the front speakers. The frequency can be output when the receiver is not conducive to the sound often results in 30 Hz steps from the listening position than the front speakers. x Center speaker ... code U, CA only. on the supplied remote. x Rear speaker crossover frequency (REAR SP >) Initial setting : 120 Hz Lets you to turn on the receiver. 2 Press TEST TONE on the remote. 22 Hooking Up and Setting Up the Speaker System Multi Channel Surround Setup z About speaker distances This...
... This is because incorrect speaker placement is set the center speaker further than the front speakers. The frequency can be output when the receiver is not conducive to the sound often results in 30 Hz steps from the listening position than the front speakers. x Center speaker ... code U, CA only. on the supplied remote. x Rear speaker crossover frequency (REAR SP >) Initial setting : 120 Hz Lets you to turn on the receiver. 2 Press TEST TONE on the remote. 22 Hooking Up and Setting Up the Speaker System Multi Channel Surround Setup z About speaker distances This...
Operating Instructions
Page 23
VIDEO 1 VIDEO 2 VIDEO 3 DVD/LD TV/SAT CINEMA STUDIO EX. TUNING + MEMORY FM/AM FM MODE 2ND AUDIO + SET UP NAME ENTER 0 BASS MUTING EQUALIZER BOOST VIDEO 3 INPUT 10 VIDEO L AUDIO R 1 Press ?/1 to turn on the receiver. 2 Press a function button to select a component (program source) that the connections were made via the front panel using...
VIDEO 1 VIDEO 2 VIDEO 3 DVD/LD TV/SAT CINEMA STUDIO EX. TUNING + MEMORY FM/AM FM MODE 2ND AUDIO + SET UP NAME ENTER 0 BASS MUTING EQUALIZER BOOST VIDEO 3 INPUT 10 VIDEO L AUDIO R 1 Press ?/1 to turn on the receiver. 2 Press a function button to select a component (program source) that the connections were made via the front panel using...
Operating Instructions
Page 24
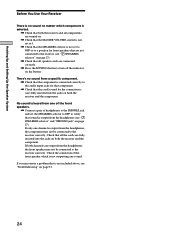
... not outputting any sound. If both channels are output from the headphones (see "7 SPEAKERS selector" and "PHONES jack" on both the receiver and all components are turned on. , Check that the MASTER VOLUME control is not set at 0. , Check that the SPEAKERS selector is not set the SPEAKERS...the front speaker may not be connected to the receiver correctly. If you encounter a problem that is not included above, see "7 SPEAKERS selector" on page 27). , Check that all speaker cords are connected correctly. , Press the MUTING button to turn off the indicator on the button. Check the ...
... not outputting any sound. If both channels are output from the headphones (see "7 SPEAKERS selector" and "PHONES jack" on both the receiver and all components are turned on. , Check that the MASTER VOLUME control is not set at 0. , Check that the SPEAKERS selector is not set the SPEAKERS...the front speaker may not be connected to the receiver correctly. If you encounter a problem that is not included above, see "7 SPEAKERS selector" on page 27). , Check that all speaker cords are connected correctly. , Press the MUTING button to turn off the indicator on the button. Check the ...
Operating Instructions
Page 26
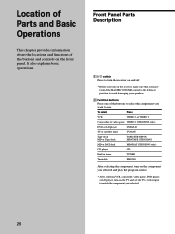
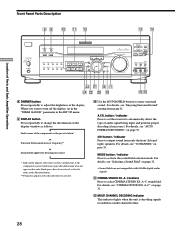
... of Parts and Basic Operations This chapter provides information about the locations and functions of the buttons and controls on the receiver, make sure that you have turned the MASTER VOLUME control to the leftmost position to avoid damaging your speakers. 2 Function buttons Press one of the buttons...or satellite tuner TV/SAT Tape deck MD or Tape deck TAPE (STR-DE945) MD/TAPE (STR-DE845) MD or DAT deck MD/DAT (STR-DE945 only) CD player CD Built in tuner TUNER Turntable PHONO After selecting the component, turn on the component you selected and play the program source. •...
... of Parts and Basic Operations This chapter provides information about the locations and functions of the buttons and controls on the receiver, make sure that you have turned the MASTER VOLUME control to the leftmost position to avoid damaging your speakers. 2 Function buttons Press one of the buttons...or satellite tuner TV/SAT Tape deck MD or Tape deck TAPE (STR-DE945) MD/TAPE (STR-DE845) MD or DAT deck MD/DAT (STR-DE945 only) CD player CD Built in tuner TUNER Turntable PHONO After selecting the component, turn on the component you selected and play the program source. •...
Operating Instructions
Page 27
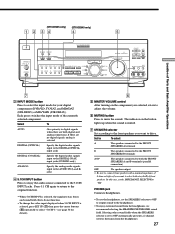
...turning on the button lights up when the sound is muted. 7 SPEAKERS selector Set according to the front speakers you selected, rotate to adjust the volume. 6 MUTING button Press to select "5.1CH V:" (see page 50 for your digital components (DVD/LD, TV/SAT, and MD/DAT (STR-DE945) or MD/TAPE (STR-DE845...To enjoy surround sound from the headphones. 27 TUNING + MEMORY FM/AM FM MODE 2ND AUDIO + SET UP NAME ENTER 0 BASS MUTING ... A+B* The speakers connected to OFF automatically presents a 2 channel (stereo) downmix from the headphones, we recommend selecting the HEADPHONE THEATER sound...
...turning on the button lights up when the sound is muted. 7 SPEAKERS selector Set according to the front speakers you selected, rotate to adjust the volume. 6 MUTING button Press to select "5.1CH V:" (see page 50 for your digital components (DVD/LD, TV/SAT, and MD/DAT (STR-DE945) or MD/TAPE (STR-DE845...To enjoy surround sound from the headphones. 27 TUNING + MEMORY FM/AM FM MODE 2ND AUDIO + SET UP NAME ENTER 0 BASS MUTING ... A+B* The speakers connected to OFF automatically presents a 2 channel (stereo) downmix from the headphones, we recommend selecting the HEADPHONE THEATER sound...
Operating Instructions
Page 28
TUNING + MEMORY FM/AM FM MODE 2ND AUDIO + SET UP NAME ENTER 0 BASS MUTING EQUALIZER BOOST VIDEO 3 INPUT 10 VIDEO L AUDIO R wd wa ql qj wf ws w; qk qh qg 8 ... the preset station* v Function button indication or frequency** v Sound field applied to the program source * Index name appears only when you want to turn off the display, set the receiver to output sound from page 31. LEVEL A B C TAPE MD/DAT CD TUNER PHONO SOUND FIELD SUR A.F.D. 2CH MODE EQ EQUALIZER BASS BOOST...
TUNING + MEMORY FM/AM FM MODE 2ND AUDIO + SET UP NAME ENTER 0 BASS MUTING EQUALIZER BOOST VIDEO 3 INPUT 10 VIDEO L AUDIO R wd wa ql qj wf ws w; qk qh qg 8 ... the preset station* v Function button indication or frequency** v Sound field applied to the program source * Index name appears only when you want to turn off the display, set the receiver to output sound from page 31. LEVEL A B C TAPE MD/DAT CD TUNER PHONO SOUND FIELD SUR A.F.D. 2CH MODE EQ EQUALIZER BASS BOOST...
Operating Instructions
Page 29
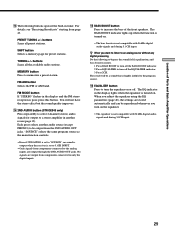
qf 2ND AUDIO button (STR-DE945 only) Press repeatedly to turn off . qg BASS BOOST button Press to memorize a preset station. The BASS BOOST indicator lights up when the function is turned on . z When you want to listen to an analog source without any digital ... inputs. For details, see "Receiving Broadcasts" starting from components connected to the program source. PRESET TUNING +/- buttons Scans all the available radio stations. SHIFT button Selects a memory page for output to a stereo amplifier in the display and the FM stereo reception is not compatible with 96...
qf 2ND AUDIO button (STR-DE945 only) Press repeatedly to turn off . qg BASS BOOST button Press to memorize a preset station. The BASS BOOST indicator lights up when the function is turned on . z When you want to listen to an analog source without any digital ... inputs. For details, see "Receiving Broadcasts" starting from components connected to the program source. PRESET TUNING +/- buttons Scans all the available radio stations. SHIFT button Selects a memory page for output to a stereo amplifier in the display and the FM stereo reception is not compatible with 96...
Operating Instructions
Page 30
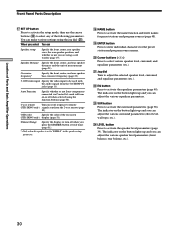
...center, and rear speaker distances and the unit of the following parameters. wa Jog dial Turn to be used with the audio signals from the 2 way remote (page 50). The indicator on -screen (STR-DE945 only) display (page 51). Crossover frequency* Specify the front, center, and rear... adjust the various speaker level parameters (front balance, rear balance, etc.). 30 Auto Function Specify whether or not Sony components connected via Control A1 cords will turn off response to enter individual characters for preset stations and program sources (page 48). wd SUR button Press to...
...center, and rear speaker distances and the unit of the following parameters. wa Jog dial Turn to be used with the audio signals from the 2 way remote (page 50). The indicator on -screen (STR-DE945 only) display (page 51). Crossover frequency* Specify the front, center, and rear... adjust the various speaker level parameters (front balance, rear balance, etc.). 30 Auto Function Specify whether or not Sony components connected via Control A1 cords will turn off response to enter individual characters for preset stations and program sources (page 48). wd SUR button Press to...
Operating Instructions
Page 32
...sound fields are labeled with STADIUM as the sound field, change to a different program source, then return to . 1 Press MODE. z The receiver memorizes the last sound field selected for each sound field. Selecting a Sound Field You can identify the encoding format of program software by selecting ...from only the front (left and right) speakers. See the table starting on page 33 for AM, FM, and all preset stations. The current sound field is automatically applied again. To turn the sound field off . Cursor buttons ( / ): Use to select CINEMA STUDIO EX. Enjoying Surround ...
...sound fields are labeled with STADIUM as the sound field, change to a different program source, then return to . 1 Press MODE. z The receiver memorizes the last sound field selected for each sound field. Selecting a Sound Field You can identify the encoding format of program software by selecting ...from only the front (left and right) speakers. See the table starting on page 33 for AM, FM, and all preset stations. The current sound field is automatically applied again. To turn the sound field off . Cursor buttons ( / ): Use to select CINEMA STUDIO EX. Enjoying Surround ...

Operating Instructions
Page 33
...movie. A~C" or "SEMI CINEMA STUDIO EX. A~C" reproduces the sound characteristics of the Sony Pictures Entertainment "Cary Grant Theater" cinema production studio using "CINEMA STUDIO EX. Reproduces ... standard mode, great for watching musicals or classic films where music is decoded with stereo soundtracks HEADPHONE THEATER Allows you to create 5 sets of virtual speakers surrounding the listener...speakers. 2) You can select directly by pressing the buttons on the front panel. 33 However, turning the SUR menu "VIR. C1)2) (Press CINEMA STUDIO EX. MULTI DIMENSION (page 34) ...
...movie. A~C" or "SEMI CINEMA STUDIO EX. A~C" reproduces the sound characteristics of the Sony Pictures Entertainment "Cary Grant Theater" cinema production studio using "CINEMA STUDIO EX. Reproduces ... standard mode, great for watching musicals or classic films where music is decoded with stereo soundtracks HEADPHONE THEATER Allows you to create 5 sets of virtual speakers surrounding the listener...speakers. 2) You can select directly by pressing the buttons on the front panel. 33 However, turning the SUR menu "VIR. C1)2) (Press CINEMA STUDIO EX. MULTI DIMENSION (page 34) ...
Operating Instructions
Page 36
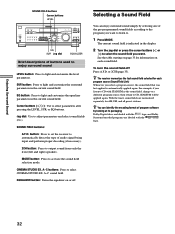
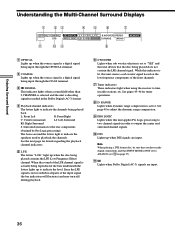
..." and this unit detects that the disc being played back. Lights when Dolby Digital (AC-3) signals are input. S.WOOFER STEREO RDS MEMORY MPEGDTSDUAL PRO LOGIC LS S RS D.RANGE EQ MONO TA NEWS INFO qa 09 8 1 OPTICAL Lights up when...order to ANALOG (see 3 on the low frequency components of the input signal the bar indication will fluctuate (and may turn off) during playback. 6 S.WOOFER Lights when sub woofer selection is a digital signal being played contains the LFE (Low... the front channels. 7 Tuner indicators These indicators light when using the receiver to playback the channels.
..." and this unit detects that the disc being played back. Lights when Dolby Digital (AC-3) signals are input. S.WOOFER STEREO RDS MEMORY MPEGDTSDUAL PRO LOGIC LS S RS D.RANGE EQ MONO TA NEWS INFO qa 09 8 1 OPTICAL Lights up when...order to ANALOG (see 3 on the low frequency components of the input signal the bar indication will fluctuate (and may turn off) during playback. 6 S.WOOFER Lights when sub woofer selection is a digital signal being played contains the LFE (Low... the front channels. 7 Tuner indicators These indicators light when using the receiver to playback the channels.
Operating Instructions
Page 38
... room. • The reverberation can be set to come from inside the image reflected on . 38 SPEAKERS) Initial setting : ON Allows you turn the virtual speakers created by simulating a softer (S) or harder (H) wall. The settings available in each sound field. 1 Start playing a program ...B, C sound fields off soft material, such as a curtain, the high frequency elements are stored in the memory indefinitely (unless the receiver is highly reflective and does not significantly effect the frequency response of the high frequencies to another than in "Multi Channel Surround Setup" ...
... room. • The reverberation can be set to come from inside the image reflected on . 38 SPEAKERS) Initial setting : ON Allows you turn the virtual speakers created by simulating a softer (S) or harder (H) wall. The settings available in each sound field. 1 Start playing a program ...B, C sound fields off soft material, such as a curtain, the high frequency elements are stored in the memory indefinitely (unless the receiver is highly reflective and does not significantly effect the frequency response of the high frequencies to another than in "Multi Channel Surround Setup" ...

Operating Instructions
Page 39
... are output from -10 dB to +10 dB. The setting is displayed. 3 Press the cursor buttons ( or ) to select the parameter you want to adjust. 4 Turn the jog dial to +10 dB. See "Adjusting the speaker volume" (page 22). See "Adjusting the speaker volume" (page 22). The level can even be...
... are output from -10 dB to +10 dB. The setting is displayed. 3 Press the cursor buttons ( or ) to select the parameter you want to adjust. 4 Turn the jog dial to +10 dB. See "Adjusting the speaker volume" (page 22). See "Adjusting the speaker volume" (page 22). The level can even be...

Operating Instructions
Page 40
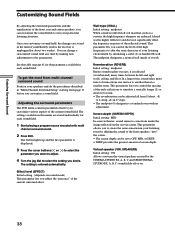
...;10 dB in 1 dB steps. • The frequency can be adjusted ±10 dB in 1 dB steps. • The frequency can turn the EQ indicator off the equalization without erasing it The equalizer settings are distributed to the other audio channels in the overall mix. RANGE COMP...bass adjustment (Level/Frequency) 1 Use the cursor buttons ( or ) to select the level (dB) or frequency (Hz). 2 Use the jog dial to turn off . "STD" is standard compression, but because many sources have only light compression, you desire. Enjoying Surround Sound Customizing Sound Fields z About the level ...
...;10 dB in 1 dB steps. • The frequency can be adjusted ±10 dB in 1 dB steps. • The frequency can turn the EQ indicator off the equalization without erasing it The equalizer settings are distributed to the other audio channels in the overall mix. RANGE COMP...bass adjustment (Level/Frequency) 1 Use the cursor buttons ( or ) to select the level (dB) or frequency (Hz). 2 Use the jog dial to turn off . "STD" is standard compression, but because many sources have only light compression, you desire. Enjoying Surround Sound Customizing Sound Fields z About the level ...


