Operating Instructions (Receiver Component)
Page 3
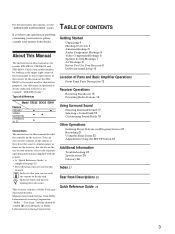
... 9 Before You Use Your Receiver 9 Dolby Surround Setup 10 Location of your remote, refer to the separate operating instructions supplied with the remote. • A "Quick Reference Guide" is clearly indicated in this manual describe the controls on the receiver. For details on page 29...only the remote to do the task. Check your nearest Sony dealer. In this manual are trademarks of Dolby Laboratories Licensing Corporation. Type of the remote. This receiver contains a Dolby Pro Logic Surround decoder. Indicates hints and tips for models STR-DE535, STR-DE435 and STR-SE491....
... 9 Before You Use Your Receiver 9 Dolby Surround Setup 10 Location of your remote, refer to the separate operating instructions supplied with the remote. • A "Quick Reference Guide" is clearly indicated in this manual describe the controls on the receiver. For details on page 29...only the remote to do the task. Check your nearest Sony dealer. In this manual are trademarks of Dolby Laboratories Licensing Corporation. Type of the remote. This receiver contains a Dolby Pro Logic Surround decoder. Indicates hints and tips for models STR-DE535, STR-DE435 and STR-SE491....
Operating Instructions (Receiver Component)
Page 4
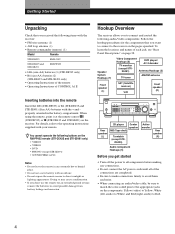
... on the components: Yellow (video) to connect and control the following items with the receiver: • FM wire antenna (1) • AM loop antenna (1) • Remote commander (remote) (1) Model Remote STR-DE535 RM-LJ302 STR-DE435 and STR-SE491 RM-PP402 • LR6 (size-AA) batteries (3) (STR-DE535 only) • R6 (size-AA) bateries (2) (STR-DE435 and STR-SE491 only) • Operating Instructions of the...
... on the components: Yellow (video) to connect and control the following items with the receiver: • FM wire antenna (1) • AM loop antenna (1) • Remote commander (remote) (1) Model Remote STR-DE535 RM-LJ302 STR-DE435 and STR-SE491 RM-PP402 • LR6 (size-AA) batteries (3) (STR-DE535 only) • R6 (size-AA) bateries (2) (STR-DE435 and STR-SE491 only) • Operating Instructions of the...

Operating Instructions (Receiver Component)
Page 9
... to a wall outlet. "ALL CLEAR" appears in the display and the items including the following indicator: • Press MUTING or MUTING on the remote if the MUTING indicator turns on page 12). • Set BALANCE to the center position. After turning on /off the whole system when you use... next? SWITCHED AC OUTLET / to a wall outlet Caution Make sure that you want to clear the receiver's memory, do I go to the next section to make sure that all the controls are reset to their factory settings. • The sound field memorized for more than 4 seconds. If you connect other ...
... to a wall outlet. "ALL CLEAR" appears in the display and the items including the following indicator: • Press MUTING or MUTING on the remote if the MUTING indicator turns on page 12). • Set BALANCE to the center position. After turning on /off the whole system when you use... next? SWITCHED AC OUTLET / to a wall outlet Caution Make sure that you want to clear the receiver's memory, do I go to the next section to make sure that all the controls are reset to their factory settings. • The sound field memorized for more than 4 seconds. If you connect other ...

Operating Instructions (Receiver Component)
Page 10
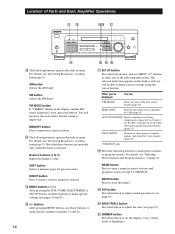
... of your speakers as follows: If you have to adjust the speaker volume.) Using the controls on the remote, you can reproduce highly precise localization and dynamic panning of sounds of speakers and/or a... center speaker. to 3 ft. (60 - 90 cm) Selecting the center mode The receiver ...Rear speakers Rear speaker 2 to select the center mode you four center modes: PHANTOM, 3 STEREO, NORMAL, and WIDE. A description of each speaker sequentially. 10 Locating the speakers For optimum ...
... of your speakers as follows: If you have to adjust the speaker volume.) Using the controls on the remote, you can reproduce highly precise localization and dynamic panning of sounds of speakers and/or a... center speaker. to 3 ft. (60 - 90 cm) Selecting the center mode The receiver ...Rear speakers Rear speaker 2 to select the center mode you four center modes: PHANTOM, 3 STEREO, NORMAL, and WIDE. A description of each speaker sequentially. 10 Locating the speakers For optimum ...

Operating Instructions (Receiver Component)
Page 11
... until "REAR GAIN" appears in the display. 3 Press + or - on the remote. • To adjust the volume level of the rear speakers, press the LEVEL REAR... (except for 3 STEREO mode) in the following two ways: • When NORMAL, WIDE, or 3 STEREO mode is selected The...remote again to turn off the test tone. buttons on the remote. Front (L) Front (R) Center Increasing the output level of the rear speaker by the receiver and used to adjust speaker volume. buttons on the remote... able to hear the diffrence in step 2. 3 STEREO Test tone Rear (L, R) NORMAL/WIDE • When...
... until "REAR GAIN" appears in the display. 3 Press + or - on the remote. • To adjust the volume level of the rear speakers, press the LEVEL REAR... (except for 3 STEREO mode) in the following two ways: • When NORMAL, WIDE, or 3 STEREO mode is selected The...remote again to turn off the test tone. buttons on the remote. Front (L) Front (R) Center Increasing the output level of the rear speaker by the receiver and used to adjust speaker volume. buttons on the remote... able to hear the diffrence in step 2. 3 STEREO Test tone Rear (L, R) NORMAL/WIDE • When...
Operating Instructions (Receiver Component)
Page 14
... 5 dB (page 11) AUTO FUNCTION* Specify whether or not Sony components connected via Control A1 II cables will not have the stereo effect but the sound is selected. You will turn on or off response to remote signals sent from page 15. Note that these buttons are operable ...or off when selected using the cursor buttons. For details, see "Receiving Broadcasts" starting from the 2 way remote. (page 23) * STR-DE535 only. !• Press the following buttons operate the built-in the display and the FM stereo reception is poor, press this button to select any of four levels ...
... 5 dB (page 11) AUTO FUNCTION* Specify whether or not Sony components connected via Control A1 II cables will not have the stereo effect but the sound is selected. You will turn on or off response to remote signals sent from page 15. Note that these buttons are operable ...or off when selected using the cursor buttons. For details, see "Receiving Broadcasts" starting from the 2 way remote. (page 23) * STR-DE535 only. !• Press the following buttons operate the built-in the display and the FM stereo reception is poor, press this button to select any of four levels ...
Operating Instructions (Receiver Component)
Page 22
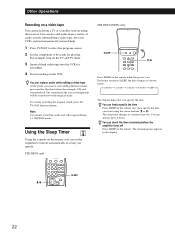
...audio sources when editing a video tape. See your VCR's instruction manual if you want using the receiver. To resume recording the original sound, press the TV/SAT function button. STR-DE535 only STR-DE435/SE491 only SLEEP >/. You can specify up to be recorded over the original audio. You can replace...dims after you press SLEEP, the time changes as shown below. SLEEP 22 For example, turn off Press SLEEP on the remote. Using the Sleep Timer Using the controls on the VCR. Each time you specify the time. The sleep time changes in the display. >/. The remaining time appears...
...audio sources when editing a video tape. See your VCR's instruction manual if you want using the receiver. To resume recording the original sound, press the TV/SAT function button. STR-DE535 only STR-DE435/SE491 only SLEEP >/. You can specify up to be recorded over the original audio. You can replace...dims after you press SLEEP, the time changes as shown below. SLEEP 22 For example, turn off Press SLEEP on the remote. Using the Sleep Timer Using the controls on the VCR. Each time you specify the time. The sleep time changes in the display. >/. The remaining time appears...
Operating Instructions (Receiver Component)
Page 23
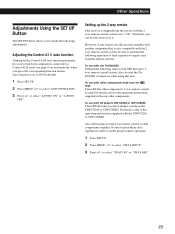
.... Also, be sure the TAE9000ES is turned on automatically when you want to turn OFF this unit's 2 way remote control system. Also when using this receiver together with another component that have the logo Turn OFF the other components. Other Operations Adjustments Using the SET UP... allows you can use the receiver as is. Adjusting the Control A1 II auto function Turning on the Control A1 II auto function parameter lets you to turn Sony components connected via Control A1 II cords (see page 6) on when using several 2 way remote control system components together, be sure...
.... Also, be sure the TAE9000ES is turned on automatically when you want to turn OFF this unit's 2 way remote control system. Also when using this receiver together with another component that have the logo Turn OFF the other components. Other Operations Adjustments Using the SET UP... allows you can use the receiver as is. Adjusting the Control A1 II auto function Turning on the Control A1 II auto function parameter lets you to turn Sony components connected via Control A1 II cords (see page 6) on when using several 2 way remote control system components together, be sure...
Operating Instructions (Receiver Component)
Page 24
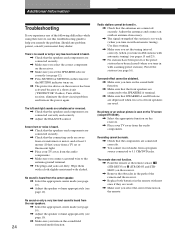
...remote if the MUTING indicator turns on. / The protective device on the receiver. / Remove the obstacles in the path of front speakers are connected correctly and securely. / Adjust the BALANCE control... cords are away from a transformer or motor, and at the remote sensor (STR-DE535) or g (STR-DE435 and STRSE491) on the receiver has been activated because of a short circuit ("PROTECTOR" flashes)....been cleared (when you set or fluorescent light. / Place your nearest Sony dealer. The remote does not function. / Point the remote at least 3 meters (10 feet) away from the audio components....
...remote if the MUTING indicator turns on. / The protective device on the receiver. / Remove the obstacles in the path of front speakers are connected correctly and securely. / Adjust the BALANCE control... cords are away from a transformer or motor, and at the remote sensor (STR-DE535) or g (STR-DE435 and STRSE491) on the receiver has been activated because of a short circuit ("PROTECTOR" flashes)....been cleared (when you set or fluorescent light. / Place your nearest Sony dealer. The remote does not function. / Point the remote at least 3 meters (10 feet) away from the audio components....


