Operating Instructions
Page 3
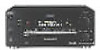
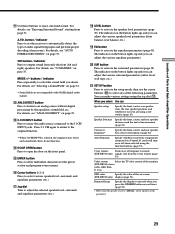
...Sound 31 Selecting a Sound Field 32 Understanding the Multi-Channel Surround Displays 36 Customizing Sound Fields 38 Receiving Broadcasts 43 Storing FM Stations Automatically (AUTOBETICAL)*** 44 Direct Tuning 45 Automatic Tuning 45 Preset Tuning 46 Using the Radio Data ... and SET UP buttons 62 Index (Back cover) 3 About This Manual The instructions in this manual describe the controls on the receiver. Check your remote, refer to the area code, are for models STR-DB940 and STR-DB840. B FRONT A REAR CENTER FRONT REAR SUB WOOFER CENTER L L R L R L SPEAKERS IMPEDANCE USE ...
...Sound 31 Selecting a Sound Field 32 Understanding the Multi-Channel Surround Displays 36 Customizing Sound Fields 38 Receiving Broadcasts 43 Storing FM Stations Automatically (AUTOBETICAL)*** 44 Direct Tuning 45 Automatic Tuning 45 Preset Tuning 46 Using the Radio Data ... and SET UP buttons 62 Index (Back cover) 3 About This Manual The instructions in this manual describe the controls on the receiver. Check your remote, refer to the area code, are for models STR-DB940 and STR-DB840. B FRONT A REAR CENTER FRONT REAR SUB WOOFER CENTER L L R L R L SPEAKERS IMPEDANCE USE ...

Operating Instructions
Page 4
...all batteries with the remote: • FM wire antenna (1) • AM loop antenna (1) Models of area code U, CA only • Audio/video/control S connecting cord (1) • Control S connecting cord (1) STR-DB940 only • Remote commander RM-LJ304 (remote) (1) • LR6 (size-AA) alkaline batteries (3) STR-DB840 only • ...the operating instructions supplied with an old one. • Do not expose the remote sensor to yellow; white (left, audio) to the receiver. Do not use a new battery with your remote. Be sure to read the sections for about 3 months. properly oriented in ...
...all batteries with the remote: • FM wire antenna (1) • AM loop antenna (1) Models of area code U, CA only • Audio/video/control S connecting cord (1) • Control S connecting cord (1) STR-DB940 only • Remote commander RM-LJ304 (remote) (1) • LR6 (size-AA) alkaline batteries (3) STR-DB840 only • ...the operating instructions supplied with an old one. • Do not expose the remote sensor to yellow; white (left, audio) to the receiver. Do not use a new battery with your remote. Be sure to read the sections for about 3 months. properly oriented in ...
Operating Instructions
Page 8
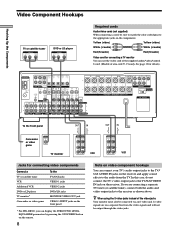
...on the front panel 1) For STR-DB940, you are on the receiver. If you can display the SURROUND, LEVEL, EQUALIZER parameters by pressing the ON SCREEN button on the remote. 8 Note on video component hookups You can use the video cord of the supplied audio/video/control S cord. (Models of the...shown above. ANTENNA AM L MD/DAT MD/DAT TV/SAT DVD/LD DVD/LD OPTICAL OPTICAL OPTICAL OPTICAL COAXIAL OUT IN IN IN IN CENTER B + U FM 75Ω COAXIAL R FRONT REAR SUB WOOFER 5.1CH INPUT CTRL S IN CTRL S STATUS IN DIGITAL CTRL S OUT CTRL S OUT SIGNAL GND U S-VIDEO...
...on the front panel 1) For STR-DB940, you are on the receiver. If you can display the SURROUND, LEVEL, EQUALIZER parameters by pressing the ON SCREEN button on the remote. 8 Note on video component hookups You can use the video cord of the supplied audio/video/control S cord. (Models of the...shown above. ANTENNA AM L MD/DAT MD/DAT TV/SAT DVD/LD DVD/LD OPTICAL OPTICAL OPTICAL OPTICAL COAXIAL OUT IN IN IN IN CENTER B + U FM 75Ω COAXIAL R FRONT REAR SUB WOOFER 5.1CH INPUT CTRL S IN CTRL S STATUS IN DIGITAL CTRL S OUT CTRL S OUT SIGNAL GND U S-VIDEO...
Operating Instructions
Page 18
... when you have hooked up the speakers and turned on the power, clear the receiver's memory. To view the demonstration Hold down ?/1 for the first time, or when you press DIMMER (page 54). • STR-DB940 only: - 2 way remote control system operation (page 53). - You can adjust the following items. For details on how...
... when you have hooked up the speakers and turned on the power, clear the receiver's memory. To view the demonstration Hold down ?/1 for the first time, or when you press DIMMER (page 54). • STR-DB940 only: - 2 way remote control system operation (page 53). - You can adjust the following items. For details on how...

Operating Instructions
Page 23
... source) that the connections were made via the front panel using the remote control. Checking the connections After connecting all of your listening position using the LEVEL menu (when the test tone is output, the receiver switches to the LEVEL menu automatically), we recommend you follow the procedure ...described above and adjust the speaker levels from your components to the receiver, do not obtain normal sound output after performing this procedure, look for the reason in the display during adjustment. • ...
... source) that the connections were made via the front panel using the remote control. Checking the connections After connecting all of your listening position using the LEVEL menu (when the test tone is output, the receiver switches to the LEVEL menu automatically), we recommend you follow the procedure ...described above and adjust the speaker levels from your components to the receiver, do not obtain normal sound output after performing this procedure, look for the reason in the display during adjustment. • ...
Operating Instructions
Page 29
...select You can make various settings using the function buttons (page 53). 2 way remote Turn on -screen (STR-DB940 only) display (page 54). Press 5.1 CH again to return to output sound from the 2 way remote (page 53). qf DOOR OPEN button Press to adjust the selected speaker level, .../ indicator Press to the original function. • When 5.1CH INPUT is set the receiver to select any of the following parameters. Auto Function Specify whether or not Sony components connected via Control A1 cords will turn off response to select the sound field you are not compatible with...
...select You can make various settings using the function buttons (page 53). 2 way remote Turn on -screen (STR-DB940 only) display (page 54). Press 5.1 CH again to return to output sound from the 2 way remote (page 53). qf DOOR OPEN button Press to adjust the selected speaker level, .../ indicator Press to the original function. • When 5.1CH INPUT is set the receiver to select any of the following parameters. Auto Function Specify whether or not Sony components connected via Control A1 cords will turn off response to select the sound field you are not compatible with...
Operating Instructions
Page 44
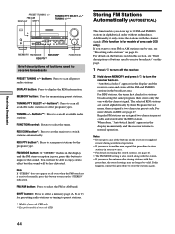
... on tuning the stored stations, see "Presetting radio stations" on the receiver or supplied remote during autobetical operation. • If you move to another area, repeat this page. 1 Press ?/1 to turn off the receiver. 2 Hold down MEMORY and press ?/1 to scan all available radio stations... to 30 FM and FM RDS stations in the display and the receiver scans and stores all available radio stations. FM/AM button: Press to display the RDS information. For RDS stations, the tuner first checks for memorizing preset stations. FUNCTION control: Rotate to enjoy stereo effect but...
... on tuning the stored stations, see "Presetting radio stations" on the receiver or supplied remote during autobetical operation. • If you move to another area, repeat this page. 1 Press ?/1 to turn off the receiver. 2 Hold down MEMORY and press ?/1 to scan all available radio stations... to 30 FM and FM RDS stations in the display and the receiver scans and stores all available radio stations. FM/AM button: Press to display the RDS information. For RDS stations, the tuner first checks for memorizing preset stations. FUNCTION control: Rotate to enjoy stereo effect but...
Operating Instructions
Page 53
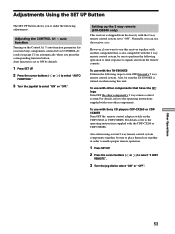
...have the logo Turn OFF the other components. To use with Sony CD players CDP-CX260 or CDPCX88ES Turn OFF the remote control adapter switch on automatically when you can use the receiver as is also compatible with the 2 way remote control system set to ON by default. 1 Press SET UP. ...to select "AUTO FUNCTION." 3 Turn the jog dial to "ON". Setting up the 2 way remote (STR-DB940 only) This receiver is set to select "ON" or "OFF." Auto function is shipped from the remote controls. Other Operations 53 To use with the TA-E9000ES Perform the following steps to signals sent from...
...have the logo Turn OFF the other components. To use with Sony CD players CDP-CX260 or CDPCX88ES Turn OFF the remote control adapter switch on automatically when you can use the receiver as is also compatible with the 2 way remote control system set to ON by default. 1 Press SET UP. ...to select "AUTO FUNCTION." 3 Turn the jog dial to "ON". Setting up the 2 way remote (STR-DB940 only) This receiver is set to select "ON" or "OFF." Auto function is shipped from the remote controls. Other Operations 53 To use with the TA-E9000ES Perform the following steps to signals sent from...
Operating Instructions
Page 54
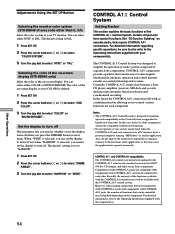
... however, older components will be limited depending on -screen display (STR-DB940 only) Select the color of the CONTROL A1 Control System. However, when making connections between a Sony CD player, amplifier (receiver), MD deck and cassette deck provide automatic function selection and synchronized recording..., the majority of separate Sony components. You can select either COLOR or MONOCHROME. The color of your component(s). In this may be available with the new functions. • Do not operate a 2 way remote control unit when the CONTROL A1 jacks are compatible with...
... however, older components will be limited depending on -screen display (STR-DB940 only) Select the color of the CONTROL A1 Control System. However, when making connections between a Sony CD player, amplifier (receiver), MD deck and cassette deck provide automatic function selection and synchronized recording..., the majority of separate Sony components. You can select either COLOR or MONOCHROME. The color of your component(s). In this may be available with the new functions. • Do not operate a 2 way remote control unit when the CONTROL A1 jacks are compatible with...


