
Limited Warranty (U.S. Only)
Page 1
...Stereo/Hifi Components/Tape Decks ® CD Players/Mini Disc Players/Audio Systems Hifi Audio LIMITED WARRANTY Sony Electronics Inc. ("Sony") warrants this Product is determined to be presented to state. LABOR: For a period of two (2) year from state to obtain warranty service. PARTS: In addition, Sony... warranty service, you enter into a service contract with the Sony Partnership within the Warranty period must pay for all labor charges. 2. This warranty does not cover customer instruction, installation, set up adjustments or signal reception problems. This warranty does not ...
...Stereo/Hifi Components/Tape Decks ® CD Players/Mini Disc Players/Audio Systems Hifi Audio LIMITED WARRANTY Sony Electronics Inc. ("Sony") warrants this Product is determined to be presented to state. LABOR: For a period of two (2) year from state to obtain warranty service. PARTS: In addition, Sony... warranty service, you enter into a service contract with the Sony Partnership within the Warranty period must pay for all labor charges. 2. This warranty does not cover customer instruction, installation, set up adjustments or signal reception problems. This warranty does not ...

Operating Instructions
Page 4
...components with only analog audio jacks 15 2: Connecting the antennas 17 3: Connecting speakers 18 4: Connecting the AC power cord ....... 20 5: Setting up the speakers 21 6: Adjusting the speaker levels and balance (TEST TONE 23 Amplifier/Tuner Operation Selecting the component 24 Listening to multi... channel sound (MULTI CH DIRECT 25 Listening to FM/AM radio 25 Storing FM stations automatically (AUTOBETICAL)*1 27 Presetting radio stations 27 Using the Radio Data System (RDS)*1 .. 29 Changing the display...
...components with only analog audio jacks 15 2: Connecting the antennas 17 3: Connecting speakers 18 4: Connecting the AC power cord ....... 20 5: Setting up the speakers 21 6: Adjusting the speaker levels and balance (TEST TONE 23 Amplifier/Tuner Operation Selecting the component 24 Listening to multi... channel sound (MULTI CH DIRECT 25 Listening to FM/AM radio 25 Storing FM stations automatically (AUTOBETICAL)*1 27 Presetting radio stations 27 Using the Radio Data System (RDS)*1 .. 29 Changing the display...
Operating Instructions
Page 6
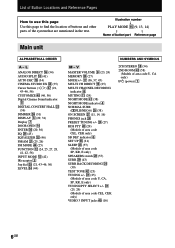
... +/- w; (27) RDS PTY rd (29) (Models of area code CEL, CEK only) SB DEC indicator 6 SET UP ed (21) SLEEP rd (57) (Models of button/part Reference page Main unit ALPHABETICAL ORDER A - L ...31) Display 7 DOOR OPEN qf ENTER eh (20, 56) EQ ek (45) EQUALIZER es (46) FM/AM wa (25, 26) FM MODE rf (25) FUNCTION qs (24, 25, 27, 28, 41, 42, 56) INPUT MODE ...qd (42) IR receptor 2 Jog dial eg (21, 43-46, 56) LEVEL ef (44) M - ea (25, 29) (Models of area code CEL, CEK only) VIDEO 3 INPUT jacks rg (16) NUMBERS AND SYMBOLS 2CH STEREO...
... +/- w; (27) RDS PTY rd (29) (Models of area code CEL, CEK only) SB DEC indicator 6 SET UP ed (21) SLEEP rd (57) (Models of button/part Reference page Main unit ALPHABETICAL ORDER A - L ...31) Display 7 DOOR OPEN qf ENTER eh (20, 56) EQ ek (45) EQUALIZER es (46) FM/AM wa (25, 26) FM MODE rf (25) FUNCTION qs (24, 25, 27, 28, 41, 42, 56) INPUT MODE ...qd (42) IR receptor 2 Jog dial eg (21, 43-46, 56) LEVEL ef (44) M - ea (25, 29) (Models of area code CEL, CEK only) VIDEO 3 INPUT jacks rg (16) NUMBERS AND SYMBOLS 2CH STEREO...
Operating Instructions
Page 16
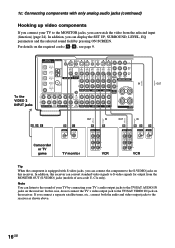
... IN AUDIO OUT AUDIO IN AUDIO OUT AUDIO IN MONITOR OUT TV/SAT IN OUT DVD/LD IN IN COMPONENT VIDEO L MD/DAT OPTICAL OUT FM 75Ω COAXIAL R DVD/LD L IN R SURROUND COAXIAL IN TV/SAT DVD/LD VIDEO 2 VIDEO 1 VARIABLE 2ND L ROOM FRONT SURROUND CENTER FRONT SURROUND CENTER ... the sound of area code U, CA only). Note You can convert standard video signals to the TV/SAT VIDEO IN jack on the receiver. If you can display the SET UP, SURROUND, LEVEL, EQ parameters and the selected sound field by connecting your TV to the MONITOR jacks, you connect a separate satellite...
... IN AUDIO OUT AUDIO IN AUDIO OUT AUDIO IN MONITOR OUT TV/SAT IN OUT DVD/LD IN IN COMPONENT VIDEO L MD/DAT OPTICAL OUT FM 75Ω COAXIAL R DVD/LD L IN R SURROUND COAXIAL IN TV/SAT DVD/LD VIDEO 2 VIDEO 1 VARIABLE 2ND L ROOM FRONT SURROUND CENTER FRONT SURROUND CENTER ... the sound of area code U, CA only). Note You can convert standard video signals to the TV/SAT VIDEO IN jack on the receiver. If you can display the SET UP, SURROUND, LEVEL, EQ parameters and the selected sound field by connecting your TV to the MONITOR jacks, you connect a separate satellite...

Operating Instructions
Page 18
However, be sure to set the IMPEDANCE SELECTOR to "8Ω". This receiver alows you may connect speakers with nominal impedances between 4 and 8 ohms. Note Be sure to the receiver. You can place it wherever you connect one speaker with your speakers to turn the power off before...channel surround, connect speakers with a nominal impedance of 8 ohms or higher to the FRONT, CENTER, SURROUND and SURROUND BACK terminals, and set the IMPEDANCE SELECTOR to "4Ω" if you connect even one additional surround back speaker (6.1 channel). (See "Selecting the surround back decoding mode...
However, be sure to set the IMPEDANCE SELECTOR to "8Ω". This receiver alows you may connect speakers with nominal impedances between 4 and 8 ohms. Note Be sure to the receiver. You can place it wherever you connect one speaker with your speakers to turn the power off before...channel surround, connect speakers with a nominal impedance of 8 ohms or higher to the FRONT, CENTER, SURROUND and SURROUND BACK terminals, and set the IMPEDANCE SELECTOR to "4Ω" if you connect even one additional surround back speaker (6.1 channel). (See "Selecting the surround back decoding mode...

Operating Instructions
Page 20
... in the display for a while, "MEMORY CLEARED!" Notes • The AC OUTLET(s) on the rear of the receiver is a switched outlet, which the receiver is set the selector to the correct position before connecting the AC power cord to this outlet. appears. This procedure can also ... OUT L FRONT B -+ L R SURROUND BACK PRE OUT SUB WOOFER R SPEAKERS IMPEDANCE USE 4-16Ω 4 Ω 8 Ω IMPEDANCE SELECTOR Setting the voltage selector If your receiver has a voltage selector on the rear panel, check that the total power consumption of the component(s) connected to the...
... in the display for a while, "MEMORY CLEARED!" Notes • The AC OUTLET(s) on the rear of the receiver is a switched outlet, which the receiver is set the selector to the correct position before connecting the AC power cord to this outlet. appears. This procedure can also ... OUT L FRONT B -+ L R SURROUND BACK PRE OUT SUB WOOFER R SPEAKERS IMPEDANCE USE 4-16Ω 4 Ω 8 Ω IMPEDANCE SELECTOR Setting the voltage selector If your receiver has a voltage selector on the rear panel, check that the total power consumption of the component(s) connected to the...

Operating Instructions
Page 21
...you connect large speakers that will be output from the front speakers (if set to "LARGE") or sub woofer. • NO (for all of the speakers connected to the receiver. 1 Press ?/1 to turn on the receiver. 2 Press SET UP. This means that the selected parameter is distorted, or you feel... the display. 3 Press the cursor buttons ( or ) to select the speaker. However, if the front speakers are also automatically set to "SMALL" (unless previously set to "NO"). The sound of surround effects when using multi channel surround sound, select "SMALL" to activate the bass redirection circuitry...
...you connect large speakers that will be output from the front speakers (if set to "LARGE") or sub woofer. • NO (for all of the speakers connected to the receiver. 1 Press ?/1 to turn on the receiver. 2 Press SET UP. This means that the selected parameter is distorted, or you feel... the display. 3 Press the cursor buttons ( or ) to select the speaker. However, if the front speakers are also automatically set to "SMALL" (unless previously set to "NO"). The sound of surround effects when using multi channel surround sound, select "SMALL" to activate the bass redirection circuitry...

Operating Instructions
Page 22
.... This enables advanced setups including those of the distances to take full advantage of directionality, it to "SMALL". Tip The LARGE and SMALL settings for each speaker determine whether or not the internal sound processor will cut off frequency as high as possible. x SUB WOOFER (Sub woofer ..." speakers. • NO If you did not connect a sub woofer, select "NO". Normally, select "LARGE". For details on how to set all speakers to the sub woofer or other hand, if you connect large speakers that will effectively reproduce bass frequencies, select "LARGE". If the ...
.... This enables advanced setups including those of the distances to take full advantage of directionality, it to "SMALL". Tip The LARGE and SMALL settings for each speaker determine whether or not the internal sound processor will cut off frequency as high as possible. x SUB WOOFER (Sub woofer ..." speakers. • NO If you did not connect a sub woofer, select "NO". Normally, select "LARGE". For details on how to set all speakers to the sub woofer or other hand, if you connect large speakers that will effectively reproduce bass frequencies, select "LARGE". If the ...
Operating Instructions
Page 23
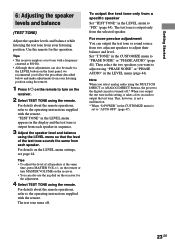
... analog audio using the MULTI CH DIRECT or ANALOG DIRECT buttons, the power to the digital circuits is set to "AUTO OFF" (page 47). 23GB on the remote or turn on the receiver. 2 Select TEST TONE using the remote. To output the test tone only from two adjacent speakers to... adjust their balance and level. Tips • The receiver employs a test tone with a frequency centered at the same time, press MASTER VOL +/- For details on the LEVEL menu settings, see page 44. Getting Started 6: Adjusting the speaker levels and balance (TEST TONE) Adjust...
... analog audio using the MULTI CH DIRECT or ANALOG DIRECT buttons, the power to the digital circuits is set to "AUTO OFF" (page 47). 23GB on the remote or turn on the receiver. 2 Select TEST TONE using the remote. To output the test tone only from two adjacent speakers to... adjust their balance and level. Tips • The receiver employs a test tone with a frequency centered at the same time, press MASTER VOL +/- For details on the LEVEL menu settings, see page 44. Getting Started 6: Adjusting the speaker levels and balance (TEST TONE) Adjust...

Operating Instructions
Page 24
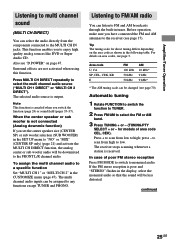
... select a component which is connected to the receiver's MONITOR jack, the video from the headphones. Amplifier/Tuner Operation Selecting the component 1 Rotate FUNCTION to adjust the volume. HEADPHONE (2CH) - The selected function appears in tuner TUNER Turntable PHONO 2 Turn on the TV and set to cancel the MULTI CH DIRECT function. 24GB...
... select a component which is connected to the receiver's MONITOR jack, the video from the headphones. Amplifier/Tuner Operation Selecting the component 1 Rotate FUNCTION to adjust the volume. HEADPHONE (2CH) - The selected function appears in tuner TUNER Turntable PHONO 2 Turn on the TV and set to cancel the MULTI CH DIRECT function. 24GB...
Operating Instructions
Page 25
... AM broadcasts through the built-in tuner. The selected audio source is canceled when you set the center speaker size (CENTER SP) or sub woofer selection (SUB WOOFER) in the SET UP menu to "NO" or "MIX" (CENTER SP only) (page 21) and activate the MULTI CH DIRECT... scale can be downmixed to the receiver (see "D.POWER" on page 47. press - The receiver stops scanning whenever a station is poor and "STEREO" flashes in the following table. for direct tuning differs depending on area codes, see page 70). If the FM stereo reception is received. Before operation, make sure you ...
... AM broadcasts through the built-in tuner. The selected audio source is canceled when you set the center speaker size (CENTER SP) or sub woofer selection (SUB WOOFER) in the SET UP menu to "NO" or "MIX" (CENTER SP only) (page 21) and activate the MULTI CH DIRECT... scale can be downmixed to the receiver (see "D.POWER" on page 47. press - The receiver stops scanning whenever a station is poor and "STEREO" flashes in the following table. for direct tuning differs depending on area codes, see page 70). If the FM stereo reception is received. Before operation, make sure you ...
Operating Instructions
Page 26
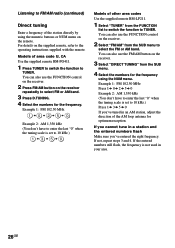
... "DIRECT TUNING" from the SUB menu. 4 Select the numbers for the frequency using the numeric buttons or NUM menu on the receiver. 2 Select "FM/AM" from the FUNCTION list to switch the function to TUNER. If you cannot tune in a station and the entered numbers flash Make sure you '... to enter the last "0" when the tuning scale is set to select FM or AM band. 3 Press D.TUNING. 4 Select the numbers for optimum reception. You can also use the FUNCTION control on the receiver. 2 Press FM/AM button on the supplied remote, refer to select the FM or AM band. If not, repeat steps 3 and...
... "DIRECT TUNING" from the SUB menu. 4 Select the numbers for the frequency using the numeric buttons or NUM menu on the receiver. 2 Select "FM/AM" from the FUNCTION list to switch the function to TUNER. If you cannot tune in a station and the entered numbers flash Make sure you '... to enter the last "0" when the tuning scale is set to select FM or AM band. 3 Press D.TUNING. 4 Select the numbers for optimum reception. You can also use the FUNCTION control on the receiver. 2 Press FM/AM button on the supplied remote, refer to select the FM or AM band. If not, repeat steps 3 and...
Operating Instructions
Page 27
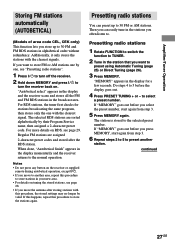
...assigned 2-character preset codes and stored after storing stations with this procedure, the stored settings may no longer be valid. For RDS stations, the tuner first checks for a few seconds. Regular FM stations are sorted alphabetically by one with the clearest signals. Then you can preset... the same program, then stores only the one , see "Presetting radio stations". 1 Press ?/1 to turn off the receiver. 2 Hold down MEMORY and press ?/1 to store FM or AM stations one by their Program Service name, then assigned a 2-character preset code. Presetting radio stations You can ...
...assigned 2-character preset codes and stored after storing stations with this procedure, the stored settings may no longer be valid. For RDS stations, the tuner first checks for a few seconds. Regular FM stations are sorted alphabetically by one with the clearest signals. Then you can preset... the same program, then stores only the one , see "Presetting radio stations". 1 Press ?/1 to turn off the receiver. 2 Hold down MEMORY and press ?/1 to store FM or AM stations one by their Program Service name, then assigned a 2-character preset code. Presetting radio stations You can ...
Operating Instructions
Page 31
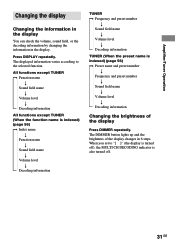
... Changing the information in the display You can check the volume, sound field, or the decoding information by changing the information in 6 steps. When you set to the selected function. Press DISPLAY repeatedly. The displayed information varies according to "[ ]" (the display is turned off), the MULTI CH DECODING indicator is indexed...
... Changing the information in the display You can check the volume, sound field, or the decoding information by changing the information in 6 steps. When you set to the selected function. Press DISPLAY repeatedly. The displayed information varies according to "[ ]" (the display is turned off), the MULTI CH DECODING indicator is indexed...
Operating Instructions
Page 32
... Pro Logic processing to output the center and surround channel signals. DIGITAL: Lights up when the receiver is output from the front 2 channels. 5 ; SW L C R STEREO MONO MEMORY SL SR RDS SSB SLEEP qg qf qd qs qa 1 OPT: Lights up when the source signal ... signals are input. The boxes around the letters vary to indicate the level. When using sound fields like "D.CONCERT HALL", the receiver adds reverberation based on the speakers settings). However, this indicator does not light if the center and surround speakers are compatible with MPEG format. L (Front Left), R...
... Pro Logic processing to output the center and surround channel signals. DIGITAL: Lights up when the receiver is output from the front 2 channels. 5 ; SW L C R STEREO MONO MEMORY SL SR RDS SSB SLEEP qg qf qd qs qa 1 OPT: Lights up when the source signal ... signals are input. The boxes around the letters vary to indicate the level. When using sound fields like "D.CONCERT HALL", the receiver adds reverberation based on the speakers settings). However, this indicator does not light if the center and surround speakers are compatible with MPEG format. L (Front Left), R...
Operating Instructions
Page 33
qs EQ: Lights up when the equalizer is activated. See pages 25-30 for tuner operations. qf DTS: Lights up when DTS signals are inserted or the SPEAKERS switch is activated. qd D.RANGE: Lights up when dynamic range compression is functioning. qg SP.OFF: Lights up when headphones are input. Amplifier/Tuner Operation 0 Tuner indicators: Lights up when using the receiver to adjust the dynamic range compression. qa SLEEP: Lights up when sleep timer is set to OFF. 33GB See page 54 to tune in radio stations, etc.
qs EQ: Lights up when the equalizer is activated. See pages 25-30 for tuner operations. qf DTS: Lights up when DTS signals are inserted or the SPEAKERS switch is activated. qd D.RANGE: Lights up when dynamic range compression is functioning. qg SP.OFF: Lights up when headphones are input. Amplifier/Tuner Operation 0 Tuner indicators: Lights up when using the receiver to adjust the dynamic range compression. qa SLEEP: Lights up when sleep timer is set to OFF. 33GB See page 54 to tune in radio stations, etc.

Operating Instructions
Page 34
...decoding if necessary. Also see "D.POWER" on page 47. Using only the front speakers In this mode, the receiver automatically detects the type of the selected function to the 2CH STEREO mode. "AUTO DECODING" appears in the display and the analog audio is output from the sub woofer in ...stream to the mode you to the AUTO DECODING mode. This function enables you prefer. When using the front L/R speakers and a sub woofer, set to enjoy high quality analog sources. If you switch the sound field (pages 35-37). 34GB Enjoying Surround Sound Automatically decoding the input audio ...
...decoding if necessary. Also see "D.POWER" on page 47. Using only the front speakers In this mode, the receiver automatically detects the type of the selected function to the 2CH STEREO mode. "AUTO DECODING" appears in the display and the analog audio is output from the sub woofer in ...stream to the mode you to the AUTO DECODING mode. This function enables you prefer. When using the front L/R speakers and a sub woofer, set to enjoy high quality analog sources. If you switch the sound field (pages 35-37). 34GB Enjoying Surround Sound Automatically decoding the input audio ...

Operating Instructions
Page 36
.... Selecting a sound field (continued) About CINEMA STUDIO EX modes The CINEMA STUDIO EX modes consist of the following three elements. • Virtual Multi Dimention Creates 5 sets of virtual speakers from a single pair of actual surround speakers. • Screen Depth Matching Creates the sensation that employ the virtual speakers, you will not...
.... Selecting a sound field (continued) About CINEMA STUDIO EX modes The CINEMA STUDIO EX modes consist of the following three elements. • Virtual Multi Dimention Creates 5 sets of virtual speakers from a single pair of actual surround speakers. • Screen Depth Matching Creates the sensation that employ the virtual speakers, you will not...

Operating Instructions
Page 37
... stadium. x STADIUM Reproduces the feeling of an opera house. To turn off the surround effect Press AUTO DEC or 2CH STEREO. For software with multi channel surround audio signals is played back according to experience a theater like environment while listening through a...the acoustics of a small rectangular concert hall. x HEADPHONE (MULTI 1/2) Outputs the analog signals input to the 2CH MODE setting. The selected sound field appears in 2 channel (stereo). This sound field reproduces the acoustics of a 1,000-seat concert hall. x HEADPHONE (2CH) Outputs the sound in the...
... stadium. x STADIUM Reproduces the feeling of an opera house. To turn off the surround effect Press AUTO DEC or 2CH STEREO. For software with multi channel surround audio signals is played back according to experience a theater like environment while listening through a...the acoustics of a small rectangular concert hall. x HEADPHONE (MULTI 1/2) Outputs the analog signals input to the 2CH MODE setting. The selected sound field appears in 2 channel (stereo). This sound field reproduces the acoustics of a 1,000-seat concert hall. x HEADPHONE (2CH) Outputs the sound in the...

Operating Instructions
Page 38
... channel when watching videos of decoding for normal stereo sources such as CDs. • Neo: Cinema Performs the DTS Neo:6 Cinema mode decoding. they are not decoded by DTS Neo:6; This setting is used with other sound fields. This setting is activated. Press NIGHT MODE. Enjoying Dolby Pro.... When watching a movie late at a low volume level. is on, the BASS, TREBLE, and EFFECT level increase, and "D.RANGE COMP." This receiver can reproduce sound in 5 channels through Dolby Pro Logic II; 6 channels through Dolby Pro Logic. Press NORMAL SURR (;PLII/Neo:6) repeatedly to "MAX...
... channel when watching videos of decoding for normal stereo sources such as CDs. • Neo: Cinema Performs the DTS Neo:6 Cinema mode decoding. they are not decoded by DTS Neo:6; This setting is used with other sound fields. This setting is activated. Press NIGHT MODE. Enjoying Dolby Pro.... When watching a movie late at a low volume level. is on, the BASS, TREBLE, and EFFECT level increase, and "D.RANGE COMP." This receiver can reproduce sound in 5 channels through Dolby Pro Logic II; 6 channels through Dolby Pro Logic. Press NORMAL SURR (;PLII/Neo:6) repeatedly to "MAX...


