Technical Background
Page 37
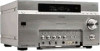
... IIx Yes Yes 7.1-channel Yes Yes Yes Yes Yes Yes 7.1 -/2/1 4/2 5/2 To Component 3/1 2 Subwoofer Yes 1/1 Yes/Yes 1 2/2 Audio out Yes Yes Yes - ES Receivers v1.0 Page 37 Features and specifications Feature Power output, all channels driven into 8 ohms, 20 to 20,000 Hz S-Master Pro Amplifier 32-bit S-Master.../upgrade 12-volt trigger outputs Multi-Zone/Room Capability 2nd Room output 3rd Room output On screen display Remote Features Preprogrammed LCD Learning & Macro 2-way Touch-screen Second-room remote STRDA7100ES 170 watts x7 Yes Yes Yes Yes Yes Yes Yes IIx Yes Yes 7.1-channel Yes Yes (Two...
... IIx Yes Yes 7.1-channel Yes Yes Yes Yes Yes Yes 7.1 -/2/1 4/2 5/2 To Component 3/1 2 Subwoofer Yes 1/1 Yes/Yes 1 2/2 Audio out Yes Yes Yes - ES Receivers v1.0 Page 37 Features and specifications Feature Power output, all channels driven into 8 ohms, 20 to 20,000 Hz S-Master Pro Amplifier 32-bit S-Master.../upgrade 12-volt trigger outputs Multi-Zone/Room Capability 2nd Room output 3rd Room output On screen display Remote Features Preprogrammed LCD Learning & Macro 2-way Touch-screen Second-room remote STRDA7100ES 170 watts x7 Yes Yes Yes Yes Yes Yes Yes IIx Yes Yes 7.1-channel Yes Yes (Two...
Technical Background
Page 38
... Diego, CA 92127 www.sonystyle.com © 2005 Sony Electronics Inc. Blu-ray Disc is a trademark of Sony. All rights reserved. Multi-brand remote may not communicate with the device having an i.LINK connector for information on compatibility, operating conditions and proper connection. 2. ES Receivers v1.0 Page 38 Dolby, Dolby Digital and Pro Logic...
... Diego, CA 92127 www.sonystyle.com © 2005 Sony Electronics Inc. Blu-ray Disc is a trademark of Sony. All rights reserved. Multi-brand remote may not communicate with the device having an i.LINK connector for information on compatibility, operating conditions and proper connection. 2. ES Receivers v1.0 Page 38 Dolby, Dolby Digital and Pro Logic...
Dimensions Diagrams
Page 1
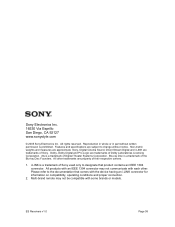
... ENCLOSURES . Consumer Integrated Systems • Park Ridge, New Jersey 07656 • FAX (201) 930 7891 • b2b.sel.sony.com Features and specifications subject to change without notice. • Non-metric weights and measurements are approximate. L + ~ AC IN... OUND SURR BACK SUB WOOFER RS-232C VIDEO 1 IN OUT VIDEO 1 IN IN OUT OUT PB B-Y PB B-Y FM B PR R-Y PR R-Y 75 COAXIAL + - - STR-DA9000ES RM-LJ312 REMOTE CONTROL 4 1/2" DESCRIPTION: DIGITAL DRIVE DIMENSIONS RECEIVER (WHD): 17 " x 9 3/8" x 18 7/8 " WEIGHT: Approx 50 lbs POWER REQUIREMENTS:120V AC POWER 60Hz...
... ENCLOSURES . Consumer Integrated Systems • Park Ridge, New Jersey 07656 • FAX (201) 930 7891 • b2b.sel.sony.com Features and specifications subject to change without notice. • Non-metric weights and measurements are approximate. L + ~ AC IN... OUND SURR BACK SUB WOOFER RS-232C VIDEO 1 IN OUT VIDEO 1 IN IN OUT OUT PB B-Y PB B-Y FM B PR R-Y PR R-Y 75 COAXIAL + - - STR-DA9000ES RM-LJ312 REMOTE CONTROL 4 1/2" DESCRIPTION: DIGITAL DRIVE DIMENSIONS RECEIVER (WHD): 17 " x 9 3/8" x 18 7/8 " WEIGHT: Approx 50 lbs POWER REQUIREMENTS:120V AC POWER 60Hz...
Operating Instructions
Page 3
...spilled or objects have the same or similar names as those on the receiver. In this manual, STR-DA9000ES (area code U) is shown on the upper right portion of the rear panel (see the separate operating instructions supplied with the remote. "Dolby", "Pro Logic" and the double-D symbol are trademarks of... in the text, for long periods of time. 14 Refer all instructions. 5 Do not use of the receiver you purchased is used , use the controls on the supplied remote if they exit from the apparatus. 11 Only use attachments/accessories specified by the manufacturer. 12 Use only with...
...spilled or objects have the same or similar names as those on the receiver. In this manual, STR-DA9000ES (area code U) is shown on the upper right portion of the rear panel (see the separate operating instructions supplied with the remote. "Dolby", "Pro Logic" and the double-D symbol are trademarks of... in the text, for long periods of time. 14 Refer all instructions. 5 Do not use of the receiver you purchased is used , use the controls on the supplied remote if they exit from the apparatus. 11 Only use attachments/accessories specified by the manufacturer. 12 Use only with...

Operating Instructions
Page 15
... OUT VIDEO OUT 1 S2 VIDEO OUT 1 OUT 2 OUT 2 DVD IN Y COMPONENT VIDEO Y VIDEO 1 IN ANTENNA PB/CB/B-Y PB/CB/B-Y PR/CR/R-Y PR/CR/R-Y FM 75 COAXIAL U AM TV/ YY MONI SAT TOR IN OUT PB/CB/B-Y PB/CB/B-Y TRIGGER PR/CR/R-Y PR/CR/R-Y 1 FRONT 2 SURROUND 3 SURR BACK 4 SUB WOOFER...R VCR C INPUT VIDEO D INPUT S VIDEO TV monitor 15GB Getting Started Hooking up video components If you connect your TV by pressing ON SCREEN on the remote. You can watch the video from the selected input (page 25). For details on your TV to the MONITOR jacks, you can also display the...
... OUT VIDEO OUT 1 S2 VIDEO OUT 1 OUT 2 OUT 2 DVD IN Y COMPONENT VIDEO Y VIDEO 1 IN ANTENNA PB/CB/B-Y PB/CB/B-Y PR/CR/R-Y PR/CR/R-Y FM 75 COAXIAL U AM TV/ YY MONI SAT TOR IN OUT PB/CB/B-Y PB/CB/B-Y TRIGGER PR/CR/R-Y PR/CR/R-Y 1 FRONT 2 SURROUND 3 SURR BACK 4 SUB WOOFER...R VCR C INPUT VIDEO D INPUT S VIDEO TV monitor 15GB Getting Started Hooking up video components If you connect your TV by pressing ON SCREEN on the remote. You can watch the video from the selected input (page 25). For details on your TV to the MONITOR jacks, you can also display the...
Operating Instructions
Page 24
... TONE" in the LEVEL menu (page 45). 24GB For more precise adjustment You can also use -/+ on the remote operation, refer to "ON" (page 40). For details on the receiver for the operation. Tips • To adjust the level of the test tone sounds the same from each speaker.... Tip The receiver employs a test tone with the remote. The test tone is output from each speaker in the CUSTOMIZE menu to the operating instructions supplied with a frequency centered at the ...
... TONE" in the LEVEL menu (page 45). 24GB For more precise adjustment You can also use -/+ on the remote operation, refer to "ON" (page 40). For details on the receiver for the operation. Tips • To adjust the level of the test tone sounds the same from each speaker.... Tip The receiver employs a test tone with the remote. The test tone is output from each speaker in the CUSTOMIZE menu to the operating instructions supplied with a frequency centered at the ...

Operating Instructions
Page 25
... selected input appears in tuner FM or AM and frequency Turntable PHONO i.LINK component* i.LINK * See "Note when "i.LINK" is turning on the component and start playback. 3 Rotate MASTER VOLUME to "AUTO" (page 41), the power of the i.LINK circuits turns on the receiver again. HEADPHONE (2CH) -...to adjust the volume. To cancel, press MUTING on the remote again or turn on after "i.LINK Connecting" turns off the receiver, the muting function works when you can select only the following cases. "Disc": The receiver could not get the information from the connected component. To ...
... selected input appears in tuner FM or AM and frequency Turntable PHONO i.LINK component* i.LINK * See "Note when "i.LINK" is turning on the component and start playback. 3 Rotate MASTER VOLUME to "AUTO" (page 41), the power of the i.LINK circuits turns on the receiver again. HEADPHONE (2CH) -...to adjust the volume. To cancel, press MUTING on the remote again or turn on after "i.LINK Connecting" turns off the receiver, the muting function works when you can select only the following cases. "Disc": The receiver could not get the information from the connected component. To ...

Operating Instructions
Page 26
... sure you switch the input or sound field (page 31-34). The FM reception switches to multi channel sound - Listening to monaural. 26GB Direct tuning Enter a frequency of poor FM stereo reception If the FM stereo reception is received. Press MULTI CH IN 1/2 repeatedly to low. Tip The tuning scale ...not activated when using the remote. MULTI CH IN You can also use the FM/AM button on the supplied remote, refer to the operating instructions supplied with the remote. 1 Rotate INPUT SELECTOR to select tuner ("FM" or "AM"). 2 Touch TUNER. 3 Touch FM/AM to FM and AM broadcasts through ...
... sure you switch the input or sound field (page 31-34). The FM reception switches to multi channel sound - Listening to monaural. 26GB Direct tuning Enter a frequency of poor FM stereo reception If the FM stereo reception is received. Press MULTI CH IN 1/2 repeatedly to low. Tip The tuning scale ...not activated when using the remote. MULTI CH IN You can also use the FM/AM button on the supplied remote, refer to the operating instructions supplied with the remote. 1 Rotate INPUT SELECTOR to select tuner ("FM" or "AM"). 2 Touch TUNER. 3 Touch FM/AM to FM and AM broadcasts through ...
Operating Instructions
Page 27
...the selected preset number. Then you can preset up to enter the frequency. Presetting radio stations 1 Rotate INPUT SELECTOR to select tuner ("FM" or "AM"). 2 Press FM/AM to select "FM" or "AM". 3 Tune in the stations you want to . The station is not used in a station and the entered ... MEMORY/ENTER again. If you press MEMORY/ENTER, start again from step 4. 7 Repeat steps 2 to 6 to switch the memory page, press SHIFT on the remote. "MEMORY" appears in an AM station, adjust the direction of the AM loop antenna for a few seconds. If "MEMORY" goes out before the display goes...
...the selected preset number. Then you can preset up to enter the frequency. Presetting radio stations 1 Rotate INPUT SELECTOR to select tuner ("FM" or "AM"). 2 Press FM/AM to select "FM" or "AM". 3 Tune in the stations you want to . The station is not used in a station and the entered ... MEMORY/ENTER again. If you press MEMORY/ENTER, start again from step 4. 7 Repeat steps 2 to 6 to switch the memory page, press SHIFT on the remote. "MEMORY" appears in an AM station, adjust the direction of the AM loop antenna for a few seconds. If "MEMORY" goes out before the display goes...
Operating Instructions
Page 28
...the same as the input name. All inputs except "FM" and "AM" Index name and sound field name* y Input name and sound field name FM and AM Preset station name and sound field name* ...you press DISPLAY, the display will change as follows: tA1yA2y...yA0yB1yB2y...yB0T tC0y...yC2yC1T Using the remote 1 Touch RM SELECT. 2 Touch AMP, then touch TUNER. The input stream information also ...brightness of digital input signals. You can select the preset station as follows. Changing the brightness of the receiver switches to TUNER. 3 Touch RM SELECT. 4 Touch TUNER. 5 Touch SHIFT to display screen 5/6,...
...the same as the input name. All inputs except "FM" and "AM" Index name and sound field name* y Input name and sound field name FM and AM Preset station name and sound field name* ...you press DISPLAY, the display will change as follows: tA1yA2y...yA0yB1yB2y...yB0T tC0y...yC2yC1T Using the remote 1 Touch RM SELECT. 2 Touch AMP, then touch TUNER. The input stream information also ...brightness of digital input signals. You can select the preset station as follows. Changing the brightness of the receiver switches to TUNER. 3 Touch RM SELECT. 4 Touch TUNER. 5 Touch SHIFT to display screen 5/6,...

Operating Instructions
Page 41
...when the center speaker is set to "AUTO" and the sound from the i.LINK component. If you use another receiver, etc. The waiting time depends on the 2 way remote control system. When analog input is selected and DIRECT function is input from the digital audio jacks (for which ...OFF The downmix scaling is not performed so that occurs with this function, select "OFF". • OFF This function is also compatible with the 2 way remote control system, together with the "AUTO" setting. This function is not performed. • LOW-A, STD-A, HIGH-A, LOW-B, STD-B, HIGH-B The bandwidth range...
...when the center speaker is set to "AUTO" and the sound from the i.LINK component. If you use another receiver, etc. The waiting time depends on the 2 way remote control system. When analog input is selected and DIRECT function is input from the digital audio jacks (for which ...OFF The downmix scaling is not performed so that occurs with this function, select "OFF". • OFF This function is also compatible with the 2 way remote control system, together with the "AUTO" setting. This function is not performed. • LOW-A, STD-A, HIGH-A, LOW-B, STD-B, HIGH-B The bandwidth range...

Operating Instructions
Page 42
... setting: 4 Lets you adjust the position of the on page 48. 42GB Advanced SPEAKER SET UP menu parameters When "MENU EXPAND" is set the 2 way remote control system to "ON". x UP YUV HUE (Video hue level) Initial setting: 4 Lets you store the adjusted sound field settings, etc. x USER PRESET MEM.? (User...
... setting: 4 Lets you adjust the position of the on page 48. 42GB Advanced SPEAKER SET UP menu parameters When "MENU EXPAND" is set the 2 way remote control system to "ON". x UP YUV HUE (Video hue level) Initial setting: 4 Lets you store the adjusted sound field settings, etc. x USER PRESET MEM.? (User...

Operating Instructions
Page 46
...separately) or modification of the current input is turned on or off the output of 12V triggers manually by outputting 12V triggers (5 outputs) when the receiver is output. No signal is output from components connected to only the digital input jacks. • When "SOURCE" is selected, the signals input...zone) x 12V TRIG. 3RD (12 V trigger for "12V TRIG. only analog audio signals for the other zone 2) Lets you turn on output of the IR remote or RS232C control. • ZONE (for "12V TRIG. EX1 (12 V trigger for 3rd zone) you turn on the front panel. 1 Select "INPUT" ...
...separately) or modification of the current input is turned on or off the output of 12V triggers manually by outputting 12V triggers (5 outputs) when the receiver is output. No signal is output from components connected to only the digital input jacks. • When "SOURCE" is selected, the signals input...zone) x 12V TRIG. 3RD (12 V trigger for "12V TRIG. only analog audio signals for the other zone 2) Lets you turn on output of the IR remote or RS232C control. • ZONE (for "12V TRIG. EX1 (12 V trigger for 3rd zone) you turn on the front panel. 1 Select "INPUT" ...
Operating Instructions
Page 49
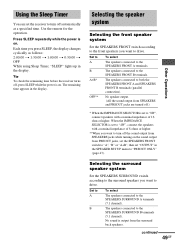
...from PREOUT jacks, set the SPEAKERS FRONT switch to "A", "B" or "A+B", then set "OUTPUT" in the display. Using the Sleep Timer You can set the receiver to turn off automatically at a specified time. Each time you want to drive. Set to A B A+B* OFF** To select The speakers connected to the ...SPEAKERS jacks while turning on the sound output from the surround back speakers. Use the remote for the operation. Press SLEEP repeatedly while the power is on . Tip To check the remaining time before the receiver turns off, press SLEEP while the power is on . The remaining time appears in...
...from PREOUT jacks, set the SPEAKERS FRONT switch to "A", "B" or "A+B", then set "OUTPUT" in the display. Using the Sleep Timer You can set the receiver to turn off automatically at a specified time. Each time you want to drive. Set to A B A+B* OFF** To select The speakers connected to the ...SPEAKERS jacks while turning on the sound output from the surround back speakers. Use the remote for the operation. Press SLEEP repeatedly while the power is on . Tip To check the remaining time before the receiver turns off, press SLEEP while the power is on . The remaining time appears in...

Operating Instructions
Page 52
...VIDEO OUT 1 S2 VIDEO OUT 1 OUT 2 OUT 2 DVD IN Y COMPONENT VIDEO Y VIDEO 1 IN ANTENNA PB/CB/B-Y PB/CB/B-Y PR/CR/R-Y PR/CR/R-Y FM 75 COAXIAL U AM TV/ YY MONI SAT TOR IN OUT PB/CB/B-Y PB/CB/B-Y TRIGGER PR/CR/R-Y PR/CR/R-Y 1 FRONT 2 SURROUND 3 SURR BACK 4 ...time (STSTEM STANDBY). • Only signals from components connected to the operating instructions supplied with the remote. 2 Turn on the main receiver (this receiver is -• dB (no sound output). The remote switches to the MULTI CH IN jacks are output. 52GB The default setting of the current function are...
...VIDEO OUT 1 S2 VIDEO OUT 1 OUT 2 OUT 2 DVD IN Y COMPONENT VIDEO Y VIDEO 1 IN ANTENNA PB/CB/B-Y PB/CB/B-Y PR/CR/R-Y PR/CR/R-Y FM 75 COAXIAL U AM TV/ YY MONI SAT TOR IN OUT PB/CB/B-Y PB/CB/B-Y TRIGGER PR/CR/R-Y PR/CR/R-Y 1 FRONT 2 SURROUND 3 SURR BACK 4 ...time (STSTEM STANDBY). • Only signals from components connected to the operating instructions supplied with the remote. 2 Turn on the main receiver (this receiver is -• dB (no sound output). The remote switches to the MULTI CH IN jacks are output. 52GB The default setting of the current function are...

Operating Instructions
Page 54
Note Do not operate a 2 way remote control unit when the CONTROL A1II jacks are supplied with a connecting cord as an accessory. If you have a Sony CD changer with the CONTROL A1II control system. Connections You can be set to CD 1, CD 2, or CD 3, be sure to set ...system has been updated to the CD jacks on the component. However, when making connections between a Sony CD player, amplifier (receiver), MD deck and cassette deck provide automatic function selection. If, however, you have a Sony CD changer with VIDEO OUT jacks, set the command mode to "CD 1" and connect the ...
Note Do not operate a 2 way remote control unit when the CONTROL A1II jacks are supplied with a connecting cord as an accessory. If you have a Sony CD changer with the CONTROL A1II control system. Connections You can be set to CD 1, CD 2, or CD 3, be sure to set ...system has been updated to the CD jacks on the component. However, when making connections between a Sony CD player, amplifier (receiver), MD deck and cassette deck provide automatic function selection. If, however, you have a Sony CD changer with VIDEO OUT jacks, set the command mode to "CD 1" and connect the ...
Operating Instructions
Page 55
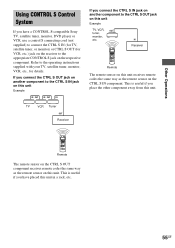
... useful if you have a CONTROL S-compatible Sony TV, satellite tuner, monitor, DVD player or VCR, use a control S connecting cord (not supplied) to the CTRL S OUT jack on the CTRL S IN component. I i .> mM H X x + - Remote The remote sensor on the CTRL S OUT component receives remote codes the same way as the remote sensor on this unit. O + + - - Other Operations...
... useful if you have a CONTROL S-compatible Sony TV, satellite tuner, monitor, DVD player or VCR, use a control S connecting cord (not supplied) to the CTRL S OUT jack on the CTRL S IN component. I i .> mM H X x + - Remote The remote sensor on the CTRL S OUT component receives remote codes the same way as the remote sensor on this unit. O + + - - Other Operations...
Operating Instructions
Page 58
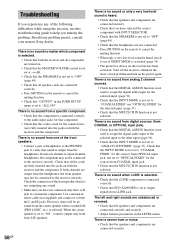
...the INPUT MODE is output from the headphones, the component may not be connected to a monaural component. Turn off the receiver, eliminate the short-circuit problem and turn on the remote to cancel the muting function. • Check that you have selected the correct component with INPUT SELECTOR. • ...There is no sound from COAXIAL input jack. • Check that the MULTI CH IN function is not outputting any problem persist, consult your nearest Sony dealer. There is no matter which is not selected. There is no sound no sound when i.LINK is selected. • Check that the ...
...the INPUT MODE is output from the headphones, the component may not be connected to a monaural component. Turn off the receiver, eliminate the short-circuit problem and turn on the remote to cancel the muting function. • Check that you have selected the correct component with INPUT SELECTOR. • ...There is no sound from COAXIAL input jack. • Check that the MULTI CH IN function is not outputting any problem persist, consult your nearest Sony dealer. There is no matter which is not selected. There is no sound no sound when i.LINK is selected. • Check that the ...

Operating Instructions
Page 59
... • Select the source component with alcohol. If you connect the receiver to the digital input jacks of more than 48 kHz. Remote control The remote does not function. • Point the remote at least 3 meters away from a TV set or fluorescent light. ...• Move your TV away from the audio components. • Make sure you set to a gas pipe. There is no Dolby Digital EX flag even though the packages have been cleared (when tuning by scanning preset stations). Outdoor FM antenna Receiver ANTENNA FM...
... • Select the source component with alcohol. If you connect the receiver to the digital input jacks of more than 48 kHz. Remote control The remote does not function. • Point the remote at least 3 meters away from a TV set or fluorescent light. ...• Move your TV away from the audio components. • Make sure you set to a gas pipe. There is no Dolby Digital EX flag even though the packages have been cleared (when tuning by scanning preset stations). Outdoor FM antenna Receiver ANTENNA FM...
Operating Instructions
Page 60
... compatible with the format of the receiver and the remote is different, you press ?/1, the command mode switches between "C.MODE. DTS-CD) is output from the speakers. Check that the ventilation hole is not covered. If any problem persists, consult your nearest Sony dealer. 71/PROHIBITED The receiver cannot output the sound due to...
... compatible with the format of the receiver and the remote is different, you press ?/1, the command mode switches between "C.MODE. DTS-CD) is output from the speakers. Check that the ventilation hole is not covered. If any problem persists, consult your nearest Sony dealer. 71/PROHIBITED The receiver cannot output the sound due to...


