
Operating Instructions (Large File - 23.24 MB)
Page 1
STR-DA5200ES ©2006 Sony Corporation Serial No. Refer to them whenever you call upon your Sony dealer regarding this product. Model No. Sony Corporation Printed in the space provided below. Record the serial number in Malaysia 2-687-417-11(1) Multi Channel AV Receiver Operating Instructions G_B_ Mode d'emploi F_R_ Owner's Record The model and serial numbers are located on the rear of the unit.
STR-DA5200ES ©2006 Sony Corporation Serial No. Refer to them whenever you call upon your Sony dealer regarding this product. Model No. Sony Corporation Printed in the space provided below. Record the serial number in Malaysia 2-687-417-11(1) Multi Channel AV Receiver Operating Instructions G_B_ Mode d'emploi F_R_ Owner's Record The model and serial numbers are located on the rear of the unit.
Operating Instructions (Large File - 23.24 MB)
Page 2
Don't throw away battery with the limits for help. If this apparatus to rain or moisture. Increase the separation between the equipment and receiver. - dispose of it correctly as practical. 2GB This symbol is intended to alert the user to the presence of important operating and maintenance (... shall be connected to the grounding system of the building, as close to the point of cable entry as chemical waste. Reorient or relocate the receiving antenna. - Consult the dealer or an experienced radio/TV technician for a Class B digital device, pursuant to Part 15 of the FCC Rules. For...
Don't throw away battery with the limits for help. If this apparatus to rain or moisture. Increase the separation between the equipment and receiver. - dispose of it correctly as practical. 2GB This symbol is intended to alert the user to the presence of important operating and maintenance (... shall be connected to the grounding system of the building, as close to the point of cable entry as chemical waste. Reorient or relocate the receiving antenna. - Consult the dealer or an experienced radio/TV technician for a Class B digital device, pursuant to Part 15 of the FCC Rules. For...
Operating Instructions (Large File - 23.24 MB)
Page 3
... the user a nonexclusive, non-transferable, limited license right to MORISAWA & COMPANY LTD. These names are trademarks of Sony Corporation. GB 3GB This receiver incorporates Dolby* Digital and Pro Logic Surround and the DTS** Digital Surround System. * Manufactured under license from Digital... Theater Systems, Inc. The font type (Shin Go R) installed in this receiver is manufactured under license from Fraunhofer IIS and Thomson. ATRAC, ATRAC3, ATRAC3plus and their logos are trademarks of Sony Corporation. All Rights Reserved. "Dolby", "Pro Logic", "Surround EX", and...
... the user a nonexclusive, non-transferable, limited license right to MORISAWA & COMPANY LTD. These names are trademarks of Sony Corporation. GB 3GB This receiver incorporates Dolby* Digital and Pro Logic Surround and the DTS** Digital Surround System. * Manufactured under license from Digital... Theater Systems, Inc. The font type (Shin Go R) installed in this receiver is manufactured under license from Fraunhofer IIS and Thomson. ATRAC, ATRAC3, ATRAC3plus and their logos are trademarks of Sony Corporation. All Rights Reserved. "Dolby", "Pro Logic", "Surround EX", and...
Operating Instructions (Large File - 23.24 MB)
Page 4
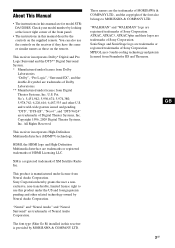
...19 4a: Connecting the audio components ........21 4b: Connecting the video components .......26 5: Connecting the antennas (aerials 35 6: Preparing the receiver and the remote ....36 7: Navigating through menus 38 8: Setting the speakers 40 9: Calibrating the appropriate settings automatically (AUTO CALIBRATION 42 ... 4GB Advanced Speakers Setting Up Adjusting the speaker settings manually .... 69 Adjusting the equalizer 75 Tuner Operations Listening to FM/AM radio 77 Presetting radio stations 79 Listening to XM Radio 81 Presetting XM Radio channels 85 Other Operations Converting analog...
...19 4a: Connecting the audio components ........21 4b: Connecting the video components .......26 5: Connecting the antennas (aerials 35 6: Preparing the receiver and the remote ....36 7: Navigating through menus 38 8: Setting the speakers 40 9: Calibrating the appropriate settings automatically (AUTO CALIBRATION 42 ... 4GB Advanced Speakers Setting Up Adjusting the speaker settings manually .... 69 Adjusting the equalizer 75 Tuner Operations Listening to FM/AM radio 77 Presetting radio stations 79 Listening to XM Radio 81 Presetting XM Radio channels 85 Other Operations Converting analog...
Operating Instructions (Large File - 23.24 MB)
Page 6
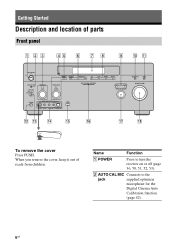
When you remove the cover, keep it out of parts Front panel To remove the cover Press PUSH. Name Function A POWER Press to the jack supplied optimizer microphone for the Digital Cinema Auto Calibration function (page 42). 6GB Getting Started Description and location of reach from children. B AUTO CAL MIC Connects to turn the receiver on or off (page 36, 50, 51, 52, 53).
When you remove the cover, keep it out of parts Front panel To remove the cover Press PUSH. Name Function A POWER Press to the jack supplied optimizer microphone for the Digital Cinema Auto Calibration function (page 42). 6GB Getting Started Description and location of reach from children. B AUTO CAL MIC Connects to turn the receiver on or off (page 36, 50, 51, 52, 53).

Operating Instructions (Large File - 23.24 MB)
Page 7
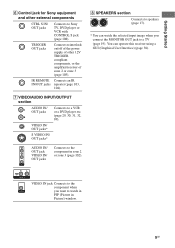
N VIDEO 3 IN/ Connect to the selected zone (page 102). D Remote sensor Receives signals from the component connected to select the audio input signal from remote commander. MOVIE MUSIC I POWER SELECT J MULTI CH IN Press SELECT repeatedly to ... a portable PORTABLE AV audio/video component IN jacks such as a camcorder or video game (page 32, 52). O USB (AUDIO) jack Connects to operate a tuner ENTER (FM/AM/XM Radio) TUNING MODE (page 77). CATEGORY +/- Press to the MULTI CHANNEL INPUT jack (page 48). M SPEAKERS Switch to adjust the volume level of...
N VIDEO 3 IN/ Connect to the selected zone (page 102). D Remote sensor Receives signals from the component connected to select the audio input signal from remote commander. MOVIE MUSIC I POWER SELECT J MULTI CH IN Press SELECT repeatedly to ... a portable PORTABLE AV audio/video component IN jacks such as a camcorder or video game (page 32, 52). O USB (AUDIO) jack Connects to operate a tuner ENTER (FM/AM/XM Radio) TUNING MODE (page 77). CATEGORY +/- Press to the MULTI CHANNEL INPUT jack (page 48). M SPEAKERS Switch to adjust the volume level of...

Operating Instructions (Large File - 23.24 MB)
Page 8
MULTI CHANNEL INPUT jacks Connect to the FM jack wire antenna (aerial) supplied with this receiver (page 35). HDMI IN/OUT Connects to a tape deck, MD deck or DAT player, etc (page 21, 25). Rear panel A AUDIO INPUT/OUTPUT section AUDIO... TV or a projector (page 27). D COMPONENT VIDEO INPUT/ OUTPUT section COMPONENT Connect to an external power amplifier. C ANTENNA section FM ANTENNA Connects to a Super Audio CD player or DVD player with this receiver (page 35). AM ANTENNA jack Connects to the XM Connect-and-Play antenna (aerial) (not supplied) (page 81). PRE...
MULTI CHANNEL INPUT jacks Connect to the FM jack wire antenna (aerial) supplied with this receiver (page 35). HDMI IN/OUT Connects to a tape deck, MD deck or DAT player, etc (page 21, 25). Rear panel A AUDIO INPUT/OUTPUT section AUDIO... TV or a projector (page 27). D COMPONENT VIDEO INPUT/ OUTPUT section COMPONENT Connect to an external power amplifier. C ANTENNA section FM ANTENNA Connects to a Super Audio CD player or DVD player with this receiver (page 35). AM ANTENNA jack Connects to the XM Connect-and-Play antenna (aerial) (not supplied) (page 81). PRE...
Operating Instructions (Large File - 23.24 MB)
Page 9
...jack to watch in PIP (Picture in zone 2 or zone 3 (page 102). H SPEAKERS section Connects to speakers (page 17). * You can operate this receiver using a GUI (Graphical User Interface) (page 38). VIDEO IN/ OUT jacks* S VIDEO IN/ OUT jacks* AUDIO IN/ OUT jack VIDEO IN/ OUT jacks...player etc. (page 29, 30, 31, 32, 89). Getting Started F Control jack for Sony equipment and other 12V TRIGGER compliant components, or the amplifier/receiver of other external components CTRL S IN/ OUT jacks Connects to Sony TV, DVD player or VCR with CONTROL S jack (page 108). G VIDEO/AUDIO INPUT/OUTPUT...
...jack to watch in PIP (Picture in zone 2 or zone 3 (page 102). H SPEAKERS section Connects to speakers (page 17). * You can operate this receiver using a GUI (Graphical User Interface) (page 38). VIDEO IN/ OUT jacks* S VIDEO IN/ OUT jacks* AUDIO IN/ OUT jack VIDEO IN/ OUT jacks...player etc. (page 29, 30, 31, 32, 89). Getting Started F Control jack for Sony equipment and other 12V TRIGGER compliant components, or the amplifier/receiver of other external components CTRL S IN/ OUT jacks Connects to Sony TV, DVD player or VCR with CONTROL S jack (page 108). G VIDEO/AUDIO INPUT/OUTPUT...
Operating Instructions (Large File - 23.24 MB)
Page 10
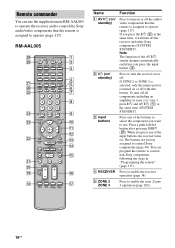
...off all components including an amplifier in "Programming the remote" (page 117). The buttons are factory assigned to enable the receiver operation (page 38). You can use . Press to control Sony components (page 48). Press to turn on . Press one of the buttons to select the component you press the ... (A) at the same time, it will turn off with this button. Press to use the supplied remote RM-AAL005 to operate the receiver and to control the Sony audio/video components that the remote is assigned to operate (page 117). If you want to enable the zone 2/zone 3 operation (...
...off all components including an amplifier in "Programming the remote" (page 117). The buttons are factory assigned to enable the receiver operation (page 38). You can use . Press to control Sony components (page 48). Press to turn on . Press one of the buttons to select the component you press the ... (A) at the same time, it will turn off with this button. Press to use the supplied remote RM-AAL005 to operate the receiver and to control the Sony audio/video components that the remote is assigned to operate (page 117). If you want to enable the zone 2/zone 3 operation (...

Operating Instructions (Large File - 23.24 MB)
Page 11
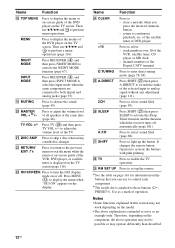
... TV (wk), press the numeric buttons to select the wide picture mode. TUNING +/- TV CH +/- WIDE Press to select the TV channels. MACRO1, MACRO2 Press RECEIVER (4) and then press MACRO 1 or MACRO 2 to select sound field (page 62). You can also change the resolution of the PIP window by pressing V/v. MOVIE... function (page 120). TOOLS Press to display and select items from option menus for DVD player, etc. Press to select preset stations. Press to register FM/AM/XM Radio stations or to operate the DVD player, CD player, MD deck or tape deck, etc. Q F1/F2 Press TV (wk) and ...
... TV (wk), press the numeric buttons to select the wide picture mode. TUNING +/- TV CH +/- WIDE Press to select the TV channels. MACRO1, MACRO2 Press RECEIVER (4) and then press MACRO 1 or MACRO 2 to select sound field (page 62). You can also change the resolution of the PIP window by pressing V/v. MOVIE... function (page 120). TOOLS Press to display and select items from option menus for DVD player, etc. Press to select preset stations. Press to register FM/AM/XM Radio stations or to operate the DVD player, CD player, MD deck or tape deck, etc. Q F1/F2 Press TV (wk) and ...
Operating Instructions (Large File - 23.24 MB)
Page 12
...and to activate the NIGHT MODE function (page 67). NIGHT MODE Press RECEIVER (4) and then press NIGHT MODE to perform menu operations. W ON SCREEN...the satellite tuner or DVD player. >10 Press to serve as a mark of operation. INPUT MODE Press RECEIVER (4) and then press INPUT MODE to select the input mode when the same components are connected to adjust... Press to silence the sound (page 49). Press to activate the Sleep Timer function and the duration which the receiver turns off . Z SLEEP Press SHIFT (wj) then press SLEEP to adjust the volume level of all speakers...
...and to activate the NIGHT MODE function (page 67). NIGHT MODE Press RECEIVER (4) and then press NIGHT MODE to perform menu operations. W ON SCREEN...the satellite tuner or DVD player. >10 Press to serve as a mark of operation. INPUT MODE Press RECEIVER (4) and then press INPUT MODE to select the input mode when the same components are connected to adjust... Press to silence the sound (page 49). Press to activate the Sleep Timer function and the duration which the receiver turns off . Z SLEEP Press SHIFT (wj) then press SLEEP to adjust the volume level of all speakers...

Operating Instructions (Large File - 23.24 MB)
Page 13
... SA-CD/CD Super Audio CD/CD player TUNER* Built-in "Changing button assignments (RM-AAU009 only)" on page 124. Press to control Sony components as follows. Lights up when data is being sent or when the remote button assignment is only for zone 2/zone 3 operations (page ...can change the category of the buttons. D MUTING E MASTER VOL +/- Press to mute the sound. Operating the main receiver from zone 2 Name A ?/1 (on/ standby) B Command mode buttons Function Press to turn a receiver in zone 2 or zone 3 on . Press to use. Name C Input buttons Function Press one of the buttons ...
... SA-CD/CD Super Audio CD/CD player TUNER* Built-in "Changing button assignments (RM-AAU009 only)" on page 124. Press to control Sony components as follows. Lights up when data is being sent or when the remote button assignment is only for zone 2/zone 3 operations (page ...can change the category of the buttons. D MUTING E MASTER VOL +/- Press to mute the sound. Operating the main receiver from zone 2 Name A ?/1 (on/ standby) B Command mode buttons Function Press to turn a receiver in zone 2 or zone 3 on . Press to use. Name C Input buttons Function Press one of the buttons ...
Operating Instructions (Large File - 23.24 MB)
Page 14
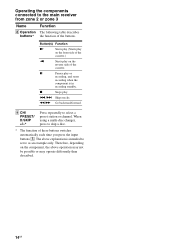
....) n Starts play . ./> Skips tracks. The above operation may not be possible or may operate differently than described. 14GB Operating the components connected to the main receiver from zone 2 or zone 3 Name H Operation buttons* Function The following table describes the function of these buttons switches automatically each time you press the input...
....) n Starts play . ./> Skips tracks. The above operation may not be possible or may operate differently than described. 14GB Operating the components connected to the main receiver from zone 2 or zone 3 Name H Operation buttons* Function The following table describes the function of these buttons switches automatically each time you press the input...

Operating Instructions (Large File - 23.24 MB)
Page 15
... back speaker (6.1 channel system) or two surround back speakers (7.1 channel system.) See "Using the surround back decoding mode" (page 65). Getting Started 1: Installing speakers This receiver allows you connect one sub woofer). Enjoying a 5.1/7.1 channel system To fully enjoy theater-like multi-channel surround sound requires five speakers (two front speakers, a center...
... back speaker (6.1 channel system) or two surround back speakers (7.1 channel system.) See "Using the surround back decoding mode" (page 65). Getting Started 1: Installing speakers This receiver allows you connect one sub woofer). Enjoying a 5.1/7.1 channel system To fully enjoy theater-like multi-channel surround sound requires five speakers (two front speakers, a center...

Operating Instructions (Large File - 23.24 MB)
Page 19
Video signals TV monitor A B C A Component video cord (not supplied) B S video cord (not supplied) C Video cord (not supplied) continued 19GB Connect audio and video cords according to connect all the cables. Getting Started 3: Connecting the monitor for displaying menus You can operate this receiver using a GUI (Graphical User Interface) (page 38). You can watch the selected input image when you connect the MONITOR OUT jack to a TV. It is not necessary to the jacks of your components.
Video signals TV monitor A B C A Component video cord (not supplied) B S video cord (not supplied) C Video cord (not supplied) continued 19GB Connect audio and video cords according to connect all the cables. Getting Started 3: Connecting the monitor for displaying menus You can operate this receiver using a GUI (Graphical User Interface) (page 38). You can watch the selected input image when you connect the MONITOR OUT jack to a TV. It is not necessary to the jacks of your components.

Operating Instructions (Large File - 23.24 MB)
Page 20
... signals" (page 34). • The sound of the TV is turned off when there has been no operation for 15 minutes. 20GB Tips • The receiver has a video conversion function. In this configuration, set the sound output jack of the TV to "Fixed" if it can be switched between the TV... and the antenna (aerial), the image on the receiver. Notes • Connect image display components such as a TV monitor or a projector to the MONITOR OUT jack on the TV screen may not be able...
... signals" (page 34). • The sound of the TV is turned off when there has been no operation for 15 minutes. 20GB Tips • The receiver has a video conversion function. In this configuration, set the sound output jack of the TV to "Fixed" if it can be switched between the TV... and the antenna (aerial), the image on the receiver. Notes • Connect image display components such as a TV monitor or a projector to the MONITOR OUT jack on the TV screen may not be able...

Operating Instructions (Large File - 23.24 MB)
Page 21
... "Component to be connected The sound quality depends on the jack used. Select the connection configuration according to the jacks of your components to this receiver. Getting Started 4a: Connecting the audio components How to hook up your components This section describes how to hook up all your components, proceed to...
... "Component to be connected The sound quality depends on the jack used. Select the connection configuration according to the jacks of your components to this receiver. Getting Started 4a: Connecting the audio components How to hook up your components This section describes how to hook up all your components, proceed to...

Operating Instructions (Large File - 23.24 MB)
Page 23
... this configuration. 23GB Refer to the MULTI CHANNEL INPUT or SA-CD/CD IN jacks. You must use an RF demodulator for recording in this receiver. Getting Started Notes on playing a Super Audio CD on a Super Audio CD player • No sound is output when playing a Super Audio CD on a Super... operating instructions supplied with the Super Audio CD player. • You cannot make digital recordings of a Super Audio CD. Use the analog jack for this receiver's digital input jacks.
... this configuration. 23GB Refer to the MULTI CHANNEL INPUT or SA-CD/CD IN jacks. You must use an RF demodulator for recording in this receiver. Getting Started Notes on playing a Super Audio CD on a Super Audio CD player • No sound is output when playing a Super Audio CD on a Super... operating instructions supplied with the Super Audio CD player. • You cannot make digital recordings of a Super Audio CD. Use the analog jack for this receiver's digital input jacks.

Operating Instructions (Large File - 23.24 MB)
Page 24
...; When "Sur Back Assign" is invalid (page 74). 24GB Alternatively, the multichannel input jacks can connect them to the MULTI CHANNEL INPUT jacks of this receiver to the SUR BACK jacks is set to "ZONE 2" in the Auto Calibration settings menu, the input to enjoy multichannel sound. DVD player, Super Audio...
...; When "Sur Back Assign" is invalid (page 74). 24GB Alternatively, the multichannel input jacks can connect them to the MULTI CHANNEL INPUT jacks of this receiver to the SUR BACK jacks is set to "ZONE 2" in the Auto Calibration settings menu, the input to enjoy multichannel sound. DVD player, Super Audio...

Operating Instructions (Large File - 23.24 MB)
Page 26
After hooking up your components to this receiver. Page 19, 31 27 29-30 31 32 32 Video input/output jacks to be connected The image quality depends on your components. Component to ...
After hooking up your components to this receiver. Page 19, 31 27 29-30 31 32 32 Video input/output jacks to be connected The image quality depends on your components. Component to ...


