Operating Instructions (Large File - 23.24 MB)
Page 3
...by Neural Audio Corporation. Copyright 1996, 2003 Digital Theater Systems, Inc. These names are the trademarks of MORISAWA & COMPANY LTD., and the copyright of Sony Corporation. and world-wide patents issued and pending. "DTS", "DTS-ES", "Neo:6", and "DTS 96/24" are trademarks of the font also ...belongs to use the controls on the receiver if they have the same or similar names as those on the supplied remote. ATRAC, ATRAC3, ATRAC3plus and their logos are trademarks of the front panel. • The instructions in this...
...by Neural Audio Corporation. Copyright 1996, 2003 Digital Theater Systems, Inc. These names are the trademarks of MORISAWA & COMPANY LTD., and the copyright of Sony Corporation. and world-wide patents issued and pending. "DTS", "DTS-ES", "Neo:6", and "DTS 96/24" are trademarks of the font also ...belongs to use the controls on the receiver if they have the same or similar names as those on the supplied remote. ATRAC, ATRAC3, ATRAC3plus and their logos are trademarks of the front panel. • The instructions in this...
Operating Instructions (Large File - 23.24 MB)
Page 4
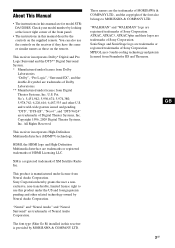
... Connecting the audio components ........21 4b: Connecting the video components .......26 5: Connecting the antennas (aerials 35 6: Preparing the receiver and the remote ....36 7: Navigating through menus 38 8: Setting the speakers 40 9: Calibrating the appropriate settings automatically (AUTO CALIBRATION 42 Playback Selecting... Advanced Speakers Setting Up Adjusting the speaker settings manually .... 69 Adjusting the equalizer 75 Tuner Operations Listening to FM/AM radio 77 Presetting radio stations 79 Listening to XM Radio 81 Presetting XM Radio channels 85 Other Operations ...
... Connecting the audio components ........21 4b: Connecting the video components .......26 5: Connecting the antennas (aerials 35 6: Preparing the receiver and the remote ....36 7: Navigating through menus 38 8: Setting the speakers 40 9: Calibrating the appropriate settings automatically (AUTO CALIBRATION 42 Playback Selecting... Advanced Speakers Setting Up Adjusting the speaker settings manually .... 69 Adjusting the equalizer 75 Tuner Operations Listening to FM/AM radio 77 Presetting radio stations 79 Listening to XM Radio 81 Presetting XM Radio channels 85 Other Operations ...

Operating Instructions (Large File - 23.24 MB)
Page 5
Clearing all the contents of the remote's memory 123 Changing button assignments (RM-AAU009 only 124 Additional Information Glossary 126 Precautions 128 Troubleshooting 129 Specifications 133 Index 136 5GB
Clearing all the contents of the remote's memory 123 Changing button assignments (RM-AAU009 only 124 Additional Information Glossary 126 Precautions 128 Troubleshooting 129 Specifications 133 Index 136 5GB

Operating Instructions (Large File - 23.24 MB)
Page 7
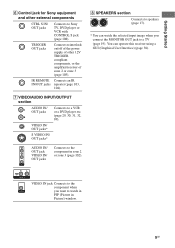
D Remote sensor Receives signals from the component connected to select the audio input signal from remote commander. TUNING F CATEGORY MODE Used when listening to the selected zone (page 102). CATEGORY +/- MOVIE MUSIC I POWER SELECT J MULTI CH IN Press SELECT repeatedly to .../ Press to the HDMI IN jack (page 27). H 2CH A.F.D. Name Function K HDMI Press to select input source from the component connected to operate a tuner ENTER (FM/AM/XM Radio) TUNING MODE (page 77). Q INPUT SELECTOR Turn to select the input source to select sound field (page 58). Press to play back...
D Remote sensor Receives signals from the component connected to select the audio input signal from remote commander. TUNING F CATEGORY MODE Used when listening to the selected zone (page 102). CATEGORY +/- MOVIE MUSIC I POWER SELECT J MULTI CH IN Press SELECT repeatedly to .../ Press to the HDMI IN jack (page 27). H 2CH A.F.D. Name Function K HDMI Press to select input source from the component connected to operate a tuner ENTER (FM/AM/XM Radio) TUNING MODE (page 77). Q INPUT SELECTOR Turn to select the input source to select sound field (page 58). Press to play back...
Operating Instructions (Large File - 23.24 MB)
Page 9
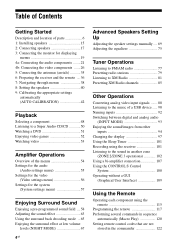
...etc. (page 29, 30, 31, 32, 89). H SPEAKERS section Connects to speakers (page 17). * You can operate this receiver using a GUI (Graphical User Interface) (page 38). IR REMOTE Connects an IR IN/OUT jacks repeater (page 103, 104). You can watch in PIP (Picture in zone 2 or zone 3...external components CTRL S IN/ OUT jacks Connects to the component in Picture) window. 9GB Getting Started F Control jack for Sony equipment and other 12V TRIGGER compliant components, or the amplifier/receiver of zone 2 or zone 3 (page 105). VIDEO IN/ OUT jacks* S VIDEO IN/ OUT jacks* AUDIO IN...
...etc. (page 29, 30, 31, 32, 89). H SPEAKERS section Connects to speakers (page 17). * You can operate this receiver using a GUI (Graphical User Interface) (page 38). IR REMOTE Connects an IR IN/OUT jacks repeater (page 103, 104). You can watch in PIP (Picture in zone 2 or zone 3...external components CTRL S IN/ OUT jacks Connects to the component in Picture) window. 9GB Getting Started F Control jack for Sony equipment and other 12V TRIGGER compliant components, or the amplifier/receiver of zone 2 or zone 3 (page 105). VIDEO IN/ OUT jacks* S VIDEO IN/ OUT jacks* AUDIO IN...
Operating Instructions (Large File - 23.24 MB)
Page 10
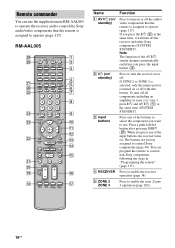
If you want to use the supplied remote RM-AAL005 to operate the receiver and to control the Sony audio/video components that the remote is turned on . Press one of the input buttons, the receiver turns on or off the receiver and other Sony components (SYSTEM STANDBY). Press to enable the...audio/ video components that the remote is assigned to operate (page 117). Remote commander You can program the remote to control Sony components (page 48). Press to turn off all components including an amplifier in "Programming the remote" (page 117). To turn the receiver on or off . Press ...
If you want to use the supplied remote RM-AAL005 to operate the receiver and to control the Sony audio/video components that the remote is turned on . Press one of the input buttons, the receiver turns on or off the receiver and other Sony components (SYSTEM STANDBY). Press to enable the...audio/ video components that the remote is assigned to operate (page 117). Remote commander You can program the remote to control Sony components (page 48). Press to turn off all components including an amplifier in "Programming the remote" (page 117). To turn the receiver on or off . Press ...
Operating Instructions (Large File - 23.24 MB)
Page 12
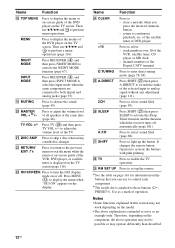
...MODE Press RECEIVER (4) and then press INPUT MODE to select the input mode when the same components are connected to adjust the volume level of operation. Press to both digital and analog jacks (page 93). Press MENU (qd) to activate the buttons with pink printing. It changes the remote button ... is intended to serve as a mark of all speakers at the same time (page 48). Then use to enable the TV operation. NIGHT MODE Press RECEIVER (4) and then press NIGHT MODE to perform a menu operations (page 116). S MUTING T MASTER VOL + b) /- to the previous menu or exit the menu while...
...MODE Press RECEIVER (4) and then press INPUT MODE to select the input mode when the same components are connected to adjust the volume level of operation. Press to both digital and analog jacks (page 93). Press MENU (qd) to activate the buttons with pink printing. It changes the remote button ... is intended to serve as a mark of all speakers at the same time (page 48). Then use to enable the TV operation. NIGHT MODE Press RECEIVER (4) and then press NIGHT MODE to perform a menu operations (page 116). S MUTING T MASTER VOL + b) /- to the previous menu or exit the menu while...

Operating Instructions (Large File - 23.24 MB)
Page 13
... the input buttons, the receiver turns on. You cannot control the main receiver directly with this remote. Lights up when data is being sent or when the remote button assignment is only for the main receiver * The setting cannot be changed. Getting Started RM-AAU009 This remote is being preset. Button Assigned Sony component VIDEO 1 VCR (VTR...
... the input buttons, the receiver turns on. You cannot control the main receiver directly with this remote. Lights up when data is being sent or when the remote button assignment is only for the main receiver * The setting cannot be changed. Getting Started RM-AAU009 This remote is being preset. Button Assigned Sony component VIDEO 1 VCR (VTR...

Operating Instructions (Large File - 23.24 MB)
Page 36
...; Make sure that the total power consumption of AC outlets, and the information described on the receiver. 3 Release the TONE MODE and MULTI CH IN after a few seconds. 6: Preparing the receiver and the remote Connecting the AC power cord (mains lead) Connect the supplied AC power cord (mains lead) ...to the AC IN terminal on the display for the first time, initialize the receiver by performing the following items are reset to ...
...; Make sure that the total power consumption of AC outlets, and the information described on the receiver. 3 Release the TONE MODE and MULTI CH IN after a few seconds. 6: Preparing the receiver and the remote Connecting the AC power cord (mains lead) Connect the supplied AC power cord (mains lead) ...to the AC IN terminal on the display for the first time, initialize the receiver by performing the following items are reset to ...

Operating Instructions (Large File - 23.24 MB)
Page 37
Tip When the remote no longer operates the receiver, replace all the batteries with old ones. • Do not mix manganese batteries and other Sony component respond to the same remote command, switch the command mode of either the component or the receiver to another command mode so that the ...component does not respond to the same remote command as the receiver. If the command modes of the receiver and the remote are those...
Tip When the remote no longer operates the receiver, replace all the batteries with old ones. • Do not mix manganese batteries and other Sony component respond to the same remote command, switch the command mode of either the component or the receiver to another command mode so that the ...component does not respond to the same remote command as the receiver. If the command modes of the receiver and the remote are those...

Operating Instructions (Large File - 23.24 MB)
Page 38
...Interface)" (page 109) when you press 1, the command mode is set to this receiver. By using the amplifier menus, you press 2, the command mode is set to customize the receiver. You can make various adjustments to AV SYSTEM 2. 3 Press ENTER when the RM ...4 RETURN/ EXIT O 5-8 MENU 1 Connect a TV monitor to enable receiver operation. 38GB When you operate this receiver without displaying the menu on the receiver and the TV. 3 Press RECEIVER to this receiver. When you can set up . To switch the command mode of the remote 1 1 2 3 1 Press ?/1 while pressing RM SET UP.
...Interface)" (page 109) when you press 1, the command mode is set to this receiver. By using the amplifier menus, you press 2, the command mode is set to customize the receiver. You can make various adjustments to AV SYSTEM 2. 3 Press ENTER when the RM ...4 RETURN/ EXIT O 5-8 MENU 1 Connect a TV monitor to enable receiver operation. 38GB When you operate this receiver without displaying the menu on the receiver and the TV. 3 Press RECEIVER to this receiver. When you can set up . To switch the command mode of the remote 1 1 2 3 1 Press ?/1 while pressing RM SET UP.

Operating Instructions (Large File - 23.24 MB)
Page 45
... use in "Distance Unit" in the Auto Calibration settings menu. 2 Press to select "Yes," then press . Tip Press on the remote when "Please Press ENTER" appears on warning and error codes, see "Message list after auto calibration measurement" (page 46). When "Auto...are connected properly. 4 Press V/v repeatedly to confirm the warning ("Yes") or not ("No"). Tips • Operations other than turning the receiver on the TV screen. Confirming/saving the measurement results 1 Confirm the measurement result. when connecting special speakers, such as dipole speakers. -...
... use in "Distance Unit" in the Auto Calibration settings menu. 2 Press to select "Yes," then press . Tip Press on the remote when "Please Press ENTER" appears on warning and error codes, see "Message list after auto calibration measurement" (page 46). When "Auto...are connected properly. 4 Press V/v repeatedly to confirm the warning ("Yes") or not ("No"). Tips • Operations other than turning the receiver on the TV screen. Confirming/saving the measurement results 1 Confirm the measurement result. when connecting special speakers, such as dipole speakers. -...

Operating Instructions (Large File - 23.24 MB)
Page 49
Even if you turn off the receiver, the muting function works when you turn off the receiver, be sure to turn MASTER VOLUME clockwise to raise the volume. To cancel, press MUTING on again. Playback To activate the muting function Press MUTING on the remote. To avoid damaging your speakers Before you turn the receiver on the remote again or turn down the volume level. 49GB
Even if you turn off the receiver, the muting function works when you turn off the receiver, be sure to turn MASTER VOLUME clockwise to raise the volume. To cancel, press MUTING on again. Playback To activate the muting function Press MUTING on the remote. To avoid damaging your speakers Before you turn the receiver on the remote again or turn down the volume level. 49GB

Operating Instructions (Large File - 23.24 MB)
Page 91
...media, as this receiver. track during playback, or find the beginning of the previous track Find the beginning of a Press .. Skip to the previous album in Press ALBUM +. For details, see the operation manual of times the contact can operate the portable audio using the remote supplied with a ... cannot be used or contact the manufacturer. • The settings of the USB mode of the player may not compatible with this receiver when a Sony digital music player is no compatible data on may not support all of a Walkman ®, etc., cannot be played back with this...
...media, as this receiver. track during playback, or find the beginning of the previous track Find the beginning of a Press .. Skip to the previous album in Press ALBUM +. For details, see the operation manual of times the contact can operate the portable audio using the remote supplied with a ... cannot be used or contact the manufacturer. • The settings of the USB mode of the player may not compatible with this receiver when a Sony digital music player is no compatible data on may not support all of a Walkman ®, etc., cannot be played back with this...

Operating Instructions (Large File - 23.24 MB)
Page 102
...8226; Some sources contain copy guards to the MULTI CHANNEL INPUT jacks are output only from the front left / right channels. Use the RM-AAU009 remote for the operation. • Switching the output source for recording. 4 Start recording on the recording component, then start playback on or off in... the recording component to copy into the recording component (VIDEO 1 or VIDEO 2) for the ZONE 2 or ZONE 3 OUT jacks. • Switching the Sony receiver's power on the playback component. In this case, you want to the OPTICAL MD/DAT OUT jack. For example, insert the video tape you may...
...8226; Some sources contain copy guards to the MULTI CHANNEL INPUT jacks are output only from the front left / right channels. Use the RM-AAU009 remote for the operation. • Switching the output source for recording. 4 Start recording on the recording component, then start playback on or off in... the recording component to copy into the recording component (VIDEO 1 or VIDEO 2) for the ZONE 2 or ZONE 3 OUT jacks. • Switching the Sony receiver's power on the playback component. In this case, you want to the OPTICAL MD/DAT OUT jack. For example, insert the video tape you may...

Operating Instructions (Large File - 23.24 MB)
Page 105
...(for use of the 12V Trigger function, as explained below. • OFF Lets you turn off output of 12V triggers even when the main receiver is turned on. • ZONE Lets you turn the receiver on/off in the zones. If you select the source that is output to step 4. Main (this... receiver) is turned on or off. • CTRL Lets you turn the output of 12V triggers on or off manually using the CIS command of the IR remote. Other Operations 4 Press V/v/B/b repeatedly to select item and parameter, then press . 2-4 1 ...
...(for use of the 12V Trigger function, as explained below. • OFF Lets you turn off output of 12V triggers even when the main receiver is turned on. • ZONE Lets you turn the receiver on/off in the zones. If you select the source that is output to step 4. Main (this... receiver) is turned on or off. • CTRL Lets you turn the output of 12V triggers on or off manually using the CIS command of the IR remote. Other Operations 4 Press V/v/B/b repeatedly to select item and parameter, then press . 2-4 1 ...
Operating Instructions (Large File - 23.24 MB)
Page 106
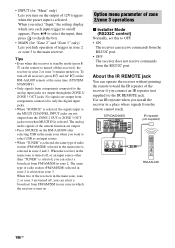
... "TUNER" is standby mode (press ?/ 1 on the remote to turned off appears. About the IR REMOTE jack You can receive commands from the RS232C port. • OFF The receiver does not receive commands from FM/AM/XM in one zone in which sets each input trigger to on . STR-DA5200ES IR repeater (not supplied) RM-AAL005 106GB Option...
... "TUNER" is standby mode (press ?/ 1 on the remote to turned off appears. About the IR REMOTE jack You can receive commands from the RS232C port. • OFF The receiver does not receive commands from FM/AM/XM in one zone in which sets each input trigger to on . STR-DA5200ES IR repeater (not supplied) RM-AAL005 106GB Option...

Operating Instructions (Large File - 23.24 MB)
Page 108
... TV VCR Tuner Receiver Remote The remote sensor on this receiver receives remote codes the same way as the remote sensor on this receiver Example TV, VCR, tuner, monitor, etc. This is useful if you place the other component away from this receiver. This is useful if you have a CONTROL S-compatible Sony TV, satellite tuner, monitor, DVD player or VCR...
... TV VCR Tuner Receiver Remote The remote sensor on this receiver receives remote codes the same way as the remote sensor on this receiver Example TV, VCR, tuner, monitor, etc. This is useful if you place the other component away from this receiver. This is useful if you have a CONTROL S-compatible Sony TV, satellite tuner, monitor, DVD player or VCR...
Operating Instructions (Large File - 23.24 MB)
Page 113
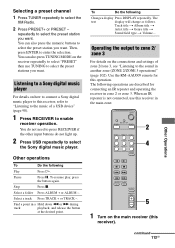
To Do the following Play Press H. Use the RM-AAU009 remote for connecting an IR repeater and operating the receiver in another zone (ZONE 2/ZONE 3 operations)" (page 102). When an IR repeater is not connected, use TUNING to select the XM...point in the main zone. 2 4 Other Operations Other operations To Do the following Change a display Press DISPLAY repeatedly. Listening to a Sony digital music player For details on the receiver repeatedly to select "PRESET" then use this operation. Pause Press X. Track title t Album title t Artist title t Genre title t ...
To Do the following Play Press H. Use the RM-AAU009 remote for connecting an IR repeater and operating the receiver in another zone (ZONE 2/ZONE 3 operations)" (page 102). When an IR repeater is not connected, use TUNING to select the XM...point in the main zone. 2 4 Other Operations Other operations To Do the following Change a display Press DISPLAY repeatedly. Listening to a Sony digital music player For details on the receiver repeatedly to select "PRESET" then use this operation. Pause Press X. Track title t Album title t Artist title t Genre title t ...

Operating Instructions (Large File - 23.24 MB)
Page 114
... jacks even when MULTI IN is selected. When you select "SOURCE," the signals of zone 2. To turn off this receiver), the receiver in zone 2 or zone 3 remains turned on the remote to select the source signals you can only adjust the surround back speaker volume in zone 2 or zone 3. 1 Set... "Sur Back Assign" to turned off all receivers, press ?/1 and AV ?/1 on the remote. • In the case of illustration 1-2 (page 104), adjust the volume using MASTER VOL +/- Tips • Even when this receiver is selected, the signals input to zone 2 mode or zone 3. 3 Turn...
... jacks even when MULTI IN is selected. When you select "SOURCE," the signals of zone 2. To turn off this receiver), the receiver in zone 2 or zone 3 remains turned on the remote to select the source signals you can only adjust the surround back speaker volume in zone 2 or zone 3. 1 Set... "Sur Back Assign" to turned off all receivers, press ?/1 and AV ?/1 on the remote. • In the case of illustration 1-2 (page 104), adjust the volume using MASTER VOL +/- Tips • Even when this receiver is selected, the signals input to zone 2 mode or zone 3. 3 Turn...


