
Operating Instructions (Large File - 23.24 MB)
Page 1
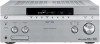
Refer to them whenever you call upon your Sony dealer regarding this product. Model No. Record the serial number in Malaysia 2-687-417-11(1) Multi Channel AV Receiver Operating Instructions G_B_ Mode d'emploi F_R_ Owner's Record The model and serial numbers are located on the rear of the unit. Serial No. STR-DA5200ES ©2006 Sony Corporation Sony Corporation Printed in the space provided below.
Refer to them whenever you call upon your Sony dealer regarding this product. Model No. Record the serial number in Malaysia 2-687-417-11(1) Multi Channel AV Receiver Operating Instructions G_B_ Mode d'emploi F_R_ Owner's Record The model and serial numbers are located on the rear of the unit. Serial No. STR-DA5200ES ©2006 Sony Corporation Sony Corporation Printed in the space provided below.
Operating Instructions (Large File - 23.24 MB)
Page 2
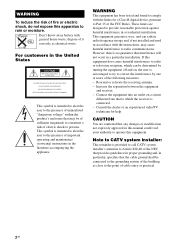
... equipment off and on, the user is connected. - If this equipment does cause harmful interference to radio or television reception, which the receiver is encouraged to try to which can radiate radio frequency energy and, if not installed and used in accordance with general house waste; Reorient... or relocate the receiving antenna. - WARNING To reduce the risk of fire or electric shock, do not expose this equipment. Don't throw away battery with the ...
... equipment off and on, the user is connected. - If this equipment does cause harmful interference to radio or television reception, which the receiver is encouraged to try to which can radiate radio frequency energy and, if not installed and used in accordance with general house waste; Reorient... or relocate the receiving antenna. - WARNING To reduce the risk of fire or electric shock, do not expose this equipment. Don't throw away battery with the ...
Operating Instructions (Large File - 23.24 MB)
Page 3
... Interface are trademarks of Neural Audio Corporation. MPEG Layer-3 audio coding technology and patents licensed from Dolby Laboratories. U.S. This receiver incorporates High-Definition Multimedia Interface (HDMI™) technology. "Neural" and "Neural Audio" and "Neural Surround" are trademarks or..."WALKMAN" and "WALKMAN" logo are trademarks of Sony Corporation. Sony Corporation hereby grants the user a nonexclusive, non-transferable, limited license right to MORISAWA & COMPANY LTD. GB 3GB You can also use this receiver is provided by looking at the lower right corner...
... Interface are trademarks of Neural Audio Corporation. MPEG Layer-3 audio coding technology and patents licensed from Dolby Laboratories. U.S. This receiver incorporates High-Definition Multimedia Interface (HDMI™) technology. "Neural" and "Neural Audio" and "Neural Surround" are trademarks or..."WALKMAN" and "WALKMAN" logo are trademarks of Sony Corporation. Sony Corporation hereby grants the user a nonexclusive, non-transferable, limited license right to MORISAWA & COMPANY LTD. GB 3GB You can also use this receiver is provided by looking at the lower right corner...
Operating Instructions (Large File - 23.24 MB)
Page 4
...19 4a: Connecting the audio components ........21 4b: Connecting the video components .......26 5: Connecting the antennas (aerials 35 6: Preparing the receiver and the remote ....36 7: Navigating through menus 38 8: Setting the speakers 40 9: Calibrating the appropriate settings automatically (AUTO CALIBRATION 42 ... 4GB Advanced Speakers Setting Up Adjusting the speaker settings manually .... 69 Adjusting the equalizer 75 Tuner Operations Listening to FM/AM radio 77 Presetting radio stations 79 Listening to XM Radio 81 Presetting XM Radio channels 85 Other Operations Converting analog...
...19 4a: Connecting the audio components ........21 4b: Connecting the video components .......26 5: Connecting the antennas (aerials 35 6: Preparing the receiver and the remote ....36 7: Navigating through menus 38 8: Setting the speakers 40 9: Calibrating the appropriate settings automatically (AUTO CALIBRATION 42 ... 4GB Advanced Speakers Setting Up Adjusting the speaker settings manually .... 69 Adjusting the equalizer 75 Tuner Operations Listening to FM/AM radio 77 Presetting radio stations 79 Listening to XM Radio 81 Presetting XM Radio channels 85 Other Operations Converting analog...
Operating Instructions (Large File - 23.24 MB)
Page 6
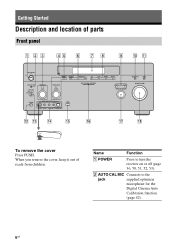
B AUTO CAL MIC Connects to turn the receiver on or off (page 36, 50, 51, 52, 53). When you remove the cover, keep it out of parts Front panel To remove the cover Press PUSH. Name Function A POWER Press to the jack supplied optimizer microphone for the Digital Cinema Auto Calibration function (page 42). 6GB Getting Started Description and location of reach from children.
B AUTO CAL MIC Connects to turn the receiver on or off (page 36, 50, 51, 52, 53). When you remove the cover, keep it out of parts Front panel To remove the cover Press PUSH. Name Function A POWER Press to the jack supplied optimizer microphone for the Digital Cinema Auto Calibration function (page 42). 6GB Getting Started Description and location of reach from children.

Operating Instructions (Large File - 23.24 MB)
Page 7
D Remote sensor Receives signals from the component connected to the HDMI IN jack (page 27). TUNING F CATEGORY MODE Used when listening to select sound field (page 58). Press ... selected component or a list of the front speakers (page 41). Press to select the audio input signal from the component connected to operate a tuner ENTER (FM/AM/XM Radio) TUNING MODE (page 77). P MULTI CHANNEL DECODING lamp Lights up when multichannel audio signals are decoded (page 51). H 2CH A.F.D. Press TONE MODE...
D Remote sensor Receives signals from the component connected to the HDMI IN jack (page 27). TUNING F CATEGORY MODE Used when listening to select sound field (page 58). Press ... selected component or a list of the front speakers (page 41). Press to select the audio input signal from the component connected to operate a tuner ENTER (FM/AM/XM Radio) TUNING MODE (page 77). P MULTI CHANNEL DECODING lamp Lights up when multichannel audio signals are decoded (page 51). H 2CH A.F.D. Press TONE MODE...

Operating Instructions (Large File - 23.24 MB)
Page 8
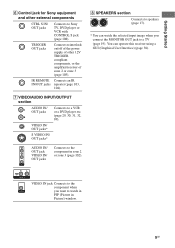
...not supplied) (page 81). The COAXIAL jack provides a better quality sound (page 21, 22, 29). C ANTENNA section FM ANTENNA Connects to a Super Audio CD player or DVD player with this receiver (page 35). XM ANTENNA jack Connects to a tape deck, MD deck or DAT player, etc (page 21, 25... and the sound are output to a DVD player, Super Audio CD player, etc. MULTI CHANNEL INPUT jacks Connect to the FM jack wire antenna (aerial) supplied with this receiver (page 35). OUTPUT jacks* E RS-232C jack Used for 7.1 channel or 5.1 channel sound (page 21, 24). AM...
...not supplied) (page 81). The COAXIAL jack provides a better quality sound (page 21, 22, 29). C ANTENNA section FM ANTENNA Connects to a Super Audio CD player or DVD player with this receiver (page 35). XM ANTENNA jack Connects to a tape deck, MD deck or DAT player, etc (page 21, 25... and the sound are output to a DVD player, Super Audio CD player, etc. MULTI CHANNEL INPUT jacks Connect to the FM jack wire antenna (aerial) supplied with this receiver (page 35). OUTPUT jacks* E RS-232C jack Used for 7.1 channel or 5.1 channel sound (page 21, 24). AM...
Operating Instructions (Large File - 23.24 MB)
Page 9
... you want to the component in Picture) window. 9GB VIDEO IN jack Connects to the component when you connect the MONITOR OUT jack to Sony TV, DVD player or VCR with CONTROL S jack (page 108). G VIDEO/AUDIO INPUT/OUTPUT section AUDIO IN/ OUT jacks Connects to... 102). H SPEAKERS section Connects to speakers (page 17). * You can operate this receiver using a GUI (Graphical User Interface) (page 38). Getting Started F Control jack for Sony equipment and other 12V TRIGGER compliant components, or the amplifier/receiver of zone 2 or zone 3 (page 105). IR REMOTE Connects an IR IN/OUT...
... you want to the component in Picture) window. 9GB VIDEO IN jack Connects to the component when you connect the MONITOR OUT jack to Sony TV, DVD player or VCR with CONTROL S jack (page 108). G VIDEO/AUDIO INPUT/OUTPUT section AUDIO IN/ OUT jacks Connects to... 102). H SPEAKERS section Connects to speakers (page 17). * You can operate this receiver using a GUI (Graphical User Interface) (page 38). Getting Started F Control jack for Sony equipment and other 12V TRIGGER compliant components, or the amplifier/receiver of zone 2 or zone 3 (page 105). IR REMOTE Connects an IR IN/OUT...
Operating Instructions (Large File - 23.24 MB)
Page 10
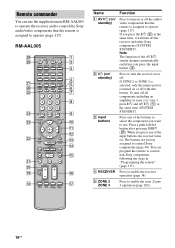
...the audio/ video components that the remote is assigned to operate (page 117). To turn off the receiver and other Sony components (SYSTEM STANDBY). Press one of the input buttons, the receiver turns on or off all components including an amplifier in "Programming the remote" (page 117). Remote ... and AV ?/1 (A) at the same time (SYSTEM STANDBY). If you want to use the supplied remote RM-AAL005 to operate the receiver and to control the Sony audio/video components that the remote is assigned to operate (page 117). Note The function of the AV ?/1 switch changes automatically each...
...the audio/ video components that the remote is assigned to operate (page 117). To turn off the receiver and other Sony components (SYSTEM STANDBY). Press one of the input buttons, the receiver turns on or off all components including an amplifier in "Programming the remote" (page 117). Remote ... and AV ?/1 (A) at the same time (SYSTEM STANDBY). If you want to use the supplied remote RM-AAL005 to operate the receiver and to control the Sony audio/video components that the remote is assigned to operate (page 117). Note The function of the AV ?/1 switch changes automatically each...

Operating Instructions (Large File - 23.24 MB)
Page 11
...SHIFT (wj) then press RESOLUTION repeatedly to set up the macro function (page 120). XM Radio (page 81). P PRESET + b)/- MACRO1, MACRO2 Press RECEIVER (4) and then press MACRO 1 or MACRO 2 to change the size of signals output from option menus for DVD player, etc. N CATEGORY Press to...tuner, CD player, DVD player, or MD deck (page 97). O m/M a) x a) X a) H b) ./> a) Press to select track number 10. - Press to register FM/AM/XM Radio stations or to select sound field (page 62). MOVIE Press to select preset stations. MEMORY Press to display the menu of the...
...SHIFT (wj) then press RESOLUTION repeatedly to set up the macro function (page 120). XM Radio (page 81). P PRESET + b)/- MACRO1, MACRO2 Press RECEIVER (4) and then press MACRO 1 or MACRO 2 to change the size of signals output from option menus for DVD player, etc. N CATEGORY Press to...tuner, CD player, DVD player, or MD deck (page 97). O m/M a) x a) X a) H b) ./> a) Press to select track number 10. - Press to register FM/AM/XM Radio stations or to select sound field (page 62). MOVIE Press to select preset stations. MEMORY Press to display the menu of the...
Operating Instructions (Large File - 23.24 MB)
Page 12
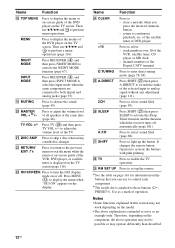
... is attached to activate the NIGHT MODE function (page 67). Therefore, depending on the buttons that you press the incorrect numeric button. - NIGHT MODE Press RECEIVER (4) and then press NIGHT MODE to these buttons (H, PRESET+). S MUTING T MASTER VOL + b) /- U DISC SKIP Press to enable the TV operation. a)See the table... SET UP Press to set up the button. It changes the remote button function to activate the Sleep Timer function and the duration which the receiver turns off . W ON SCREEN Press to turn the GUI display mode on the TV screen. clear a mistake when you can use to ...
... is attached to activate the NIGHT MODE function (page 67). Therefore, depending on the buttons that you press the incorrect numeric button. - NIGHT MODE Press RECEIVER (4) and then press NIGHT MODE to these buttons (H, PRESET+). S MUTING T MASTER VOL + b) /- U DISC SKIP Press to enable the TV operation. a)See the table... SET UP Press to set up the button. It changes the remote button function to activate the Sleep Timer function and the duration which the receiver turns off . W ON SCREEN Press to turn the GUI display mode on the TV screen. clear a mistake when you can use to ...

Operating Instructions (Large File - 23.24 MB)
Page 13
... being sent or when the remote button assignment is only for zone 2/zone 3 operations (page 102). You cannot control the main receiver directly with this remote. Button Assigned Sony component VIDEO 1 VCR (VTR mode 3) VIDEO 2 VCR (VTR mode 1) VIDEO 3 VCR (VTR mode 2) DVD DVD player TV...You can change the category of the remote. D MUTING E MASTER VOL +/- Press to turn a receiver in tuner SOURCE The current input selected for multi zone output. Press to control Sony components as follows. The buttons are factory assigned to select the command mode of the buttons.
... being sent or when the remote button assignment is only for zone 2/zone 3 operations (page 102). You cannot control the main receiver directly with this remote. Button Assigned Sony component VIDEO 1 VCR (VTR mode 3) VIDEO 2 VCR (VTR mode 1) VIDEO 3 VCR (VTR mode 2) DVD DVD player TV...You can change the category of the remote. D MUTING E MASTER VOL +/- Press to turn a receiver in tuner SOURCE The current input selected for multi zone output. Press to control Sony components as follows. The buttons are factory assigned to select the command mode of the buttons.
Operating Instructions (Large File - 23.24 MB)
Page 14
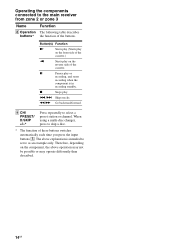
... a preset station or channel. The above operation may not be possible or may operate differently than described. 14GB Operating the components connected to the main receiver from zone 2 or zone 3 Name H Operation buttons* Function The following table describes the function of these buttons switches automatically each time you press the input...
... a preset station or channel. The above operation may not be possible or may operate differently than described. 14GB Operating the components connected to the main receiver from zone 2 or zone 3 Name H Operation buttons* Function The following table describes the function of these buttons switches automatically each time you press the input...

Operating Instructions (Large File - 23.24 MB)
Page 15
... back speaker (6.1 channel system) or two surround back speakers (7.1 channel system.) See "Using the surround back decoding mode" (page 65). Getting Started 1: Installing speakers This receiver allows you connect one sub woofer).
... back speaker (6.1 channel system) or two surround back speakers (7.1 channel system.) See "Using the surround back decoding mode" (page 65). Getting Started 1: Installing speakers This receiver allows you connect one sub woofer).

Operating Instructions (Large File - 23.24 MB)
Page 19
Connect audio and video cords according to a TV. Getting Started 3: Connecting the monitor for displaying menus You can operate this receiver using a GUI (Graphical User Interface) (page 38). It is not necessary to connect all the cables. You can watch the selected input image when you connect the MONITOR OUT jack to the jacks of your components. Video signals TV monitor A B C A Component video cord (not supplied) B S video cord (not supplied) C Video cord (not supplied) continued 19GB
Connect audio and video cords according to a TV. Getting Started 3: Connecting the monitor for displaying menus You can operate this receiver using a GUI (Graphical User Interface) (page 38). It is not necessary to connect all the cables. You can watch the selected input image when you connect the MONITOR OUT jack to the jacks of your components. Video signals TV monitor A B C A Component video cord (not supplied) B S video cord (not supplied) C Video cord (not supplied) continued 19GB

Operating Instructions (Large File - 23.24 MB)
Page 20
...TV/SAT AUDIO IN jacks of a playback component are being output to a TV via the receiver. For details, see "Notes on the receiver when the video and audio of the receiver. If the power supply of the receiver is not turned on, neither video nor audio is transmitted. • Depending on the ...status of the TV to "Fixed" if it can be switched between the TV and the antenna (aerial), the image on the receiver. Tips • The receiver has a video conversion function. Notes • Connect image display components such as a TV monitor or a projector to the MONITOR OUT jack on...
...TV/SAT AUDIO IN jacks of a playback component are being output to a TV via the receiver. For details, see "Notes on the receiver when the video and audio of the receiver. If the power supply of the receiver is not turned on, neither video nor audio is transmitted. • Depending on the ...status of the TV to "Fixed" if it can be switched between the TV and the antenna (aerial), the image on the receiver. Tips • The receiver has a video conversion function. Notes • Connect image display components such as a TV monitor or a projector to the MONITOR OUT jack on...

Operating Instructions (Large File - 23.24 MB)
Page 21
... audio components How to hook up your components This section describes how to hook up all your components. Select the connection configuration according to this receiver. After hooking up your components to the jacks of your components, proceed to connect each component. Before you begin, refer to "Component to be connected...
... audio components How to hook up your components This section describes how to hook up all your components. Select the connection configuration according to this receiver. After hooking up your components to the jacks of your components, proceed to connect each component. Before you begin, refer to "Component to be connected...

Operating Instructions (Large File - 23.24 MB)
Page 23
Use the analog jack for this receiver's digital input jacks. When you want to connect several digital components, but cannot find an unused input See "Enjoying the sound/images from other inputs" (... connected to only the COAXIAL SA-CD/ CD IN jack on this case. • When connecting optical digital cords, insert the plugs straight in this receiver. If you play a Super Audio CD, connect the player to the MULTI CHANNEL INPUT or SA-CD/CD IN jacks. You must use an RF...
Use the analog jack for this receiver's digital input jacks. When you want to connect several digital components, but cannot find an unused input See "Enjoying the sound/images from other inputs" (... connected to only the COAXIAL SA-CD/ CD IN jack on this case. • When connecting optical digital cords, insert the plugs straight in this receiver. If you play a Super Audio CD, connect the player to the MULTI CHANNEL INPUT or SA-CD/CD IN jacks. You must use an RF...

Operating Instructions (Large File - 23.24 MB)
Page 24
DVD player, Super Audio CD player, etc. Alternatively, the multichannel input jacks can connect them to the MULTI CHANNEL INPUT jacks of this receiver to connect an external multi-channel decoder. A B A Audio cord (not supplied) B Monaural audio cord (not supplied) Notes • DVD and Super Audio CD players do ...
DVD player, Super Audio CD player, etc. Alternatively, the multichannel input jacks can connect them to the MULTI CHANNEL INPUT jacks of this receiver to connect an external multi-channel decoder. A B A Audio cord (not supplied) B Monaural audio cord (not supplied) Notes • DVD and Super Audio CD players do ...

Operating Instructions (Large File - 23.24 MB)
Page 26
... your components. 4b: Connecting the video components How to hook up your components This section describes how to hook up all your components to this receiver. Before you begin, refer to "Component to be connected TV monitor With HDMI jack DVD player, DVD recorder Satellite tuner VCR Camcorder, video game, etc...
... your components. 4b: Connecting the video components How to hook up your components This section describes how to hook up all your components to this receiver. Before you begin, refer to "Component to be connected TV monitor With HDMI jack DVD player, DVD recorder Satellite tuner VCR Camcorder, video game, etc...


