
HDMI Control Guide
Page 7
... TV, then press AV ?/1. The TV, receiver and connected components are turned off the TV. Notes • Set the TV power supply interlock function to - For details, see the operating instructions of ... the input of a component connected to turn off automatically. No sound is selected as the input on the TV's remote, the receiver and the connected components turn off . "TV+AMP" if you remedy the problem. The HDMI CONTROL function does not work. • Check the HDMI connection (...
... TV, then press AV ?/1. The TV, receiver and connected components are turned off the TV. Notes • Set the TV power supply interlock function to - For details, see the operating instructions of ... the input of a component connected to turn off automatically. No sound is selected as the input on the TV's remote, the receiver and the connected components turn off . "TV+AMP" if you remedy the problem. The HDMI CONTROL function does not work. • Check the HDMI connection (...
Operating Instructions (Large File - 19.55 MB)
Page 1
Serial No. Model No. STR-DA3300ES ©2007 Sony Corporation Sony Corporation Printed in the space provided below. Record the serial number in Malaysia 3-209-648-11(5) Multi Channel AV Receiver Operating Instructions G_B_ Mode d'emploi F_R_ Owner's Record The model and serial numbers are located on the rear of the unit. Refer to them whenever you call upon your Sony dealer regarding this product.
Serial No. Model No. STR-DA3300ES ©2007 Sony Corporation Sony Corporation Printed in the space provided below. Record the serial number in Malaysia 3-209-648-11(5) Multi Channel AV Receiver Operating Instructions G_B_ Mode d'emploi F_R_ Owner's Record The model and serial numbers are located on the rear of the unit. Refer to them whenever you call upon your Sony dealer regarding this product.
Operating Instructions (Large File - 19.55 MB)
Page 3
...trademarks of SIRIUS Satellite Radio Inc. "DTS", "DTS-ES" and "Neo:6" are for model STR-DA3300ES. "SIRIUS" and the SIRIUS dog logo are owned by Sony Corporation is under license from Dolby Laboratories. and other related technologies dully licensed owned by looking ...Server" is a trademark of their respective owners. The font type (Shin Go R) installed in this STR-DA3300ES Multi Channel AV Receiver is a trademark of Directive 1999/5/EC. These names are of Sony Corporation. 3GB All other relevant provisions of THX Ltd., which may be registered in the U.S. Other ...
...trademarks of SIRIUS Satellite Radio Inc. "DTS", "DTS-ES" and "Neo:6" are for model STR-DA3300ES. "SIRIUS" and the SIRIUS dog logo are owned by Sony Corporation is under license from Dolby Laboratories. and other related technologies dully licensed owned by looking ...Server" is a trademark of their respective owners. The font type (Shin Go R) installed in this STR-DA3300ES Multi Channel AV Receiver is a trademark of Directive 1999/5/EC. These names are of Sony Corporation. 3GB All other relevant provisions of THX Ltd., which may be registered in the U.S. Other ...
Operating Instructions (Large File - 19.55 MB)
Page 7
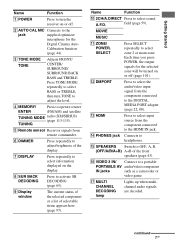
...and TREBLE. H SUR BACK DECODING Press to a portable PORTABLE AV audio/video component IN jacks such as a camcorder or video game. field (page 59). P VIDEO 3 IN/ Connect to activate SB DECODING (page 65). Q MULTI CHANNEL DECODING lamp Lights up when multichannel audio signals are decoded. Each... Connects to operate a tuner ENTER (FM/AM) and satellite TUNING MODE radio (XM/SIRIUS) (page 113-115). TUNING E Remote sensor Receives signals from the component connected to the DIGITAL MEDIA PORT adapter (page 22, 88). Getting Started Name Function A POWER Press to turn TONE...
...and TREBLE. H SUR BACK DECODING Press to a portable PORTABLE AV audio/video component IN jacks such as a camcorder or video game. field (page 59). P VIDEO 3 IN/ Connect to activate SB DECODING (page 65). Q MULTI CHANNEL DECODING lamp Lights up when multichannel audio signals are decoded. Each... Connects to operate a tuner ENTER (FM/AM) and satellite TUNING MODE radio (XM/SIRIUS) (page 113-115). TUNING E Remote sensor Receives signals from the component connected to the DIGITAL MEDIA PORT adapter (page 22, 88). Getting Started Name Function A POWER Press to turn TONE...
Operating Instructions (Large File - 19.55 MB)
Page 11
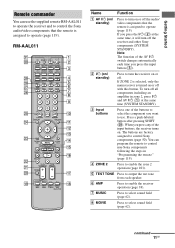
...MUSIC Press to control non-Sony components following the steps in zone 2, press ?/1 and AV ?/1 (A) at the same time, it will turn off . B ?/1 (on/ standby) Press to select sound field (page 62). H MOVIE Press to turn on or off the receiver and other Sony components (SYSTEM STANDBY). ...continued 11GB C Input buttons Press one of the buttons to select the component you press any of the AV ?/1 switch changes automatically each speaker. Getting Started Remote commander ...
...MUSIC Press to control non-Sony components following the steps in zone 2, press ?/1 and AV ?/1 (A) at the same time, it will turn off . B ?/1 (on/ standby) Press to select sound field (page 62). H MOVIE Press to turn on or off the receiver and other Sony components (SYSTEM STANDBY). ...continued 11GB C Input buttons Press one of the buttons to select the component you press any of the AV ?/1 switch changes automatically each speaker. Getting Started Remote commander ...

Operating Instructions (Large File - 19.55 MB)
Page 37
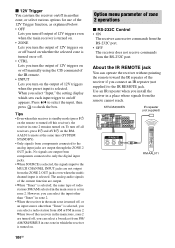
When the command mode is set to "AV2," "COMMAND MODE [AV2]" appears on the receiver while pressing 2CH/A.DIRECT. If the command modes of both the receiver and the other kinds of the initial setting (AV SYSTEM 2), it is not necessary to direct sunlight or lighting apparatuses. Insert two R6 (size-AA... all the batteries with old ones. • Do not mix manganese batteries and other Sony component respond to the same remote command, switch the command mode of the receiver 2CH/A.DIRECT RM-AAL011 RM-AAU018 Notes • Do not leave the remote in an extremely hot or humid place. &#...
When the command mode is set to "AV2," "COMMAND MODE [AV2]" appears on the receiver while pressing 2CH/A.DIRECT. If the command modes of both the receiver and the other kinds of the initial setting (AV SYSTEM 2), it is not necessary to direct sunlight or lighting apparatuses. Insert two R6 (size-AA... all the batteries with old ones. • Do not mix manganese batteries and other Sony component respond to the same remote command, switch the command mode of the receiver 2CH/A.DIRECT RM-AAL011 RM-AAU018 Notes • Do not leave the remote in an extremely hot or humid place. &#...
Operating Instructions (Large File - 19.55 MB)
Page 38
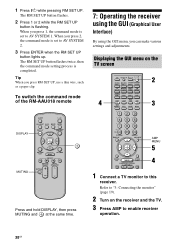
... completed. Tip When you can make various settings and adjustments. AMP MENU 5 4 1 Connect a TV monitor to AV SYSTEM 1. To switch the command mode of the RM-AAU018 remote 7: Operating the receiver using the GUI (Graphical User Interface) By using the GUI menu, you press RM SET UP, use a thin...is flashing. When you press 2, the command mode is set to enable receiver operation. 38GB When you press 1, the command mode is set to this receiver. Displaying the GUI menu on the receiver and the TV. 3 Press AMP to AV SYSTEM 2. 3 Press ENTER when the RM SET UP button lights up....
... completed. Tip When you can make various settings and adjustments. AMP MENU 5 4 1 Connect a TV monitor to AV SYSTEM 1. To switch the command mode of the RM-AAU018 remote 7: Operating the receiver using the GUI (Graphical User Interface) By using the GUI menu, you press RM SET UP, use a thin...is flashing. When you press 2, the command mode is set to enable receiver operation. 38GB When you press 1, the command mode is set to this receiver. Displaying the GUI menu on the receiver and the TV. 3 Press AMP to AV SYSTEM 2. 3 Press ENTER when the RM SET UP button lights up....

Operating Instructions (Large File - 19.55 MB)
Page 54
Enjoying video games 2 3 6 6 3 VIDEO 3 IN/PORTABLE AV IN • Refer to the operating instructions supplied with the TV and video game. 1 Turn on the TV and video game. 2 Turn on this receiver to select "VIDEO 3*." * When you have finished playing a game, eject the disc and turn off the receiver, the TV, and the video... back on the video game. 6 Adjust to a suitable volume. 7 After you connect a TV game to select "VIDEO 3*." You can also use INPUT SELECTOR on the receiver. 3 Press INPUT SELECTOR to the VIDEO 3 IN/PORTABLE AV IN jack on the front panel.
Enjoying video games 2 3 6 6 3 VIDEO 3 IN/PORTABLE AV IN • Refer to the operating instructions supplied with the TV and video game. 1 Turn on the TV and video game. 2 Turn on this receiver to select "VIDEO 3*." * When you have finished playing a game, eject the disc and turn off the receiver, the TV, and the video... back on the video game. 6 Adjust to a suitable volume. 7 After you connect a TV game to select "VIDEO 3*." You can also use INPUT SELECTOR on the receiver. 3 Press INPUT SELECTOR to the VIDEO 3 IN/PORTABLE AV IN jack on the front panel.
Operating Instructions (Large File - 19.55 MB)
Page 104
...this receiver), the receiver in zone 2. Tips • Even when this receiver is standby mode (press ?/1 on the output of the receiver if you can select the input other than "Tuner" in zone 2. • When the receiver in zone 2. However, you connect an IR repeater (not supplied) to the MULTI CHANNEL ...even when the main receiver is turned off appears. Press V/v to select the input, then press to on . When two of radio station (FM/AM) selected in a place where signals from the ZONE 2 OUT jacks even when the multichannel input is selected. STR-DA3300ES IR repeater (not ...
...this receiver), the receiver in zone 2. Tips • Even when this receiver is standby mode (press ?/1 on the output of the receiver if you can select the input other than "Tuner" in zone 2. • When the receiver in zone 2. However, you connect an IR repeater (not supplied) to the MULTI CHANNEL ...even when the main receiver is turned off appears. Press V/v to select the input, then press to on . When two of radio station (FM/AM) selected in a place where signals from the ZONE 2 OUT jacks even when the multichannel input is selected. STR-DA3300ES IR repeater (not ...

Operating Instructions (Large File - 19.55 MB)
Page 116
...receivers, press ?/1 and AV ?/1 on the RMAAL011 remote at the same time (SYSTEM STANDBY). • Only signals from components connected to only the digital input jacks. • When SOURCE is selected, the signals input to the MULTI CHANNEL INPUT jacks are output. 1 Turn on the main receiver (this receiver), the receiver...zone 2. No signals are output from components connected to the analog input jacks are described for connecting an IR repeater and operating the receiver in another zone (ZONE 2 operations)" (page 101). The remote switches to zone 2 mode. 3 Turn on the amplifier in ...
...receivers, press ?/1 and AV ?/1 on the RMAAL011 remote at the same time (SYSTEM STANDBY). • Only signals from components connected to only the digital input jacks. • When SOURCE is selected, the signals input to the MULTI CHANNEL INPUT jacks are output. 1 Turn on the main receiver (this receiver), the receiver...zone 2. No signals are output from components connected to the analog input jacks are described for connecting an IR repeater and operating the receiver in another zone (ZONE 2 operations)" (page 101). The remote switches to zone 2 mode. 3 Turn on the amplifier in ...

Operating Instructions (Large File - 19.55 MB)
Page 118
... player, Disc CD CATV satellite/ BST A/B deck player, MEDIA DVD/ Player player, terminal terrestrial MD PORT VHS LD (UC) receiver deck device Button combo player (EURO) AV ?/1, zz z z z z z ?/1 (after pressing TV) zz zz Numeric buttons zz z z zz z z z z zzz z MEMORY/ENTER z z z z z z* z z z zzz z CLEAR/D.TUNING/ z z z z z z z >10/-/-- PRESET +/-, TV CH +/- zz z z z* z z z z zzz z zz z DVD TOP...
... player, Disc CD CATV satellite/ BST A/B deck player, MEDIA DVD/ Player player, terminal terrestrial MD PORT VHS LD (UC) receiver deck device Button combo player (EURO) AV ?/1, zz z z z z z ?/1 (after pressing TV) zz zz Numeric buttons zz z z zz z z z z zzz z MEMORY/ENTER z z z z z z* z z z zzz z CLEAR/D.TUNING/ z z z z z z z >10/-/-- PRESET +/-, TV CH +/- zz z z z* z z z z zzz z zz z DVD TOP...

Operating Instructions (Large File - 19.55 MB)
Page 119
...mode. To cancel programming Press RM SET UP during any step. You cannot change the settings of the component, more than Sony is connected to your receiver. RM SET UP and the input button light up . Note For a TV remote code value, only numbers in which...2 While the RM SET UP button is normally unable to control non-Sony components and also Sony components that a component accepts differs depending on the receiver and point the remote towards the receiver when performing the following procedure. 1 2 3 4 1 Press AV ?/1 while pressing RM SET UP. The procedure below to control. Tip...
...mode. To cancel programming Press RM SET UP during any step. You cannot change the settings of the component, more than Sony is connected to your receiver. RM SET UP and the input button light up . Note For a TV remote code value, only numbers in which...2 While the RM SET UP button is normally unable to control non-Sony components and also Sony components that a component accepts differs depending on the receiver and point the remote towards the receiver when performing the following procedure. 1 2 3 4 1 Press AV ?/1 while pressing RM SET UP. The procedure below to control. Tip...


