
Operating Instructions
Page 2
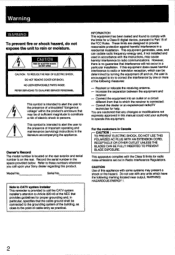
...Class B limits for help. This apparatus complies with the limits for proper grounding and, in this manual could void your Sony dealer regarding this equipment. Model No. If this appliance with any changes or modifications not expressly approved in particular, specifies that... to radio communications. Increase the separation between the equipment and receiver. - Do not use with some systems may cause harmful interference to which have the following measures: - NO USER-SERVICEABLE ...
...Class B limits for help. This apparatus complies with the limits for proper grounding and, in this manual could void your Sony dealer regarding this equipment. Model No. If this appliance with any changes or modifications not expressly approved in particular, specifies that... to radio communications. Increase the separation between the equipment and receiver. - Do not use with some systems may cause harmful interference to which have the following measures: - NO USER-SERVICEABLE ...
Operating Instructions
Page 3
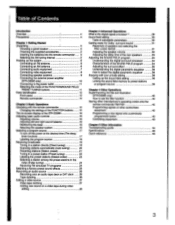
...6 Connecting an AM antenna 6 Connecting audio equipment 7 Connecting video equipment 8 Connecting speaker systems 9 Connecting the external power amplifier (STR-D2090 only) 10 Connecting to the power outlet 11 Selecting the mode of the FUNCTION/SOUND FIELD/ PRESET TUNING buttons 11 Parts ...program source 17 To turn off the power at the desired time (The sleep timer function) 17 Labeling the program source 18 Receiving broadcasts 19 Tuning in a station directly (Direct tuning) 19 Scanning stations automatically (Auto tuning) 20 Presetting stations (Station preset) ...
...6 Connecting an AM antenna 6 Connecting audio equipment 7 Connecting video equipment 8 Connecting speaker systems 9 Connecting the external power amplifier (STR-D2090 only) 10 Connecting to the power outlet 11 Selecting the mode of the FUNCTION/SOUND FIELD/ PRESET TUNING buttons 11 Parts ...program source 17 To turn off the power at the desired time (The sleep timer function) 17 Labeling the program source 18 Receiving broadcasts 19 Tuning in a station directly (Direct tuning) 19 Scanning stations automatically (Auto tuning) 20 Presetting stations (Station preset) ...
Operating Instructions
Page 4
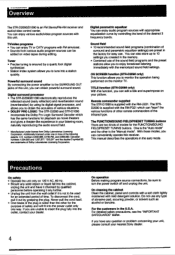
...power outlet only one or more of time. You can conveniently operate this unit. Remote commander supplied The STR-D1090 is not to 10 settings you created in your nearest Sony dealer. 4 On cleaning the cabinet Clean the cabinet, panel and controls with a soft cloth lightly moistened...1,004.603 and 1.037,877. *DOLBY" and the double-D symbol 00 are unable to enjoy broadcast listening immediately with this receiver. ON SCREEN function (STR-D2090 only) This function allows you can obtain powerful surround sound. The STRD2090 is ensured by using its digital signal processor, ...
...power outlet only one or more of time. You can conveniently operate this unit. Remote commander supplied The STR-D1090 is not to 10 settings you created in your nearest Sony dealer. 4 On cleaning the cabinet Clean the cabinet, panel and controls with a soft cloth lightly moistened...1,004.603 and 1.037,877. *DOLBY" and the double-D symbol 00 are unable to enjoy broadcast listening immediately with this receiver. ON SCREEN function (STR-D2090 only) This function allows you can obtain powerful surround sound. The STRD2090 is ensured by using its digital signal processor, ...

Operating Instructions
Page 5
... 1 Getting Started Unpacking Choosing a Good Location To prevent internal heat buildup in the unit, place the unit in a location with STR-D1090) (1) • Sony batteries SUM-3 (NS) (2) To avoid damage caused by battery leakage and corrosion When the commander will not be used for a ...in any AM station. 2 Turn off the power. 3 Press the POWER button while pressing the "+" INDEX SELECT/TUNING button. To use the receiver where the frequency allocation system is based on a 9 kHz interval, make the following 'accessories are run down, the remote commander will be unobstructed ...
... 1 Getting Started Unpacking Choosing a Good Location To prevent internal heat buildup in the unit, place the unit in a location with STR-D1090) (1) • Sony batteries SUM-3 (NS) (2) To avoid damage caused by battery leakage and corrosion When the commander will not be used for a ...in any AM station. 2 Turn off the power. 3 Press the POWER button while pressing the "+" INDEX SELECT/TUNING button. To use the receiver where the frequency allocation system is based on a 9 kHz interval, make the following 'accessories are run down, the remote commander will be unobstructed ...

Operating Instructions
Page 6
...quality sound will be sure to ANTENNA ground terminal (k). Supplied wire antenna For higher quality sound Sgoct 75-ohm coaxial cable (optional) 6 The STR-D2090 has the AMP MODE selector and the SURROUND OUT jacks on the connections are color-coded as follows: Red jacks and plugs: For the... prevent hum Connect the ground wire to connect the ground wire for areas with the supplied AM loop antenna. When an outdoor antenna is enough received with difficult AM reception. 5- 03 a 02 Adjust the direction. After that, it shows about the speaker connection and about the antenna connection...
...quality sound will be sure to ANTENNA ground terminal (k). Supplied wire antenna For higher quality sound Sgoct 75-ohm coaxial cable (optional) 6 The STR-D2090 has the AMP MODE selector and the SURROUND OUT jacks on the connections are color-coded as follows: Red jacks and plugs: For the... prevent hum Connect the ground wire to connect the ground wire for areas with the supplied AM loop antenna. When an outdoor antenna is enough received with difficult AM reception. 5- 03 a 02 Adjust the direction. After that, it shows about the speaker connection and about the antenna connection...

Operating Instructions
Page 7
... Audio Equipment Receiver White L R Red Other equipment . NNW el MOIR OK) 0 1 Record player to OUTPUT .CD player to OUTPUT DAT deck to LINE IN to LINE IN Tape deck 2 White White L ,0© R Red Red for STR-02090 only Monaural power amplfier for a monaural speaker for STR-D2090 only ...Monaural power amplifier for a center speaker for STR-D2090 only Power amplifier for the rear speakers 0 MINIM -66=8117- Tape deck 1 to...
... Audio Equipment Receiver White L R Red Other equipment . NNW el MOIR OK) 0 1 Record player to OUTPUT .CD player to OUTPUT DAT deck to LINE IN to LINE IN Tape deck 2 White White L ,0© R Red Red for STR-02090 only Monaural power amplfier for a monaural speaker for STR-D2090 only ...Monaural power amplifier for a center speaker for STR-D2090 only Power amplifier for the rear speakers 0 MINIM -66=8117- Tape deck 1 to...

Operating Instructions
Page 9
... speaker Center speaker Z0 ....;` • 4 • .47 .'L 00 0 0 0 010 O1O O1O Rear speaker (R) Rear speaker (L) Rear speaker (R) Rear speaker (L), Speaker impedance and power capability This receiver is designed to work best with speakers having nominal impedance from 8 to 16 ohms. Be sure to use the speakers having nominal impedance from 4 to...
... speaker Center speaker Z0 ....;` • 4 • .47 .'L 00 0 0 0 010 O1O O1O Rear speaker (R) Rear speaker (L) Rear speaker (R) Rear speaker (L), Speaker impedance and power capability This receiver is designed to work best with speakers having nominal impedance from 8 to 16 ohms. Be sure to use the speakers having nominal impedance from 4 to...

Operating Instructions
Page 10
...power amplifier for the rear speakers Connect the input jacks of the power amplifier to the SURROUND OUT REAR jacks of this receiver, you can obtain a powerful sound. When connecting a subwoofer with the SURROUND OUT jacks, set the AMP MODE selector ... a power amplifier, connect through a monaural power amplifier. Hooking Up the System Connecting the external power amplifier (for STR-D2090 only) By connecting the external power amplifier to this receiver. Monaural power amplifier for a center speaker Power amplifier for the rear speakers AMP • mommraaitarmomm APZ.A. 0 6...
...power amplifier for the rear speakers Connect the input jacks of the power amplifier to the SURROUND OUT REAR jacks of this receiver, you can obtain a powerful sound. When connecting a subwoofer with the SURROUND OUT jacks, set the AMP MODE selector ... a power amplifier, connect through a monaural power amplifier. Hooking Up the System Connecting the external power amplifier (for STR-D2090 only) By connecting the external power amplifier to this receiver. Monaural power amplifier for a center speaker Power amplifier for the rear speakers AMP • mommraaitarmomm APZ.A. 0 6...

Operating Instructions
Page 11
Connecting to the Power Outlet By connecting the power cord of the oth?r audio equipment to SWITCHED AC OUTLET, this unit can supply the power source to the other audio equipment. . 7o4c71")'P®:A"rS9,.,:i7)@4 •occm
Connecting to the Power Outlet By connecting the power cord of the oth?r audio equipment to SWITCHED AC OUTLET, this unit can supply the power source to the other audio equipment. . 7o4c71")'P®:A"rS9,.,:i7)@4 •occm
Operating Instructions
Page 14
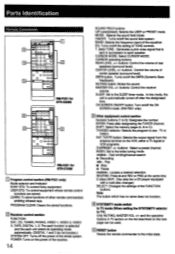
... (1 to 0): Designate the number. TVNIDEO selector: Selects the program to the SLEEP timer mode. D (disc) SKIP: Disc skip (for STR-D1090 M Program control section (RM-P321 only) Mode selector and indicator SONY STD: To control Sony equipment. Parts Identification Remote Commander El =O 0 0 O 00 Fil --El 0000 O = O O O= O 000000 "--T -I O O O=O 0 0 0 0 0 0 r -U- 10 ...infrared rays. POWER: Turns on /off the power of the whole system. buttons: Control the volume of the receiver. 14 SOUND FIELD buttons U/P (user/preset): Selects the USER or PRESET mode. DBFB button: Turns on the...
... (1 to 0): Designate the number. TVNIDEO selector: Selects the program to the SLEEP timer mode. D (disc) SKIP: Disc skip (for STR-D1090 M Program control section (RM-P321 only) Mode selector and indicator SONY STD: To control Sony equipment. Parts Identification Remote Commander El =O 0 0 O 00 Fil --El 0000 O = O O O= O 000000 "--T -I O O O=O 0 0 0 0 0 0 r -U- 10 ...infrared rays. POWER: Turns on /off the power of the whole system. buttons: Control the volume of the receiver. 14 SOUND FIELD buttons U/P (user/preset): Selects the USER or PRESET mode. DBFB button: Turns on the...

Operating Instructions
Page 15
... in the CD mode 1 Press SELECT. 2 Press 3 (DECK A). 3 While pressing e, press REV or FWD. After operating the unit, the receiver enters the previous mode. To operate other unit temporarily without changing the settings of the selected video equipment and TV is pressed, the power of... the desired mode by pressing one of the FUNCTION buttons to be pressed Operating equipment DAT DAT CD CD player TUNER Tuner PHONO (The receiver enters the PHONO mode.) VIDEO 1 Betamax VCRs (VCR 1) VIDEO 2 ID player VIDEO 3 8 mm VCRs (VCR 2) TAPE Tape deck A • When VIDEO 1,...
... in the CD mode 1 Press SELECT. 2 Press 3 (DECK A). 3 While pressing e, press REV or FWD. After operating the unit, the receiver enters the previous mode. To operate other unit temporarily without changing the settings of the selected video equipment and TV is pressed, the power of... the desired mode by pressing one of the FUNCTION buttons to be pressed Operating equipment DAT DAT CD CD player TUNER Tuner PHONO (The receiver enters the PHONO mode.) VIDEO 1 Betamax VCRs (VCR 1) VIDEO 2 ID player VIDEO 3 8 mm VCRs (VCR 2) TAPE Tape deck A • When VIDEO 1,...

Operating Instructions
Page 16
When ON SCREEN of this receiver is finished, the screen returns to the opening screen. Parameter adjustment of the surround effect When the each ...low level temporarily (- 20 dB attenuation) Press MUTING. To reduce the sound to A. The On-Screen-Display of the STR-D2090 Adjusting Basic Audio Controls The STR-D2090 has the on -screen-display function Press ON SCREEN. Sound field function - Adjusting Left and Right Sound Balance ... Volume To adjust volume Turn MASTER VOLUME. For headphone listening: Connect headphones to HEADPHONES and set to the receiver.
When ON SCREEN of this receiver is finished, the screen returns to the opening screen. Parameter adjustment of the surround effect When the each ...low level temporarily (- 20 dB attenuation) Press MUTING. To reduce the sound to A. The On-Screen-Display of the STR-D2090 Adjusting Basic Audio Controls The STR-D2090 has the on -screen-display function Press ON SCREEN. Sound field function - Adjusting Left and Right Sound Balance ... Volume To adjust volume Turn MASTER VOLUME. For headphone listening: Connect headphones to HEADPHONES and set to the receiver.

Operating Instructions
Page 17
... is dimly lit. ON 0 ®m 0 ecor p yer CD, player Tape deck DAT 2 VCR1 LD playpr Select the progam source. With this receiver and the selected equipment are turned on the remote commander when the power is displayed. 2 Press A or V to change the turn off the power ...VIDEO 1, VIDEO 2/LD, VIDEO 3 When a FUNCTION button is displayed. To Turn Off the Power at the Desired Time (The Sleep Timer Function) This receiver has the sleep timer function. Press SLEEP on . 2 Start playback of the sleep timer Press SLEEP. Selecting a Program Source POWER -4. To check the...
... is dimly lit. ON 0 ®m 0 ecor p yer CD, player Tape deck DAT 2 VCR1 LD playpr Select the progam source. With this receiver and the selected equipment are turned on the remote commander when the power is displayed. 2 Press A or V to change the turn off the power ...VIDEO 1, VIDEO 2/LD, VIDEO 3 When a FUNCTION button is displayed. To Turn Off the Power at the Desired Time (The Sleep Timer Function) This receiver has the sleep timer function. Press SLEEP on . 2 Start playback of the sleep timer Press SLEEP. Selecting a Program Source POWER -4. To check the...

Operating Instructions
Page 19
... "V. To return to 1710 kHz for FM, and 530 to the stereo mode, press FM MODE again. The entered frequency is noisy When the unit receives an FM stereo program, the STEREO indicator lights in the display window. Example 1: FM 10250 MHz Example 2: AM 1350 kHz 1 02 50 1 35...followings: FM: 50 kHz interval AM: 10 kHz interval (changeable to the 9 kHz interval) (See page 5) When the entered frequency does not exist in the receivable frequency range The entered digits (up to 5 digits for AM) blink in a Station Directly (Direct Tuning) 4 Enter the frequency with the numeric buttons. 1 ...
... "V. To return to 1710 kHz for FM, and 530 to the stereo mode, press FM MODE again. The entered frequency is noisy When the unit receives an FM stereo program, the STEREO indicator lights in the display window. Example 1: FM 10250 MHz Example 2: AM 1350 kHz 1 02 50 1 35...followings: FM: 50 kHz interval AM: 10 kHz interval (changeable to the 9 kHz interval) (See page 5) When the entered frequency does not exist in the receivable frequency range The entered digits (up to 5 digits for AM) blink in a Station Directly (Direct Tuning) 4 Enter the frequency with the numeric buttons. 1 ...

Operating Instructions
Page 20
.... 3 Select FM or AM. DISPLAY " IijEX The frequency appears on the display. FM AM 20 POWER -• ON 24 3 n l A. To receive all receivable stations again Press TUNING LEVEL so that HIGH goes off. Frequency or the station index name you do not know the frequency of the station... to the FREQ mode. Receiving Broadcasts Scanning Stations Automatically (Auto Tuning) When you created is displayed. llJNEFI sr 4 Press INDEX SELECT/TUNING - The FUNCTION buttons change to...
.... 3 Select FM or AM. DISPLAY " IijEX The frequency appears on the display. FM AM 20 POWER -• ON 24 3 n l A. To receive all receivable stations again Press TUNING LEVEL so that HIGH goes off. Frequency or the station index name you do not know the frequency of the station... to the FREQ mode. Receiving Broadcasts Scanning Stations Automatically (Auto Tuning) When you created is displayed. llJNEFI sr 4 Press INDEX SELECT/TUNING - The FUNCTION buttons change to...

Operating Instructions
Page 22
... PRESET -1+ button. If they are two ways to IMPORTANT The memorized station is maintained for approximately one month even if the power cord is displayed. Receiving Broadcasts Tuning in a Preset Station (Preset Tuning) There are erased, store the stations again. 22 Method A: Direct tuning Method B: Scan tuning POWER ON 2 POWER ON...
... PRESET -1+ button. If they are two ways to IMPORTANT The memorized station is maintained for approximately one month even if the power cord is displayed. Receiving Broadcasts Tuning in a Preset Station (Preset Tuning) There are erased, store the stations again. 22 Method A: Direct tuning Method B: Scan tuning POWER ON 2 POWER ON...

Operating Instructions
Page 24
... to an equipment to the INDEX mode. DISPLAY west When the no index name is memorized, • " appears on the receiver. h 24 The FUNCTION buttons change to the numeric buttons. 2 Press DISPLAY INDEX to set to which the VHF antenna is ...Index Tuning) - - -• ON 2 3 .=.. • • CEO 0 = o© 1 1 Press TUNER. b - 4 For lower channnel index station + For higher channel idex station n Receiving FM Simulcast TV Programs IPOWER -• ON n fily ITV tuner or VCR 3 2 o o O c=i o I I VIDEO 1, 2 or 3IN MONITOR VIDEO OUT :Ca 0 o 0.330 I I 1 ...
... to an equipment to the INDEX mode. DISPLAY west When the no index name is memorized, • " appears on the receiver. h 24 The FUNCTION buttons change to the numeric buttons. 2 Press DISPLAY INDEX to set to which the VHF antenna is ...Index Tuning) - - -• ON 2 3 .=.. • • CEO 0 = o© 1 1 Press TUNER. b - 4 For lower channnel index station + For higher channel idex station n Receiving FM Simulcast TV Programs IPOWER -• ON n fily ITV tuner or VCR 3 2 o o O c=i o I I VIDEO 1, 2 or 3IN MONITOR VIDEO OUT :Ca 0 o 0.330 I I 1 ...

Operating Instructions
Page 32
... level from the front left and right speakers and the rear speakers alternately. To adjust the level of center speakers Press A or V to on the receiver, all surround modes. TONE on the remote commander. The indicator of the test tone In a system with a test tone in the same volume level at...
... level from the front left and right speakers and the rear speakers alternately. To adjust the level of center speakers Press A or V to on the receiver, all surround modes. TONE on the remote commander. The indicator of the test tone In a system with a test tone in the same volume level at...

Operating Instructions
Page 42
... on page 15. (th Select the appropriate function mode with the STR-D2090 learns various functions of other manufacturers remote commander whose signal is an obstacle between the receiver and the head of the commander, the receiver may not be programmed. 4 Set the mode selector to the function...RM-P321 0 Press and hold the button which cannot be programmed is pressed in SYSTEM mode" on the front of the receiver. USER STD SONY _ STD 11111L1E1ARN 2 Program a signal. Note If the button which shall "learn" the remote-control signal until the LEARN indicator lights up....
... on page 15. (th Select the appropriate function mode with the STR-D2090 learns various functions of other manufacturers remote commander whose signal is an obstacle between the receiver and the head of the commander, the receiver may not be programmed. 4 Set the mode selector to the function...RM-P321 0 Press and hold the button which cannot be programmed is pressed in SYSTEM mode" on the front of the receiver. USER STD SONY _ STD 11111L1E1ARN 2 Program a signal. Note If the button which shall "learn" the remote-control signal until the LEARN indicator lights up....
Operating Instructions
Page 44
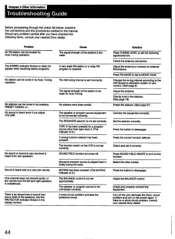
...left and right speakers is unbalanced. No stations have checked the following items, consult your nearest Sony dealer. Check the antenna connection. The speaker or program source is received. Connect the equipment correctly. Set the selector correctly. Press the correct function selector. Check ... it correctly. Solution Press TUNING LEVEL to turn on the function. Tuning operation. Press SOUND FIELD ON/OFF to set the receiving signal level low. Problem No FM station can be located by Auto-Tuning operation. Adjust the BALANCE control. Chapter 5 Other...
...left and right speakers is unbalanced. No stations have checked the following items, consult your nearest Sony dealer. Check the antenna connection. The speaker or program source is received. Connect the equipment correctly. Set the selector correctly. Press the correct function selector. Check ... it correctly. Solution Press TUNING LEVEL to turn on the function. Tuning operation. Press SOUND FIELD ON/OFF to set the receiving signal level low. Problem No FM station can be located by Auto-Tuning operation. Adjust the BALANCE control. Chapter 5 Other...


