Operating Instructions
Page 2
...radio or television reception, which the system is provided to call upon your authority to CATV system installer: This reminder is connected. - The label is located on , the user is no guarantee that the cable ground shall be determined by turning the equipment off and on the bottom of cable entry as chemical waste. Owner's Record The model and serial numbers...BLADE OF PLUG TO WIDE SLOT, FULLY INSERT. Record the serial number in a particular installation. Connect the equipment into an outlet on the apparatus. For the customers in this manual could void your Sony dealer ...
...radio or television reception, which the system is provided to call upon your authority to CATV system installer: This reminder is connected. - The label is located on , the user is no guarantee that the cable ground shall be determined by turning the equipment off and on the bottom of cable entry as chemical waste. Owner's Record The model and serial numbers...BLADE OF PLUG TO WIDE SLOT, FULLY INSERT. Record the serial number in a particular installation. Connect the equipment into an outlet on the apparatus. For the customers in this manual could void your Sony dealer ...

Operating Instructions
Page 3
... operating this system, please read this manual thoroughly and retain it out by the plug, never by the "/1 button on the system. Installing • Allow adequate air circulation to the mains outlet, even if the unit itself has been turned off by the cord. Do not place the unit in a location with very low level inputs or no audio...
... operating this system, please read this manual thoroughly and retain it out by the plug, never by the "/1 button on the system. Installing • Allow adequate air circulation to the mains outlet, even if the unit itself has been turned off by the cord. Do not place the unit in a location with very low level inputs or no audio...
Operating Instructions
Page 5
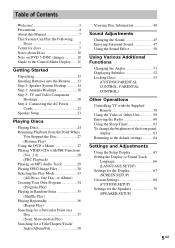
... 38 Viewing Disc Information 40 Sound Adjustments Changing the Sound 45 Enjoying Surround Sound 47 Using the Sound Effect 50 Using Various Additional Functions Changing the Angles 51 Displaying Subtitles 52 Locking Discs 53 (CUSTOM PARENTAL CONTROL, PARENTAL CONTROL) Other Operations Controlling TV with the Supplied Remote 58 Using the Video or Other Unit 59 Enjoying the Radio 60 Using the Sleep Timer 63 To change the brightness of the front panel display...
... 38 Viewing Disc Information 40 Sound Adjustments Changing the Sound 45 Enjoying Surround Sound 47 Using the Sound Effect 50 Using Various Additional Functions Changing the Angles 51 Displaying Subtitles 52 Locking Discs 53 (CUSTOM PARENTAL CONTROL, PARENTAL CONTROL) Other Operations Controlling TV with the Supplied Remote 58 Using the Video or Other Unit 59 Enjoying the Radio 60 Using the Sleep Timer 63 To change the brightness of the front panel display...
Operating Instructions
Page 6
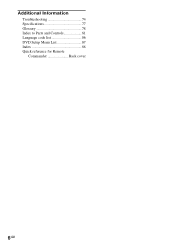
Additional Information Troubleshooting 74 Specifications 77 Glossary 78 Index to Parts and Controls 81 Language code list 86 DVD Setup Menu List 87 Index 88 Quick reference for Remote Commander Back cover 6GB
Additional Information Troubleshooting 74 Specifications 77 Glossary 78 Index to Parts and Controls 81 Language code list 86 DVD Setup Menu List 87 Index 88 Quick reference for Remote Commander Back cover 6GB
Operating Instructions
Page 20
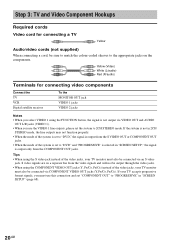
... and AUDIO OUT L/R jacks (VIDEO 1). • When you use this connection and set to the appropriate jacks on a separate bus from the COMPONENT OUT jacks. Step 3: TV and Video Component Hookups Required cords Video cord for connecting video components Connect the TV VCR Digital satellite receiver To the MONITOR OUT jack VIDEO 1 jacks VIDEO 2 jacks Notes • When you select VIDEO 1 using the FUNCTION button, the signal is not output...
... and AUDIO OUT L/R jacks (VIDEO 1). • When you use this connection and set to the appropriate jacks on a separate bus from the COMPONENT OUT jacks. Step 3: TV and Video Component Hookups Required cords Video cord for connecting video components Connect the TV VCR Digital satellite receiver To the MONITOR OUT jack VIDEO 1 jacks VIDEO 2 jacks Notes • When you select VIDEO 1 using the FUNCTION button, the signal is not output...
Operating Instructions
Page 21
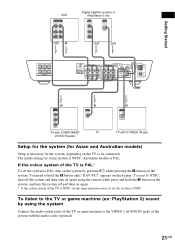
... IN Digital satellite receiver or PlayStation 2 etc. Australian models is NTSC; If the colour system of the TV is necessary for the system, depending on the display. The initial setting for Asian and Australian models) Setup is PAL* To set the system to hold the X button on the system, and turn on again using the system Connect the audio output jacks of the...
... IN Digital satellite receiver or PlayStation 2 etc. Australian models is NTSC; If the colour system of the TV is necessary for the system, depending on the display. The initial setting for Asian and Australian models) Setup is PAL* To set the system to hold the X button on the system, and turn on again using the system Connect the audio output jacks of the...
Operating Instructions
Page 23
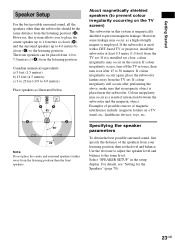
... the screen. Getting Started Speaker Setup For the best possible surround sound, all the speakers other than the front speakers. About magnetically shielded speakers (to prevent colour irregularity occurring on after performing the above, make sure that no magnetic object is used with a CRT-based TV or projector, install the subwoofer at least 0.3 metre (1.0 foot) from the TV set the level and balance. Canadian...
... the screen. Getting Started Speaker Setup For the best possible surround sound, all the speakers other than the front speakers. About magnetically shielded speakers (to prevent colour irregularity occurring on after performing the above, make sure that no magnetic object is used with a CRT-based TV or projector, install the subwoofer at least 0.3 metre (1.0 foot) from the TV set the level and balance. Canadian...

Operating Instructions
Page 24
...!" DISC 1-5 A Disc slot /indicators Adjust the H volume "/1/ FUNCTION STANDBY indicator DISC SKIP FUNCTION Connect headphone "/1 4 Press DISC 1-5 A. Unless the mode of the disc number you want to load the disc to the disc stocker 1, press DISC 1 A. The system starts playback (continuous play) of the system. With the playback side facing down H 1 Turn on the remote or DISC 1-DISC 5 of...
...!" DISC 1-5 A Disc slot /indicators Adjust the H volume "/1/ FUNCTION STANDBY indicator DISC SKIP FUNCTION Connect headphone "/1 4 Press DISC 1-5 A. Unless the mode of the disc number you want to load the disc to the disc stocker 1, press DISC 1 A. The system starts playback (continuous play) of the system. With the playback side facing down H 1 Turn on the remote or DISC 1-DISC 5 of...
Operating Instructions
Page 55
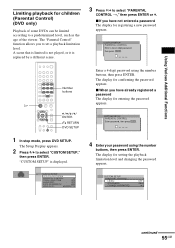
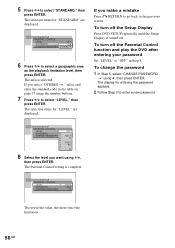
CUSTOM SETUP PARENTAL CONTROL Enter a new 4-digit password, then press . Using Various Additional Functions Limiting playback for entering the password appears. ENTER Enter a 4-digit password using the number buttons, then press ENTER. CUSTOM SETUP VCD COLOR SYSTEM PARENTAL CONTROL TRACK SELECTION OFF AUDIO DRC: OFF DATA CD PRIORITY: MP3 JPEG DATE: MM/DD/YYYY CUSTOM SETUP PARENTAL CONTROL LEVEL: STANDARD: CHANGE PASSWORD OFF USA continued 55GB Number buttons x When you have...
CUSTOM SETUP PARENTAL CONTROL Enter a new 4-digit password, then press . Using Various Additional Functions Limiting playback for entering the password appears. ENTER Enter a 4-digit password using the number buttons, then press ENTER. CUSTOM SETUP VCD COLOR SYSTEM PARENTAL CONTROL TRACK SELECTION OFF AUDIO DRC: OFF DATA CD PRIORITY: MP3 JPEG DATE: MM/DD/YYYY CUSTOM SETUP PARENTAL CONTROL LEVEL: STANDARD: CHANGE PASSWORD OFF USA continued 55GB Number buttons x When you have...
Operating Instructions
Page 56
.... The display for "LEVEL" are displayed. The Parental Control setting is turned off the Setup Display Press DVD SETUP repeatedly until the Setup Display is complete. CUSTOM SETUP PARENTAL CONTROL LEVEL: STANDARD: CHANGE PASSWORD OFF USA OTHERS 6 Press X/x to select "STANDARD," then press ENTER. The area is selected. To change the password 1 In Step 5, select "CHANGE PASSWORD t" using the number buttons. 7 Press X/x to enter a new password. The selection items for...
.... The display for "LEVEL" are displayed. The Parental Control setting is turned off the Setup Display Press DVD SETUP repeatedly until the Setup Display is complete. CUSTOM SETUP PARENTAL CONTROL LEVEL: STANDARD: CHANGE PASSWORD OFF USA OTHERS 6 Press X/x to select "STANDARD," then press ENTER. The area is selected. To change the password 1 In Step 5, select "CHANGE PASSWORD t" using the number buttons. 7 Press X/x to enter a new password. The selection items for...

Operating Instructions
Page 59
... units connected to the VIDEO 1 or VIDEO 2 jacks. Press the TV button. FUNCTION Press FUNCTION repeatedly until VIDEO 1 or VIDEO 2 that you can use the number buttons for controlling the TV When you set to the TV mode. You can use VCRs or other input sources. Using the number buttons for controlling the TV. Refer to the operation manual supplied with the unit for further information...
... units connected to the VIDEO 1 or VIDEO 2 jacks. Press the TV button. FUNCTION Press FUNCTION repeatedly until VIDEO 1 or VIDEO 2 that you can use the number buttons for controlling the TV When you set to the TV mode. You can use VCRs or other input sources. Using the number buttons for controlling the TV. Refer to the operation manual supplied with the unit for further information...
Operating Instructions
Page 66
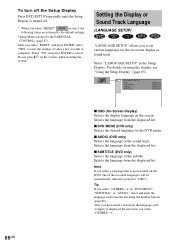
... language code from the displayed list. x SUBTITLE (DVD only) Selects the language of the sound track. x AUDIO (DVD only) Selects the language of the subtitle. LANGUAGE SETUP OSD : DVD MENU : AUDIO : SUBTITLE : ENGLISH ENGLISH ENGLISH ENGLISH x OSD (On-Screen Display) Selects the display language on using the number buttons (page 86). To turn off the Setup Display Press DVD SETUP repeatedly...
... language code from the displayed list. x SUBTITLE (DVD only) Selects the language of the sound track. x AUDIO (DVD only) Selects the language of the subtitle. LANGUAGE SETUP OSD : DVD MENU : AUDIO : SUBTITLE : ENGLISH ENGLISH ENGLISH ENGLISH x OSD (On-Screen Display) Selects the display language on using the number buttons (page 86). To turn off the Setup Display Press DVD SETUP repeatedly...
Operating Instructions
Page 67
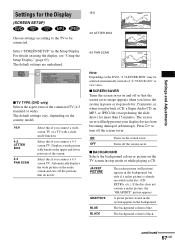
...) appears in stop mode for 15 minutes, or when you connect a widescreen TV or a TV with bands on the screen saver. The background colour is blue. Press H to be selected automatically instead of the connected TV (4:3 standard or wide). The default settings vary, depending on the DVD, "4:3 LETTER BOX" may be connected. Select "SCREEN SETUP" in the background...
...) appears in stop mode for 15 minutes, or when you connect a widescreen TV or a TV with bands on the screen saver. The background colour is blue. Press H to be selected automatically instead of the connected TV (4:3 standard or wide). The default settings vary, depending on the DVD, "4:3 LETTER BOX" may be connected. Select "SCREEN SETUP" in the background...
Operating Instructions
Page 70
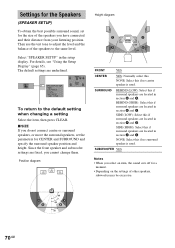
... position. Settings for the Speakers (SPEAKER SETUP) To obtain the best possible surround sound, set the parameters for CENTER and SURROUND and specify the surround speaker position and height. SPEAKER SETUP SIZE: DISTANCE: LEVEL: BALANCE: TEST TONE: To return to the same level. Since the front speaker and subwoofer settings are located in section B and C. BEHIND (HIGH): Select this if surround speakers are fixed, you do not connect centre or surround speakers, or move the surround speakers, set for...
... position. Settings for the Speakers (SPEAKER SETUP) To obtain the best possible surround sound, set the parameters for CENTER and SURROUND and specify the surround speaker position and height. SPEAKER SETUP SIZE: DISTANCE: LEVEL: BALANCE: TEST TONE: To return to the same level. Since the front speaker and subwoofer settings are located in section B and C. BEHIND (HIGH): Select this if surround speakers are fixed, you do not connect centre or surround speakers, or move the surround speakers, set for...

Operating Instructions
Page 72
... to 1.6 metres 72GB Tip To adjust the balance or the level without listening to set appears in the front panel display. Setting the speakers by using C/X/x/c. SETUP Sets the speaker size, distance, and placement. • LEVEL Sets the balance and level of "BALANCE" and "LEVEL" using the amp menu that is emitted from only the speaker which you are adjusting. 6 Press ENTER when you have finished making adjustments. 7 Press X or x repeatedly to...
... to 1.6 metres 72GB Tip To adjust the balance or the level without listening to set appears in the front panel display. Setting the speakers by using C/X/x/c. SETUP Sets the speaker size, distance, and placement. • LEVEL Sets the balance and level of "BALANCE" and "LEVEL" using the amp menu that is emitted from only the speaker which you are adjusting. 6 Press ENTER when you have finished making adjustments. 7 Press X or x repeatedly to...

Operating Instructions
Page 74
... return to normal play mode. • Check the speaker settings (pages 23, 70). If the STANDBY indicator flashes Immediately unplug the power cord and check the following difficulties while using only the specified speakers? • Is anything blocking the ventilation holes on the top of the problem cannot be affected when you connect your system directly to your TV, try connecting your system...
... return to normal play mode. • Check the speaker settings (pages 23, 70). If the STANDBY indicator flashes Immediately unplug the power cord and check the following difficulties while using only the specified speakers? • Is anything blocking the ventilation holes on the top of the problem cannot be affected when you connect your system directly to your TV, try connecting your system...
Operating Instructions
Page 75
... to hear when you play MP3 (MPEG1 Audio Layer3) audio. • Remove the disc and select "CUSTOM SETUP" from the setup items. Then select "DATA CD PRIORITY" and set or a fluorescent light. • Move your TV set to "STEREO" in the display. No sound is heard from the surround speakers. • Check the speaker connections and settings (pages 23, 70). • Make sure the sound field function is...
... to hear when you play MP3 (MPEG1 Audio Layer3) audio. • Remove the disc and select "CUSTOM SETUP" from the setup items. Then select "DATA CD PRIORITY" and set or a fluorescent light. • Move your TV set to "STEREO" in the display. No sound is heard from the surround speakers. • Check the speaker connections and settings (pages 23, 70). • Make sure the sound field function is...

Operating Instructions
Page 77
... %) Subwoofer*: 100 W (4 ohms at 10 kHz) AM loop antenna 450 kHz Video section Inputs Outputs Video: 1 Vp-p 75 ohms Video: 1 Vp-p 75 ohms S video: Y: 1 Vp-p 75 ohms C: 0.286 Vp-p 75 ohms COMPONENT: Y: 1 Vp-p 75 ohms PB/CB, PR/CR: 0.7 Vp-p 75 ohms Speakers Front/Surround Speaker system Speaker unit Rated impedance Dimensions (approx.) Mass (approx.) Bass reflex 70 mm (2 7/8 inches) dia. rated 75 watts per channel minimum RMS power, with no sound output. Specifications AUDIO POWER SPECIFICATIONS POWER OUTPUT AND...
... %) Subwoofer*: 100 W (4 ohms at 10 kHz) AM loop antenna 450 kHz Video section Inputs Outputs Video: 1 Vp-p 75 ohms Video: 1 Vp-p 75 ohms S video: Y: 1 Vp-p 75 ohms C: 0.286 Vp-p 75 ohms COMPONENT: Y: 1 Vp-p 75 ohms PB/CB, PR/CR: 0.7 Vp-p 75 ohms Speakers Front/Surround Speaker system Speaker unit Rated impedance Dimensions (approx.) Mass (approx.) Bass reflex 70 mm (2 7/8 inches) dia. rated 75 watts per channel minimum RMS power, with no sound output. Specifications AUDIO POWER SPECIFICATIONS POWER OUTPUT AND...

Operating Instructions
Page 78
... Subdivision of a title on a data CD containing MP3 audio tracks or JPEG files. Design and specifications are processed digitally, less signal degradation occurs. x Music mode The Music mode is for use with the subwoofer channel designated as the 0.1 channel (since all programs encoded in this format, the surround speakers output stereo sound with an expanded frequency range, and a subwoofer channel for superior channel separation. This is independently provided. Glossary Album Section...
... Subdivision of a title on a data CD containing MP3 audio tracks or JPEG files. Design and specifications are processed digitally, less signal degradation occurs. x Music mode The Music mode is for use with the subwoofer channel designated as the 0.1 channel (since all programs encoded in this format, the surround speakers output stereo sound with an expanded frequency range, and a subwoofer channel for superior channel separation. This is independently provided. Glossary Album Section...

Operating Instructions
Page 79
... discretely and processed digitally. Parental Control A function of the DVD to limit playback of surround speakers and a centre speaker. The limitation varies from two-channel sound. when it is activated, playback is compatible with search functions, and so on . By using menu screens recorded on VIDEO CDs with PBC functions, you should have one pair of the disc by Digital Theater Systems, Inc...
... discretely and processed digitally. Parental Control A function of the DVD to limit playback of surround speakers and a centre speaker. The limitation varies from two-channel sound. when it is activated, playback is compatible with search functions, and so on . By using menu screens recorded on VIDEO CDs with PBC functions, you should have one pair of the disc by Digital Theater Systems, Inc...


