Operating Instructions
Page 6
... quality. • Avoid driving the speaker system continuously with an input exceeding the maximum input power of the shutter adaptor. Miscellaneous • Be careful not to avoid damaging the speaker system. 6 If used with a soft, dry cloth. This may damage the surface finish, or impair the operation of this speaker system. • Before connecting, turn off the display to spill water...
... quality. • Avoid driving the speaker system continuously with an input exceeding the maximum input power of the shutter adaptor. Miscellaneous • Be careful not to avoid damaging the speaker system. 6 If used with a soft, dry cloth. This may damage the surface finish, or impair the operation of this speaker system. • Before connecting, turn off the display to spill water...
Operating Instructions
Page 13
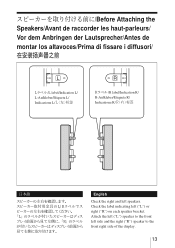
Check the label indicating left side and the right ("R") speaker to the front right side of the display. 13 Attach the left ("L") speaker to the front left ("L") or right ("R") on each speaker bracket. Before Attaching the Speakers/Avant de raccorder les haut-parleurs/ Vor dem Anbringen der Lautsprecher/Antes de montar los altavoces/Prima di fissare i diffusori/ -ϥϕϧ /L label/Indication L/ L-Aufkleber/Etiqueta L/ Indicazione L/ 3ϥϕϧ /R label/Indication R/ R-Aufkleber/Etiqueta R/ Indicazione R/ 3 3 English Check the right and left speakers.
Check the label indicating left side and the right ("R") speaker to the front right side of the display. 13 Attach the left ("L") speaker to the front left ("L") or right ("R") on each speaker bracket. Before Attaching the Speakers/Avant de raccorder les haut-parleurs/ Vor dem Anbringen der Lautsprecher/Antes de montar los altavoces/Prima di fissare i diffusori/ -ϥϕϧ /L label/Indication L/ L-Aufkleber/Etiqueta L/ Indicazione L/ 3ϥϕϧ /R label/Indication R/ R-Aufkleber/Etiqueta R/ Indicazione R/ 3 3 English Check the right and left speakers.

Operating Instructions
Page 15
... the left and right speakers). 15 Attaching the Speakers/ Montage des haut-parleurs/Anbringen der Lautsprecher/Fijación de los altavoces/Fissaggio dei diffusori/ Cable cover/ Cache-câbles/ Kabelabdeckung/Cubierta de cables/Coperchio dei cavi/ 12 1 1 2 b 12 b Bracket/Support/ Halterung/Soporte/Staffa/ English Follow the procedure below to attach the speakers: 1 Attach the speaker to open. Pull the cable cover...
... the left and right speakers). 15 Attaching the Speakers/ Montage des haut-parleurs/Anbringen der Lautsprecher/Fijación de los altavoces/Fissaggio dei diffusori/ Cable cover/ Cache-câbles/ Kabelabdeckung/Cubierta de cables/Coperchio dei cavi/ 12 1 1 2 b 12 b Bracket/Support/ Halterung/Soporte/Staffa/ English Follow the procedure below to attach the speakers: 1 Attach the speaker to open. Pull the cable cover...

Operating Instructions
Page 18
At this time, insert the red cord 2 into the + terminal and the black cord 3 into the L terminal of the display to the speaker terminals on the rear of the display, and to the left speaker. terminal. The speaker cords can be connected by inserting the cord while pressing button 1 and then releasing button 1 after inserting. Connect the speaker cords to the speaker terminals located at the bottom on...
At this time, insert the red cord 2 into the + terminal and the black cord 3 into the L terminal of the display to the speaker terminals on the rear of the display, and to the left speaker. terminal. The speaker cords can be connected by inserting the cord while pressing button 1 and then releasing button 1 after inserting. Connect the speaker cords to the speaker terminals located at the bottom on...
Operating Instructions
Page 21
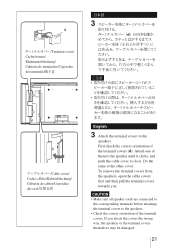
...from the speakers, open the cable covers first and then pull the terminal covers towards you attach the covers the wrong way, the speakers or the terminal covers themselves may be damaged. 21 d Terminal cover/ Cache-bornes/ Klemmenabdeckung/ Cubierta de terminales/Coperchio dei terminali/ Cable cover/ ... of the terminal covers. If you . Attach one of them to the speaker until it clicks, and push the cable cover to the speakers. CAUTION • Make sure all speaker cords are connected to the corresponding terminals before attaching the terminal covers to the other cover. Do...
...from the speakers, open the cable covers first and then pull the terminal covers towards you attach the covers the wrong way, the speakers or the terminal covers themselves may be damaged. 21 d Terminal cover/ Cache-bornes/ Klemmenabdeckung/ Cubierta de terminales/Coperchio dei terminali/ Cable cover/ ... of the terminal covers. If you . Attach one of them to the speaker until it clicks, and push the cable cover to the speakers. CAUTION • Make sure all speaker cords are connected to the corresponding terminals before attaching the terminal covers to the other cover. Do...

Operating Instructions
Page 24
...°F) Humidity 0 % to 90 % (no condensation) Pressure 700 hPa to 1,060 hPa Dimensions Approx. 93 × 480 × 59 mm (3 21/32 × 18 29/32 × 2 5/16 inches) (w/h/d) (net per speaker) Mass Approx. 1.0 kg (2 lb 3 oz) (net per speaker) Supplied accessories Speaker cord (2) Speaker attachment screw (4) Terminal cover (2) Operating instructions (1) Design and specifications are subject to change without notice. 24
...°F) Humidity 0 % to 90 % (no condensation) Pressure 700 hPa to 1,060 hPa Dimensions Approx. 93 × 480 × 59 mm (3 21/32 × 18 29/32 × 2 5/16 inches) (w/h/d) (net per speaker) Mass Approx. 1.0 kg (2 lb 3 oz) (net per speaker) Supplied accessories Speaker cord (2) Speaker attachment screw (4) Terminal cover (2) Operating instructions (1) Design and specifications are subject to change without notice. 24


