
Operating Instructions
Page 6
...the handset 46 Receiving a call while using the intercom 47 Transferring a call 47 To transfer from the base phone to the handset 48 To transfer from the handset to the base phone 49 Having a conference call 49 Making another call while talking 50 Receiving a call while talking 51 Switching ...conference from the handset to the base phone 51 Switching conference from the base phone to the handset 51 To join on the base phone while the handset is talking on one line 51 To join on the handset while the ...
...the handset 46 Receiving a call while using the intercom 47 Transferring a call 47 To transfer from the base phone to the handset 48 To transfer from the handset to the base phone 49 Having a conference call 49 Making another call while talking 50 Receiving a call while talking 51 Switching ...conference from the handset to the base phone 51 Switching conference from the base phone to the handset 51 To join on the base phone while the handset is talking on one line 51 To join on the handset while the ...
Operating Instructions
Page 7
...list 56 Calling back a number from the Caller ID list 57 Storing a number of the Caller ID list into the Phone Directory 58 To change the number of digits of the phone number 60 Using "Caller ID with call waiting" service 61 Using visual message waiting service Additional Information 63 Mounting the... base phone on a wall 64 Carrying the handset by the belt clip 65 Notes on power sources 66 Maintenance 67 Troubleshooting 70 Specifications 71 Index Back ...
...list 56 Calling back a number from the Caller ID list 57 Storing a number of the Caller ID list into the Phone Directory 58 To change the number of digits of the phone number 60 Using "Caller ID with call waiting" service 61 Using visual message waiting service Additional Information 63 Mounting the... base phone on a wall 64 Carrying the handset by the belt clip 65 Notes on power sources 66 Maintenance 67 Troubleshooting 70 Specifications 71 Index Back ...
Operating Instructions
Page 8
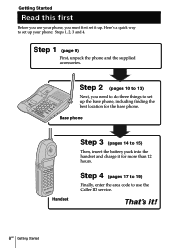
... (page 9) First, unpack the phone and the supplied accessories. Step 4 (pages 17 to 19) Finally, enter the area code to 15) Then, insert the battery pack into the handset and charge it for the base phone. Base phone Handset Step 3 (pages 14 to use your phone, you need to do three things ...to set up your phone: Steps 1, 2, 3 and 4. Getting Started Read this first Before you use the Caller ID ...
... (page 9) First, unpack the phone and the supplied accessories. Step 4 (pages 17 to 19) Finally, enter the area code to 15) Then, insert the battery pack into the handset and charge it for the base phone. Base phone Handset Step 3 (pages 14 to use your phone, you need to do three things ...to set up your phone: Steps 1, 2, 3 and 4. Getting Started Read this first Before you use the Caller ID ...
Operating Instructions
Page 9
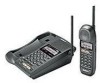
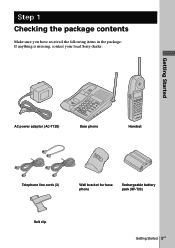
Getting Started AC power adaptor (AC-T128) Base phone Handset Telephone line cords (3) Wall bracket for base phone Rechargeable battery pack (BP-T23) Belt clip Getting Started 9US Step 1 Checking the package contents Make sure you have received the following items in the package. If anything is missing, contact your local Sony dealer.
Getting Started AC power adaptor (AC-T128) Base phone Handset Telephone line cords (3) Wall bracket for base phone Rechargeable battery pack (BP-T23) Belt clip Getting Started 9US Step 1 Checking the package contents Make sure you have received the following items in the package. If anything is missing, contact your local Sony dealer.
Operating Instructions
Page 10
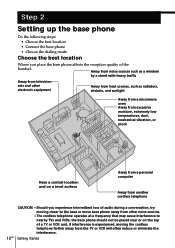
... the reception quality of a TV or VCR; Getting Started Step 2 Setting up the base phone Do the following steps: • Choose the best location • Connect the base phone • Choose the dialing mode Choose the best location Where you experience intermittent loss of audio during a ... sets and other noise sources. • The cordless telephone operates at a frequency that may cause interference to the base or move base phone away from other electronic equipment Away from heat sources, such as radiators, airducts, and sunlight Away from a microwave oven Away from the ...
... the reception quality of a TV or VCR; Getting Started Step 2 Setting up the base phone Do the following steps: • Choose the best location • Connect the base phone • Choose the dialing mode Choose the best location Where you experience intermittent loss of audio during a ... sets and other noise sources. • The cordless telephone operates at a frequency that may cause interference to the base or move base phone away from other electronic equipment Away from heat sources, such as radiators, airducts, and sunlight Away from a microwave oven Away from the ...

Operating Instructions
Page 11
Make sure it points towards the ceiling. continued Getting Started 11US To an AC outlet To DC IN 9V 2 AC power adaptor (supplied AC-T128) DATA jack 1 Telephone line cord (supplied) To L1/L1+L2 To the telephone outlet 1 Connect the telephone line cord to the L1/L1+L2 jack and to a telephone outlet. 2 Connect the AC power adaptor to the DC IN 9V jack and to hang the base phone on the wall, see page 63. Getting Started Connect the base phone If you want to an AC outlet. 3 Raise the antenna. To connect the base phone to a single outlet having two lines 3 Hook the cord.
Make sure it points towards the ceiling. continued Getting Started 11US To an AC outlet To DC IN 9V 2 AC power adaptor (supplied AC-T128) DATA jack 1 Telephone line cord (supplied) To L1/L1+L2 To the telephone outlet 1 Connect the telephone line cord to the L1/L1+L2 jack and to a telephone outlet. 2 Connect the AC power adaptor to the DC IN 9V jack and to hang the base phone on the wall, see page 63. Getting Started Connect the base phone If you want to an AC outlet. 3 Raise the antenna. To connect the base phone to a single outlet having two lines 3 Hook the cord.

Operating Instructions
Page 12
Step 2: Setting up the base phone (continued) To connect the base phone to an AC outlet. 3 Raise the antenna. To an AC outlet To DC IN 9V 2 AC power adaptor (supplied AC-T128) To the telephone outlets To L1/L1+L2 Line 1 Telephone line cord (supplied) 1 Telephone line cord (supplied) DATA jack To L2 Line 2 1 Connect the telephone line cords to the L1/L1+L2 and L2 jacks and to the telephone outlets. 2 Connect the AC power adaptor to the DC IN 9V jack and to two separate outlets 3 Hook the cord. Make sure it points towards the ceiling. 12US Getting Started
Step 2: Setting up the base phone (continued) To connect the base phone to an AC outlet. 3 Raise the antenna. To an AC outlet To DC IN 9V 2 AC power adaptor (supplied AC-T128) To the telephone outlets To L1/L1+L2 Line 1 Telephone line cord (supplied) 1 Telephone line cord (supplied) DATA jack To L2 Line 2 1 Connect the telephone line cords to the L1/L1+L2 and L2 jacks and to the telephone outlets. 2 Connect the AC power adaptor to the DC IN 9V jack and to two separate outlets 3 Hook the cord. Make sure it points towards the ceiling. 12US Getting Started
Operating Instructions
Page 13
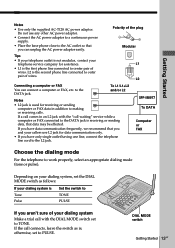
SPP-IM977 To DATA Computer or FAX Choose the dialing mode For the telephone to the DATA jack....tone or pulse). otherwise, set to the DATA jack is ; L2 is not modular, contact your telephone outlet is the second phone line connected to outer pair of your callers use any other AC power adaptor. • Connect the AC power adaptor to a... • Use only the supplied AC-T128 AC power adaptor. Polarity of wires. L1 • L1 is the first phone line connected to center pair of the plug Modular Tips • If your telephone service company for receiving or sending computer ...
SPP-IM977 To DATA Computer or FAX Choose the dialing mode For the telephone to the DATA jack....tone or pulse). otherwise, set to the DATA jack is ; L2 is not modular, contact your telephone outlet is the second phone line connected to outer pair of your callers use any other AC power adaptor. • Connect the AC power adaptor to a... • Use only the supplied AC-T128 AC power adaptor. Polarity of wires. L1 • L1 is the first phone line connected to center pair of the plug Modular Tips • If your telephone service company for receiving or sending computer ...

Operating Instructions
Page 14
BP-T23 2 Insert the battery pack (with either side facing up when the handset is properly seated on the base phone. CHARGE lamp 14US Getting Started 3 Close the battery compartment lid. 4 Place the handset on the charge terminals of the handset. The CHARGE lamp lights up . ... can place it with contacts facing down) into the battery compartment. Charge the battery pack for more than 12 hours before you start using your phone. 1 Slide open the battery compartment lid of the base...
BP-T23 2 Insert the battery pack (with either side facing up when the handset is properly seated on the base phone. CHARGE lamp 14US Getting Started 3 Close the battery compartment lid. 4 Place the handset on the charge terminals of the handset. The CHARGE lamp lights up . ... can place it with contacts facing down) into the battery compartment. Charge the battery pack for more than 12 hours before you start using your phone. 1 Slide open the battery compartment lid of the base...

Operating Instructions
Page 15
... Approx. 7 days when the handset is returned to its full capacity. Contact your local Sony authorized dealer or service center, and ask for a long period of charging to recover to the base phone after two or three calls. Note Battery life may require several times of time as this... will completely discharge the battery pack. continued Getting Started 15US However, do not leave the handset off the base phone for a Sony BP-T23 rechargeable battery pack. The battery works best if the handset is in standby mode. Getting Started Battery duration A fully charged ...
... Approx. 7 days when the handset is returned to its full capacity. Contact your local Sony authorized dealer or service center, and ask for a long period of charging to recover to the base phone after two or three calls. Note Battery life may require several times of time as this... will completely discharge the battery pack. continued Getting Started 15US However, do not leave the handset off the base phone for a Sony BP-T23 rechargeable battery pack. The battery works best if the handset is in standby mode. Getting Started Battery duration A fully charged ...

Operating Instructions
Page 16
.... SPARE BATTERY lamp 16US Getting Started Charge the battery pack for use as a handset spare battery pack. 1 Open the battery compartment lid of the base phone.
.... SPARE BATTERY lamp 16US Getting Started Charge the battery pack for use as a handset spare battery pack. 1 Open the battery compartment lid of the base phone.

Operating Instructions
Page 17
...Press 2 Turn Jog Dial up to 5 local area codes with this telephone to take advantage of this phone and the Caller ID functions. See "To enter the local area code (For 10 digits phone number users)" on the display. See "To enter your home area code. Then see "To enter your..., enter 3-digit area code as follows: Case 1. Depending on page 18. Otherwise, you cannot use this phone for local calls in your area, see "To enter the local area code (For 10 digits phone number users)" on your home area code" below . Case␣ 2. continued Getting Started 17US Getting Started...
...Press 2 Turn Jog Dial up to 5 local area codes with this telephone to take advantage of this phone and the Caller ID functions. See "To enter the local area code (For 10 digits phone number users)" on the display. See "To enter your home area code. Then see "To enter your..., enter 3-digit area code as follows: Case 1. Depending on page 18. Otherwise, you cannot use this phone for local calls in your area, see "To enter the local area code (For 10 digits phone number users)" on your home area code" below . Case␣ 2. continued Getting Started 17US Getting Started...

Operating Instructions
Page 18
... press Jog Dial instead of (PGM) in step 4. To enter the local area code (For 10 digits phone numbers users) If a call does not match one of the local area codes you entered, the phone number will be entered in the Caller ID list (1 + area code + number). Some regions of the ... "To change the home area code 1 Perform steps 1 to have more than one of the local area codes you entered, the phone number will be registered with 11 digits in this phone.) 1 Perform steps 1 to 3 on page 17. 2 Turn Jog Dial up to make "LOCAL" flash. Step 4: Entering the area code (continued...
... press Jog Dial instead of (PGM) in step 4. To enter the local area code (For 10 digits phone numbers users) If a call does not match one of the local area codes you entered, the phone number will be entered in the Caller ID list (1 + area code + number). Some regions of the ... "To change the home area code 1 Perform steps 1 to have more than one of the local area codes you entered, the phone number will be registered with 11 digits in this phone.) 1 Perform steps 1 to 3 on page 17. 2 Turn Jog Dial up to make "LOCAL" flash. Step 4: Entering the area code (continued...

Operating Instructions
Page 20
...) Lets you to switch temporarily to tone dialing. 7 SPARE BATTERY lamp (p. 16) Lights while the spare battery is a "NEW" data in parentheses for details. Base Phone 1 2 qf 3 4 qg 5 6 qh qj 7 qk 8 ql 9 w; 0 qa wa ws qs wd qd wf 1 Display window (p. 24, 34, 52) 2 MESSAGES lamp (p. 61) Flashes when you have...
...) Lets you to switch temporarily to tone dialing. 7 SPARE BATTERY lamp (p. 16) Lights while the spare battery is a "NEW" data in parentheses for details. Base Phone 1 2 qf 3 4 qg 5 6 qh qj 7 qk 8 ql 9 w; 0 qa wa ws qs wd qd wf 1 Display window (p. 24, 34, 52) 2 MESSAGES lamp (p. 61) Flashes when you have...

Operating Instructions
Page 21
... ringer volume. wd OFF button (p. 27) Allows you to a second call if you have "call waiting" service, or lets you talk by using the base phone and handset. wg Hook for speed dialing. SPEED DIAL button (p. 34) Automatically dials the numbers programmed. qk REDIAL/PAUSE button (p. 28, 35) Redials the last...
... ringer volume. wd OFF button (p. 27) Allows you to a second call if you have "call waiting" service, or lets you talk by using the base phone and handset. wg Hook for speed dialing. SPEED DIAL button (p. 34) Automatically dials the numbers programmed. qk REDIAL/PAUSE button (p. 28, 35) Redials the last...

Operating Instructions
Page 22
q; Display window (p. 24, 52) qa OFF button (p. 24) Allows you to change the number of digits of the phone number in the Caller ID list. 22US Getting Started qs FLASH/CALL WAITING button (p. 30, 60) Switches to a second call if you have "call waiting" ...service, or lets you make or receive a call. 5 INTERCOM button (p. 45) Lets you talk by using the base phone and handset. 6 HOLD button (p. 25) Puts a call on hold. 7 Battery compartment (p. 14) 8 TONE button (p. 25) Allows you to switch temporarily to tone dialing. 9 CONF (conference...
q; Display window (p. 24, 52) qa OFF button (p. 24) Allows you to change the number of digits of the phone number in the Caller ID list. 22US Getting Started qs FLASH/CALL WAITING button (p. 30, 60) Switches to a second call if you have "call waiting" ...service, or lets you make or receive a call. 5 INTERCOM button (p. 45) Lets you talk by using the base phone and handset. 6 HOLD button (p. 25) Puts a call on hold. 7 Battery compartment (p. 14) 8 TONE button (p. 25) Allows you to switch temporarily to tone dialing. 9 CONF (conference...

Operating Instructions
Page 23
qh PGM (program) button (p. 17, 37) Used to store numbers in the dialing sequence. Getting Started 23US Getting Started qk ql qg REDIAL/PAUSE button (p. 28, 38) Redials the last number called/ inserts a pause in Phone Directory. qj Microphone qk I (HEADSET) jack (p. 25, 30, 64) ql VOL (volume) switch (p. 25) Adjusts the handset volume.
qh PGM (program) button (p. 17, 37) Used to store numbers in the dialing sequence. Getting Started 23US Getting Started qk ql qg REDIAL/PAUSE button (p. 28, 38) Redials the last number called/ inserts a pause in Phone Directory. qj Microphone qk I (HEADSET) jack (p. 25, 30, 64) ql VOL (volume) switch (p. 25) Adjusts the handset volume.

Operating Instructions
Page 24
...appears on the display of the base phone and the line button on the base phone. You will then hear a dial tone. The display and the LINE 1 or LINE 2 button go off. 24US Basics The corresponding line button lights up the handset from the base phone. 2 Press (LINE 1) or (...LINE 2) to the base phone. 3 Dial the phone number. 4 When you're done talking, press (OFF) or replace the handset on the base phone double flashes in hours, minutes and seconds. If "CHANNEL SEARCHING..." ...
...appears on the display of the base phone and the line button on the base phone. You will then hear a dial tone. The display and the LINE 1 or LINE 2 button go off. 24US Basics The corresponding line button lights up the handset from the base phone. 2 Press (LINE 1) or (...LINE 2) to the base phone. 3 Dial the phone number. 4 When you're done talking, press (OFF) or replace the handset on the base phone double flashes in hours, minutes and seconds. If "CHANNEL SEARCHING..." ...

Operating Instructions
Page 25
... connected. If you press (LINE 1) or (LINE 2) whichever button is connected to the I (HEADSET) jack, you can talk to the base phone and to the line connected. You should adjust the volume accordingly. • If your hearing. Notes • When you increase the sound volume, ...in succession, when the base phone is muted and "CHANNEL SEARCHING..." The LINE 1 or LINE 2 button will remain in tone dialing until disconnected. otherwise, the call on that extended...
... connected. If you press (LINE 1) or (LINE 2) whichever button is connected to the I (HEADSET) jack, you can talk to the base phone and to the line connected. You should adjust the volume accordingly. • If your hearing. Notes • When you increase the sound volume, ...in succession, when the base phone is muted and "CHANNEL SEARCHING..." The LINE 1 or LINE 2 button will remain in tone dialing until disconnected. otherwise, the call on that extended...

Operating Instructions
Page 26
...If you have a spare battery You can replace the battery pack without disconnecting the call during the first 10 - 15 minutes of charging, the phone will beep every three seconds five times and E and "BATTERY LOW" appears on the display. Finish your call is recommended that during a ...and charge the battery pack. For optimum performance, charge the battery for a full 12 hours. Note that you may be able to use the phone, but the battery duration will be inactive, i.e., unable to resume the conversation. 26US Basics To replace the battery pack, perform the following procedure. ...
...If you have a spare battery You can replace the battery pack without disconnecting the call during the first 10 - 15 minutes of charging, the phone will beep every three seconds five times and E and "BATTERY LOW" appears on the display. Finish your call is recommended that during a ...and charge the battery pack. For optimum performance, charge the battery for a full 12 hours. Note that you may be able to use the phone, but the battery duration will be inactive, i.e., unable to resume the conversation. 26US Basics To replace the battery pack, perform the following procedure. ...


