Operating Instructions
Page 1
3-043-723-11 (1) Cordless Telephone Operating Instructions US Manual de instrucciones ES SPP-933 ©1999 Sony Corporation
3-043-723-11 (1) Cordless Telephone Operating Instructions US Manual de instrucciones ES SPP-933 ©1999 Sony Corporation
Operating Instructions
Page 2
...not disassemble this can cause electric shock when the appliance is required. Do not allow anything to your home, consult your Sony dealer regarding this product where the cord will be abused by placing the product on the marking label. Do not locate ...: 1. Follow all instructions. 2. Use a damp cloth for ventilation. Do not use liquid cleaners or aerosol cleaners. SPP-933 Serial No IMPORTANT SAFETY INSTRUCTIONS When using your telephone equipment, basic safety precautions should never be placed near a swimming pool. 5. The openings should always be operated only ...
...not disassemble this can cause electric shock when the appliance is required. Do not allow anything to your home, consult your Sony dealer regarding this product where the cord will be abused by placing the product on the marking label. Do not locate ...: 1. Follow all instructions. 2. Use a damp cloth for ventilation. Do not use liquid cleaners or aerosol cleaners. SPP-933 Serial No IMPORTANT SAFETY INSTRUCTIONS When using your telephone equipment, basic safety precautions should never be placed near a swimming pool. 5. The openings should always be operated only ...
Operating Instructions
Page 3
... instruction manual provided for use the telephone to report a gas leak in response to qualified service personnel under the following type and size battery pack: Sony BP-T18. 2. Charge the battery...of the RENs should not exceed five (5.0).To be certain of the number of other than a cordless type) during an electrical storm. Also, you believe it is corrosive and may be connected to ... temporary discontinuance of service may be advised of your equipment (SPP-933) causes harm to the telephone network, the telephone company will notify you in damage and will often require extensive...
... instruction manual provided for use the telephone to report a gas leak in response to qualified service personnel under the following type and size battery pack: Sony BP-T18. 2. Charge the battery...of the RENs should not exceed five (5.0).To be certain of the number of other than a cordless type) during an electrical storm. Also, you believe it is corrosive and may be connected to ... temporary discontinuance of service may be advised of your equipment (SPP-933) causes harm to the telephone network, the telephone company will notify you in damage and will often require extensive...
Operating Instructions
Page 4
...which can radiate radio frequency energy and, if not installed and used to your warranty card when having your telephone is connected. - If this equipment (SPP-933), for help. All repairs will not occur in the off and on Warranty Be sure to save the ...equipment is resolved. 8. Perform such activities in a particular installation. These limits are cautioned that you to make changes in an authorized Sony service station. 9. However, there is experienced with the instructions, may request that any changes or modifications not expressly approved in this manual...
...which can radiate radio frequency energy and, if not installed and used to your warranty card when having your telephone is connected. - If this equipment (SPP-933), for help. All repairs will not occur in the off and on Warranty Be sure to save the ...equipment is resolved. 8. Perform such activities in a particular installation. These limits are cautioned that you to make changes in an authorized Sony service station. 9. However, there is experienced with the instructions, may request that any changes or modifications not expressly approved in this manual...
Operating Instructions
Page 5
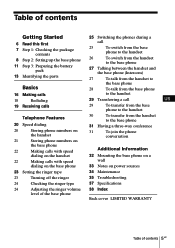
... 16 Making calls to the handset 18 Redialing 29 Transferring a call US 19 Receiving calls 29 To transfer from the base phone to the handset Telephone Features 20 Speed dialing 20 Storing phone numbers on the handset 21 Storing phone numbers on the base phone 22 Making calls with speed dialing...
... 16 Making calls to the handset 18 Redialing 29 Transferring a call US 19 Receiving calls 29 To transfer from the base phone to the handset Telephone Features 20 Speed dialing 20 Storing phone numbers on the handset 21 Storing phone numbers on the base phone 22 Making calls with speed dialing...
Operating Instructions
Page 6
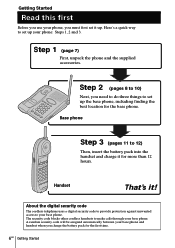
... to set it up the base phone, including finding the best location for the first time. 6US Getting Started About the digital security code The cordless telephone uses a digital security code to provide protection against unwanted access to set up your phone, you must first set up . A random security code will be... 7) First, unpack the phone and the supplied accessories. Getting Started Read this first Before you use your phone: Steps 1, 2 and 3. The security code blocks other cordless handsets to 12) Then, insert the battery pack into the handset and charge it !
... to set it up the base phone, including finding the best location for the first time. 6US Getting Started About the digital security code The cordless telephone uses a digital security code to provide protection against unwanted access to set up your phone, you must first set up . A random security code will be... 7) First, unpack the phone and the supplied accessories. Getting Started Read this first Before you use your phone: Steps 1, 2 and 3. The security code blocks other cordless handsets to 12) Then, insert the battery pack into the handset and charge it !
Operating Instructions
Page 7
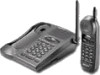
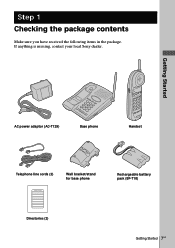
Getting Started AC power adaptor (AC-T129) Base phone Handset Telephone line cords (2) SPEED DIALING 1 2 3 4 5 6 7 8 9 0 Directories (2) Wall bracket/stand for base phone Rechargeable battery pack (BP-T18) Getting Started 7US If anything is missing, contact your local Sony dealer. Step 1 Checking the package contents Make sure you have received the following items in the package.
Getting Started AC power adaptor (AC-T129) Base phone Handset Telephone line cords (2) SPEED DIALING 1 2 3 4 5 6 7 8 9 0 Directories (2) Wall bracket/stand for base phone Rechargeable battery pack (BP-T18) Getting Started 7US If anything is missing, contact your local Sony dealer. Step 1 Checking the package contents Make sure you have received the following items in the package.
Operating Instructions
Page 8
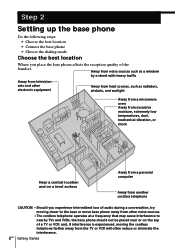
... Away from heat sources, such as a window by a street with heavy traffic Away from television sets and other noise sources. • The cordless telephone operates at a frequency that may cause interference to nearby TVs and VCRs; Step 2 Setting up the base phone Do the following steps: •...mode Choose the best location Where you place the base phone affects the reception quality of audio during a conversation, try moving the cordless telephone farther away from the TV or VCR will often reduce or eliminate the interference. 8US Getting Started the base phone should not be ...
... Away from heat sources, such as a window by a street with heavy traffic Away from television sets and other noise sources. • The cordless telephone operates at a frequency that may cause interference to nearby TVs and VCRs; Step 2 Setting up the base phone Do the following steps: •...mode Choose the best location Where you place the base phone affects the reception quality of audio during a conversation, try moving the cordless telephone farther away from the TV or VCR will often reduce or eliminate the interference. 8US Getting Started the base phone should not be ...
Operating Instructions
Page 9
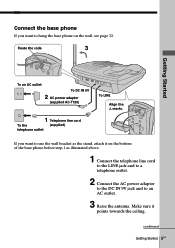
... code 3 Getting Started To an AC outlet To DC IN 9V 2 AC power adaptor (supplied AC-T129) To LINE Align the f marks. 1 Telephone line cord 2 To the (supplied) telephone outlet 1 If you want to use the wall bracket as the stand, attach it points towards the ceiling. Connect the base phone If... outlet. 3 Raise the antenna. Make sure it on the bottom of the base phone before step 1 as illustrated above. 1 Connect the telephone line cord to the LINE jack and to a telephone outlet. 2 Connect the AC power adaptor to the DC IN 9V jack and to hang the base phone on the wall...
... code 3 Getting Started To an AC outlet To DC IN 9V 2 AC power adaptor (supplied AC-T129) To LINE Align the f marks. 1 Telephone line cord 2 To the (supplied) telephone outlet 1 If you want to use the wall bracket as the stand, attach it points towards the ceiling. Connect the base phone If... outlet. 3 Raise the antenna. Make sure it on the bottom of the base phone before step 1 as illustrated above. 1 Connect the telephone line cord to the LINE jack and to a telephone outlet. 2 Connect the AC power adaptor to the DC IN 9V jack and to hang the base phone on the wall...
Operating Instructions
Page 10
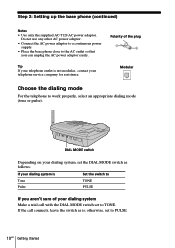
...switch as is Set the switch to PULSE. 10US Getting Started Modular Choose the dialing mode For the telephone to the AC outlet so that you aren't sure of the plug Tip If your telephone outlet is not modular, contact your dialing system is ; Do not use any other AC power ..., select an appropriate dialing mode (tone or pulse). Polarity of your dialing system Make a trial call connects, leave the switch as follows: If your telephone service company for assistance. Step 2: Setting up the base phone (continued) Notes • Use only the supplied AC-T129 AC power adaptor.
...switch as is Set the switch to PULSE. 10US Getting Started Modular Choose the dialing mode For the telephone to the AC outlet so that you aren't sure of the plug Tip If your telephone outlet is not modular, contact your dialing system is ; Do not use any other AC power ..., select an appropriate dialing mode (tone or pulse). Polarity of your dialing system Make a trial call connects, leave the switch as follows: If your telephone service company for assistance. Step 2: Setting up the base phone (continued) Notes • Use only the supplied AC-T129 AC power adaptor.
Operating Instructions
Page 15
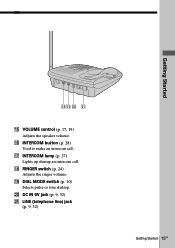
qj INTERCOM lamp (p. 27) Lights up during an intercom call . ql DIAL MODE switch (p. 10) Selects pulse or tone dialing. DC IN 9V jack (p. 9, 32) wa LINE (telephone line) jack (p. 9, 32) Getting Started 15US Getting Started qh INTERCOM button (p. 28) Used to make an intercom call . w; qk ql w; qk RINGER switch (p. 24) Adjusts the ringer volume. wa qg VOLUME control (p. 17, 19) Adjusts the speaker volume.
qj INTERCOM lamp (p. 27) Lights up during an intercom call . ql DIAL MODE switch (p. 10) Selects pulse or tone dialing. DC IN 9V jack (p. 9, 32) wa LINE (telephone line) jack (p. 9, 32) Getting Started 15US Getting Started qh INTERCOM button (p. 28) Used to make an intercom call . w; qk ql w; qk RINGER switch (p. 24) Adjusts the ringer volume. wa qg VOLUME control (p. 17, 19) Adjusts the speaker volume.
Operating Instructions
Page 16
... phone is in tone dialing until disconnected. To Do this Put a call waiting" service*) Press (FLASH) to tone dialing temporarily Press (*TONE) while using the telephone after you 're done talking, press (OFF) or replace the handset on the base phone light up the handset from your... telephone company. Adjust the handset volume Set the VOL switch to resume the conversation. Press (FLASH) again to return to the first caller. * You need to ...
... phone is in tone dialing until disconnected. To Do this Put a call waiting" service*) Press (FLASH) to tone dialing temporarily Press (*TONE) while using the telephone after you 're done talking, press (OFF) or replace the handset on the base phone light up the handset from your... telephone company. Adjust the handset volume Set the VOL switch to resume the conversation. Press (FLASH) again to return to the first caller. * You need to ...
Operating Instructions
Page 17
... three seconds and the TALK/BATT LOW lamp on the handset flashes. Press (SPEAKERPHONE) to access the flash function. Switch to the service from your telephone company. Press (FLASH) again to return to he first caller. * You need to subscribe to tone dialing temporarily Press (*TONE) while using the... telephone after you may be able to use the phone, but the battery duration will disconnect soon. Replace the handset on the base phone to make ...
... three seconds and the TALK/BATT LOW lamp on the handset flashes. Press (SPEAKERPHONE) to access the flash function. Switch to the service from your telephone company. Press (FLASH) again to return to he first caller. * You need to subscribe to tone dialing temporarily Press (*TONE) while using the... telephone after you may be able to use the phone, but the battery duration will disconnect soon. Replace the handset on the base phone to make ...
Operating Instructions
Page 18
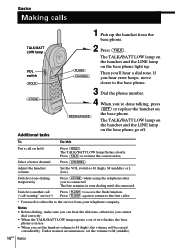
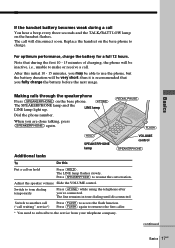
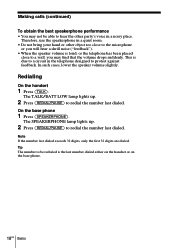
... base phone 1 Press (SPEAKERPHONE). Therefore, use the speakerphone in a quiet room. • Do not bring your hand or other party's voice in the telephone designed to redial the number last dialed. Note If the number last dialed exceeds 32 digits, only the first 32 digits are dialed. Tip The... number to a wall, you will hear a shrill noise ("feedback"). • When the speaker volume is loud, or the telephone has been placed close to the microphone or you may not be redialed is due to a circuit in a noisy place. The SPEAKERPHONE lamp lights up...
... base phone 1 Press (SPEAKERPHONE). Therefore, use the speakerphone in a quiet room. • Do not bring your hand or other party's voice in the telephone designed to redial the number last dialed. Note If the number last dialed exceeds 32 digits, only the first 32 digits are dialed. Tip The... number to a wall, you will hear a shrill noise ("feedback"). • When the speaker volume is loud, or the telephone has been placed close to the microphone or you may not be redialed is due to a circuit in a noisy place. The SPEAKERPHONE lamp lights up...
Operating Instructions
Page 19
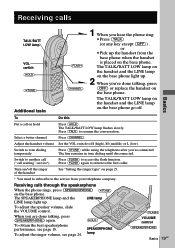
... the LINE lamp LINE lamp light up . 2 When you 're connected. or • Pick up the handset from your telephone company. Switch to tone dialing temporarily Press (*TONE) while using the telephone after you 're done talking, press (OFF) or replace the handset on the base phone. Adjust the handset volume Set...
... the LINE lamp LINE lamp light up . 2 When you 're connected. or • Pick up the handset from your telephone company. Switch to tone dialing temporarily Press (*TONE) while using the telephone after you 're done talking, press (OFF) or replace the handset on the base phone. Adjust the handset volume Set...
Operating Instructions
Page 20
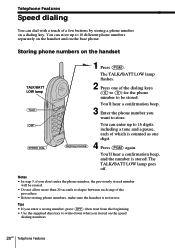
Telephone Features Speed dialing You can dial with a touch of the dialing keys ((0) to (9)) for the phone number to be erased. • Do not allow more ..., including a tone and a pause, each step of which is counted as one of a few buttons by storing a phone number on the speed dialing numbers. 20US Telephone Features The TALK/BATT LOW lamp flashes. 2 Press one digit. 4 Press (PGM) again. You'll hear a confirmation beep. 3 Enter the phone number you want to...
Telephone Features Speed dialing You can dial with a touch of the dialing keys ((0) to (9)) for the phone number to be erased. • Do not allow more ..., including a tone and a pause, each step of which is counted as one of a few buttons by storing a phone number on the speed dialing numbers. 20US Telephone Features The TALK/BATT LOW lamp flashes. 2 Press one digit. 4 Press (PGM) again. You'll hear a confirmation beep. 3 Enter the phone number you want to...
Operating Instructions
Page 21
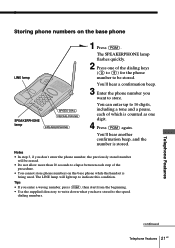
... of the procedure. • You cannot store phone numbers on the base phone LINE lamp (SPEED DIAL) SPEAKERPHONE lamp (REDIAL/PAUSE) (SPEAKERPHONE) 1 Press (PGM). Telephone Features continued Telephone Features 21US The LINE lamp will be stored. Storing phone numbers on the base phone while the handset is being used. You'll hear...
... of the procedure. • You cannot store phone numbers on the base phone LINE lamp (SPEED DIAL) SPEAKERPHONE lamp (REDIAL/PAUSE) (SPEAKERPHONE) 1 Press (PGM). Telephone Features continued Telephone Features 21US The LINE lamp will be stored. Storing phone numbers on the base phone while the handset is being used. You'll hear...
Operating Instructions
Page 22
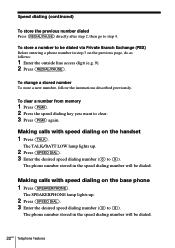
... DIAL). 3 Enter the desired speed dialing number ((0) to clear. 3 Press (PGM) again. The phone number stored in the speed dialing number will be dialed. 22US Telephone Features
... DIAL). 3 Enter the desired speed dialing number ((0) to clear. 3 Press (PGM) again. The phone number stored in the speed dialing number will be dialed. 22US Telephone Features
Operating Instructions
Page 23
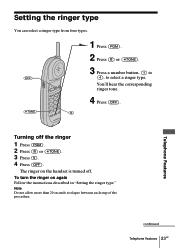
To turn the ringer on the handset is turned off the ringer 1 Press (PGM). 2 Press (#) or (*TONE). 3 Press (5). 4 Press (OFF). Telephone Features continued Telephone Features 23US The ringer on again Follow the instructions described in "Setting the ringer type." Setting the ringer type You can select a ringer type from ...
To turn the ringer on the handset is turned off the ringer 1 Press (PGM). 2 Press (#) or (*TONE). 3 Press (5). 4 Press (OFF). Telephone Features continued Telephone Features 23US The ringer on again Follow the instructions described in "Setting the ringer type." Setting the ringer type You can select a ringer type from ...
Operating Instructions
Page 24
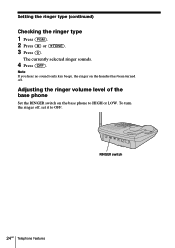
Adjusting the ringer volume level of the base phone Set the RINGER switch on the handset has been turned off , set it to HIGH or LOW. The currently selected ringer sounds. 4 Press (OFF). To turn the ringer off . Note If you hear no sound (only key beep), the ringer on the base phone to OFF. Setting the ringer type (continued) Checking the ringer type 1 Press (PGM). 2 Press (#) or (*TONE). 3 Press (0). RINGER switch 24US Telephone Features
Adjusting the ringer volume level of the base phone Set the RINGER switch on the handset has been turned off , set it to HIGH or LOW. The currently selected ringer sounds. 4 Press (OFF). To turn the ringer off . Note If you hear no sound (only key beep), the ringer on the base phone to OFF. Setting the ringer type (continued) Checking the ringer type 1 Press (PGM). 2 Press (#) or (*TONE). 3 Press (0). RINGER switch 24US Telephone Features


