User Guide
Page 2
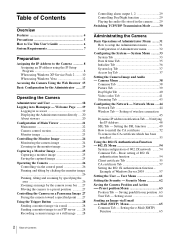
... - Setting the SSL function 49 How to setup the Administrator menu 31 Configuration of Administrator menu 32 Configuring the System - Saving pan/tilt/zoom position .63 Tour Tab - e-Mail (SMTP) Menu 65 Common Tab - Network Menu .....44 Network Tab 44 Wireless Tab - Example of 802....Contents Overview Features 4 Precautions 5 How to Use This User's Guide 6 System Requirements 7 Preparation Assigning the IP Address to the Camera 8 Assigning an IP address using the IP Setup Program 8 When using Windows XP Service Pack 2 ........ 10 When using Windows Vista 12 Accessing the Camera ...
... - Setting the SSL function 49 How to setup the Administrator menu 31 Configuration of Administrator menu 32 Configuring the System - Saving pan/tilt/zoom position .63 Tour Tab - e-Mail (SMTP) Menu 65 Common Tab - Network Menu .....44 Network Tab 44 Wireless Tab - Example of 802....Contents Overview Features 4 Precautions 5 How to Use This User's Guide 6 System Requirements 7 Preparation Assigning the IP Address to the Camera 8 Assigning an IP address using the IP Setup Program 8 When using Windows XP Service Pack 2 ........ 10 When using Windows Vista 12 Accessing the Camera ...
User Guide
Page 3
... 77 Setting the Operations from the Camera - DDNS setting Menu .. 91 Others Using the Supplied IP Setup Program 94 Starting the IP Setup Program 94 Bandwidth control Tab 94 Date time Tab 95 Rebooting the Camera 95 Using the SNC audio upload tool - Schedule Menu 80 Setting the Alarm Buffer - Creating a Panorama Image 103 Installing...
... 77 Setting the Operations from the Camera - DDNS setting Menu .. 91 Others Using the Supplied IP Setup Program 94 Starting the IP Setup Program 94 Bandwidth control Tab 94 Date time Tab 95 Rebooting the Camera 95 Using the SNC audio upload tool - Schedule Menu 80 Setting the Alarm Buffer - Creating a Panorama Image 103 Installing...

User Guide
Page 8
... opens. Preparation Preparation The Preparation section explains what the administrator has to a Local Network" in the supplied Installation Manual. You can assign an IP address in two ways: • Using the IP Setup Program stored in the Web browser, double-click on the index.htm file on ...Camera The program detects the network cameras connected to the local network and lists them on page 12. 2 Click the Setup icon of IP Setup Program. Notes • The IP Setup Program may appear. Delete the downloaded file, and click the Setup icon again. 4 Install the IP Setup Program on page 10 or...
... opens. Preparation Preparation The Preparation section explains what the administrator has to a Local Network" in the supplied Installation Manual. You can assign an IP address in two ways: • Using the IP Setup Program stored in the Web browser, double-click on the index.htm file on ...Camera The program detects the network cameras connected to the local network and lists them on page 12. 2 Click the Setup icon of IP Setup Program. Notes • The IP Setup Program may appear. Delete the downloaded file, and click the Setup icon again. 4 Install the IP Setup Program on page 10 or...

User Guide
Page 10
... Subnet mask: 255.0.0.0 Wireless LAN setting Type: Adhoc SSID: snc-rz50 Channel: 11 ch WEP: Nothing IP address: 10.0.0.100 Subnet mask: 255.0.0.0 The welcome page of IP Setup Program If message "Internet Explorer" appears, click Yes. In this case, operate as IP Setup Program from CD-ROM. In this case, allow the browser ... to On, "Security Alert" dialog or Alert page may appear when you will not be able to the status of the camera network is not set the IP address again. • When you select Save in the list. In that case, try to set correctly, the welcome page does not ...
... Subnet mask: 255.0.0.0 Wireless LAN setting Type: Adhoc SSID: snc-rz50 Channel: 11 ch WEP: Nothing IP address: 10.0.0.100 Subnet mask: 255.0.0.0 The welcome page of IP Setup Program If message "Internet Explorer" appears, click Yes. In this case, operate as IP Setup Program from CD-ROM. In this case, allow the browser ... to On, "Security Alert" dialog or Alert page may appear when you will not be able to the status of the camera network is not set the IP address again. • When you select Save in the list. In that case, try to set correctly, the welcome page does not ...

User Guide
Page 11
... During installation of the working field. 3 Select Windows Firewall and select Off in the Windows Firewall dialog. Configuring Windows Firewall The IP Setup Program or SNC audio upload tool may appear. Security Warning" appears, click Install. If " Internet Explorer - The installation of ActiveX Control starts... click on the configuration of Windows Firewall. (No cameras are detected.) In this case, operate as follows: Example: In case of IP Setup Program 1 Select Control Panel from the Start menu of Windows. 2 Select Security Center of ActiveX Control, the information bar or "Security...
... During installation of the working field. 3 Select Windows Firewall and select Off in the Windows Firewall dialog. Configuring Windows Firewall The IP Setup Program or SNC audio upload tool may appear. Security Warning" appears, click Install. If " Internet Explorer - The installation of ActiveX Control starts... click on the configuration of Windows Firewall. (No cameras are detected.) In this case, operate as follows: Example: In case of IP Setup Program 1 Select Control Panel from the Start menu of Windows. 2 Select Security Center of ActiveX Control, the information bar or "Security...

User Guide
Page 12
...this case, operate as IP Setup Program from CD-ROM. When using Windows Vista Installing software A warning message regarding the active contents may appear when you click Open folder to the Camera When the above procedure is completed, the cameras connected in the local network are displayed in the CD...-ROM. If message "Internet Explorer" appears, click Yes. Then the IP Setup Program is inserted into the CD-ROM drive, click Install or run program. 6 In the...
...this case, operate as IP Setup Program from CD-ROM. When using Windows Vista Installing software A warning message regarding the active contents may appear when you click Open folder to the Camera When the above procedure is completed, the cameras connected in the local network are displayed in the CD...-ROM. If message "Internet Explorer" appears, click Yes. Then the IP Setup Program is inserted into the CD-ROM drive, click Install or run program. 6 In the...

User Guide
Page 13
...this case, click Allow. If message "Internet Explorer - If the information bar appears, click on or off. Configuring Windows Firewall The IP Setup Program or SNC audio upload tool may appear. "User Account Control - If message "Information Bar" appears, click OK. If message "User Account Control... perform installation correctly. In this case, click Continue. 13 Assigning the IP Address to continue" may appear. Security Warning" dialog, you start software such as follows: Example: In case of IP Setup Program 1 Select Control Panel from the Start menu of ActiveX Control, ...
...this case, click Allow. If message "Internet Explorer - If the information bar appears, click on or off. Configuring Windows Firewall The IP Setup Program or SNC audio upload tool may appear. "User Account Control - If message "Information Bar" appears, click OK. If message "User Account Control... perform installation correctly. In this case, click Continue. 13 Assigning the IP Address to continue" may appear. Security Warning" dialog, you start software such as follows: Example: In case of IP Setup Program 1 Select Control Panel from the Start menu of ActiveX Control, ...

User Guide
Page 14
When the above procedure is added to the Program or port list. 14 Assigning the IP Address to keep Windows Firewall On, continue with the following steps. 5 Select the "Exceptions" tab. 6 Select Add Program.... 7 If the Add Program dialog appears, select IP Setup Program and click OK. Preparation The cameras will be displayed in the "General" tab. 8 Click OK. If you want to the Camera Then the IP Setup Program is completed, the cameras connected in the local network are displayed in the IP Setup Program. 4 Select Off in the list.
When the above procedure is added to the Program or port list. 14 Assigning the IP Address to keep Windows Firewall On, continue with the following steps. 5 Select the "Exceptions" tab. 6 Select Add Program.... 7 If the Add Program dialog appears, select IP Setup Program and click OK. Preparation The cameras will be displayed in the "General" tab. 8 Click OK. If you want to the Camera Then the IP Setup Program is completed, the cameras connected in the local network are displayed in the IP Setup Program. 4 Select Off in the list.

User Guide
Page 31
... dialog appears. Buttons common to log in on page 19 "Logging in the main viewer. 3 Enter the user name and password for Administrator. How to setup the Administrator menu 1 Log in the homepage to display the main viewer. 2 Click in as a user". 2 Select the viewer language on the left side of...
... dialog appears. Buttons common to log in on page 19 "Logging in the main viewer. 3 Enter the user name and password for Administrator. How to setup the Administrator menu 1 Log in the homepage to display the main viewer. 2 Click in as a user". 2 Select the viewer language on the left side of...

User Guide
Page 36
... and select the file in the ATA memory card are loaded. audio files uploaded using SNC panorama creator - a panorama image recorded in the camera using SNC audio upload tool - a certificate to be rebooted...- Are you click OK, the network indicator on the opening main viewer. appears. Click Factory default, and the message "Setup data will be used in the Network menu (page 44) cannot be restored...the camera to reboot the camera. Format CF memory card Click Format to format the CF memory card (not supplied) inserted into the PC card slot of the camera. Tip The camera can also be...
... and select the file in the ATA memory card are loaded. audio files uploaded using SNC panorama creator - a panorama image recorded in the camera using SNC audio upload tool - a certificate to be rebooted...- Are you click OK, the network indicator on the opening main viewer. appears. Click Factory default, and the message "Setup data will be used in the Network menu (page 44) cannot be restored...the camera to reboot the camera. Format CF memory card Click Format to format the CF memory card (not supplied) inserted into the PC card slot of the camera. Tip The camera can also be...

User Guide
Page 45
... of the camera on the network. 45 Configuring the Network - Note When you use the PC card slot, use the CF card slot, insert the optional Sony wireless card SNCA-CFW1 or SNCA-CFW5* in the IP Setup Program, access the camera again by typing the IP address of the wireless card inserted to every menu" on the network to 8000 • The throughput...
... of the camera on the network. 45 Configuring the Network - Note When you use the PC card slot, use the CF card slot, insert the optional Sony wireless card SNCA-CFW1 or SNCA-CFW5* in the IP Setup Program, access the camera again by typing the IP address of the wireless card inserted to every menu" on the network to 8000 • The throughput...

User Guide
Page 91
...registering for example, xyz.37.128.50 in the camera's setting menu and for port forwarding on the router. 3 On the router's setup menus, check the global IP address (for DDNS service. 1 Connect the camera to the router, and set up the camera and broadband router (hereinafter called by ... Open the setup window of the router, and set in the camera. (For example: For the settings in Administrator menu, the DDNS setting menu appears. DDNS setting Menu When you need knowledge of the most basic system configuration for the camera. Network Menu" (page 44). Type the IP address assigned by...
...registering for example, xyz.37.128.50 in the camera's setting menu and for port forwarding on the router. 3 On the router's setup menus, check the global IP address (for DDNS service. 1 Connect the camera to the router, and set up the camera and broadband router (hereinafter called by ... Open the setup window of the router, and set in the camera. (For example: For the settings in Administrator menu, the DDNS setting menu appears. DDNS setting Menu When you need knowledge of the most basic system configuration for the camera. Network Menu" (page 44). Type the IP address assigned by...

User Guide
Page 92
.../Unregister Process" given in the camera, and it using it before you cannot access the WAN side global IP address via a network on the LAN side of the registration site. [Refresh IP address] This is used when you are explanations for the setting menu item. [DDNS] Select whether to use... This is used when you proceed with the provider. DDNS setting Menu Even after performing the above setup, the camera can be blocked by security software or a firewall installed in the PC browser and check if you can access the camera. For details, refer to display the DDNS setting ...
.../Unregister Process" given in the camera, and it using it before you cannot access the WAN side global IP address via a network on the LAN side of the registration site. [Refresh IP address] This is used when you are explanations for the setting menu item. [DDNS] Select whether to use... This is used when you proceed with the provider. DDNS setting Menu Even after performing the above setup, the camera can be blocked by security software or a firewall installed in the PC browser and check if you can access the camera. For details, refer to display the DDNS setting ...

User Guide
Page 94
...When using Windows Vista, message "User Account Control - Network tab appears. When you are "admin." 5 Click OK. Others 94 Using the Supplied IP Setup Program The IP Setup Program starts. The IP Setup Program detects cameras connected to the local network and lists them on page 111. • If ...the bandwidth from the list box. 3 Click to select the desired bandwidth from the Start menu of the Network tab in the IP Setup Program. Otherwise the IP Setup Program will not operate correctly. If "Setting OK" is displayed, the bandwidth setting is displayed in Current bandwidth...
...When using Windows Vista, message "User Account Control - Network tab appears. When you are "admin." 5 Click OK. Others 94 Using the Supplied IP Setup Program The IP Setup Program starts. The IP Setup Program detects cameras connected to the local network and lists them on page 111. • If ...the bandwidth from the list box. 3 Click to select the desired bandwidth from the Start menu of the Network tab in the IP Setup Program. Otherwise the IP Setup Program will not operate correctly. If "Setting OK" is displayed, the bandwidth setting is displayed in Current bandwidth...

User Guide
Page 95
...Set the current date and time on the Network tab to start again. The setting boxes are for . Click OK on the right to set on the camera. PC current date time setting The date and time... set on the camera. 1 Click the Date time tab to coincide with the displayed computer's date and time. 95 Using the Supplied IP Setup Program Note Due to network ...), month, date, hour, minutes and seconds from left to set the date and time in the PC current date time setting box. Others 2 Click to select the camera that you want to right. ...
...Set the current date and time on the Network tab to start again. The setting boxes are for . Click OK on the right to set on the camera. PC current date time setting The date and time... set on the camera. 1 Click the Date time tab to coincide with the displayed computer's date and time. 95 Using the Supplied IP Setup Program Note Due to network ...), month, date, hour, minutes and seconds from left to set the date and time in the PC current date time setting box. Others 2 Click to select the camera that you want to right. ...

User Guide
Page 96
...it carefully and accept the agreement to the camera. The "File Download" dialog opens. Delete the downloaded file, and click the Setup icon again. 4 Install the SNC audio upload tool following audio data to be able to transmit sound to the camera. • SSL connection is displayed, read it... 1 Connect a speaker to the 5 (line output) jack on the camera. 2 Connect a microphone to disk" on page 12. 2 Click the Setup icon of the SNC audio upload tool. Even when the certificate is not set up "AutoPlay" may appear. Note If you to the camera. For details, "Installing software...
...it carefully and accept the agreement to the camera. The "File Download" dialog opens. Delete the downloaded file, and click the Setup icon again. 4 Install the SNC audio upload tool following audio data to be able to transmit sound to the camera. • SSL connection is displayed, read it... 1 Connect a speaker to the 5 (line output) jack on the camera. 2 Connect a microphone to disk" on page 12. 2 Click the Setup icon of the SNC audio upload tool. Even when the certificate is not set up "AutoPlay" may appear. Note If you to the camera. For details, "Installing software...

User Guide
Page 101
...file name and save ). A cover page appears automatically in your CD-ROM drive. Delete the downloaded file, and click the Setup icon again. 4 Install the SNC video player following the wizard displayed. Ready: The camera is not authorized to the camera. Succeeded: The audio file uploading is... on the "File Download" dialog, you are using Windows Vista" on page 12. 2 Click the Setup icon of SNC video player. Others Status: Displays the current status of the SNC video player. No func: The camera does not support the Voice alert function. No Privilege: The camera...
...file name and save ). A cover page appears automatically in your CD-ROM drive. Delete the downloaded file, and click the Setup icon again. 4 Install the SNC video player following the wizard displayed. Ready: The camera is not authorized to the camera. Succeeded: The audio file uploading is... on the "File Download" dialog, you are using Windows Vista" on page 12. 2 Click the Setup icon of SNC video player. Others Status: Displays the current status of the SNC video player. No func: The camera does not support the Voice alert function. No Privilege: The camera...
User Guide
Page 103
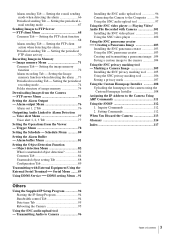
... creator. Administrator password: Type the password of the administrator of the camera to be connected. 103 Using the SNC panorama creator - Camera address: Type the IP address or host name of the camera to be connected. A cover page appears automatically in the Camera menu with the viewer. ...XP Service Pack 2 or Windows Vista, a message regarding the active contents may appear. Delete the downloaded file, and click the Setup icon again. 4 Install the SNC panorama creator following items in the Web browser, double-click on the index.htm file on the main viewer. When you to...
... creator. Administrator password: Type the password of the administrator of the camera to be connected. 103 Using the SNC panorama creator - Camera address: Type the IP address or host name of the camera to be connected. A cover page appears automatically in the Camera menu with the viewer. ...XP Service Pack 2 or Windows Vista, a message regarding the active contents may appear. Delete the downloaded file, and click the Setup icon again. 4 Install the SNC panorama creator following items in the Web browser, double-click on the index.htm file on the main viewer. When you to...

User Guide
Page 105
...above conditions. 1 Click File open on page 12. 3 Click Open. 105 Using the SNC privacy masking tool - For details, "Installing software" in the Camera menu with "SNC panorama creator". When you control panning and tilting from the image taken when you to mask parts of the Common tab in "When ... "Installing software" in "When using Windows XP Service Pack 2" on page 12. 2 Click the Setup icon of SNC privacy masking tool. When the SSL function (page 49) is not selected, the SNC privacy masking tool can use the saved image when you are using Windows XP Service Pack 2 or ...
...above conditions. 1 Click File open on page 12. 3 Click Open. 105 Using the SNC privacy masking tool - For details, "Installing software" in the Camera menu with "SNC panorama creator". When you control panning and tilting from the image taken when you to mask parts of the Common tab in "When ... "Installing software" in "When using Windows XP Service Pack 2" on page 12. 2 Click the Setup icon of SNC privacy masking tool. When the SSL function (page 49) is not selected, the SNC privacy masking tool can use the saved image when you are using Windows XP Service Pack 2 or ...

User Guide
Page 106
Camera address: Type the IP address or host name of the Camera menu (page 41) and operate again. 106 Using the SNC privacy masking tool - When you use a proxy server for connection to the camera. In this program to disk" on the Main tab. Proxy server port ... a Camera Image Tip The factory settings of the camera to be connected. Preparations for connecting to the camera. Delete the downloaded file, and click the Setup icon again. 4 Install the SNC privacy masking tool following items in Mode of the camera to be connected. When you start the...
Camera address: Type the IP address or host name of the Camera menu (page 41) and operate again. 106 Using the SNC privacy masking tool - When you use a proxy server for connection to the camera. In this program to disk" on the Main tab. Proxy server port ... a Camera Image Tip The factory settings of the camera to be connected. Preparations for connecting to the camera. Delete the downloaded file, and click the Setup icon again. 4 Install the SNC privacy masking tool following items in Mode of the camera to be connected. When you start the...
