Operating Instructions
Page 6
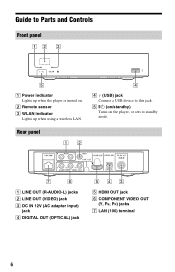
E [/1 (on/standby) Turns on . Guide to Parts and Controls Front panel A Power indicator Lights up when using a wireless LAN. D (USB) jack Connect a USB device to standby mode. Rear panel A LINE OUT (R-AUDIO-L) jacks B LINE OUT (VIDEO) jack C DC IN 12V (AC adapter input) jack D DIGITAL OUT (OPTICAL) jack E HDMI OUT jack F COMPONENT VIDEO OUT (Y, PB, PR) jacks G LAN (100) terminal 6 B Remote sensor C WLAN indicator Lights up when the player is turned on the player, or sets to this jack.
E [/1 (on/standby) Turns on . Guide to Parts and Controls Front panel A Power indicator Lights up when using a wireless LAN. D (USB) jack Connect a USB device to standby mode. Rear panel A LINE OUT (R-AUDIO-L) jacks B LINE OUT (VIDEO) jack C DC IN 12V (AC adapter input) jack D DIGITAL OUT (OPTICAL) jack E HDMI OUT jack F COMPONENT VIDEO OUT (Y, PB, PR) jacks G LAN (100) terminal 6 B Remote sensor C WLAN indicator Lights up when the player is turned on the player, or sets to this jack.
Operating Instructions
Page 7
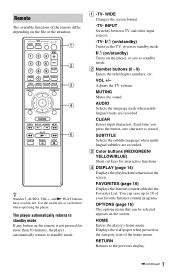
... to 18 of your favorite Internet content programs. OPTIONS (page 16) The options menu that can be selected appears on the remote is erased. A -TV- Remote The available functions of the remote differ depending on the screen. The player automatically returns to standby mode If any button on the screen. Each time you...
... to 18 of your favorite Internet content programs. OPTIONS (page 16) The options menu that can be selected appears on the remote is erased. A -TV- Remote The available functions of the remote differ depending on the screen. The player automatically returns to standby mode If any button on the screen. Each time you...
Operating Instructions
Page 9
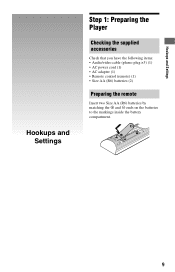
Hookups and Settings Hookups and Settings Step 1: Preparing the Player Checking the supplied accessories Check that you have the following items: • Audio/video cable (phono plug ×3) (1) • AC power cord (1) • AC adapter (1) • Remote control (remote) (1) • Size AA (R6) batteries (2) Preparing the remote Insert two Size AA (R6) batteries by matching the 3 and # ends on the batteries to the markings inside the battery compartment. 9
Hookups and Settings Hookups and Settings Step 1: Preparing the Player Checking the supplied accessories Check that you have the following items: • Audio/video cable (phono plug ×3) (1) • AC power cord (1) • AC adapter (1) • Remote control (remote) (1) • Size AA (R6) batteries (2) Preparing the remote Insert two Size AA (R6) batteries by matching the 3 and # ends on the batteries to the markings inside the battery compartment. 9
Operating Instructions
Page 12
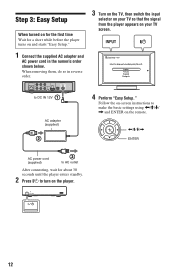
When removing them, do so in the numeric order shown below. Follow the on your TV so that the signal from the player appears on -screen instructions to DC IN 12V AC adapter (supplied) 4 Perform "Easy Setup." to make the basic settings using Step 3: Easy Setup When turned on for the first time Wait for a short while before the player turns on and starts "Easy Setup." 1 Connect the supplied AC adapter and AC power cord in reverse order. 3 Turn on the TV, then switch the input selector on your TV screen.
When removing them, do so in the numeric order shown below. Follow the on your TV so that the signal from the player appears on -screen instructions to DC IN 12V AC adapter (supplied) 4 Perform "Easy Setup." to make the basic settings using Step 3: Easy Setup When turned on for the first time Wait for a short while before the player turns on and starts "Easy Setup." 1 Connect the supplied AC adapter and AC power cord in reverse order. 3 Turn on the TV, then switch the input selector on your TV screen.
Operating Instructions
Page 21
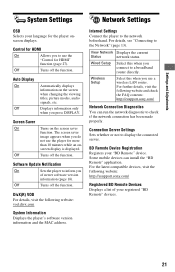
...picture modes, audio signals, etc. Turns off the function. DivX(R) VOD For details, visit the following website: http://esupport.sony.com/ Registered BD Remote Devices Displays a list of newer software version information (page 18). Wired Setup Select this when you use the player for ... Status network status. For further details, visit the following website and check the FAQ contents: http://esupport.sony.com/ Network Connection Diagnostics You can install the "BD Remote" application. Software Update Notification On Sets the player to inform you press DISPLAY.
...picture modes, audio signals, etc. Turns off the function. DivX(R) VOD For details, visit the following website: http://esupport.sony.com/ Registered BD Remote Devices Displays a list of newer software version information (page 18). Wired Setup Select this when you use the player for ... Status network status. For further details, visit the following website and check the FAQ contents: http://esupport.sony.com/ Network Connection Diagnostics You can install the "BD Remote" application. Software Update Notification On Sets the player to inform you press DISPLAY.
Operating Instructions
Page 27
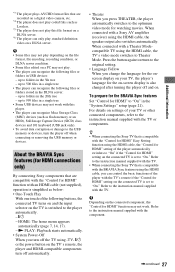
...: Playback starts automatically. • System Power-Off When you turn off the TV using -TV- [/1 or the power button on the TV's remote, the player and HDMI-compatible components turn the player off when connecting or removing the USB memory or devices. Refer to the instruction manual supplied...memory or devices, turn off and on your TV, the player's language for HDMI" function with the TV's remote if the "Control for watching movies. z • When connecting the Sony TV that are recorded on settings of the following files or folders in USB devices: - When connected with ...
...: Playback starts automatically. • System Power-Off When you turn off the TV using -TV- [/1 or the power button on the TV's remote, the player and HDMI-compatible components turn the player off when connecting or removing the USB memory or devices. Refer to the instruction manual supplied...memory or devices, turn off and on your TV, the player's language for HDMI" function with the TV's remote if the "Control for watching movies. z • When connecting the Sony TV that are recorded on settings of the following files or folders in USB devices: - When connected with ...
Operating Instructions
Page 30
... 21 MUTING 7 N "Network Settings" 21 "Network Update" 18 O One-Touch Play 27 OPTIONS 7 "OSD" 21 P Parental Control 20 "Parental Control Settings" 20 Playable files 26 R Remote 7, 9 "Resetting" 22 Resetting the player 22 Resume 8, 25 S "Screen Settings" 18 "Setup" 17 Software update 18, 21 SUBTITLE 7 System Power-Off 27 "System Settings" 21...
... 21 MUTING 7 N "Network Settings" 21 "Network Update" 18 O One-Touch Play 27 OPTIONS 7 "OSD" 21 P Parental Control 20 "Parental Control Settings" 20 Playable files 26 R Remote 7, 9 "Resetting" 22 Resetting the player 22 Resume 8, 25 S "Screen Settings" 18 "Setup" 17 Software update 18, 21 SUBTITLE 7 System Power-Off 27 "System Settings" 21...


