Dimensions Diagram
Page 1
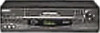
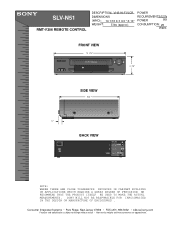
SLV-N51 RMT-V306 REMOTE CONTROL MDDEEOSSDCCERRLII:PPTTIIOONN:: VHS HI-FI VCR DIMENSIONS (W(WWEHHIGDDH))::T: 14 1/16 X 3 3/4 " X 10" WEIGHT: 5 lbs (approx) POWER REQUIREMENTS:120V POWER 60H CONSUMPTION: 25 Watts FRONT VIEW 14 1/16" HI-FI Stereo R 3 7/8" SIDE VIEW 10 " 1" AC IN BACK VIEW LINE LINE IN OUT IN L VHF/UHF R OUT VIDEO.... Consumer Integrated Systems • Park Ridge, New Jersey 07656 • FAX (201) 986 3062 • b2b.sel.sony.com Features and specifications subject to change without notice. • Non-metric weights and measurements are approximate...
SLV-N51 RMT-V306 REMOTE CONTROL MDDEEOSSDCCERRLII:PPTTIIOONN:: VHS HI-FI VCR DIMENSIONS (W(WWEHHIGDDH))::T: 14 1/16 X 3 3/4 " X 10" WEIGHT: 5 lbs (approx) POWER REQUIREMENTS:120V POWER 60H CONSUMPTION: 25 Watts FRONT VIEW 14 1/16" HI-FI Stereo R 3 7/8" SIDE VIEW 10 " 1" AC IN BACK VIEW LINE LINE IN OUT IN L VHF/UHF R OUT VIDEO.... Consumer Integrated Systems • Park Ridge, New Jersey 07656 • FAX (201) 986 3062 • b2b.sel.sony.com Features and specifications subject to change without notice. • Non-metric weights and measurements are approximate...
Operating Instructions
Page 5
...Step 1 : Unpacking 7 Step 2 : Setting up the remote commander 9 Step 3 : Hookups 17 Step 4 : Selecting a language 18 Step 5 : Setting the clock 23 Step 6 : Presetting channels Basic Operations 27 Playing a tape 30 Recording TV programs 33 Recording TV programs using the timer 36 Locking the VCR (Child ... 37 Playing/searching at various speeds 39 Setting the recording duration time 40 Checking/changing/canceling timer settings 42 Recording stereo and bilingual programs 44 Searching using the VCR Caution Television programs, films, video tapes and other materials may be contrary to the ...
...Step 1 : Unpacking 7 Step 2 : Setting up the remote commander 9 Step 3 : Hookups 17 Step 4 : Selecting a language 18 Step 5 : Setting the clock 23 Step 6 : Presetting channels Basic Operations 27 Playing a tape 30 Recording TV programs 33 Recording TV programs using the timer 36 Locking the VCR (Child ... 37 Playing/searching at various speeds 39 Setting the recording duration time 40 Checking/changing/canceling timer settings 42 Recording stereo and bilingual programs 44 Searching using the VCR Caution Television programs, films, video tapes and other materials may be contrary to the ...
Operating Instructions
Page 6
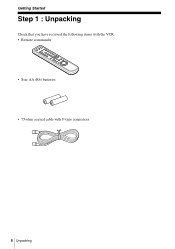
Getting Started Step 1 : Unpacking Check that you have received the following items with the VCR: • Remote commander • Size AA (R6) batteries • 75-ohm coaxial cable with F-type connectors 6 Unpacking
Getting Started Step 1 : Unpacking Check that you have received the following items with the VCR: • Remote commander • Size AA (R6) batteries • 75-ohm coaxial cable with F-type connectors 6 Unpacking
Operating Instructions
Page 7
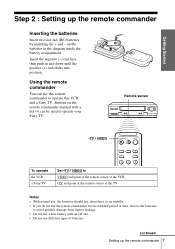
... by matching the + and - Buttons on the batteries to operate this remote commander to the diagram inside the battery compartment. Remote sensor •TV / VIDEO To operate the VCR a Sony TV 123 Set •TV / VIDEO to VIDEO and point at the remote sensor at the VCR •TV and point at the... remote sensor at the TV Notes • With normal use, the batteries...
... by matching the + and - Buttons on the batteries to operate this remote commander to the diagram inside the battery compartment. Remote sensor •TV / VIDEO To operate the VCR a Sony TV 123 Set •TV / VIDEO to VIDEO and point at the remote sensor at the VCR •TV and point at the... remote sensor at the TV Notes • With normal use, the batteries...
Operating Instructions
Page 8
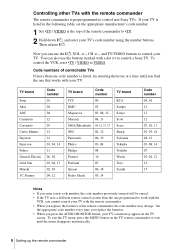
You can use the buttons marked with the remote commander The remote commander is preprogrammed to control non-Sony TVs. To control the VCR, reset •TV / VIDEO to •TV. 2 Hold down ?/1, and enter your TV. Set the appropriate code number every time you replace the batteries. • When you can also ...
You can use the buttons marked with the remote commander The remote commander is preprogrammed to control non-Sony TVs. To control the VCR, reset •TV / VIDEO to •TV. 2 Hold down ?/1, and enter your TV. Set the appropriate code number every time you replace the batteries. • When you can also ...
Operating Instructions
Page 13
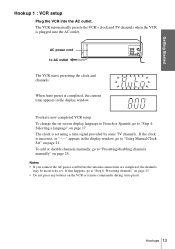
... is set . The clock is incorrect, or "--:--" appears in the display window. If this happens, go to "Using Manual Clock Set" on the VCR or remote commander during Auto preset. Getting Started Hookup 1 : VCR setup Plug the VCR into the AC outlet. When Auto preset is plugged into the AC outlet...
... is set . The clock is incorrect, or "--:--" appears in the display window. If this happens, go to "Using Manual Clock Set" on the VCR or remote commander during Auto preset. Getting Started Hookup 1 : VCR setup Plug the VCR into the AC outlet. When Auto preset is plugged into the AC outlet...

Operating Instructions
Page 15
... and TV channels when the VCR is completed, the current time appears in the display window, go to "Step 4: Selecting a language" on the VCR or remote commander during Auto preset. If the clock is set . To add or disable channels manually, go to AC outlet The VCR starts presetting the clock...
... and TV channels when the VCR is completed, the current time appears in the display window, go to "Step 4: Selecting a language" on the VCR or remote commander during Auto preset. If the clock is set . To add or disable channels manually, go to AC outlet The VCR starts presetting the clock...
Operating Instructions
Page 32
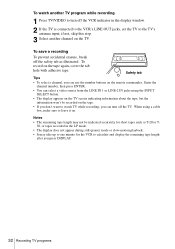
... won't be indicated accurately for the VCR to calculate and display the remaining tape length after you press DISPLAY. 32 Recording TV programs To record on the remote commander. Notes • The remaining tape length may take up to one minute for short tapes such as illustrated. ...if not, skip this step. 3 Select another TV program while recording 1 Press TV/VIDEO to turn off the TV. To watch TV while recording, you...
... won't be indicated accurately for the VCR to calculate and display the remaining tape length after you press DISPLAY. 32 Recording TV programs To record on the remote commander. Notes • The remaining tape length may take up to one minute for short tapes such as illustrated. ...if not, skip this step. 3 Select another TV program while recording 1 Press TV/VIDEO to turn off the TV. To watch TV while recording, you...

Operating Instructions
Page 37
... TRACKING +/- When you release the button, normal playback resumes. To resume normal playback Press H PLAY. Play frame by frame During pause, press M FF on the remote commander. H PLAY m REW M FF x2 y SLOW M FF m REW Playback options Operation View the picture during fast- Play in slow motion During playback or pause, press...
... TRACKING +/- When you release the button, normal playback resumes. To resume normal playback Press H PLAY. Play frame by frame During pause, press M FF on the remote commander. H PLAY m REW M FF x2 y SLOW M FF m REW Playback options Operation View the picture during fast- Play in slow motion During playback or pause, press...
Operating Instructions
Page 53
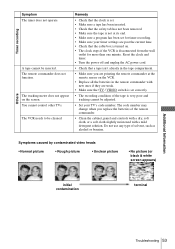
...the VCR is disconnected from the wall outlet for timer recording. • Make sure your timer settings are past the current time. • Check that a tape isn't already in the remote commander with a mild detergent solution. Symptoms caused by contaminated video heads • Normal picture • Rough picture ...moistened with new ones if they are weak. • Make sure the •TV / VIDEO switch is not at its end. • Make sure a program has been set correctly. • The recording condition of solvent, such as alcohol or benzine. A tape cannot be cleaned. You cannot ...
...the VCR is disconnected from the wall outlet for timer recording. • Make sure your timer settings are past the current time. • Check that a tape isn't already in the remote commander with a mild detergent solution. Symptoms caused by contaminated video heads • Normal picture • Rough picture ...moistened with new ones if they are weak. • Make sure the •TV / VIDEO switch is not at its end. • Make sure a program has been set correctly. • The recording condition of solvent, such as alcohol or benzine. A tape cannot be cleaned. You cannot ...
Operating Instructions
Page 54
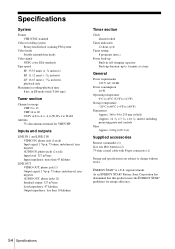
...mm/s ( 11 16 inches/s), playback only Maximum recording/playback time 8 hrs. As an ENERGY STAR® Partner, Sony Corporation has determined that this product meets the ENERGY STAR® guidelines for VHF/UHF Inputs and outputs LINE IN 1 and LINE-2 IN VIDEO IN, phono jack (1 each) Input signal:... (Approx. 14 14 × 3 34 × 10 1 8 inches) including projecting parts and controls Mass Approx. 2.6 kg (6 lb 3 oz) Supplied accessories Remote commander (1) Size AA (R6) batteries (2) 75-ohm coaxial cable with T-160 tape) Tuner section Channel coverage VHF 2 to 13 UHF 14 to 69 CATV A-8 to...
...mm/s ( 11 16 inches/s), playback only Maximum recording/playback time 8 hrs. As an ENERGY STAR® Partner, Sony Corporation has determined that this product meets the ENERGY STAR® guidelines for VHF/UHF Inputs and outputs LINE IN 1 and LINE-2 IN VIDEO IN, phono jack (1 each) Input signal:... (Approx. 14 14 × 3 34 × 10 1 8 inches) including projecting parts and controls Mass Approx. 2.6 kg (6 lb 3 oz) Supplied accessories Remote commander (1) Size AA (R6) batteries (2) 75-ohm coaxial cable with T-160 tape) Tuner section Channel coverage VHF 2 to 13 UHF 14 to 69 CATV A-8 to...
Operating Instructions
Page 55
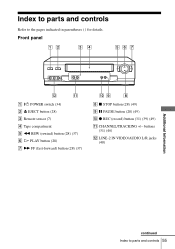
buttons (31) (46) L LINE-2 IN VIDEO/AUDIO L/R jacks (48) Additional Information continued Index to the pages indicated in parentheses ( ) for details. Index to parts and controls Refer to parts and controls 55 Front panel A ?/1 POWER switch (34) B Z EJECT button (28) C Remote sensor (7) D Tape compartment E m REW (rewind) button (28) (37) F H PLAY button (28) G M FF (fast-forward) button (28) (37) H x STOP button (28) (49) I X PAUSE button (28) (49) J z REC (record) button (31) (39) (49) K CHANNEL/TRACKING +/-
buttons (31) (46) L LINE-2 IN VIDEO/AUDIO L/R jacks (48) Additional Information continued Index to the pages indicated in parentheses ( ) for details. Index to parts and controls Refer to parts and controls 55 Front panel A ?/1 POWER switch (34) B Z EJECT button (28) C Remote sensor (7) D Tape compartment E m REW (rewind) button (28) (37) F H PLAY button (28) G M FF (fast-forward) button (28) (37) H x STOP button (28) (49) I X PAUSE button (28) (49) J z REC (record) button (31) (39) (49) K CHANNEL/TRACKING +/-
Operating Instructions
Page 57
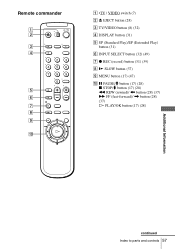
Remote commander 123 456 789 0 A •TV / VIDEO switch (7) B Z EJECT button (28) C TV/VIDEO button (8) (32) D DISPLAY button (31) E SP (Standard Play)/EP (Extended Play) button (31) F INPUT SELECT button (32) (49) G z REC (record) button (31) (39) H y SLOW button (37) I MENU button (17) (47) J X PAUSE/M button (17) (28) x STOP/m button (17) (28) m REW (rewind)/ < button (28) (37) M FF (fast-forward)/ , button (28) (37) H PLAY/OK button (17) (28) Additional Information continued Index to parts and controls 57
Remote commander 123 456 789 0 A •TV / VIDEO switch (7) B Z EJECT button (28) C TV/VIDEO button (8) (32) D DISPLAY button (31) E SP (Standard Play)/EP (Extended Play) button (31) F INPUT SELECT button (32) (49) G z REC (record) button (31) (39) H y SLOW button (37) I MENU button (17) (47) J X PAUSE/M button (17) (28) x STOP/m button (17) (28) m REW (rewind)/ < button (28) (37) M FF (fast-forward)/ , button (28) (37) H PLAY/OK button (17) (28) Additional Information continued Index to parts and controls 57


