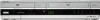
Operating Instructions
Page 4
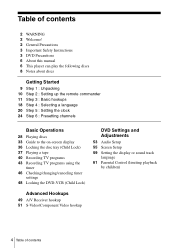
... of contents 2 WARNING 2 Welcome! 2 General Precautions 3 Important Safety Instructions 3 DVD Precautions 6 About this manual 6 This player can play the following discs 8 Notes about discs Getting Started 9 Step 1 : Unpacking 10 Step 2 : Setting up the remote commander 11 Step 3 : Basic hookups 18 Step 4 : Selecting a language 20... 46 Checking/changing/canceling timer settings 48 Locking the DVD-VCR (Child Lock) DVD Settings and Adjustments 53 Audio Setup 55 Screen Setup 59 Setting the display or sound track language 61 Parental Control (limiting playback by children) Advanced Hookups 49 A/V ...
... of contents 2 WARNING 2 Welcome! 2 General Precautions 3 Important Safety Instructions 3 DVD Precautions 6 About this manual 6 This player can play the following discs 8 Notes about discs Getting Started 9 Step 1 : Unpacking 10 Step 2 : Setting up the remote commander 11 Step 3 : Basic hookups 18 Step 4 : Selecting a language 20... 46 Checking/changing/canceling timer settings 48 Locking the DVD-VCR (Child Lock) DVD Settings and Adjustments 53 Audio Setup 55 Screen Setup 59 Setting the display or sound track language 61 Parental Control (limiting playback by children) Advanced Hookups 49 A/V ...
Operating Instructions
Page 18
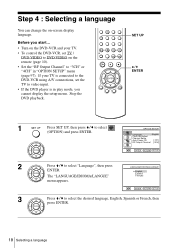
.../LANGUE ENTER. Before you start... • Turn on the DVD-VCR and your TV is connected to the DVD-VCR using A/V connections, set TV / DVD·VIDEO to DVD·VIDEO on -screen display language. If your TV. • To control the DVD-VCR, set the TV to video input. • If ...the DVD player is in "OPTION SETUP" menu (page 97). Step 4 : Selecting a language You can change the on the remote (page 10). • Set the "RF Output Channel" to "3CH...
.../LANGUE ENTER. Before you start... • Turn on the DVD-VCR and your TV is connected to the DVD-VCR using A/V connections, set TV / DVD·VIDEO to DVD·VIDEO on -screen display language. If your TV. • To control the DVD-VCR, set the TV to video input. • If ...the DVD player is in "OPTION SETUP" menu (page 97). Step 4 : Selecting a language You can change the on the remote (page 10). • Set the "RF Output Channel" to "3CH...

Operating Instructions
Page 20
... select (OPTION) and press ENTER. Your DVDVCR can pick up this time signal to automatically set the TV to the DVD-VCR using a cable box, turn it on. • To control the DVD-VCR, set the time manually (page 22). V v ENTER RETURN SET UP 20 Setting the clock If your area are not... yet sending time signals, set TV / DVD·VIDEO to DVD·VIDEO on the DVD-VCR and your area is in play mode, you start... • Turn on the remote (page...
... select (OPTION) and press ENTER. Your DVDVCR can pick up this time signal to automatically set the TV to the DVD-VCR using a cable box, turn it on. • To control the DVD-VCR, set the time manually (page 22). V v ENTER RETURN SET UP 20 Setting the clock If your area are not... yet sending time signals, set TV / DVD·VIDEO to DVD·VIDEO on the DVD-VCR and your area is in play mode, you start... • Turn on the remote (page...

Operating Instructions
Page 22
... automatically may take up to about 20 minutes, set the TV to video input. • If the DVD player is in "OPTION SETUP" menu (page 97). If so, set the clock accurately. • The...8226; If you made Hookup 3, make sure you leave the cable box on the remote (page 10). • Set the "RF Output Channel" to DVD·VIDEO on . • To record TV programs using the timer, you cannot...setup menu. Using Manual Clock Set Before you start... • Turn on the DVD-VCR and your TV. • To control the DVD-VCR, set TV / DVD·VIDEO to "3CH" or "4CH" in play mode, you must set the...
... automatically may take up to about 20 minutes, set the TV to video input. • If the DVD player is in "OPTION SETUP" menu (page 97). If so, set the clock accurately. • The...8226; If you made Hookup 3, make sure you leave the cable box on the remote (page 10). • Set the "RF Output Channel" to DVD·VIDEO on . • To record TV programs using the timer, you cannot...setup menu. Using Manual Clock Set Before you start... • Turn on the DVD-VCR and your TV. • To control the DVD-VCR, set TV / DVD·VIDEO to "3CH" or "4CH" in play mode, you must set the...

Operating Instructions
Page 24
...if there are any unwanted channels, disable them directly using a cable box, turn it on. • To control the DVD-VCR, set TV / DVD·VIDEO to DVD·VIDEO on the DVD-VCR and your TV. Stop the DVD playback. 1 Press SET UP, then press V/v to 125. If your area using A/V connections, set them ...SET UP 24 Presetting channels First, we recommend that you start... • Turn on the remote (page 10). • Set the "RF Output Channel" to preset, set the TV to video input. • If the DVD player is capable of receiving VHF channels 2 to 13, UHF channels 14 to 69 and...
...if there are any unwanted channels, disable them directly using a cable box, turn it on. • To control the DVD-VCR, set TV / DVD·VIDEO to DVD·VIDEO on the DVD-VCR and your TV. Stop the DVD playback. 1 Press SET UP, then press V/v to 125. If your area using A/V connections, set them ...SET UP 24 Presetting channels First, we recommend that you start... • Turn on the remote (page 10). • Set the "RF Output Channel" to preset, set the TV to video input. • If the DVD player is capable of receiving VHF channels 2 to 13, UHF channels 14 to 69 and...

Operating Instructions
Page 26
CH +/- CHANNEL SETUP Ant/Cable [ Cable TV ] The "CHANNEL SETUP" menu appears. Presetting/disabling channels manually Before you start... • Turn on the remote (page 10). • Set the "RF Output Channel" to "3CH" or "4CH" in play mode, you cannot display the setup menu. Auto Channel ...your TV. Number buttons SET UP V/v/B/b ENTER O RETURN 1 Press SET UP, then press V/v to DVD·VIDEO on the DVD-VCR and your TV is in "OPTION SETUP" menu (page 97). When using a cable box, turn it on. • To control the DVD-VCR, set the TV to video input. • If the...
CH +/- CHANNEL SETUP Ant/Cable [ Cable TV ] The "CHANNEL SETUP" menu appears. Presetting/disabling channels manually Before you start... • Turn on the remote (page 10). • Set the "RF Output Channel" to "3CH" or "4CH" in play mode, you cannot display the setup menu. Auto Channel ...your TV. Number buttons SET UP V/v/B/b ENTER O RETURN 1 Press SET UP, then press V/v to DVD·VIDEO on the DVD-VCR and your TV is in "OPTION SETUP" menu (page 97). When using a cable box, turn it on. • To control the DVD-VCR, set the TV to video input. • If the...

Operating Instructions
Page 42
...as illustrated. Safety tab Tips • To select a channel, you press DISPLAY. • You cannot record a DVD to the TV's antenna input; When using A/V connections, set the TV to a VCR tape. • To ...a cable box, make sure to watch TV while recording, you can use the number buttons on the remote commander. Enter the channel number, then press ENTER. • You can select a video source from ... information about the tape, but the information will automatically change to control the DVD player. 2 Press Z and place the disc on the tape again, cover the tab hole with ...
...as illustrated. Safety tab Tips • To select a channel, you press DISPLAY. • You cannot record a DVD to the TV's antenna input; When using A/V connections, set the TV to a VCR tape. • To ...a cable box, make sure to watch TV while recording, you can use the number buttons on the remote commander. Enter the channel number, then press ENTER. • You can select a video source from ... information about the tape, but the information will automatically change to control the DVD player. 2 Press Z and place the disc on the tape again, cover the tab hole with ...

Operating Instructions
Page 103
...Sony cleaning cassette is set it is poor. • Adjust the TV antenna. buttons. • The video heads are dirty (see the last page of "Troubleshooting"). Do not use a commercially available liquid type cleaning cassette, as it to be charged). The picture has no sound. • Adjust the vertical hold control... cannot be changed . • Try using the DVD's menu instead of the direct selection button on the remote (page 64). • Multi-angles are not recorded on the DVD being played. • The DVD prohibits the changing of the subtitles. Playback The picture...
...Sony cleaning cassette is set it is poor. • Adjust the TV antenna. buttons. • The video heads are dirty (see the last page of "Troubleshooting"). Do not use a commercially available liquid type cleaning cassette, as it to be charged). The picture has no sound. • Adjust the vertical hold control... cannot be changed . • Try using the DVD's menu instead of the direct selection button on the remote (page 64). • Multi-angles are not recorded on the DVD being played. • The DVD prohibits the changing of the subtitles. Playback The picture...

Operating Instructions
Page 107
... humidity 25% to 80% Dimensions including projecting parts and controls (w/h/d) Approx. 430 × 85 × 287 mm (Approx. 17 × 3 38 × 11 3 8 inches) Mass Approx. 3.6 kg (Approx. 7.9 lbs) Supplied accessories Remote commander (1) Size AA (R6) batteries (2) 75-ohm ...coaxial cable with F-type connectors (1) Design and specifications are subject to change without notice. Specifications System Laser Semiconductor laser Format VHS NTSC standard Video recording system Rotary head helical...
... humidity 25% to 80% Dimensions including projecting parts and controls (w/h/d) Approx. 430 × 85 × 287 mm (Approx. 17 × 3 38 × 11 3 8 inches) Mass Approx. 3.6 kg (Approx. 7.9 lbs) Supplied accessories Remote commander (1) Size AA (R6) batteries (2) 75-ohm ...coaxial cable with F-type connectors (1) Design and specifications are subject to change without notice. Specifications System Laser Semiconductor laser Format VHS NTSC standard Video recording system Rotary head helical...

Operating Instructions
Page 108
buttons*1 (40) (92) N SELECT DVD/VIDEO buttons (10) O LINE-2 IN VIDEO/AUDIO L/R jacks*2 (95) *1 H and CHANNEL/TRACKING + buttons have a tactile dot. Index to parts and controls Refer to parts and controls Use the tactile dot as a reference. *2 Covered 108 Index to the pages indicated in parentheses ( ) for details. Front panel A ?/1 POWER (on/standby) ... F A (eject) button (38) G z REC (record) button (41) H m (rewind)/M (fast-forward) button (30) (38) I x (stop) button (29) (38) J X (pause) button (29) (38) K H (play) button*1 (29) (37) L Remote sensor (10) M CHANNEL/TRACKING +/-
buttons*1 (40) (92) N SELECT DVD/VIDEO buttons (10) O LINE-2 IN VIDEO/AUDIO L/R jacks*2 (95) *1 H and CHANNEL/TRACKING + buttons have a tactile dot. Index to parts and controls Refer to parts and controls Use the tactile dot as a reference. *2 Covered 108 Index to the pages indicated in parentheses ( ) for details. Front panel A ?/1 POWER (on/standby) ... F A (eject) button (38) G z REC (record) button (41) H m (rewind)/M (fast-forward) button (30) (38) I x (stop) button (29) (38) J X (pause) button (29) (38) K H (play) button*1 (29) (37) L Remote sensor (10) M CHANNEL/TRACKING +/-

Operating Instructions
Page 111
... a reference. *2 The ENTER buttons 14 and 20 can be used interchangeably. Additional Information continued Index to parts and controls 111 Remote commander for DVD A Z (open/close) button (28) (30) B TV / DVD·VIDEO switch (10) C SELECT DVD button (10) D Number buttons*1 (27) E CLEAR button (70) F ANGLE button (67) G SET UP button (18) H SUBTITLE button (68...
... a reference. *2 The ENTER buttons 14 and 20 can be used interchangeably. Additional Information continued Index to parts and controls 111 Remote commander for DVD A Z (open/close) button (28) (30) B TV / DVD·VIDEO switch (10) C SELECT DVD button (10) D Number buttons*1 (27) E CLEAR button (70) F ANGLE button (67) G SET UP button (18) H SUBTITLE button (68...

Operating Instructions
Page 112
Remote commander for VIDEO A Z (eject) button (38) B TV / DVD·VIDEO switch (10) C SELECT VIDEO button (10) D Number buttons*1 (27) E CLEAR button (39) (44) F SET UP button (18) G TIMER button (43) H AUDIO button*1 (89) I ... + buttons have a tactile dot. Use the tactile dot as a reference. *2 The ENTER buttons 15 and 21 can be used interchangeably. 112 Index to parts and controls buttons*1 (40) (92) S VOL (volume) +/-
Remote commander for VIDEO A Z (eject) button (38) B TV / DVD·VIDEO switch (10) C SELECT VIDEO button (10) D Number buttons*1 (27) E CLEAR button (39) (44) F SET UP button (18) G TIMER button (43) H AUDIO button*1 (89) I ... + buttons have a tactile dot. Use the tactile dot as a reference. *2 The ENTER buttons 15 and 21 can be used interchangeably. 112 Index to parts and controls buttons*1 (40) (92) S VOL (volume) +/-


