Operating Instructions
Page 2
...following measures: - This equipment generates, uses, and can be determined by turning the equipment off and on, the user is connected. - Connect the equipment into an outlet on a circuit different from that to which can radiate radio frequency energy and, if not installed and...low frequency (ELF). INFORMATION This product complies with Part 15 of Conformity Trade Name: Model No.: Responsible Party: Address: Telephone No.: SONY SDM-M81 Sony Electronics Inc. 680 Kinderkamack Road,Oradell,NJ 07649 USA 201-930-6972 This device complies with Swedish National Council for Metrology (MPR) ...
...following measures: - This equipment generates, uses, and can be determined by turning the equipment off and on, the user is connected. - Connect the equipment into an outlet on a circuit different from that to which can radiate radio frequency energy and, if not installed and...low frequency (ELF). INFORMATION This product complies with Part 15 of Conformity Trade Name: Model No.: Responsible Party: Address: Telephone No.: SONY SDM-M81 Sony Electronics Inc. 680 Kinderkamack Road,Oradell,NJ 07649 USA 201-930-6972 This device complies with Swedish National Council for Metrology (MPR) ...
Operating Instructions
Page 3
... are not mentioned in each case in the U.S.A. Precautions 4 Identifying parts and controls 5 Setup 7 Step 1: Connect the display to your computer 7 Step 2: Check the digital/analog select switch 7 Step 3: Connect the audio cord 8 Step 4: Connect the power cord 8 Step 5: Secure the cords and close the back cover 8 Step 6: Turn on the monitor...
... are not mentioned in each case in the U.S.A. Precautions 4 Identifying parts and controls 5 Setup 7 Step 1: Connect the display to your computer 7 Step 2: Check the digital/analog select switch 7 Step 3: Connect the audio cord 8 Step 4: Connect the power cord 8 Step 5: Secure the cords and close the back cover 8 Step 6: Turn on the monitor...
Operating Instructions
Page 4
... powder, or solvent, such as in an automobile parked in this monitor with your monitor. • Clean the LCD screen with AC adapter, SONY AC-V018 The equipment should be damaged. • When you do not use the appropriate UK power cord. If the screen becomes dark, unstable...for example near an easily accessible outlet. Disposal of the monitor • Do not dispose of your Sony dealer when replacing the fluorescent tube. Do not place a heavy object on power connections • Use the supplied power cord. Disposal of this monitor must be sure to extreme temperatures, such...
... powder, or solvent, such as in an automobile parked in this monitor with your monitor. • Clean the LCD screen with AC adapter, SONY AC-V018 The equipment should be damaged. • When you do not use the appropriate UK power cord. If the screen becomes dark, unstable...for example near an easily accessible outlet. Disposal of the monitor • Do not dispose of your Sony dealer when replacing the fluorescent tube. Do not place a heavy object on power connections • Use the supplied power cord. Disposal of this monitor must be sure to extreme temperatures, such...
Operating Instructions
Page 6
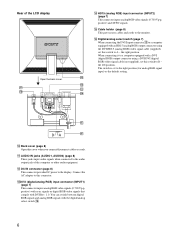
... cable (not supplied), set this switch to A - the left position. qa AUDIO IN jacks (AUDIO1, AUDIO2) (page 8) These jacks input audio signals when connected to D - The switch is set this switch to the audio output jack of the LCD display Open the back cover. DA qf HD15 (analog RGB... RGB signals with a DVI (digital RGB) output connector using the DVI-HD15 (analog RGB) video signal cable (supplied), set to this cover when you connect/disconnect cables or cords. DA 0 Back cover (page 8) Open this connector. qg Cable holder (page 8) This part secures cables and cords to the display...
... cable (not supplied), set this switch to A - the left position. qa AUDIO IN jacks (AUDIO1, AUDIO2) (page 8) These jacks input audio signals when connected to D - The switch is set this switch to the audio output jack of the LCD display Open the back cover. DA qf HD15 (analog RGB... RGB signals with a DVI (digital RGB) output connector using the DVI-HD15 (analog RGB) video signal cable (supplied), set to this cover when you connect/disconnect cables or cords. DA 0 Back cover (page 8) Open this connector. qg Cable holder (page 8) This part secures cables and cords to the display...
Operating Instructions
Page 7
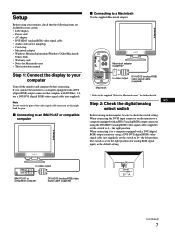
... with a DVI (digital RGB) output connector that the following items are included in your computer Turn off the monitor and computer before connecting. to a Macintosh Use the supplied Macintosh adapter. Note Do not touch the pins of the video signal cable connector as the default ... Macintosh adapter (supplied)* Macintosh DVI-HD15 (analog RGB) to video output video signal cable (supplied) * Refer to check the switch setting. When connecting it to the right position (for further details. The switch is set to a computer equipped with DVI Rev. 1.0, use a DVI-DVI (digital ...
... with a DVI (digital RGB) output connector that the following items are included in your computer Turn off the monitor and computer before connecting. to a Macintosh Use the supplied Macintosh adapter. Note Do not touch the pins of the video signal cable connector as the default ... Macintosh adapter (supplied)* Macintosh DVI-HD15 (analog RGB) to video output video signal cable (supplied) * Refer to check the switch setting. When connecting it to the right position (for further details. The switch is set to a computer equipped with DVI Rev. 1.0, use a DVI-DVI (digital ...

Operating Instructions
Page 8
... audio cord Open the back cover and turn off , first connect the AC adapter and power cord to the monitor, then connect it to a power outlet. to DC IN Cable holder 3 Close the back cover. to audio input Step 5: Secure the cords and close the back cover 1 ... cover or latch. to audio output of the computer or other audio equipment audio cord (supplied) Step 4: Connect the power cord With the monitor and computer switched off the display and computer before connecting. Bundle the cables and cords You can bundle the cables and cords by using the supplied cord strap.
... audio cord Open the back cover and turn off , first connect the AC adapter and power cord to the monitor, then connect it to a power outlet. to DC IN Cable holder 3 Close the back cover. to audio input Step 5: Secure the cords and close the back cover 1 ... cover or latch. to audio output of the computer or other audio equipment audio cord (supplied) Step 4: Connect the power cord With the monitor and computer switched off the display and computer before connecting. Bundle the cables and cords You can bundle the cables and cords by using the supplied cord strap.

Operating Instructions
Page 9
... on the screen: - The computer is . The Plug & Play monitor is automatically selected so that the input signal setting is correctly connected to the headphones jack. If your monitor. Press the INPUT button. Try pressing any particular high value. Then adjust the computer's graphics... the headphones. Since flickers are unobtrusive on the screen. • When your monitor is complete. Adjusting the volume Volume adjustments are connected to the ReadMe file on the screen. buttons to music, sound, and other GB audio equipment using the INPUT1 and INPUT2 connectors....
... on the screen: - The computer is . The Plug & Play monitor is automatically selected so that the input signal setting is correctly connected to the headphones jack. If your monitor. Press the INPUT button. Try pressing any particular high value. Then adjust the computer's graphics... the headphones. Since flickers are unobtrusive on the screen. • When your monitor is complete. Adjusting the volume Volume adjustments are connected to the ReadMe file on the screen. buttons to music, sound, and other GB audio equipment using the INPUT1 and INPUT2 connectors....
Operating Instructions
Page 11
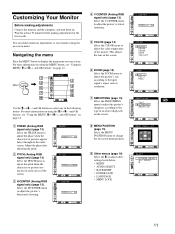
Wait for at least 30 minutes before making adjustments Connect the monitor and the computer, and turn them on -screen menu position. For more information on using the M(+)/m(-) and OK buttons, see "Using the MENU, M(+)/m(-), ...
Wait for at least 30 minutes before making adjustments Connect the monitor and the computer, and turn them on -screen menu position. For more information on using the M(+)/m(-) and OK buttons, see "Using the MENU, M(+)/m(-), ...

Operating Instructions
Page 17
... the picture on the screen. Consequently, the first time the monitor receives input signals that a clear picture appears on the screen. If the monitor is connected to provide a high quality picture at the center of the screen. (See the Appendix for any timing within the monitor's frequency range (horizontal: 28 - 92...
... the picture on the screen. Consequently, the first time the monitor receives input signals that a clear picture appears on the screen. If the monitor is connected to provide a high quality picture at the center of the screen. (See the Appendix for any timing within the monitor's frequency range (horizontal: 28 - 92...
Operating Instructions
Page 19
... is in . • Check that the input select setting is correct (page 9). • A non-supplied video signal cable is connected. This is not a malfunction. Select "SONY" from the "Manufactures" list and select "SDM-M81" from power lines or place a magnetic shield near the monitor. • Try plugging the monitor into a different AC outlet, preferably...
... is in . • Check that the input select setting is correct (page 9). • A non-supplied video signal cable is connected. This is not a malfunction. Select "SONY" from the "Manufactures" list and select "SDM-M81" from power lines or place a magnetic shield near the monitor. • Try plugging the monitor into a different AC outlet, preferably...
Operating Instructions
Page 20
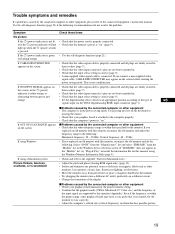
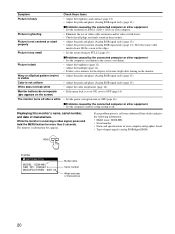
...; Adjust the pitch and phase (Analog RGB signal only) (page 13). If any problem persists, call your authorized Sony dealer and give the following information: • Model name: SDM-M81 • Serial number • Name and specifications of your computer. • Eliminate the use of video cable extensions...signal only) (page 13). • Adjust the color temperature (page 14). • If the menu lock is too small xProblems caused by the connected computer or other equipment • Set the resolution to SXGA (1280 × 1024) on the monitor. • Adjust the pitch and phase ...
...; Adjust the pitch and phase (Analog RGB signal only) (page 13). If any problem persists, call your authorized Sony dealer and give the following information: • Model name: SDM-M81 • Serial number • Name and specifications of your computer. • Eliminate the use of video cable extensions...signal only) (page 13). • Adjust the color temperature (page 14). • If the menu lock is too small xProblems caused by the connected computer or other equipment • Set the resolution to SXGA (1280 × 1024) on the monitor. • Adjust the pitch and phase ...

Marketing Specifications
Page 1
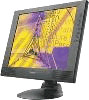
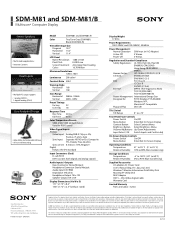
..., clear, full-screen image for computer system connections. Built unobtrusively into the flat bezel to provide arm or wall mounting. M-Series LCD Removable tilt base adjusts to any angle or can be removed to deliver exceptional audio. Advanced Digital FlexRes™ technology - SDM-M81 and SDM-M81/B Multiscan® Computer Display Technologically advanced LCD display...
..., clear, full-screen image for computer system connections. Built unobtrusively into the flat bezel to provide arm or wall mounting. M-Series LCD Removable tilt base adjusts to any angle or can be removed to deliver exceptional audio. Advanced Digital FlexRes™ technology - SDM-M81 and SDM-M81/B Multiscan® Computer Display Technologically advanced LCD display...
Marketing Specifications
Page 2
...warranty that this product is not manufactured to connect. Reproduction in whole or in each and every particular instance. ©2000 Sony Electronics Inc. Non-metric weights and measurements are property of non-Sony products you and may choose to any product ... has determined that this product meets the International Energy Star Program for themselves the suitability and compatibility of Sony. All rights reserved. SDM-M81 and SDM-M81/B Multiscan® Computer Display Stereo Speakers • Multi-media applications • Internet Content Dual Inputs • Multiple PC ...
...warranty that this product is not manufactured to connect. Reproduction in whole or in each and every particular instance. ©2000 Sony Electronics Inc. Non-metric weights and measurements are property of non-Sony products you and may choose to any product ... has determined that this product meets the International Energy Star Program for themselves the suitability and compatibility of Sony. All rights reserved. SDM-M81 and SDM-M81/B Multiscan® Computer Display Stereo Speakers • Multi-media applications • Internet Content Dual Inputs • Multiple PC ...


