Operating Instructions
Page 2
... that to provide reasonable protection against harmful interference in this manual could void your Sony dealer regarding this equipment. This symbol is encouraged to try to the presence of... user to correct the interference by turning the equipment off and on the rear of important operating and maintenance (servicing) instructions in the space provided below.... tested and found to radio communications. Increase the separation between the equipment and receiver. - SA-VA1 Serial No 2 Record the serial number in the literature accompanying the appliance. This symbol is...
... that to provide reasonable protection against harmful interference in this manual could void your Sony dealer regarding this equipment. This symbol is encouraged to try to the presence of... user to correct the interference by turning the equipment off and on the rear of important operating and maintenance (servicing) instructions in the space provided below.... tested and found to radio communications. Increase the separation between the equipment and receiver. - SA-VA1 Serial No 2 Record the serial number in the literature accompanying the appliance. This symbol is...
Operating Instructions
Page 3
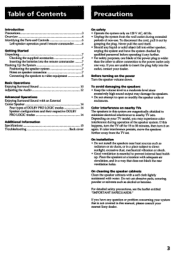
... the plug fully into either speaker, unplug the system and have any question or problem concerning your system that does not block the rear ventilation holes. Table of Contents Precautions Introduction Precautions 3 Overview 4 Identifying the Parts and Controls 6 Left-speaker operation panel/remote commander ... happens, turn it out by qualified personnel before operating it any liquid or solid object fall into the outlet, contact your nearest Sony dealer. 3 On installation • Do not install the speakers near heat sources such as alcohol or benzine. For detailed safety...
... the plug fully into either speaker, unplug the system and have any question or problem concerning your system that does not block the rear ventilation holes. Table of Contents Precautions Introduction Precautions 3 Overview 4 Identifying the Parts and Controls 6 Left-speaker operation panel/remote commander ... happens, turn it out by qualified personnel before operating it any liquid or solid object fall into the outlet, contact your nearest Sony dealer. 3 On installation • Do not install the speakers near heat sources such as alcohol or benzine. For detailed safety...

Operating Instructions
Page 4
... enters READY mode. Furthermore, by the SA-VAI (see page 14). * Manufactured under one , "Tall-boy" style speaker system features a freestanding tower design styled to connect rear speakers with built-in the movie itself. DBR (Dynamic Bass Roar) super woofer system To provide truly dynamic...speakers to independently drive the super woofers, center channel tweeters, front left speaker. Four DOLBY PRO LOGIC modes using the supplied rear speakers, you the feeling of Dolby Laboratories Licensing Corporation. You can obtain full surround sound that gives you can also connect ...
... enters READY mode. Furthermore, by the SA-VAI (see page 14). * Manufactured under one , "Tall-boy" style speaker system features a freestanding tower design styled to connect rear speakers with built-in the movie itself. DBR (Dynamic Bass Roar) super woofer system To provide truly dynamic...speakers to independently drive the super woofers, center channel tweeters, front left speaker. Four DOLBY PRO LOGIC modes using the supplied rear speakers, you the feeling of Dolby Laboratories Licensing Corporation. You can obtain full surround sound that gives you can also connect ...
Operating Instructions
Page 5
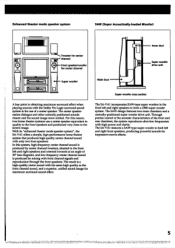
... The result is a high-quality center sound with only two front speakers. Through precise control of the acoustic characteristics of the front and rear chambers, the system reproduces ultra-low frequencies with the Dolby Pro Logic surround sound system is produced by mixing with front channel signals and ...reproduction through the front speakers. The SA-VAI features a SAW-type super woofer in the front left and right speakers to the screen image. Enhanced theater mode speaker system SAW...
... The result is a high-quality center sound with only two front speakers. Through precise control of the acoustic characteristics of the front and rear chambers, the system reproduces ultra-low frequencies with the Dolby Pro Logic surround sound system is produced by mixing with front channel signals and ...reproduction through the front speakers. The SA-VAI features a SAW-type super woofer in the front left and right speakers to the screen image. Enhanced theater mode speaker system SAW...

Operating Instructions
Page 6
... (page 12) BALANCE L/R buttons (page 13) 6 EE IE ACTIVE SPEAKERe SONY I For details, refer to an AC outlet and the system is connected to the page number(s) indicated in STANDBY mode. buttons (pages 12 and 13) [E, DELAY TIME button (page 13) REAR LEVEL +/- buttons (pages 12 and 13) S.WOOFER +/- ID DOLBY PRO...
... (page 12) BALANCE L/R buttons (page 13) 6 EE IE ACTIVE SPEAKERe SONY I For details, refer to an AC outlet and the system is connected to the page number(s) indicated in STANDBY mode. buttons (pages 12 and 13) [E, DELAY TIME button (page 13) REAR LEVEL +/- buttons (pages 12 and 13) S.WOOFER +/- ID DOLBY PRO...
Operating Instructions
Page 7
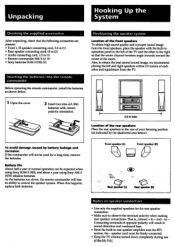
... (L) Front speaker (R) Rear speaker (L) Rear speaker (R) Notes on ...R6) batteries with the built-in rear speaker amplifier uses the BTL system...8226; Rear speaker connecting cord, 10 m (2) • Audio connecting cord, 1.5 m (1) • Remote commander RM-VA1 (1) • Sony batteries... SUM-3 (NS) (2) Inserting the batteries into the remote commander Before operating the remote commander, install the batteries as indicated by battery leakage and corrosion If the commander will not be used for the rear... using Sony SUM-3 (NS), and about a year using Sony AM...
... (L) Front speaker (R) Rear speaker (L) Rear speaker (R) Notes on ...R6) batteries with the built-in rear speaker amplifier uses the BTL system...8226; Rear speaker connecting cord, 10 m (2) • Audio connecting cord, 1.5 m (1) • Remote commander RM-VA1 (1) • Sony batteries... SUM-3 (NS) (2) Inserting the batteries into the remote commander Before operating the remote commander, install the batteries as indicated by battery leakage and corrosion If the commander will not be used for the rear... using Sony SUM-3 (NS), and about a year using Sony AM...
Operating Instructions
Page 8
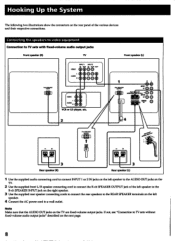
... INPUT 1 or 2 IN jacks on the left speaker to the AUDIO OUT jacks on the TV. 2 Use the supplied front L/R speaker connecting cord to the REAR SPEAKER terminals on the next page. 8 SPEAKER OUIPU'r O O O IIIIPEONCE SE aEuNcetv 2 I AUDIO R VCR or LD player, etc. 2 Front speaker (L) lid. If not, see "... The following two illustrations show the connectors on the TV are fixed-volume output jacks. Note Make sure that the AUDIO OUT jacks on the rear panel of the left speaker. 4 Connect the AC power cord to TV sets with fixed-volume audio output jacks Front speaker (R) TV VIDEO ...
... INPUT 1 or 2 IN jacks on the left speaker to the AUDIO OUT jacks on the TV. 2 Use the supplied front L/R speaker connecting cord to the REAR SPEAKER terminals on the next page. 8 SPEAKER OUIPU'r O O O IIIIPEONCE SE aEuNcetv 2 I AUDIO R VCR or LD player, etc. 2 Front speaker (L) lid. If not, see "... The following two illustrations show the connectors on the TV are fixed-volume output jacks. Note Make sure that the AUDIO OUT jacks on the rear panel of the left speaker. 4 Connect the AC power cord to TV sets with fixed-volume audio output jacks Front speaker (R) TV VIDEO ...
Operating Instructions
Page 9
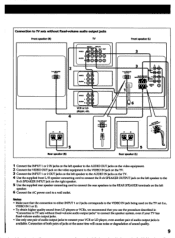
... Coltv MIR L'60•6004) MAR 0 11---,1 I II R On AUDIO 0 VCR or LD player, etc. 4 WO SPEAKER OUTPUT MI6 6 171 Pwc'0500 5 Rear speaker (R) 5 Rear speaker (L) 1 Connect the INPUT 1 or 2 IN jacks on the left speaker to the AUDIO OUT jacks on the video equipment. 2 Connect the VIDEO OUT jack... SPEAKER OUTPUT jack on the left speaker to the R-ch SPEAKER INPUT jack on the right speaker. 5 Use the supplied rear speaker connecting cord to connect the rear speakers to the REAR SPEAKER terminals on the TV set (i.e., VIDEO IN 1 or 2). • To obtain higher quality sound from LD players or...
... Coltv MIR L'60•6004) MAR 0 11---,1 I II R On AUDIO 0 VCR or LD player, etc. 4 WO SPEAKER OUTPUT MI6 6 171 Pwc'0500 5 Rear speaker (R) 5 Rear speaker (L) 1 Connect the INPUT 1 or 2 IN jacks on the left speaker to the AUDIO OUT jacks on the video equipment. 2 Connect the VIDEO OUT jack... SPEAKER OUTPUT jack on the left speaker to the R-ch SPEAKER INPUT jack on the right speaker. 5 Use the supplied rear speaker connecting cord to connect the rear speakers to the REAR SPEAKER terminals on the TV set (i.e., VIDEO IN 1 or 2). • To obtain higher quality sound from LD players or...
Operating Instructions
Page 11
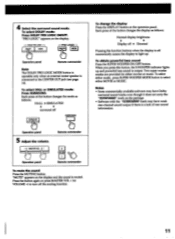
... operation panel. o MASTER VOL OiLl Operation panel Remote commander VOLUME LJ Remote commander To mute the sound Press the MUTING button. Each press of rear sound information. 11 To select either mode, press SUPER WOOFER MODE button to the CENTER OUT jack (see page 14). "MUTE" appears on ...the package. • Software with the "001 I"mark may have weak rear-channel sound output if there is a lack of the button changes the display as follows: HALL • SIMULATED • surround off the muting function....
... operation panel. o MASTER VOL OiLl Operation panel Remote commander VOLUME LJ Remote commander To mute the sound Press the MUTING button. Each press of rear sound information. 11 To select either mode, press SUPER WOOFER MODE button to the CENTER OUT jack (see page 14). "MUTE" appears on ...the package. • Software with the "001 I"mark may have weak rear-channel sound output if there is a lack of the button changes the display as follows: HALL • SIMULATED • surround off the muting function....
Operating Instructions
Page 12
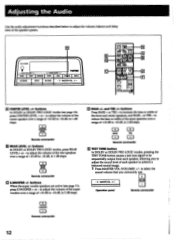
... volume that you to adjust the sound level of +10 dB to -10 dB, in 1 dB steps. =1 CENTER LEVEL CD Remote commander E REAR LEVEL +/- VOLUME Operation panel 0 Remote commander =I TRE CD Remote commander E TEST TONE button In DOLBY or DOLBY PRO LOGIC modes, pressing the TEST... STINIVIL t COPIA, MUTING - 0 MASTER VOL 0 + H A E G • III MC B ca-A C D F ni o 0 AcTNE SPEAKER' [Al CENTER LEVEL +1- to adjust the volume of the rear speakers over a range of each speaker, allowing you commonly use. - 0 MASTER VOL 0 4. buttons In DOLBY or DOLBY PRO LOGIC modes, press...
... volume that you to adjust the sound level of +10 dB to -10 dB, in 1 dB steps. =1 CENTER LEVEL CD Remote commander E REAR LEVEL +/- VOLUME Operation panel 0 Remote commander =I TRE CD Remote commander E TEST TONE button In DOLBY or DOLBY PRO LOGIC modes, pressing the TEST... STINIVIL t COPIA, MUTING - 0 MASTER VOL 0 + H A E G • III MC B ca-A C D F ni o 0 AcTNE SPEAKER' [Al CENTER LEVEL +1- to adjust the volume of the rear speakers over a range of each speaker, allowing you commonly use. - 0 MASTER VOL 0 4. buttons In DOLBY or DOLBY PRO LOGIC modes, press...
Operating Instructions
Page 13
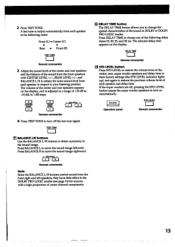
2 Press TEST TONE. and BALANCE L/R to obtain the same sound level from each speaker in DOLBY or DOLBY PRO LOGIC modes. CENTE LEVEL 1=1 REAR LEVEL =1 BALANCE --. =I 1=3 Remote commander 4 Press TEST TONE to your listening position. DELAY TIME ED Remote commander El STD LEVEL button Press STD ...LEVEL to restore the volume level of the center, rear, super woofer speakers and delay time to their factory settings (the STD LEVEL indicator lights up), and again to restore the previous volume level...
2 Press TEST TONE. and BALANCE L/R to obtain the same sound level from each speaker in DOLBY or DOLBY PRO LOGIC modes. CENTE LEVEL 1=1 REAR LEVEL =1 BALANCE --. =I 1=3 Remote commander 4 Press TEST TONE to your listening position. DELAY TIME ED Remote commander El STD LEVEL button Press STD ...LEVEL to restore the volume level of the center, rear, super woofer speakers and delay time to their factory settings (the STD LEVEL indicator lights up), and again to restore the previous volume level...
Operating Instructions
Page 14
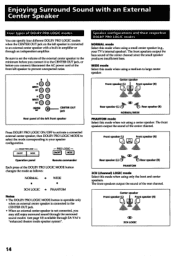
...connect it to prevent unexpected noise. DOLBY PRO LOGIC ON/OFF MOOE PRO LOGIC 01.10FF MODE Operation panel Remote commander Each press of the rear channel. The front speakers output the sound of the DOLBY PRO LOGIC MODE button changes the mode as follows: NORMAL • WIDE 3CH... MODE to select the mode corresponding to an external center speaker with a built-in amplifier or through SA-VAT's "enhanced theater mode speaker system". CENTER 0_ 0e CENTER OUT jack Rear panel of the left speaker is connected to large center speaker. Enjoying Surround Sound with an External Center...
...connect it to prevent unexpected noise. DOLBY PRO LOGIC ON/OFF MOOE PRO LOGIC 01.10FF MODE Operation panel Remote commander Each press of the rear channel. The front speakers output the sound of the DOLBY PRO LOGIC MODE button changes the mode as follows: NORMAL • WIDE 3CH... MODE to select the mode corresponding to an external center speaker with a built-in amplifier or through SA-VAT's "enhanced theater mode speaker system". CENTER 0_ 0e CENTER OUT jack Rear panel of the left speaker is connected to large center speaker. Enjoying Surround Sound with an External Center...
Operating Instructions
Page 15
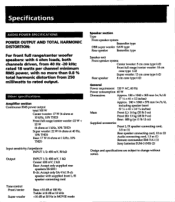
... 1/2: 450 mV, 50 Id/ Output INPUT 1/2: 450 mV, 1 kil Center: 650 mV, 2 kit Rear: Accept only supplied rear speakers SS-SR11 R-ch: Accept only SA-VA1 R-ch speaker with no more than 0.8 0/0 total harmonic distortion from 40 Hz -20 kHz; rated 18 watts...(L): 16 kg (35 lb 3 oz) Front (R): 13 kg (28 lb 9 oz) Rear: 800 g/pc (1 lb 12 oz) Supplied accessories Front L/R speaker connecting cord, 3.5 m (1) Rear speaker connecting cord, 10 m (2) Audio connecting cord, 1.5 m (1) Remote commander RM-VAI (1) Sony batteries SUM-3 (NS) (2) Design and specifications are subject to rated output.
... 1/2: 450 mV, 50 Id/ Output INPUT 1/2: 450 mV, 1 kil Center: 650 mV, 2 kit Rear: Accept only supplied rear speakers SS-SR11 R-ch: Accept only SA-VA1 R-ch speaker with no more than 0.8 0/0 total harmonic distortion from 40 Hz -20 kHz; rated 18 watts...(L): 16 kg (35 lb 3 oz) Front (R): 13 kg (28 lb 9 oz) Rear: 800 g/pc (1 lb 12 oz) Supplied accessories Front L/R speaker connecting cord, 3.5 m (1) Rear speaker connecting cord, 10 m (2) Audio connecting cord, 1.5 m (1) Remote commander RM-VAI (1) Sony batteries SUM-3 (NS) (2) Design and specifications are subject to rated output.
Operating Instructions
Page 16
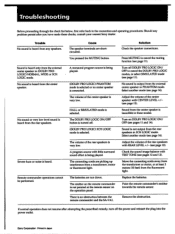
...and reinsert the plug into the power outlet. Replace the batteries. Sony Corporation Printed in these checks, consult your nearest Sony dealer. You pressed the MUTING button. Press MUTING to cancel ... noise is selected. Remove the obstruction. There is very low. Adjust the volume of the rear speakers is selected. Cause The speaker terminals are run down. The connecting cords are picking up... the volume of the center speaker is an obstruction between the remote commander and the SA-VAl. Troubleshooting Before proceeding through the check list below, first refer back to the ...
...and reinsert the plug into the power outlet. Replace the batteries. Sony Corporation Printed in these checks, consult your nearest Sony dealer. You pressed the MUTING button. Press MUTING to cancel ... noise is selected. Remove the obstruction. There is very low. Adjust the volume of the rear speakers is selected. Cause The speaker terminals are run down. The connecting cords are picking up... the volume of the center speaker is an obstruction between the remote commander and the SA-VAl. Troubleshooting Before proceeding through the check list below, first refer back to the ...


