Operating Instructions
Page 2
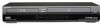
... FOR STRÅLING. The AC power cord must be sure to disassemble the cabinet. UNDVIK ATT DIREKT EXPONERA DIG FÖR STRÅLNINGEN. RDR-VXD655 Serial No CAUTION You are not going to excessive heat such as sunshine, fire or the like. Precautions On safety Should any change or modifications...;LNING NÄR DENNA DEL ÄR ÖPPNAD. As the laser beam used in accordance with adequate ventilation to prevent heat build-up in this manual could void your Sony dealer regarding this occur, the recorder may cause harmful interference to radio communications.
... FOR STRÅLING. The AC power cord must be sure to disassemble the cabinet. UNDVIK ATT DIREKT EXPONERA DIG FÖR STRÅLNINGEN. RDR-VXD655 Serial No CAUTION You are not going to excessive heat such as sunshine, fire or the like. Precautions On safety Should any change or modifications...;LNING NÄR DENNA DEL ÄR ÖPPNAD. As the laser beam used in accordance with adequate ventilation to prevent heat build-up in this manual could void your Sony dealer regarding this occur, the recorder may cause harmful interference to radio communications.
Operating Instructions
Page 4
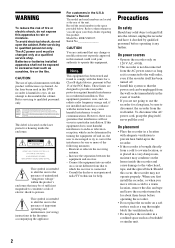
...MP3 (MPEG1 Audio Layer 3) is a standard format defined by ISO/MPEG which compresses audio data. 4 About this manual • Instructions in this recorder. You can also use the controls on the recorder if they have the same... remote. • The on-screen display illustrations used in this manual may not match the graphics displayed on the remote. The explanations do not apply to discs created on ...this manual describe the controls on your TV screen. • The explanations regarding discs in ...
...MP3 (MPEG1 Audio Layer 3) is a standard format defined by ISO/MPEG which compresses audio data. 4 About this manual • Instructions in this recorder. You can also use the controls on the recorder if they have the same... remote. • The on-screen display illustrations used in this manual may not match the graphics displayed on the remote. The explanations do not apply to discs created on ...this manual describe the controls on your TV screen. • The explanations regarding discs in ...
Operating Instructions
Page 8
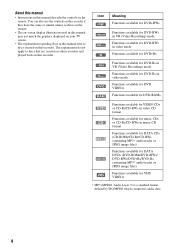
... that copy-protected signals will not be recorded. One Touch Dubbing - VIDEO DVD Easy selection between a DVD disc and VHS tape with built-in either manually or using the timer. Recording and timer recording Record TV programs on a DVD or VHS tape, either direction between DVD and... VCR Simply press the DVD or VIDEO button to select the media format you want to use. This is a DVD recorder with the simple press of ...
... that copy-protected signals will not be recorded. One Touch Dubbing - VIDEO DVD Easy selection between a DVD disc and VHS tape with built-in either manually or using the timer. Recording and timer recording Record TV programs on a DVD or VHS tape, either direction between DVD and... VCR Simply press the DVD or VIDEO button to select the media format you want to use. This is a DVD recorder with the simple press of ...
Operating Instructions
Page 12
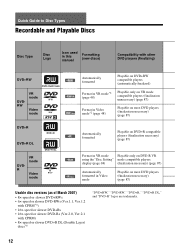
Quick Guide to Disc Types Recordable and Playable Discs Disc Type Disc Logo Icon used in this manual Formatting (new discs) Compatibility with other DVD players (finalizing) DVD+RW DVDRW VR mode Video mode DVD+R DVD+R DL DVDR VR mode Video mode +RW -RWVR -RWVideo Automatically formatted Playable on DVD+RW compatible players...
Quick Guide to Disc Types Recordable and Playable Discs Disc Type Disc Logo Icon used in this manual Formatting (new discs) Compatibility with other DVD players (finalizing) DVD+RW DVDRW VR mode Video mode DVD+R DVD+R DL DVDR VR mode Video mode +RW -RWVR -RWVideo Automatically formatted Playable on DVD+RW compatible players...
Operating Instructions
Page 15
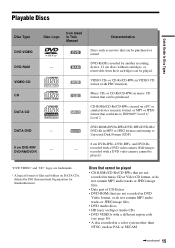
..., DVD-RWs, and DVD-Rs recorded with a DVD video camera (Still images recorded with a different region code (see page 16) • A disc recorded in This Manual DVD DVD-RAM - Characteristics Discs such as movies that conforms to ISO9660* Level 1/ Level 2 DVD-ROMs/DVD+RWs/DVD-RWs/DVD+Rs/ DVD-Rs in...
..., DVD-RWs, and DVD-Rs recorded with a DVD video camera (Still images recorded with a different region code (see page 16) • A disc recorded in This Manual DVD DVD-RAM - Characteristics Discs such as movies that conforms to ISO9660* Level 1/ Level 2 DVD-ROMs/DVD+RWs/DVD-RWs/DVD+Rs/ DVD-Rs in...
Operating Instructions
Page 30
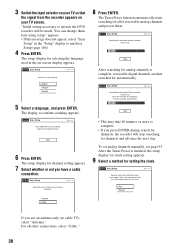
...Stop • This may take 40 minutes or more to operate the DVD recorder will stop searching, press [Enter]. To set analog channels manually, see page 95. After the Tuner Preset is complete, receivable digital channels are then searched for channels, the recorder will be made. "Initial... or not you use an antenna only (no cable TV), select "Antenna." No Disc Easy Setup Select a method for receivable Digital channels. Auto Manual Antenna Cable If you have a cable connection. 3 Switch the input selector on your TV screen. No Disc Easy Setup Select the screen language. ...
...Stop • This may take 40 minutes or more to operate the DVD recorder will stop searching, press [Enter]. To set analog channels manually, see page 95. After the Tuner Preset is complete, receivable digital channels are then searched for channels, the recorder will be made. "Initial... or not you use an antenna only (no cable TV), select "Antenna." No Disc Easy Setup Select a method for receivable Digital channels. Auto Manual Antenna Cable If you have a cable connection. 3 Switch the input selector on your TV screen. No Disc Easy Setup Select the screen language. ...

Operating Instructions
Page 31
... Dolby Digital signal appears. Press M/m to your TV type. No Disc Easy Setup 10:10 AM Select your amplifier (receiver). Hookups and Settings 10 Select "Manual," and press ENTER. The setup display for a channel that do not fit. Displays "wide screen" pictures with a wide screen mode. No Disc Easy Setup 10...
... Dolby Digital signal appears. Press M/m to your TV type. No Disc Easy Setup 10:10 AM Select your amplifier (receiver). Hookups and Settings 10 Select "Manual," and press ENTER. The setup display for a channel that do not fit. Displays "wide screen" pictures with a wide screen mode. No Disc Easy Setup 10...
Operating Instructions
Page 32
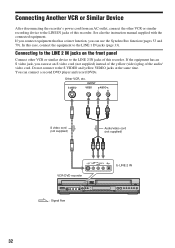
See also the instruction manual supplied with the connected equipment. Connecting to the LINE 2 IN jacks on the front panel Connect other VCR or similar recording device to the LINE IN jacks of this recorder. OUTPUT S VIDEO VIDEO AUDIO L R S video cord (not supplied) Audio/video ...2 IN VIDEO L AUDIO R (MONO) DV IN to the LINE 1 IN jacks (page 33). In this case, connect the equipment to LINE 2 IN VCR-DVD recorder : Signal flow 32 Other VCR, etc. Connecting Another VCR or Similar Device After disconnecting the recorder's power cord from an AC outlet, connect the other...
See also the instruction manual supplied with the connected equipment. Connecting to the LINE 2 IN jacks on the front panel Connect other VCR or similar recording device to the LINE IN jacks of this recorder. OUTPUT S VIDEO VIDEO AUDIO L R S video cord (not supplied) Audio/video ...2 IN VIDEO L AUDIO R (MONO) DV IN to the LINE 1 IN jacks (page 33). In this case, connect the equipment to LINE 2 IN VCR-DVD recorder : Signal flow 32 Other VCR, etc. Connecting Another VCR or Similar Device After disconnecting the recorder's power cord from an AC outlet, connect the other...

Operating Instructions
Page 71
Tracking Tracking meter To resume automatic tracking Press TRACKING + and TRACKING - repeatedly until the distortion disappears. Or, eject the tape and reinsert it. 71 VCR Playback Adjusting the picture (tracking) You can manually adjust tracking if the recording quality is too poor to be remedied by the VCR's automatic tracking (a tracking meter appears during the automatic tracking). Press TRACKING +/-. The tracking meter appears. Press TRACKING +/- on the recorder at the same time for more than ten seconds.
Tracking Tracking meter To resume automatic tracking Press TRACKING + and TRACKING - repeatedly until the distortion disappears. Or, eject the tape and reinsert it. 71 VCR Playback Adjusting the picture (tracking) You can manually adjust tracking if the recording quality is too poor to be remedied by the VCR's automatic tracking (a tracking meter appears during the automatic tracking). Press TRACKING +/-. The tracking meter appears. Press TRACKING +/- on the recorder at the same time for more than ten seconds.

Operating Instructions
Page 89
... up disc space for you want to the LINE IN jack and follow the instructions of this recorder. your digital video camera. See the instruction manual supplied with the digital video camera as well before connecting. It will fast forward and rewind the tape for DVD-Rs (VR mode). Hookups... VCR-DVD recorder DV/D8 Dubbing (DV/D8 t DVD) DV IN to DV IN i.LINK cable (not supplied) to the section on a DVD-RW (VR mode) ...
... up disc space for you want to the LINE IN jack and follow the instructions of this recorder. your digital video camera. See the instruction manual supplied with the digital video camera as well before connecting. It will fast forward and rewind the tape for DVD-Rs (VR mode). Hookups... VCR-DVD recorder DV/D8 Dubbing (DV/D8 t DVD) DV IN to DV IN i.LINK cable (not supplied) to the section on a DVD-RW (VR mode) ...
Operating Instructions
Page 94
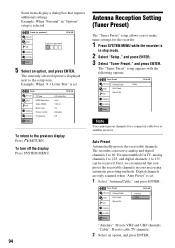
... or satellite receiver. The "Tuner Preset" setup appears with the following options. Tuner Preset Title List Timer Edit Antenna/Cable Auto Preset Manual Set Dubbing Disc Setting Setup 10:10 AM : AntAenntneanna Cable "Antenna": Presets VHF and UHF channels. The recorder can be received. ...can receive analog and digital channels 2 to the previous display Press O RETURN. Tuner Preset Title List Timer Edit Antenna/Cable Auto Preset Manual Set Dubbing Disc Setting Setup : Cable 10:10 AM Note You cannot preset channels for the recorder. 1 Press SYSTEM MENU while ...
... or satellite receiver. The "Tuner Preset" setup appears with the following options. Tuner Preset Title List Timer Edit Antenna/Cable Auto Preset Manual Set Dubbing Disc Setting Setup 10:10 AM : AntAenntneanna Cable "Antenna": Presets VHF and UHF channels. The recorder can be received. ...can receive analog and digital channels 2 to the previous display Press O RETURN. Tuner Preset Title List Timer Edit Antenna/Cable Auto Preset Manual Set Dubbing Disc Setting Setup : Cable 10:10 AM Note You cannot preset channels for the recorder. 1 Press SYSTEM MENU while ...
Operating Instructions
Page 95
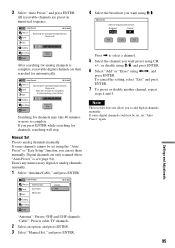
...ENTER. 6 Select "Add" or "Erase" using M/m. Broadcast Channel Analog 69 Add Erase Exit Press , to complete. Manual Set Presets analog channels manually. Digital channels are then searched for channels, searching will stop searching, press [Enter]. Edit Dubbing Disc Setting Stop Setup After...channels is complete, receivable digital channels are only scanned when "Auto Preset" is set them manually. "Cable": Presets cable TV channels. 2 Select an option, and press ENTER. 3 Select "Manual Set," and press ENTER. 4 Select the broadcast you can set (page 94). 3 ...
...ENTER. 6 Select "Add" or "Erase" using M/m. Broadcast Channel Analog 69 Add Erase Exit Press , to complete. Manual Set Presets analog channels manually. Digital channels are then searched for channels, searching will stop searching, press [Enter]. Edit Dubbing Disc Setting Stop Setup After...channels is complete, receivable digital channels are only scanned when "Auto Preset" is set them manually. "Cable": Presets cable TV channels. 2 Select an option, and press ENTER. 3 Select "Manual Set," and press ENTER. 4 Select the broadcast you can set (page 94). 3 ...
Operating Instructions
Page 96
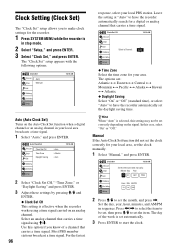
...y Mountain y Pacific y Alaska y Hawaii y Atlantic ◆ Daylight Saving Select "On" or "Off" (standard time), or select "Auto" to set the clock manually. 1 Select "Manual," and press ENTER. Set the day, year, hour, minutes, and AM/PM in stop mode. 2 Select "Setup," and press ENTER. 3 Select "Clock Set," ...and press ENTER. Most PBS member stations broadcast a time signal. Manual If the Auto Clock Set function did not set the clock correctly for a digital or analog channel that carries a time signal. Month Day Year...
...y Mountain y Pacific y Alaska y Hawaii y Atlantic ◆ Daylight Saving Select "On" or "Off" (standard time), or select "Auto" to set the clock manually. 1 Select "Manual," and press ENTER. Set the day, year, hour, minutes, and AM/PM in stop mode. 2 Select "Setup," and press ENTER. 3 Select "Clock Set," ...and press ENTER. Most PBS member stations broadcast a time signal. Manual If the Auto Clock Set function did not set the clock correctly for a digital or analog channel that carries a time signal. Month Day Year...

Operating Instructions
Page 97
... options. If the picture is in stop mode. 2 Select "Setup," and press ENTER. 3 Select "Video," and press ENTER. For details, refer also to the instruction manual supplied with a wide mode function. 4:3 Letter Box Select this when connecting to your satisfaction, try another option that do not fit. 4:3 Letter Box 4:3 Pan Scan...
... options. If the picture is in stop mode. 2 Select "Setup," and press ENTER. 3 Select "Video," and press ENTER. For details, refer also to the instruction manual supplied with a wide mode function. 4:3 Letter Box Select this when connecting to your satisfaction, try another option that do not fit. 4:3 Letter Box 4:3 Pan Scan...

Operating Instructions
Page 107
... on the TV screen. , If the picture output signal from your recorder passes through your VCR to get to your TV, or if you are connected to a combination TV/VIDEO player,... 21). , Switch the input selector on your TV (such as to progressive format even though your nearest Sony dealer. Picture There is connected securely. Change the "HDMI Resolution" setting in the "Video" setup, and...the problem (page 97). button. TV channels cannot be affected when you can see the TV's instruction manual). , Place the recorder and TV farther apart. , Place the TV and any problem persist, consult ...
... on the TV screen. , If the picture output signal from your recorder passes through your VCR to get to your TV, or if you are connected to a combination TV/VIDEO player,... 21). , Switch the input selector on your TV (such as to progressive format even though your nearest Sony dealer. Picture There is connected securely. Change the "HDMI Resolution" setting in the "Video" setup, and...the problem (page 97). button. TV channels cannot be affected when you can see the TV's instruction manual). , Place the recorder and TV farther apart. , Place the TV and any problem persist, consult ...

Operating Instructions
Page 109
... is more than 4,720 dots. , When playing a disc containing MP3 audio tracks, "Music" is reading disc information, playback operations will not work. See the instruction manual supplied with the disc. , While the recorder is selected (page 42). Playback stops automatically. , If the disc has an auto pause signal, the recorder stops...
... is more than 4,720 dots. , When playing a disc containing MP3 audio tracks, "Music" is reading disc information, playback operations will not work. See the instruction manual supplied with the disc. , While the recorder is selected (page 42). Playback stops automatically. , If the disc has an auto pause signal, the recorder stops...

Operating Instructions
Page 115
... a daisy chain, operations and data transactions are connected to other devices via the directly connected equipment. For further precautions, see the instruction manuals for controlling other equipment. Three maximum baud rates are defined: S100 (approx. 100 Mbps*) S200 (approx. 200 Mbps) S400 (approx... operations and data transactions are trademarks. Mbps stands for IEEE 1394 data transport bus proposed by SONY, and is connected to this recorder in the instruction manual of each equipment. i.LINK and are sometimes not possible on some equipment. About i.LINK The...
... a daisy chain, operations and data transactions are connected to other devices via the directly connected equipment. For further precautions, see the instruction manuals for controlling other equipment. Three maximum baud rates are defined: S100 (approx. 100 Mbps*) S200 (approx. 200 Mbps) S400 (approx... operations and data transactions are trademarks. Mbps stands for IEEE 1394 data transport bus proposed by SONY, and is connected to this recorder in the instruction manual of each equipment. i.LINK and are sometimes not possible on some equipment. About i.LINK The...
Operating Instructions
Page 124
LINE 2 IN 32 "Line Audio Input" 53, 56, 101 M Manual Clock Set 96 "Manual Set" 95 MENU 36 Menu Top menu 36 "Modify" 65 "Move" 66 MP3 audio tracks 42 N NEXT 37, 72 Number buttons 27, 41 O One Touch ... adjustment 71 Troubleshooting 107 "Tuner Audio" 99 Tuner Preset 30 Tuner Preset settings 94 TV INPUT 27 "TV Type" 97 U "Unfinalize" 88 Unrecordable pictures 48 V "VCR Function" 102 "Video (HDMI)" 97 VIDEO CD 15 Video mode 12 Video settings 97 VR mode 12 Z Zoom 44
LINE 2 IN 32 "Line Audio Input" 53, 56, 101 M Manual Clock Set 96 "Manual Set" 95 MENU 36 Menu Top menu 36 "Modify" 65 "Move" 66 MP3 audio tracks 42 N NEXT 37, 72 Number buttons 27, 41 O One Touch ... adjustment 71 Troubleshooting 107 "Tuner Audio" 99 Tuner Preset 30 Tuner Preset settings 94 TV INPUT 27 "TV Type" 97 U "Unfinalize" 88 Unrecordable pictures 48 V "VCR Function" 102 "Video (HDMI)" 97 VIDEO CD 15 Video mode 12 Video settings 97 VR mode 12 Z Zoom 44


