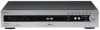
Operating Instructions
Page 2
... shock to the recorder. • Do not place the recorder in a location subject to mechanical vibrations or in this manual could void your Sony dealer regarding this DVD recorder is connected. - On safety Should any change the hard disk. After one minute, move the...with its affiliates. As the laser beam used in a particular installation. Record the serial number in a residential installation. Model No. RDR-HX900 Serial No CAUTION You are registered marks of important operating and maintenance (servicing) instructions in a malfunction. However, there is manufactured under...
... shock to the recorder. • Do not place the recorder in a location subject to mechanical vibrations or in this manual could void your Sony dealer regarding this DVD recorder is connected. - On safety Should any change the hard disk. After one minute, move the...with its affiliates. As the laser beam used in a particular installation. Record the serial number in a residential installation. Model No. RDR-HX900 Serial No CAUTION You are registered marks of important operating and maintenance (servicing) instructions in a malfunction. However, there is manufactured under...
Operating Instructions
Page 4
... (disc settings 39 Checking the Play Information and Playing Time 41 How to Enter Characters 43 Recording 45 Before Recording 45 Timer Recording (TV GUIDE/Manual/VCR Plus 46 Checking/Changing/Canceling Timer Settings 49 Recording Without the Timer 50 Recording From a VCR or Similar Device 53 Playback 54 Playing 54...
... (disc settings 39 Checking the Play Information and Playing Time 41 How to Enter Characters 43 Recording 45 Before Recording 45 Timer Recording (TV GUIDE/Manual/VCR Plus 46 Checking/Changing/Canceling Timer Settings 49 Recording Without the Timer 50 Recording From a VCR or Similar Device 53 Playback 54 Playing 54...
Operating Instructions
Page 5
... 103 Guide to Parts and Controls 105 Glossary 109 Language Code List 111 Cable Box/Satellite Receiver Brand Code 112 Index 117 About this manual • In this manual, the internal hard disk drive is written as a general reference for the HDD, DVDs, or CDs unless otherwise specified by the text or... illustrations. • Instructions in this manual refer to discs created on the remote. You can also use the controls on the recorder if they have the same or similar names as...
... 103 Guide to Parts and Controls 105 Glossary 109 Language Code List 111 Cable Box/Satellite Receiver Brand Code 112 Index 117 About this manual • In this manual, the internal hard disk drive is written as a general reference for the HDD, DVDs, or CDs unless otherwise specified by the text or... illustrations. • Instructions in this manual refer to discs created on the remote. You can also use the controls on the recorder if they have the same or similar names as...
Operating Instructions
Page 8
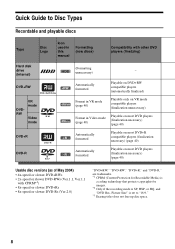
... Types Recordable and playable discs Type Disc Logo Hard disk drive (internal) DVD+RW DVDRW VR mode Video mode DVD+R DVD-R Icon used in this manual Formatting (new discs) Compatibility with other DVD players (finalizing) (Formatting HDD unnecessary) - +RW Automatically formatted Playable on DVD+RW compatible players (automatically finalized) Format in...
... Types Recordable and playable discs Type Disc Logo Hard disk drive (internal) DVD+RW DVDRW VR mode Video mode DVD+R DVD-R Icon used in this manual Formatting (new discs) Compatibility with other DVD players (finalizing) (Formatting HDD unnecessary) - +RW Automatically formatted Playable on DVD+RW compatible players (automatically finalized) Format in...

Operating Instructions
Page 9
Recording Features Editing Features Rewrite (page 45) Auto Chapter (page 91) Manual Chapter (page 68) Record Change Delete 16:9 sizes title name title (page 51) (page 65) (page 66) A-B Erase Playlist (page 66) (page 68) Yes Yes ...
Recording Features Editing Features Rewrite (page 45) Auto Chapter (page 91) Manual Chapter (page 68) Record Change Delete 16:9 sizes title name title (page 51) (page 65) (page 66) A-B Erase Playlist (page 66) (page 68) Yes Yes ...
Operating Instructions
Page 10
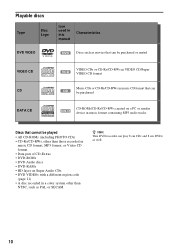
Playable discs Type Disc Logo Icon used in this manual Characteristics DVD VIDEO DVD Discs such as movies that can be purchased or rented VIDEO CD CD VCD VIDEO CDs or CD-Rs/CD-RWs ...
Playable discs Type Disc Logo Icon used in this manual Characteristics DVD VIDEO DVD Discs such as movies that can be purchased or rented VIDEO CD CD VCD VIDEO CDs or CD-Rs/CD-RWs ...
Operating Instructions
Page 25
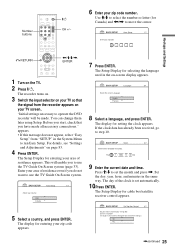
Number buttons 123 456 789 0 "/1 CH +/- 6 Enter your zip code number. Use M/m to select the number or letter (for Canada) and
Number buttons 123 456 789 0 "/1 CH +/- 6 Enter your zip code number. Use M/m to select the number or letter (for Canada) and
Operating Instructions
Page 26
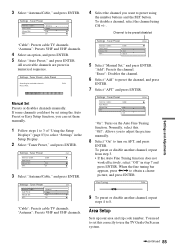
11Set the cable box/satellite receiver control, and press ENTER. If you want to use the cable box/satellite receiver control (page 14), select "Yes." See "Cable Box/Satellite Receiver Brand Code" (page 112). If you do not have a cable box, select "No," then go to select the number and Use M/m to step 15. 12Enter the brand code of your cable box/ satellite receiver.
11Set the cable box/satellite receiver control, and press ENTER. If you want to use the cable box/satellite receiver control (page 14), select "Yes." See "Cable Box/Satellite Receiver Brand Code" (page 112). If you do not have a cable box, select "No," then go to select the number and Use M/m to step 15. 12Enter the brand code of your cable box/ satellite receiver.
Operating Instructions
Page 29
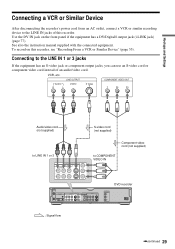
See also the instruction manual supplied with the connected equipment. LINE OUTPUT COMPONENT VIDEO OUT AUDIO R L VIDEO S Video Y PB PR Audio/video cord (not supplied) S-video cord (not supplied) Component ...
See also the instruction manual supplied with the connected equipment. LINE OUTPUT COMPONENT VIDEO OUT AUDIO R L VIDEO S Video Y PB PR Audio/video cord (not supplied) S-video cord (not supplied) Component ...
Operating Instructions
Page 34
... suddenly change even if the recorder is because the set correctly (page 85). - This is turned off . Troubleshooting guide If you are not using it manually (page 86). - When the recorder is in the program listing does not match the broadcast station, see "To match the channel number with satellite and...
... suddenly change even if the recorder is because the set correctly (page 85). - This is turned off . Troubleshooting guide If you are not using it manually (page 86). - When the recorder is in the program listing does not match the broadcast station, see "To match the channel number with satellite and...
Operating Instructions
Page 46
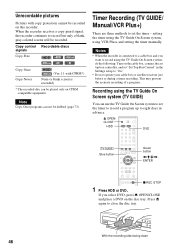
When the recorder receives a copy guard signal, the recorder continues to set the timer - Timer Recording (TV GUIDE/ Manual/VCR Plus+) There are three methods to record but only a blank, gray colored screen will be dubbed (page 73). This may prevent the ..."On." • Do not operate your cable box or satellite receiver just before or during a timer recording. Recording using VCR Plus+ and setting the timer manually. Copy control signals Copy-Free Recordable discs HDD +RW -RWVideo +R -RWVR -R Copy-Once Copy-Never HDD -RWVR (Ver.1.1 with copy protection cannot be played...
When the recorder receives a copy guard signal, the recorder continues to set the timer - Timer Recording (TV GUIDE/ Manual/VCR Plus+) There are three methods to record but only a blank, gray colored screen will be dubbed (page 73). This may prevent the ..."On." • Do not operate your cable box or satellite receiver just before or during a timer recording. Recording using VCR Plus+ and setting the timer manually. Copy control signals Copy-Free Recordable discs HDD +RW -RWVideo +R -RWVR -R Copy-Once Copy-Never HDD -RWVR (Ver.1.1 with copy protection cannot be played...
Operating Instructions
Page 48
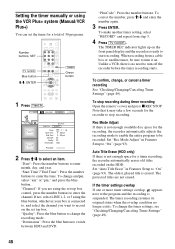
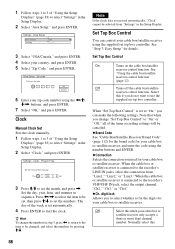
... 93). The oldest, played title is suspended. Set "Auto Title Erase" in Features Setup to record on the HDD. Setting the timer manually or using the VCR Plus+ system (Manual/VCR Plus+) You can set the timer for a total of 30 programs. Number buttons, SET [TV GUIDE] Blue button M/m, ENTER 123 456...
... 93). The oldest, played title is suspended. Set "Auto Title Erase" in Features Setup to record on the HDD. Setting the timer manually or using the VCR Plus+ system (Manual/VCR Plus+) You can set the timer for a total of 30 programs. Number buttons, SET [TV GUIDE] Blue button M/m, ENTER 123 456...
Operating Instructions
Page 52
Picture Size": Sets the picture size of the setting. For example, if a 16:9 size picture is received, the disc records the picture as 16:9 even if "Rec Screen Size" is set to HQ, HSP, or SP. "Rec NR" (noise reduction): Reduces noise contained in greater detail. Press M/m to select the item you want to 16:9 (wide mode). • Auto (HDD only): Automatically selects the actual picture size. Picture Size" works with DVDRs and DVD-RWs (Video mode) when the recording mode is set to "4:3." "HDD Rec. "Rec Video Equalizer": Adjusts the picture in the video signal. Picture Size"/"DVD ...
Picture Size": Sets the picture size of the setting. For example, if a 16:9 size picture is received, the disc records the picture as 16:9 even if "Rec Screen Size" is set to HQ, HSP, or SP. "Rec NR" (noise reduction): Reduces noise contained in greater detail. Press M/m to select the item you want to 16:9 (wide mode). • Auto (HDD only): Automatically selects the actual picture size. Picture Size" works with DVDRs and DVD-RWs (Video mode) when the recording mode is set to "4:3." "HDD Rec. "Rec Video Equalizer": Adjusts the picture in the video signal. Picture Size"/"DVD ...
Operating Instructions
Page 68
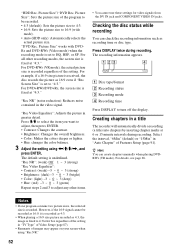
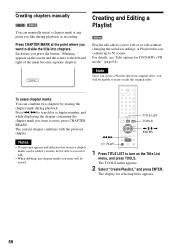
... like during playback. To erase chapter marks You can combine two chapters by erasing the chapter mark during playback or recording. Creating chapters manually HDD -RWVR You can manually insert a chapter mark at the point where you want to erase, press CHAPTER ERASE. Marking... For details, see "Edit options for a chapter number...
... like during playback. To erase chapter marks You can combine two chapters by erasing the chapter mark during playback or recording. Creating chapters manually HDD -RWVR You can manually insert a chapter mark at the point where you want to erase, press CHAPTER ERASE. Marking... For details, see "Edit options for a chapter number...
Operating Instructions
Page 74
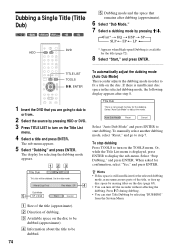
... space by erasing titles on the TOOLS menu. Title Dub There is available for the dubbing, Select "Auto Dub Mode" or adjust the mode. To manually select another dubbing mode, select "Reset," and go to be dubbed (approximate). Select "Stop Dubbing," and press ENTER. C Available space on the Title List menu...
... space by erasing titles on the TOOLS menu. Title Dub There is available for the dubbing, Select "Auto Dub Mode" or adjust the mode. To manually select another dubbing mode, select "Reset," and go to be dubbed (approximate). Select "Stop Dubbing," and press ENTER. C Available space on the Title List menu...

Operating Instructions
Page 77
.../Digital8 Dubbing (DV t HDD/DVD) Before DV/Digital8 Dubbing This section explains dubbing with the digital video camera as well before connecting. See the instruction manual supplied with a digital video camera via the DV IN jack on page 53. Notes • The DV IN jack is for you - For more information...
.../Digital8 Dubbing (DV t HDD/DVD) Before DV/Digital8 Dubbing This section explains dubbing with the digital video camera as well before connecting. See the instruction manual supplied with a digital video camera via the DV IN jack on page 53. Notes • The DV IN jack is for you - For more information...
Operating Instructions
Page 84
...: when "16:9" is set "Set Top Box Control" to "On." First, we recommend that provides further detailed settings. Tuner Preset Ch1 Antenna / Cable : Auto Preset Manual Set : AFT : Cable Add On 84 The currently selected option is selected. Auto Preset Automatically presets the receivable channels. Settings - Example: The following dialog box...
...: when "16:9" is set "Set Top Box Control" to "On." First, we recommend that provides further detailed settings. Tuner Preset Ch1 Antenna / Cable : Auto Preset Manual Set : AFT : Cable Add On 84 The currently selected option is selected. Auto Preset Automatically presets the receivable channels. Settings - Example: The following dialog box...
Operating Instructions
Page 85
...some channels could not be preset/disabled Settings - Settings - "Antenna": Presets VHF and UHF channels. 4 Select the channel you can set them manually. 1 Follow steps 1 to 3 of "Using the Setup Displays" (page 83) to turn on the Auto Fine Tuning function. "Erase": ...in numerical sequence. 3 Select "Antenna/Cable," and press ENTER. Auto Preset Searching for receivable channels. Tuner Preset Ch1 Antenna / Cable : Auto Preset Manual Set : AFT : Cable Add On 3 Select "Antenna/Cable," and press ENTER. "Add": Presets the channel. Settings - Settings - To disable...
...some channels could not be preset/disabled Settings - Settings - "Antenna": Presets VHF and UHF channels. 4 Select the channel you can set them manually. 1 Follow steps 1 to 3 of "Using the Setup Displays" (page 83) to turn on the Auto Fine Tuning function. "Erase": ...in numerical sequence. 3 Select "Antenna/Cable," and press ENTER. Auto Preset Searching for receivable channels. Tuner Preset Ch1 Antenna / Cable : Auto Preset Manual Set : AFT : Cable Add On 3 Select "Antenna/Cable," and press ENTER. "Add": Presets the channel. Settings - Settings - To disable...
Operating Instructions
Page 86
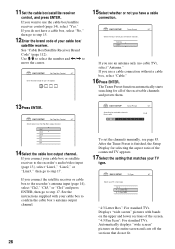
Area Setup - OK Cancel 6 Enter your zip code. ----- Zip code Enter your zip code number using the Area Setup USA / Canada : Zip Code USA ----- 3 Select "USA/Canada," and press ENTER. 4 Select your country, and press ENTER. 5 Select "Zip Code," and press ENTER. Settings - 1 Follow steps 1 to 3 of "Using the Setup Displays" (page 83) to select "Settings" in the Setup Display. 2 Select "Area Setup," and press ENTER.
Area Setup - OK Cancel 6 Enter your zip code. ----- Zip code Enter your zip code number using the Area Setup USA / Canada : Zip Code USA ----- 3 Select "USA/Canada," and press ENTER. 4 Select your country, and press ENTER. 5 Select "Zip Code," and press ENTER. Settings - 1 Follow steps 1 to 3 of "Using the Setup Displays" (page 83) to select "Settings" in the Setup Display. 2 Select "Area Setup," and press ENTER.
Operating Instructions
Page 93
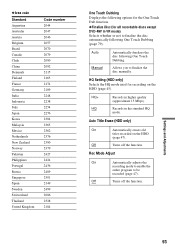
... HQ mode. Off Turns off the function. Rec Mode Adjust On Automatically adjusts the recording mode to enable the entire program to finalize the disc manually. HQ Setting (HDD only) Selects the HQ mode used for all recordable discs except DVD-RW in VR mode) Selects whether or not to finalize... erases old titles recorded on the HDD (page 45). HQ Records in higher quality (approximate 15 Mbps). Allows you to be recorded (page 47). Auto Manual Automatically finalizes the disc following One Touch Dubbing.
... HQ mode. Off Turns off the function. Rec Mode Adjust On Automatically adjusts the recording mode to enable the entire program to finalize the disc manually. HQ Setting (HDD only) Selects the HQ mode used for all recordable discs except DVD-RW in VR mode) Selects whether or not to finalize... erases old titles recorded on the HDD (page 45). HQ Records in higher quality (approximate 15 Mbps). Allows you to be recorded (page 47). Auto Manual Automatically finalizes the disc following One Touch Dubbing.


