
Operating Instructions
Page 4
...) Refer all instructions. 5) Do not use the controls on the recorder if they exit from being explained. • Instructions in this manual refer to DVDs created on this recorder. 13) Unplug this apparatus during lightning storms or when unused for replacement of the obsolete outlet.... Only use attachments/ accessories specified by the manufacturer. 12) Use only with one wider than the other recorders and played back on this manual, the internal hard disk drive is required when the apparatus has been damaged in accordance with the manufacturer's instructions. 8) Do not install ...
...) Refer all instructions. 5) Do not use the controls on the recorder if they exit from being explained. • Instructions in this manual refer to DVDs created on this recorder. 13) Unplug this apparatus during lightning storms or when unused for replacement of the obsolete outlet.... Only use attachments/ accessories specified by the manufacturer. 12) Use only with one wider than the other recorders and played back on this manual, the internal hard disk drive is required when the apparatus has been damaged in accordance with the manufacturer's instructions. 8) Do not install ...
Operating Instructions
Page 6
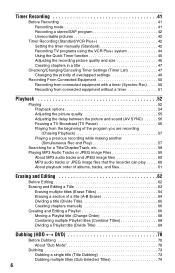
...Recording mode 41 Recording a stereo/SAP program 42 Unrecordable pictures 42 Timer Recording (Standard/VCR Plus 42 Setting the timer manually (Standard 42 Recording TV programs using the VCR Plus+ system 44 Using the Quick Timer function 45 Adjusting the recording picture...Title 63 Erasing multiple titles (Erase Titles 64 Erasing a section of a title (A-B Erase 64 Dividing a title (Divide Title 65 Creating chapters manually 66 Creating and Editing a Playlist 66 Moving a Playlist title (Change Order 68 Combining multiple Playlist titles (Combine Titles 68 Dividing a Playlist title...
...Recording mode 41 Recording a stereo/SAP program 42 Unrecordable pictures 42 Timer Recording (Standard/VCR Plus 42 Setting the timer manually (Standard 42 Recording TV programs using the VCR Plus+ system 44 Using the Quick Timer function 45 Adjusting the recording picture...Title 63 Erasing multiple titles (Erase Titles 64 Erasing a section of a title (A-B Erase 64 Dividing a title (Divide Title 65 Creating chapters manually 66 Creating and Editing a Playlist 66 Moving a Playlist title (Change Order 68 Combining multiple Playlist titles (Combine Titles 68 Dividing a Playlist title...
Operating Instructions
Page 8
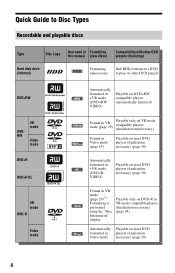
Quick Guide to Disc Types Recordable and playable discs Type Disc Logo Icon used in Formatting this manual (new discs) Compatibility with other DVD players (finalizing) Hard disk drive (internal) HDD Formatting unnecessary Dub HDD contents to a DVD to play on other DVD ...
Quick Guide to Disc Types Recordable and playable discs Type Disc Logo Icon used in Formatting this manual (new discs) Compatibility with other DVD players (finalizing) Hard disk drive (internal) HDD Formatting unnecessary Dub HDD contents to a DVD to play on other DVD ...
Operating Instructions
Page 10
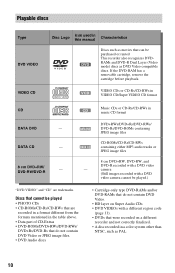
DATA DVD DATA CD - Playable discs Type DVD VIDEO VIDEO CD Disc Logo Icon used in this manual Characteristics DVD Discs such as movies that were recorded on Super Audio CDs • DVD VIDEOs with a different region code (page 11). • DVDs that ...
DATA DVD DATA CD - Playable discs Type DVD VIDEO VIDEO CD Disc Logo Icon used in this manual Characteristics DVD Discs such as movies that were recorded on Super Audio CDs • DVD VIDEOs with a different region code (page 11). • DVDs that ...
Operating Instructions
Page 23
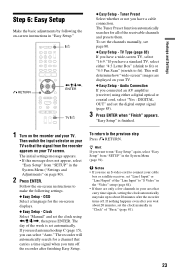
Hookups and Settings Step 6: Easy Setup Make the basic adjustments by following the on-screen instructions in "Easy Setup." [/1 O RETURN
Hookups and Settings Step 6: Easy Setup Make the basic adjustments by following the on-screen instructions in "Easy Setup." [/1 O RETURN
Operating Instructions
Page 26
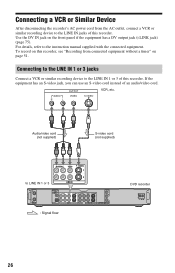
... similar recording device to the LINE IN jacks of an audio/video cord. Audio/video cord (not supplied) S-video cord (not supplied) to the instruction manual supplied with the connected equipment. For details, refer to LINE IN 1 or 3 : Signal flow DVD recorder 26 AUDIO R L OUTPUT VIDEO S VIDEO VCR, etc. Use the...
... similar recording device to the LINE IN jacks of an audio/video cord. Audio/video cord (not supplied) S-video cord (not supplied) to the instruction manual supplied with the connected equipment. For details, refer to LINE IN 1 or 3 : Signal flow DVD recorder 26 AUDIO R L OUTPUT VIDEO S VIDEO VCR, etc. Use the...

Operating Instructions
Page 29
..., the display on this recorder, you want to record. 3 Press REC MODE repeatedly to make timer recordings, see page 41. 4 Press z REC. If you can manually re-format the disc to close the disc tray. Recording stops automatically after 8 hours of how to select the recording mode. Eight Basic Operations - For...
..., the display on this recorder, you want to record. 3 Press REC MODE repeatedly to make timer recordings, see page 41. 4 Press z REC. If you can manually re-format the disc to close the disc tray. Recording stops automatically after 8 hours of how to select the recording mode. Eight Basic Operations - For...
Operating Instructions
Page 40
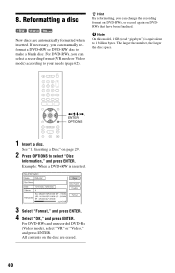
z Hint By reformatting, you can select a recording format (VR mode or Video mode) according to your needs (page 62). For DVD-RWs, you can manually reformat a DVD+RW or DVD-RW disc to 1 billion bytes. 8. If necessary, you can change the recording format on DVD-RWs, or record again on DVDRWs that have been finalized. b Note On this model, 1 GB (read "gigabyte") is equivalent to make a blank disc. Reformatting a disc +RW -RWVR -RWVideo New discs are automatically formatted when inserted. The larger the number, the larger the disc space.
z Hint By reformatting, you can select a recording format (VR mode or Video mode) according to your needs (page 62). For DVD-RWs, you can manually reformat a DVD+RW or DVD-RW disc to 1 billion bytes. 8. If necessary, you can change the recording format on DVD-RWs, or record again on DVDRWs that have been finalized. b Note On this model, 1 GB (read "gigabyte") is equivalent to make a blank disc. Reformatting a disc +RW -RWVR -RWVideo New discs are automatically formatted when inserted. The larger the number, the larger the disc space.
Operating Instructions
Page 42
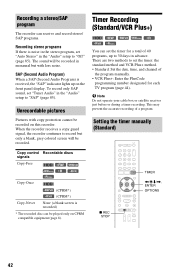
This may prevent the accurate recording of the program manually. • VCR Plus+: Enter the PlusCode programming number designated for a total of 40 programs, up on the front panel display. x REC STOP TIMER Timer Recording (... stereo program, set the timer: the standard method and VCR Plus+ method. • Standard: Set the date, time, and channel of a program. Setting the timer manually (Standard) Copy control Recordable discs signals Copy-Free Copy-Once HDD +RW -RWVideo +R -RVideo -RWVR -RVR HDD -RWVR (CPRM*) -RVR (CPRM*) Copy-Never None (a blank...
This may prevent the accurate recording of the program manually. • VCR Plus+: Enter the PlusCode programming number designated for a total of 40 programs, up on the front panel display. x REC STOP TIMER Timer Recording (... stereo program, set the timer: the standard method and VCR Plus+ method. • Standard: Set the date, time, and channel of a program. Setting the timer manually (Standard) Copy control Recordable discs signals Copy-Free Copy-Once HDD +RW -RWVideo +R -RVideo -RWVR -RVR HDD -RWVR (CPRM*) -RVR (CPRM*) Copy-Never None (a blank...
Operating Instructions
Page 43
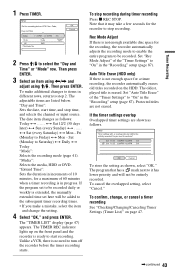
Then press ENTER. 3 Select an item using Timer Recording 1 Press TIMER. 2 Press M/m to select the "Day and Time" or "Mode" row.
Then press ENTER. 3 Select an item using Timer Recording 1 Press TIMER. 2 Press M/m to select the "Day and Time" or "Mode" row.

Operating Instructions
Page 47
... title. The Timer List appears. Checking/Changing/ Canceling Timer Settings (Timer List) HDD +RW -RWVR -RWVideo +R -RVR -RVideo You can insert and erase chapter marks manually (page 66). Timer Recording b Notes • If one program contains two picture sizes, the selected size is fixed to 4:3 Letter Box regardless of the setting...
... title. The Timer List appears. Checking/Changing/ Canceling Timer Settings (Timer List) HDD +RW -RWVR -RWVideo +R -RVR -RVideo You can insert and erase chapter marks manually (page 66). Timer Recording b Notes • If one program contains two picture sizes, the selected size is fixed to 4:3 Letter Box regardless of the setting...
Operating Instructions
Page 66
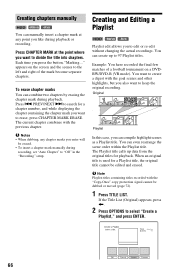
... a DVDRW/DVD-R (VR mode). The current chapter combines with the "Copy-Once" copy protection signal cannot be erased. • To insert a chapter mark manually during recording, set "Auto Chapter" to "Off" in the "Recording" setup. Original Playlist In this case, you can even rearrange the scene order within the... for a chapter number, and while displaying the chapter containing the chapter mark you want to erase, press CHAPTER MARK ERASE. Creating chapters manually HDD -RWVR -RVR You can manually insert a chapter mark at the point where you want to keep the original recording.
... a DVDRW/DVD-R (VR mode). The current chapter combines with the "Copy-Once" copy protection signal cannot be erased. • To insert a chapter mark manually during recording, set "Auto Chapter" to "Off" in the "Recording" setup. Original Playlist In this case, you can even rearrange the scene order within the... for a chapter number, and while displaying the chapter containing the chapter mark you want to erase, press CHAPTER MARK ERASE. Creating chapters manually HDD -RWVR -RVR You can manually insert a chapter mark at the point where you want to keep the original recording.
Operating Instructions
Page 73
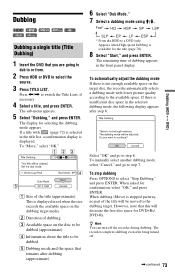
Dubbing HDD +RW -RWVR -RWVideo +R -RVR -RVideo Dubbing a single title (Title Dubbing) 1 Insert the DVD that you are going to dub to or from. 2 Press HDD or DVD to select the source. 3 Press TITLE LIST. Press
Dubbing HDD +RW -RWVR -RWVideo +R -RVR -RVideo Dubbing a single title (Title Dubbing) 1 Insert the DVD that you are going to dub to or from. 2 Press HDD or DVD to select the source. 3 Press TITLE LIST. Press
Operating Instructions
Page 74
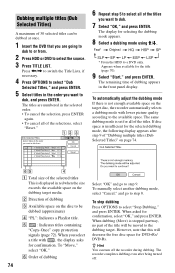
Dubbing multiple titles (Dub Selected Titles) A maximum of 30 selected titles can be dubbed at once. 1 Insert the DVD that you are going to dub to or from. 2 Press HDD or DVD to select the source. 3 Press TITLE LIST. Press
Dubbing multiple titles (Dub Selected Titles) A maximum of 30 selected titles can be dubbed at once. 1 Insert the DVD that you are going to dub to or from. 2 Press HDD or DVD to select the source. 3 Press TITLE LIST. Press
Operating Instructions
Page 75
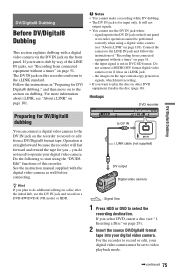
... to start using a digital video camera (see "Recording from connected equipment without a timer" on other DVD equipment, finalize the disc (page 38). See the instruction manual supplied with a digital video camera via the DV IN jack on page 101. If you want to the section on page 51. - DV/Digital8 Dubbing...
... to start using a digital video camera (see "Recording from connected equipment without a timer" on other DVD equipment, finalize the disc (page 38). See the instruction manual supplied with a digital video camera via the DV IN jack on page 101. If you want to the section on page 51. - DV/Digital8 Dubbing...
Operating Instructions
Page 80
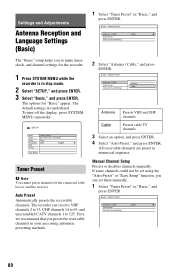
..." or "Easy Setup" function, you to 125. First, we recommend that you preset the receivable channels in "Basic," and press ENTER. 80 Manual Channel Setup Presets or disables channels manually. Auto Preset Automatically presets the receivable channels. If some channels could not be set using automatic presetting methods. 2 Select "Antenna / Cable," and...
..." or "Easy Setup" function, you to 125. First, we recommend that you preset the receivable channels in "Basic," and press ENTER. 80 Manual Channel Setup Presets or disables channels manually. Auto Preset Automatically presets the receivable channels. If some channels could not be set using automatic presetting methods. 2 Select "Antenna / Cable," and...
Operating Instructions
Page 81
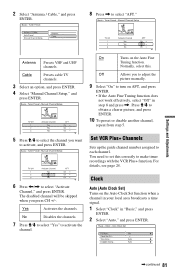
...and press ENTER. 10 To preset or disable another channel, repeat from step 5. 5 Press M/m to select the channel you to adjust the picture manually. 9 Select "On" to make timer recordings with the VCR Plus+ function. Normally, select this correctly to turn on the Auto Fine Tuning ...function. Cable Presets cable TV channels. 3 Select an option, and press ENTER. 4 Select "Manual Channel Setup," and press ENTER. Set VCR Plus+ Channels Sets up the guide channel number assigned to activate, and press ENTER. 2 Select "Antenna /...
...and press ENTER. 10 To preset or disable another channel, repeat from step 5. 5 Press M/m to select the channel you to adjust the picture manually. 9 Select "On" to make timer recordings with the VCR Plus+ function. Normally, select this correctly to turn on the Auto Fine Tuning ...function. Cable Presets cable TV channels. 3 Select an option, and press ENTER. 4 Select "Manual Channel Setup," and press ENTER. Set VCR Plus+ Channels Sets up the guide channel number assigned to activate, and press ENTER. 2 Select "Antenna /...

Operating Instructions
Page 82
...sets your time zone and Daylight Saving Time (if applicable). • If the clock does not activate, your local area, set the clock manually. 1 Select "Clock" in sequence. Leave the setting at "--" to have the recorder automatically set the clock correctly for a channel that carries a time ...signal. Manual (Manual Clock Set) If the Auto Clock Set function did not set the daylight saving time. Press z Hint If you to "Yes," the Auto ...
...sets your time zone and Daylight Saving Time (if applicable). • If the clock does not activate, your local area, set the clock manually. 1 Select "Clock" in sequence. Leave the setting at "--" to have the recorder automatically set the clock correctly for a channel that carries a time ...signal. Manual (Manual Clock Set) If the Auto Clock Set function did not set the daylight saving time. Press z Hint If you to "Yes," the Auto ...

Operating Instructions
Page 89
...Menu Switches the language for "Level" are displayed. Subtitle Switches the language of the recorded languages will be asked to finalize the disc manually. 89 Format DVD-RW (DVD-RW only) The recorder automatically starts formatting in step 3, and press ENTER. VR Automatically formats the... cannot be limited on this case, enter your password, you will have to finalize the disc automatically following One Touch Dubbing (page 77). Manual Allows you selected for the One Touch Dub function. Audio Switches the language of "Factory Setup" in the "Others" setup (page 90)....
...Menu Switches the language for "Level" are displayed. Subtitle Switches the language of the recorded languages will be asked to finalize the disc manually. 89 Format DVD-RW (DVD-RW only) The recorder automatically starts formatting in step 3, and press ENTER. VR Automatically formats the... cannot be limited on this case, enter your password, you will have to finalize the disc automatically following One Touch Dubbing (page 77). Manual Allows you selected for the One Touch Dub function. Audio Switches the language of "Factory Setup" in the "Others" setup (page 90)....
Operating Instructions
Page 92
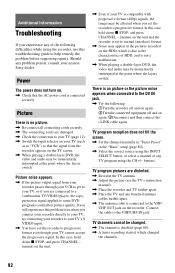
...to your TV's S VIDEO input. , You have set the recorder to progressive format. TV program reception does not fill the screen. , Set the channel manually in "Tuner Preset" in the pictures recorded on the HDD, which changed . , The channel is disabled (page 80). , A timer recording started, ... your TV cannot accept the progressive signal. If you still experience this case, hold down x STOP, and press CHANNEL - (minus) on your nearest Sony dealer. There is no picture. , Re-connect all connecting cords securely. , The connecting cords are damaged. , Check the connection to "VCR") so...
...to your TV's S VIDEO input. , You have set the recorder to progressive format. TV program reception does not fill the screen. , Set the channel manually in "Tuner Preset" in the pictures recorded on the HDD, which changed . , The channel is disabled (page 80). , A timer recording started, ... your TV cannot accept the progressive signal. If you still experience this case, hold down x STOP, and press CHANNEL - (minus) on your nearest Sony dealer. There is no picture. , Re-connect all connecting cords securely. , The connecting cords are damaged. , Check the connection to "VCR") so...


