Operating Instructions
Page 2
... the AC power cord, turn off the power and make sure that the AC power cord can easily be changed only at least 30 seconds and all recording or dubbing has stopped). • Do not move the recorder with this product will increase eye hazard. Precaution Install this system so that the hard disk drive is not operating (the clock is displayed in the front panel display for at...
... the AC power cord, turn off the power and make sure that the AC power cord can easily be changed only at least 30 seconds and all recording or dubbing has stopped). • Do not move the recorder with this product will increase eye hazard. Precaution Install this system so that the hard disk drive is not operating (the clock is displayed in the front panel display for at...
Operating Instructions
Page 3
... the provisions of recorder failure or repair undertaken to the recorder. On compensation for home and other limited viewing uses only unless otherwise authorized by yourself, as such may result in an inclined position. Copy guard function Since the recorder has a copy guard function, programs received through an external tuner (not supplied) may contain copy protection signals (copy guard function) and as this . About repairing the hard disk drive • The...
... the provisions of recorder failure or repair undertaken to the recorder. On compensation for home and other limited viewing uses only unless otherwise authorized by yourself, as such may result in an inclined position. Copy guard function Since the recorder has a copy guard function, programs received through an external tuner (not supplied) may contain copy protection signals (copy guard function) and as this . About repairing the hard disk drive • The...
Operating Instructions
Page 5
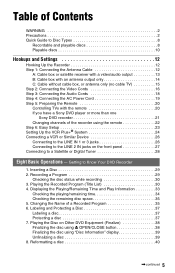
Playing the Disc on Other DVD Equipment (Finalize 38 Finalizing the disc using Z OPEN/CLOSE button 38 Finalizing the disc using the remote 22 Step 6: Easy Setup 23 Setting Up the VCR Plus+® System 24 Connecting a VCR or Similar Device 26 Connecting to the LINE IN 1 or 3 jacks 26 Connecting to the LINE 2 IN jacks on the front panel 27 Connecting to a Satellite or Digital Tuner 28 Eight Basic Operations - Playing the Recorded Program (Title List 30 4. Labeling...
Playing the Disc on Other DVD Equipment (Finalize 38 Finalizing the disc using Z OPEN/CLOSE button 38 Finalizing the disc using the remote 22 Step 6: Easy Setup 23 Setting Up the VCR Plus+® System 24 Connecting a VCR or Similar Device 26 Connecting to the LINE IN 1 or 3 jacks 26 Connecting to the LINE 2 IN jacks on the front panel 27 Connecting to a Satellite or Digital Tuner 28 Eight Basic Operations - Playing the Recorded Program (Title List 30 4. Labeling...
Operating Instructions
Page 7
... Reception and Language Settings (Basic 80 Tuner Preset 80 Set VCR Plus+ Channels 81 Clock 81 OSD (On-Screen Display 82 Video Settings (Video 83 Audio Settings (Audio 85 Recording Settings (Recording 87 Disc Settings (DVD 88 Remote Control Settings/Factory Settings (Others 90 Easy Setup (Resetting the Recorder 91 Additional Information 92 Troubleshooting 92 Self-diagnosis Function (When letters/numbers appear in the display) . . . . 98 Notes About This Recorder 99 Specifications 100 About i.LINK 101 Guide to Parts and Controls 102 Language Code List 105 Area Code 105 Index...
... Reception and Language Settings (Basic 80 Tuner Preset 80 Set VCR Plus+ Channels 81 Clock 81 OSD (On-Screen Display 82 Video Settings (Video 83 Audio Settings (Audio 85 Recording Settings (Recording 87 Disc Settings (DVD 88 Remote Control Settings/Factory Settings (Others 90 Easy Setup (Resetting the Recorder 91 Additional Information 92 Troubleshooting 92 Self-diagnosis Function (When letters/numbers appear in the display) . . . . 98 Notes About This Recorder 99 Specifications 100 About i.LINK 101 Guide to Parts and Controls 102 Language Code List 105 Area Code 105 Index...

Operating Instructions
Page 11
... music discs encoded with identical region codes. To change the disc's format, reformat the disc (page 40). Note that contain recordings made on other DVD VIDEO, the message "Playback prohibited by area restrictions. See the instructions supplied with "For Video" printed on their packaging. • You cannot add new recordings to protect copyrights. DVD VIDEOs labeled ALL will only play any other DVD equipment. However, since the audio material...
... music discs encoded with identical region codes. To change the disc's format, reformat the disc (page 40). Note that contain recordings made on other DVD VIDEO, the message "Playback prohibited by area restrictions. See the instructions supplied with "For Video" printed on their packaging. • You cannot add new recordings to protect copyrights. DVD VIDEOs labeled ALL will only play any other DVD equipment. However, since the audio material...
Operating Instructions
Page 16
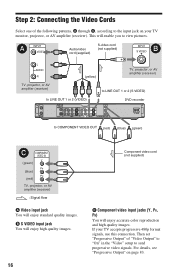
... monitor, projector, or AV amplifier (receiver). Then set "Progressive Output" of the following patterns, A through C, according to the input jack on page 83. For details, see "Progressive Output" on your TV accepts progressive 480p format signals, use this connection. A INPUT VIDEO Audio/video cord (supplied) S-video cord (not supplied) INPUT B S VIDEO L AUDIO R (yellow) TV, projector, or AV amplifier (receiver) TV, projector, or AV amplifier (receiver) to LINE OUT 1 or 2 (S VIDEO) to LINE OUT 1 or 2 (VIDEO) DVD recorder to view pictures.
... monitor, projector, or AV amplifier (receiver). Then set "Progressive Output" of the following patterns, A through C, according to the input jack on page 83. For details, see "Progressive Output" on your TV accepts progressive 480p format signals, use this connection. A INPUT VIDEO Audio/video cord (supplied) S-video cord (not supplied) INPUT B S VIDEO L AUDIO R (yellow) TV, projector, or AV amplifier (receiver) TV, projector, or AV amplifier (receiver) to LINE OUT 1 or 2 (S VIDEO) to LINE OUT 1 or 2 (VIDEO) DVD recorder to view pictures.
Operating Instructions
Page 19
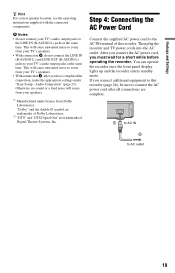
... AC power cord to the LINE IN (R-AUDIO-L) jacks at the same time. If you must wait for a short while before operating the recorder. This will cause unwanted noise to come from your speakers. *1 Manufactured under "Easy Setup - Hookups and Settings z Hint For correct speaker location, see the operating instructions supplied with the connected components. You can operate the recorder once the front panel display lights up...
... AC power cord to the LINE IN (R-AUDIO-L) jacks at the same time. If you must wait for a short while before operating the recorder. This will cause unwanted noise to come from your speakers. *1 Manufactured under "Easy Setup - Hookups and Settings z Hint For correct speaker location, see the operating instructions supplied with the connected components. You can operate the recorder once the front panel display lights up...
Operating Instructions
Page 23
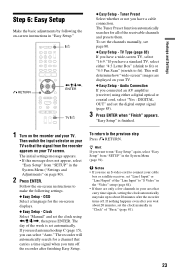
Hookups and Settings Step 6: Easy Setup Make the basic adjustments by following the on-screen instructions in "Easy Setup." [/1 O RETURN
Hookups and Settings Step 6: Easy Setup Make the basic adjustments by following the on-screen instructions in "Easy Setup." [/1 O RETURN

Operating Instructions
Page 29
... program to the hard disk (HDD) or to Know Your DVD Recorder 1. Each time you want to record. 3 Press REC MODE repeatedly to make a blank disc (page 40). For an explanation of continuous recording or when the HDD or DVD is recordable on the disc tray. Getting to Know Your DVD Recorder 1 Press DVD. 2 Press Z OPEN/CLOSE, and place a disc on this recorder, you can manually re-format the disc to select the channel or input source you make a recording. DISPLAY Recording/playing...
... program to the hard disk (HDD) or to Know Your DVD Recorder 1. Each time you want to record. 3 Press REC MODE repeatedly to make a blank disc (page 40). For an explanation of continuous recording or when the HDD or DVD is recordable on the disc tray. Getting to Know Your DVD Recorder 1 Press DVD. 2 Press Z OPEN/CLOSE, and place a disc on this recorder, you can manually re-format the disc to select the channel or input source you make a recording. DISPLAY Recording/playing...
Operating Instructions
Page 42
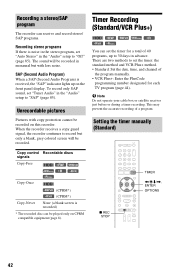
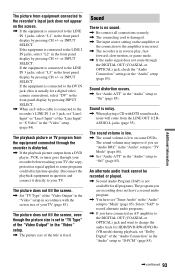
Recording a stereo/SAP program The recorder can receive and record stereo/ SAP programs. Recording stereo programs If there is noise in the stereo program, set "Auto Stereo" in the "Audio" setup to "SAP" (page 85). To record only SAP sound, set "Tuner Audio" in the "Audio" setup to 30 days in monaural but only a blank, grey colored screen will be played only on CPRM compatible equipment (page 8). Setting the timer manually (Standard) Copy control Recordable discs signals Copy-Free Copy-Once HDD +RW -RWVideo +R -RVideo -RWVR...
Recording a stereo/SAP program The recorder can receive and record stereo/ SAP programs. Recording stereo programs If there is noise in the stereo program, set "Auto Stereo" in the "Audio" setup to "SAP" (page 85). To record only SAP sound, set "Tuner Audio" in the "Audio" setup to 30 days in monaural but only a blank, grey colored screen will be played only on CPRM compatible equipment (page 8). Setting the timer manually (Standard) Copy control Recordable discs signals Copy-Free Copy-Once HDD +RW -RWVideo +R -RVideo -RWVR...
Operating Instructions
Page 43
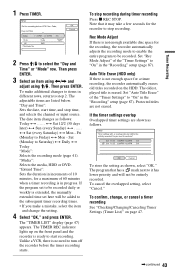
Timer Recording 1 Press TIMER. 2 Press M/m to select the "Day and Time" or "Mode" row. Then press ENTER. 3 Select an item using
Timer Recording 1 Press TIMER. 2 Press M/m to select the "Day and Time" or "Mode" row. Then press ENTER. 3 Select an item using

Operating Instructions
Page 46
Adjusting the recording picture quality and size You can adjust the recording picture quality and picture size.
Adjusting the recording picture quality and size You can adjust the recording picture quality and picture size.
Operating Instructions
Page 53
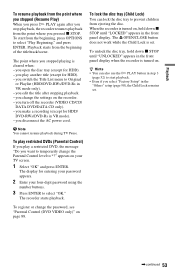
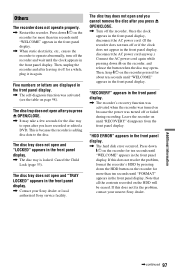
... Parental Control level to select "Play Beginning," and press ENTER. The Z OPEN/CLOSE button does not work while the Child Lock is turned on , hold down x STOP until "UNLOCKED" appears in the front panel display when the recorder is set . The recorder starts playback. To start playback. • Even if you stopped playing is turned on . When the recorder is cleared when: - To unlock the disc tray, hold down x STOP until "LOCKED" appears in VR mode). - you turn off the recorder (VIDEO...
... Parental Control level to select "Play Beginning," and press ENTER. The Z OPEN/CLOSE button does not work while the Child Lock is turned on , hold down x STOP until "UNLOCKED" appears in the front panel display when the recorder is set . The recorder starts playback. To start playback. • Even if you stopped playing is turned on . When the recorder is cleared when: - To unlock the disc tray, hold down x STOP until "LOCKED" appears in VR mode). - you turn off the recorder (VIDEO...

Operating Instructions
Page 78
... at approximately 6 minute intervals. 1 Follow steps 1 to the HDD or a DVD. The display for recording m Select and edit the scenes you want to dub Using the recorder's remote control, fast forward or rewind the tape to the HDD or DVD become a single title. At this function, do the following: Connect your digital video camera and prepare for setting the OUT point (end of the scene) appears...
... at approximately 6 minute intervals. 1 Follow steps 1 to the HDD or a DVD. The display for recording m Select and edit the scenes you want to dub Using the recorder's remote control, fast forward or rewind the tape to the HDD or DVD become a single title. At this function, do the following: Connect your digital video camera and prepare for setting the OUT point (end of the scene) appears...

Operating Instructions
Page 83
... MENU while the recorder is in stop mode. 2 Select "SETUP," and press ENTER. 3 Select "Video," and press ENTER. Choose the settings according to the type of "4:3 Pan Scan" or vice versa. Video Output TV Type Sets the picture size when playing back a title recorded from the COMPONENT VIDEO OUT jacks (page 16). Displays a wide picture with bands on the disc, "4:3 Letter Box" may be selected automatically instead of TV, tuner, or decoder connected to a 4:3 screen TV. Off Sets the black...
... MENU while the recorder is in stop mode. 2 Select "SETUP," and press ENTER. 3 Select "Video," and press ENTER. Choose the settings according to the type of "4:3 Pan Scan" or vice versa. Video Output TV Type Sets the picture size when playing back a title recorded from the COMPONENT VIDEO OUT jacks (page 16). Displays a wide picture with bands on the disc, "4:3 Letter Box" may be selected automatically instead of TV, tuner, or decoder connected to a 4:3 screen TV. Off Sets the black...

Operating Instructions
Page 89
...using the number buttons. The Parental Control setting is inserted. VR Automatically formats the disc in Video mode. Video Automatically formats the disc in VR mode. When the display for "Level" are displayed. b Note If you select a language in "DVD Menu," "Subtitle," or "Audio," select and enter a language code from "Language Code List" on page 105 using the number buttons, then select "OK" and press ENTER. Discs rated higher than the selected level will have the Parental Control function, playback cannot be automatically selected. Audio Switches the language...
...using the number buttons. The Parental Control setting is inserted. VR Automatically formats the disc in Video mode. Video Automatically formats the disc in VR mode. When the display for "Level" are displayed. b Note If you select a language in "DVD Menu," "Subtitle," or "Audio," select and enter a language code from "Language Code List" on page 105 using the number buttons, then select "OK" and press ENTER. Discs rated higher than the selected level will have the Parental Control function, playback cannot be automatically selected. Audio Switches the language...
Operating Instructions
Page 92
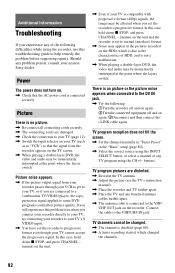
... set the recorder to the VHF/UHF IN jack. Picture There is compatible with progressive format (480p) signals, the image may be momentarily interrupted at the point where the layers switch. Should any TV program using the INPUT SELECT button, or select a channel of any problem persist, consult your TV (such as to the VHF/ UHF OUT jack on the TV screen. , When playing a double-layer DVD, the video and audio...
... set the recorder to the VHF/UHF IN jack. Picture There is compatible with progressive format (480p) signals, the image may be momentarily interrupted at the point where the layers switch. Should any TV program using the INPUT SELECT button, or select a channel of any problem persist, consult your TV (such as to the VHF/ UHF OUT jack on the TV screen. , When playing a double-layer DVD, the video and audio...
Operating Instructions
Page 93
... the front panel display by pressing CH +/- The sound volume is low. , The sound volume is in the "Audio" setup to "Off" (page 85). Select "SAP" to record alternate audio programs. , If you have set "Audio DRC" in the "Audio" setup to "TV Mode" (page 86). , Set "Audio ATT" in reverse play, fast- Sound There is no sound. , Re-connect all programs. The program you set "Tuner Audio" in the "Audio" setup (page 85). Sound is distorted. , If the playback picture output from a DVD player, VCR, or tuner goes through...
... the front panel display by pressing CH +/- The sound volume is low. , The sound volume is in the "Audio" setup to "Off" (page 85). Select "SAP" to record alternate audio programs. , If you have set "Audio DRC" in the "Audio" setup to "TV Mode" (page 86). , Set "Audio ATT" in reverse play, fast- Sound There is no sound. , Re-connect all programs. The program you set "Tuner Audio" in the "Audio" setup (page 85). Sound is distorted. , If the playback picture output from a DVD player, VCR, or tuner goes through...
Operating Instructions
Page 97
... front panel display. Once the clock appears in the front panel display, disconnect the AC power cord. (If the recorder does not turn off or if the clock does not appear in the front panel display. , Contact your nearest Sony dealer. Five numbers or letters are displayed in the front panel display. , The hard disk error occurred. Cancel the Child Lock (page 53). If this does not resolve the problem, format the recorder...
... front panel display. Once the clock appears in the front panel display, disconnect the AC power cord. (If the recorder does not turn off or if the clock does not appear in the front panel display. , Contact your nearest Sony dealer. Five numbers or letters are displayed in the front panel display. , The hard disk error occurred. Cancel the Child Lock (page 53). If this does not resolve the problem, format the recorder...
Operating Instructions
Page 107
..., 62, 66 "Power Save Standby" 90 "Preview" 67, 79 Program Edit 78 "Progressive Mode" 84 "Progressive Output" 83 "Protect Disc" 37 "Protect Title" 63 Protection disc 37 title 63 Q Quick guide to disc types 8 Quick Timer 45 R Rear panel 104 REC 29 "Rec Mode" 46 "Rec Mode Adjust" 43, 87 "Rec NR" 46 "Rec Settings" 46 REC STOP 30, 77 "Rec Video Equalizer" 46 Recordable discs 8 "Recording" 87 Recording 41 picture adjustment 46 recording format 8 recording mode 30, 41 recording time 30, 41...
..., 62, 66 "Power Save Standby" 90 "Preview" 67, 79 Program Edit 78 "Progressive Mode" 84 "Progressive Output" 83 "Protect Disc" 37 "Protect Title" 63 Protection disc 37 title 63 Q Quick guide to disc types 8 Quick Timer 45 R Rear panel 104 REC 29 "Rec Mode" 46 "Rec Mode Adjust" 43, 87 "Rec NR" 46 "Rec Settings" 46 REC STOP 30, 77 "Rec Video Equalizer" 46 Recordable discs 8 "Recording" 87 Recording 41 picture adjustment 46 recording format 8 recording mode 30, 41 recording time 30, 41...


