
Limited Warranty (US Only)
Page 1
..., to any part of , or to you must be defective, Sony will supply, at no charge, new or rebuilt replacements in material or workmanship as fuses or batteries). After the warranty period, you . This warranty does not cover customer instruction, installation, set up adjustments or signal reception problems. This warranty does not cover cosmetic damage or damage due to obtain warranty service. This warranty...
..., to any part of , or to you must be defective, Sony will supply, at no charge, new or rebuilt replacements in material or workmanship as fuses or batteries). After the warranty period, you . This warranty does not cover customer instruction, installation, set up adjustments or signal reception problems. This warranty does not cover cosmetic damage or damage due to obtain warranty service. This warranty...

Operating Instructions
Page 1
4-166-642-12(1) Home Audio Docking System Operating Instructions RDH-SK8iP ©2010 Sony Corporation
4-166-642-12(1) Home Audio Docking System Operating Instructions RDH-SK8iP ©2010 Sony Corporation

Operating Instructions
Page 2
... you call upon your Sony dealer regarding this apparatus to the AC outlet, even if the unit itself has been turned off. Replace only with battery-installed to an easily accessible AC outlet. Model No. CAUTION Danger of important operating and maintenance (servicing) instructions in cabinet. As the main plug is intended to alert the user to persons. This symbol is connected...
... you call upon your Sony dealer regarding this apparatus to the AC outlet, even if the unit itself has been turned off. Replace only with battery-installed to an easily accessible AC outlet. Model No. CAUTION Danger of important operating and maintenance (servicing) instructions in cabinet. As the main plug is intended to alert the user to persons. This symbol is connected...

Operating Instructions
Page 3
... this manual could void your safety. Reorient or relocate the receiving antenna. - CAUTION You are provided for replacement of the obsolete outlet. 10) Protect the power cord from being walked on , the user is encouraged to try to correct the interference by the manufacturer, or sold with one or more of time. 14) Refer all instructions. 5) Do not use...
... this manual could void your safety. Reorient or relocate the receiving antenna. - CAUTION You are provided for replacement of the obsolete outlet. 10) Protect the power cord from being walked on , the user is encouraged to try to correct the interference by the manufacturer, or sold with one or more of time. 14) Refer all instructions. 5) Do not use...

Operating Instructions
Page 5
... other countries. For any service or guarantee matters please refer to parts and controls... 6 Getting started 8 Setting the voltage selector....... 8 Inserting the iPod/iPhone Dock Adapter 8 Turning on the unit 9 Playing the iPod/iPhone......... 9 Enjoying optional components 11 Changing the battery 12 Changing the graphic sheet 13 Customizing the graphic sheet 14 Troubleshooting 14 Precautions 16 Specifications 17 Compatible iPod/iPhone models with separate collection systems) On copyrights iPod is a trademark of Old...
... other countries. For any service or guarantee matters please refer to parts and controls... 6 Getting started 8 Setting the voltage selector....... 8 Inserting the iPod/iPhone Dock Adapter 8 Turning on the unit 9 Playing the iPod/iPhone......... 9 Enjoying optional components 11 Changing the battery 12 Changing the graphic sheet 13 Customizing the graphic sheet 14 Troubleshooting 14 Precautions 16 Specifications 17 Compatible iPod/iPhone models with separate collection systems) On copyrights iPod is a trademark of Old...

Operating Instructions
Page 6
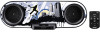
Back view 1 4 - Front and top view 5 32 6 9 87 6GB Guide to parts and controls This manual mainly explains operations using the buttons on the remote, but the same operations can also be performed using the buttons on the unit having the same or similar names. Unit -
Back view 1 4 - Front and top view 5 32 6 9 87 6GB Guide to parts and controls This manual mainly explains operations using the buttons on the remote, but the same operations can also be performed using the buttons on the unit having the same or similar names. Unit -
Operating Instructions
Page 7
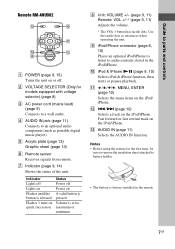
... fast rewind track on the iPod/ iPhone. Use the tactile dots as portable digital music player). K / / / , MENU, ENTER (page 10) Selects the menu items on the iPod/iPhone. G Indicator (page 9, 14) Shows the status of the unit. L ./> (page 10) Selects a track on A valid button is pressed Volume is factory-installed in the iPod/iPhone. Notes • Before using the remote for models equipped with voltage selector) (page 8) C AC power cord (mains lead...
... fast rewind track on the iPod/ iPhone. Use the tactile dots as portable digital music player). K / / / , MENU, ENTER (page 10) Selects the menu items on the iPod/iPhone. G Indicator (page 9, 14) Shows the status of the unit. L ./> (page 10) Selects a track on A valid button is pressed Volume is factory-installed in the iPod/iPhone. Notes • Before using the remote for models equipped with voltage selector) (page 8) C AC power cord (mains lead...

Operating Instructions
Page 8
... the supplied Dock Adapter, refer to the position of your local power line voltage before you connect the AC power cord (mains lead). Slot To remove the iPod/iPhone Dock Adapter, pull it up with your iPod/iPhone. Choose the iPod/iPhone Dock Adapter that fits your fingernail or a flat object using the slot inside the adapter. Brazil model only Other models VOLTAGE SELECTOR 127V 220V 220V VOLTAGE SELECTOR 120V 230240V 220V Inserting the iPod/iPhone Dock Adapter...
... the supplied Dock Adapter, refer to the position of your local power line voltage before you connect the AC power cord (mains lead). Slot To remove the iPod/iPhone Dock Adapter, pull it up with your iPod/iPhone. Choose the iPod/iPhone Dock Adapter that fits your fingernail or a flat object using the slot inside the adapter. Brazil model only Other models VOLTAGE SELECTOR 127V 220V 220V VOLTAGE SELECTOR 120V 230240V 220V Inserting the iPod/iPhone Dock Adapter...

Operating Instructions
Page 9
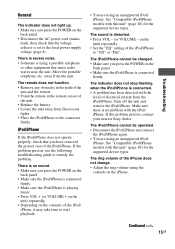
... +/- (or VOLUME +/- Note If your iPod/iPhone with the latest software before you to use buttons on the unit) repeatedly to adjust the volume. on the remote to control the connected iPod/ iPhone. 1 Place the iPod/iPhone. Getting started/Playing the iPod/iPhone Turning on the unit 1 Connect the AC power cord (mains lead) to the wall outlet. 2 Press POWER on the back panel of the iPod/iPhone. When connecting the iPod/iPhone during playback, the...
... +/- (or VOLUME +/- Note If your iPod/iPhone with the latest software before you to use buttons on the unit) repeatedly to adjust the volume. on the remote to control the connected iPod/ iPhone. 1 Place the iPod/iPhone. Getting started/Playing the iPod/iPhone Turning on the unit 1 Connect the AC power cord (mains lead) to the wall outlet. 2 Press POWER on the back panel of the iPod/iPhone. When connecting the iPod/iPhone during playback, the...
Operating Instructions
Page 10
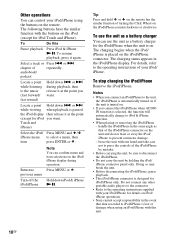
... other portable audio players to the connector. • Refer to the operating instructions supplied with this Pause playback Press iPod & iPhone NX. To use the unit as a battery charger You can use the unit as that data recorded to the unit, the iPod/iPhone is automatically turned on if the unit is turned on the unit and do not twist or sway the iPod/ iPhone to the operating instructions of the iPod/iPhone by...
... other portable audio players to the connector. • Refer to the operating instructions supplied with this Pause playback Press iPod & iPhone NX. To use the unit as a battery charger You can use the unit as that data recorded to the unit, the iPod/iPhone is automatically turned on if the unit is turned on the unit and do not twist or sway the iPod/ iPhone to the operating instructions of the iPod/iPhone by...
Operating Instructions
Page 11
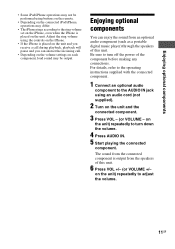
... iPhone rings according to adjust the volume. 11GB on the unit) repeatedly to the ring volume set on the iPhone, even when the iPhone is output from an optional audio component (such as a portable digital music player) through the speakers of this unit. Be sure to the AUDIO IN jack using an audio cord (not supplied). 2 Turn on the unit and the connected component. 3 Press VOL - (or VOLUME - For details, refer to the operating instructions supplied...
... iPhone rings according to adjust the volume. 11GB on the unit) repeatedly to the ring volume set on the iPhone, even when the iPhone is output from an optional audio component (such as a portable digital music player) through the speakers of this unit. Be sure to the AUDIO IN jack using an audio cord (not supplied). 2 Turn on the unit and the connected component. 3 Press VOL - (or VOLUME - For details, refer to the operating instructions supplied...

Operating Instructions
Page 12
... CR2025 may explode if mistreated. WARNING Battery may cause a fire or explosion. Keep the lithium battery out of the reach of the remote shortens as the battery becomes exhausted. Changing the battery The working distance of children. When the remote no longer operates the unit, replace the battery with the "+" facing up, then insert the battery holder into the slot. + facing up...
... CR2025 may explode if mistreated. WARNING Battery may cause a fire or explosion. Keep the lithium battery out of the reach of the remote shortens as the battery becomes exhausted. Changing the battery The working distance of children. When the remote no longer operates the unit, replace the battery with the "+" facing up, then insert the battery holder into the slot. + facing up...

Operating Instructions
Page 13
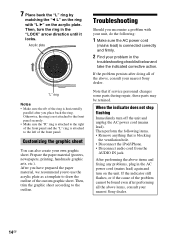
... the unit with the front panel facing up. 4 Replace the graphic sheet you want by matching the "R B" on the acrylic plate. Then, turn the ring in the "LOCK" arrow direction until it with "b R" on the ring with the guide. Guide Graphic sheet Guide Guide 2 Turn the "R" ring counterclockwise by using the rib on the front panel according to detach...
... the unit with the front panel facing up. 4 Replace the graphic sheet you want by matching the "R B" on the acrylic plate. Then, turn the ring in the "LOCK" arrow direction until it with "b R" on the ring with the guide. Guide Graphic sheet Guide Guide 2 Turn the "R" ring counterclockwise by using the rib on the front panel according to detach...
Operating Instructions
Page 14
...iPod/iPhone. • Disconnect audio cord from the AUDIO IN jack. When the indicator does not stop flashing Immediately turn the ring in the "LOCK" arrow direction until it locks. If the indicator still flashes, or if the cause of the problem cannot be retained. Customizing ...do the following items. • Remove anything that if service personnel changes some parts during repair, these parts may be found even after performing all of the above items and fixing any problems, plug in the troubleshooting checklist below and take the indicated corrective action. After performing ...
...iPod/iPhone. • Disconnect audio cord from the AUDIO IN jack. When the indicator does not stop flashing Immediately turn the ring in the "LOCK" arrow direction until it locks. If the indicator still flashes, or if the cause of the problem cannot be retained. Customizing ...do the following items. • Remove anything that if service personnel changes some parts during repair, these parts may be found even after performing all of the above items and fixing any problems, plug in the troubleshooting checklist below and take the indicated corrective action. After performing ...
Operating Instructions
Page 15
...) for the supported device types. Make sure there is no sound. • Make sure you press the POWER on the back panel. • Make sure the iPod/iPhone is connected firmly. • Make sure the iPod/iPhone is playing music. • Press VOL + (or VOLUME + on the unit) repeatedly. • Depending on the contents of the iPod/ iPhone, it may take time to start playback. • You are using a portable telephone or...
...) for the supported device types. Make sure there is no sound. • Make sure you press the POWER on the back panel. • Make sure the iPod/iPhone is connected firmly. • Make sure the iPod/iPhone is playing music. • Press VOL + (or VOLUME + on the unit) repeatedly. • Depending on the contents of the iPod/ iPhone, it may take time to start playback. • You are using a portable telephone or...
Operating Instructions
Page 16
.... if the cord plugs are connected properly. - if the cords are firmly inserted all the way. • Turn on the connected component. • Refer to the operating instructions supplied with the connected component and start playing. 16GB Precautions On safety • Completely disconnect the AC power cord (mains lead) from the wall socket (mains) if it is used for alarm. • Do...
.... if the cord plugs are connected properly. - if the cords are firmly inserted all the way. • Turn on the connected component. • Refer to the operating instructions supplied with the connected component and start playing. 16GB Precautions On safety • Completely disconnect the AC power cord (mains lead) from the wall socket (mains) if it is used for alarm. • Do...
Operating Instructions
Page 17
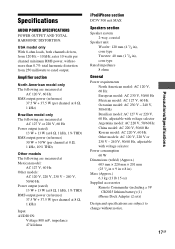
...) Supplied accessories Remote Commander (including a 3V CR2025 lithium battery) (1) iPhone Dock Adapter (2 sets) Design and specifications are measured at Mexican model: AC 127 V, 60 Hz Other models: AC 120 V, 220 V, 230 V - 240 V, 50/60 Hz Power output (rated) 13 W + 13 W (at 8 :, 1 kHz, 1% THD) RMS output power (reference) 37.5 W + 37.5 W (per channel at 8 :, 1 kHz) Input AUDIO IN: Voltage 800 mV, impedance 47 kilohms iPod/iPhone section DC5V 500 mA MAX Speakers section Speaker...
...) Supplied accessories Remote Commander (including a 3V CR2025 lithium battery) (1) iPhone Dock Adapter (2 sets) Design and specifications are measured at Mexican model: AC 127 V, 60 Hz Other models: AC 120 V, 220 V, 230 V - 240 V, 50/60 Hz Power output (rated) 13 W + 13 W (at 8 :, 1 kHz, 1% THD) RMS output power (reference) 37.5 W + 37.5 W (per channel at 8 :, 1 kHz) Input AUDIO IN: Voltage 800 mV, impedance 47 kilohms iPod/iPhone section DC5V 500 mA MAX Speakers section Speaker...
Operating Instructions
Page 19
... developer to meet Apple performance standards. • Apple is not responsible for the operation of this device or its compliance with your iPod/iPhone. Compatible iPod/iPhone models with this unit Notes • This product has been designed specifically to work with iPod/iPhone and has been certified to meet Apple performance standards. • Use a Dock Adapter supplied with safety and regulatory standards. 19GB
... developer to meet Apple performance standards. • Apple is not responsible for the operation of this device or its compliance with your iPod/iPhone. Compatible iPod/iPhone models with this unit Notes • This product has been designed specifically to work with iPod/iPhone and has been certified to meet Apple performance standards. • Use a Dock Adapter supplied with safety and regulatory standards. 19GB
Marketing Specifications
Page 1
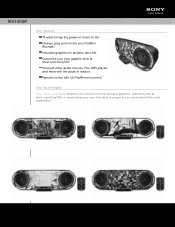
Customize your own graphic skins at Skinit.com/SonyTRiK3 Connect other audio sources, PCs, MP3 players and more with full iPod® menu control.2 Key Technologies Your dock, your taste Whether you (customized Skins sold separately).3 RDH-SK8iP Key Features 75 watts brings the power of music to life.1 Charge, play and control your own, this dock is unique to you choose from the included graphics, customized art at SkinIt.com/SonyTRiK, or simply draw your iPod® or iPhone®.2 Included graphics for anytime face lifts. Remote control with the audio-in feature.
Customize your own graphic skins at Skinit.com/SonyTRiK3 Connect other audio sources, PCs, MP3 players and more with full iPod® menu control.2 Key Technologies Your dock, your taste Whether you (customized Skins sold separately).3 RDH-SK8iP Key Features 75 watts brings the power of music to life.1 Charge, play and control your own, this dock is unique to you choose from the included graphics, customized art at SkinIt.com/SonyTRiK, or simply draw your iPod® or iPhone®.2 Included graphics for anytime face lifts. Remote control with the audio-in feature.
Marketing Specifications
Page 2
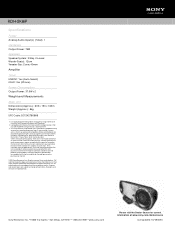
... Sony. RDH-SK8iP Specifications Power Analog Audio Input(s) (Total): 1 Hardware Output Power: 75W Speakers Speaker System: 2 Way, Co-axial Woofer Size(s): 12cm Tweeter Size: Cone, 40mm Amplifier Tuner LINE IN1: Yes (Auto Select) iPod1: Yes (iPhone) Power Consumption Output Power: 37.5W x 2 Weight and Measurements Main Unit Dimensions (Approx.): 605 x 190 x 165m Weight (Approx.): 8kg UPC Code: 027242780866 1 - Features and specifications are subject to 10 kHz with iPod touch®, iPod...
... Sony. RDH-SK8iP Specifications Power Analog Audio Input(s) (Total): 1 Hardware Output Power: 75W Speakers Speaker System: 2 Way, Co-axial Woofer Size(s): 12cm Tweeter Size: Cone, 40mm Amplifier Tuner LINE IN1: Yes (Auto Select) iPod1: Yes (iPhone) Power Consumption Output Power: 37.5W x 2 Weight and Measurements Main Unit Dimensions (Approx.): 605 x 190 x 165m Weight (Approx.): 8kg UPC Code: 027242780866 1 - Features and specifications are subject to 10 kHz with iPod touch®, iPod...


