
Primary User Manual
Page 2
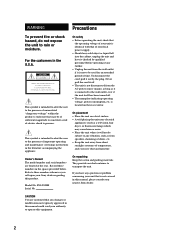
...where it is located on the rear exterior. PS-LX350H Serial No. This symbol is not covered in the literature accompanying the appliance. Model No. If you call upon your nearest Sony dealer. To disconnect the cord, pull it out by qualified personnel before operating it any vibration,...electric shock to constitute a risk of time. They provide an ideal container to rain or moisture. Refer to the presence of temperature, and excessive dust and moisture. On placement • Place the unit on a level surface. • Avoid placing the unit near electrical appliances (such as it...
...where it is located on the rear exterior. PS-LX350H Serial No. This symbol is not covered in the literature accompanying the appliance. Model No. If you call upon your nearest Sony dealer. To disconnect the cord, pull it out by qualified personnel before operating it any vibration,...electric shock to constitute a risk of time. They provide an ideal container to rain or moisture. Refer to the presence of temperature, and excessive dust and moisture. On placement • Place the unit on a level surface. • Avoid placing the unit near electrical appliances (such as it...

Primary User Manual
Page 3
... Playing a Record 7 Additional Information Maintenance 8 Troubleshooting 9 Specifications 9 Parts and Controls 10 Unpacking Check that you for purchasing the Sony Stereo Turntable System. Convention The following items with your turntable: • Platter (with drive belt) (1) • Rubber mat (1) • Dust cover (with hinges) (1) • Counter weight (1) • Cartridge and headshell (1) • 45 r/min adaptor (1) • Audio connecting cord...
... Playing a Record 7 Additional Information Maintenance 8 Troubleshooting 9 Specifications 9 Parts and Controls 10 Unpacking Check that you for purchasing the Sony Stereo Turntable System. Convention The following items with your turntable: • Platter (with drive belt) (1) • Rubber mat (1) • Dust cover (with hinges) (1) • Counter weight (1) • Cartridge and headshell (1) • 45 r/min adaptor (1) • Audio connecting cord...
Primary User Manual
Page 4
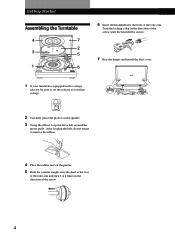
... spindle. 3 Using the ribbon, loop the drive belt around the motor pully. After looping the belt, do not forget to your turntable is secure. 7 Rise the hinges and install the dust cover. 1 If your line voltage. 110V·120V 220V·240V 2 Carefully, place the platter on the platter. 5 Slide the counter weight...
... spindle. 3 Using the ribbon, loop the drive belt around the motor pully. After looping the belt, do not forget to your turntable is secure. 7 Rise the hinges and install the dust cover. 1 If your line voltage. 110V·120V 220V·240V 2 Carefully, place the platter on the platter. 5 Slide the counter weight...

Primary User Manual
Page 8
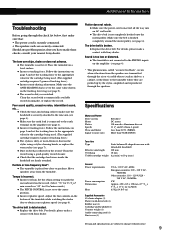
... or thinner, since they will damage the finish. Shell terminals Cleaning the Cabinet and Dust Cover Clean the cabinet and dust cover periodically using a good quality stylus cleaning brush. Do not use a cloth moistened with...stylus by pulling on the lead terminals with a soft cloth, and reattach the shell to your Sony dealer. 3 Check the location and polarity of each of the lead wires on the new ...not clean the stylus with a mild detergent solution. To replace the stylus 1 Turn off the turntable and amplifier. 2 Turn the locking collar and remove the cartridge from the tone arm. 3...
... or thinner, since they will damage the finish. Shell terminals Cleaning the Cabinet and Dust Cover Clean the cabinet and dust cover periodically using a good quality stylus cleaning brush. Do not use a cloth moistened with...stylus by pulling on the lead terminals with a soft cloth, and reattach the shell to your Sony dealer. 3 Check the location and polarity of each of the lead wires on the new ...not clean the stylus with a mild detergent solution. To replace the stylus 1 Turn off the turntable and amplifier. 2 Turn the locking collar and remove the cartridge from the tone arm. 3...
Primary User Manual
Page 9
... make a contact with drive belt) (1) Rubber mat (1) Cartridge and headshell (1) Counter weight (1) Audio connecting cord (1) Dust cover (1) Design and specifications are firmly attached. b The turntable is not connected to the PHONO inputs on page 5 and set to the earth terminal on the tracking force ring (.... b The record is deteriorated. Clean the record with Sony dealer. b The turntable is placed too close to noise ratio Belt-drive DC motor 330 mm dia. Specifications Motor and Platter Drive system Motor Platter Speeds Wow and flutter Signal to speakers. Additional...
... make a contact with drive belt) (1) Rubber mat (1) Cartridge and headshell (1) Counter weight (1) Audio connecting cord (1) Dust cover (1) Design and specifications are firmly attached. b The turntable is not connected to the PHONO inputs on page 5 and set to the earth terminal on the tracking force ring (.... b The record is deteriorated. Clean the record with Sony dealer. b The turntable is placed too close to noise ratio Belt-drive DC motor 330 mm dia. Specifications Motor and Platter Drive system Motor Platter Speeds Wow and flutter Signal to speakers. Additional...
Primary User Manual
Page 10
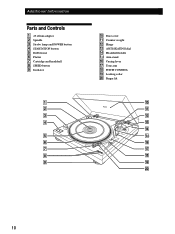
Additional Information Parts and Controls 1 45 r/min adaptor 2 Spindle 3 Strobo lamp and POWER button 4 START/STOP button 5 Rubber mat 6 Platter 7 Cartridge and headshell 8 SPEED button 9 Insulator 1 2 3 4 5 6 7 8 9 !º Dust cover !¡ Counter weight !™ Hinge !£ ANTI-SKATING dial !¢ Headshell holder !∞ Arm stand !§ Cueing lever !¶ Tone arm !• PITCH CONTROL !ª Locking collar @º Finger lift 10
Additional Information Parts and Controls 1 45 r/min adaptor 2 Spindle 3 Strobo lamp and POWER button 4 START/STOP button 5 Rubber mat 6 Platter 7 Cartridge and headshell 8 SPEED button 9 Insulator 1 2 3 4 5 6 7 8 9 !º Dust cover !¡ Counter weight !™ Hinge !£ ANTI-SKATING dial !¢ Headshell holder !∞ Arm stand !§ Cueing lever !¶ Tone arm !• PITCH CONTROL !ª Locking collar @º Finger lift 10