
Primary User Manual
Page 3
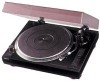
... easier. Before operating the unit, please read this manual: z Indicates hints and tips for purchasing the Sony Stereo Turntable System. Welcome! Convention The following items with your turntable: • Platter (with drive belt) (1) • Rubber mat (1) • Dust cover (with hinges) (1) • Counter weight (1) • Cartridge and headshell (1) • 45 r/min adaptor (1) • Audio connecting cord (1) 3
... easier. Before operating the unit, please read this manual: z Indicates hints and tips for purchasing the Sony Stereo Turntable System. Welcome! Convention The following items with your turntable: • Platter (with drive belt) (1) • Rubber mat (1) • Dust cover (with hinges) (1) • Counter weight (1) • Cartridge and headshell (1) • 45 r/min adaptor (1) • Audio connecting cord (1) 3
Primary User Manual
Page 6
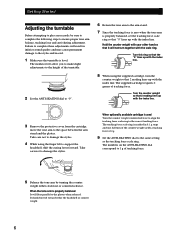
Hold the counter weight with your other hand so that 2 reading lines up with the index line. The supplied cartridge requires 2 grams of the turntable. 2 Set the ANTI-SKATING dial to insure proper tone arm balance, tracking force and anti-skating adjustment. Take care not to damage ...the stylus. 4 While using the supplied cartridge, turn the counter weight so that it will float parallel to the correct tracking ...
Hold the counter weight with your other hand so that 2 reading lines up with the index line. The supplied cartridge requires 2 grams of the turntable. 2 Set the ANTI-SKATING dial to insure proper tone arm balance, tracking force and anti-skating adjustment. Take care not to damage ...the stylus. 4 While using the supplied cartridge, turn the counter weight so that it will float parallel to the correct tracking ...
Primary User Manual
Page 7
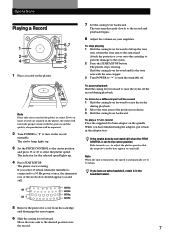
...The indicator for the selected speed lights up the tone arm, return the tone arm to the arm stand. Attach the protective cover onto the cartridge to prevent damage to the desired position over the record. 7 To play a 17-cm record Place the supplied 45 r/min adaptor on your...Turn POWER to "1" to raise the stylus off . Operations Playing a Record 1 2 4 1 Place a record on the platter. 6,7 5 3 6 3 5 Note Place only one record on the record turntable. The strobo lamp lights up. 3 Set the PITCH CONTROL to the center position and press 33 or 45 to stand still. If two or more...
...The indicator for the selected speed lights up the tone arm, return the tone arm to the arm stand. Attach the protective cover onto the cartridge to prevent damage to the desired position over the record. 7 To play a 17-cm record Place the supplied 45 r/min adaptor on your...Turn POWER to "1" to raise the stylus off . Operations Playing a Record 1 2 4 1 Place a record on the platter. 6,7 5 3 6 3 5 Note Place only one record on the record turntable. The strobo lamp lights up. 3 Set the PITCH CONTROL to the center position and press 33 or 45 to stand still. If two or more...

Primary User Manual
Page 8
To replace the stylus 1 Turn off the turntable and amplifier. 2 Turn the locking collar and remove the cartridge from the tone arm. 3 Grasp the stylus holder and pull it away from the cartridge by pushing it into the cartridge receptacle in the slanting direction until it clicks. Remove the shell from...using a good quality record cleaner. To preserve maximum sound quality and avoid damage to your Sony dealer. 3 Check the location and polarity of each of the lead wires on the new cartridge and connect the lead wires accordingly. The terminal polarity of the terminal pins on the accessory...
To replace the stylus 1 Turn off the turntable and amplifier. 2 Turn the locking collar and remove the cartridge from the tone arm. 3 Grasp the stylus holder and pull it away from the cartridge by pushing it into the cartridge receptacle in the slanting direction until it clicks. Remove the shell from...using a good quality record cleaner. To preserve maximum sound quality and avoid damage to your Sony dealer. 3 Check the location and polarity of each of the lead wires on the new cartridge and connect the lead wires accordingly. The terminal polarity of the terminal pins on the accessory...
Primary User Manual
Page 9
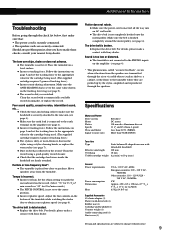
...value for the cartridge being used . (The supplied cartridge requires 2 grams of the turntable while watching the strobo dots to the same value shown on the bottom of tracking force.) b The stylus is not level. For details, please make a contact with Sony dealer. Additional ...too close to the center position. b Incorrect r/min. b Replace the drive belt. b Replace the drive belt. Specifications Motor and Platter Drive system Motor Platter Speeds Wow and flutter Signal to 10 g (max.) General Power requirements Power consumption Dimensions Mass U.S.A.: 120 V AC, 60 Hz ...
...value for the cartridge being used . (The supplied cartridge requires 2 grams of the turntable while watching the strobo dots to the same value shown on the bottom of tracking force.) b The stylus is not level. For details, please make a contact with Sony dealer. Additional ...too close to the center position. b Incorrect r/min. b Replace the drive belt. b Replace the drive belt. Specifications Motor and Platter Drive system Motor Platter Speeds Wow and flutter Signal to 10 g (max.) General Power requirements Power consumption Dimensions Mass U.S.A.: 120 V AC, 60 Hz ...
Primary User Manual
Page 10
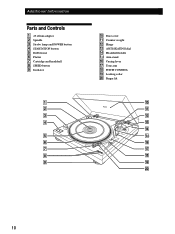
Additional Information Parts and Controls 1 45 r/min adaptor 2 Spindle 3 Strobo lamp and POWER button 4 START/STOP button 5 Rubber mat 6 Platter 7 Cartridge and headshell 8 SPEED button 9 Insulator 1 2 3 4 5 6 7 8 9 !º Dust cover !¡ Counter weight !™ Hinge !£ ANTI-SKATING dial !¢ Headshell holder !∞ Arm stand !§ Cueing lever !¶ Tone arm !• PITCH CONTROL !ª Locking collar @º Finger lift 10
Additional Information Parts and Controls 1 45 r/min adaptor 2 Spindle 3 Strobo lamp and POWER button 4 START/STOP button 5 Rubber mat 6 Platter 7 Cartridge and headshell 8 SPEED button 9 Insulator 1 2 3 4 5 6 7 8 9 !º Dust cover !¡ Counter weight !™ Hinge !£ ANTI-SKATING dial !¢ Headshell holder !∞ Arm stand !§ Cueing lever !¶ Tone arm !• PITCH CONTROL !ª Locking collar @º Finger lift 10

