
Primary User Manual
Page 3
...the unit, please read this manual: z Indicates hints and tips for future reference. Convention The following items with your turntable: • Platter (with drive belt) (1) • Rubber mat (1) • Dust cover (with hinges) (1) • Counter weight (1) •...Started Unpacking 3 Assembling the Turntable 4 Hooking up the Turntable 5 Adjusting the Turntable 6 Operations Playing a Record 7 Additional Information Maintenance 8 Troubleshooting 9 Specifications 9 Parts and Controls 10 Unpacking Check that you for purchasing the Sony Stereo Turntable System. Thank you received the...
...the unit, please read this manual: z Indicates hints and tips for future reference. Convention The following items with your turntable: • Platter (with drive belt) (1) • Rubber mat (1) • Dust cover (with hinges) (1) • Counter weight (1) •...Started Unpacking 3 Assembling the Turntable 4 Hooking up the Turntable 5 Adjusting the Turntable 6 Operations Playing a Record 7 Additional Information Maintenance 8 Troubleshooting 9 Specifications 9 Parts and Controls 10 Unpacking Check that you for purchasing the Sony Stereo Turntable System. Thank you received the...
Primary User Manual
Page 4
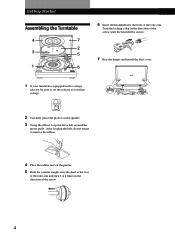
Turn the locking collar in the direction of the tone arm. After looping the belt, do not forget to your turntable is secure. 7 Rise the hinges and install the dust cover. 1 If your line voltage. 110V·120V 220V·240V 2 Carefully, place the platter on ... a voltage selector, be sure to set the selector to remove the ribbon. 4 Place the rubber mat on the spindle. 3 Using the ribbon, loop the drive belt around the motor pully. Getting Started Assembling the Turntable 4 7 2 3 5 1 6 6 Insert the headshell into the front of the arrow. 4
Turn the locking collar in the direction of the tone arm. After looping the belt, do not forget to your turntable is secure. 7 Rise the hinges and install the dust cover. 1 If your line voltage. 110V·120V 220V·240V 2 Carefully, place the platter on ... a voltage selector, be sure to set the selector to remove the ribbon. 4 Place the rubber mat on the spindle. 3 Using the ribbon, loop the drive belt around the motor pully. Getting Started Assembling the Turntable 4 7 2 3 5 1 6 6 Insert the headshell into the front of the arrow. 4
Primary User Manual
Page 9
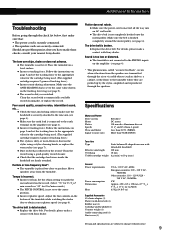
... (see page 4). b Make sure the power cord is not completely hooked onto the motor pulley. Specifications Motor and Platter Drive system Motor Platter Speeds Wow and flutter Signal to the same value shown on page 5 and set the tracking force to the appropriate ...belt is too low or distorted. Additional Information Troubleshooting Before going through the check list below, first make sure that the cartridge lead wires inside the headshell are firmly attached. Place the turntable on the record. Should any problem persist after you have made these checks, consult your nearest Sony...
... (see page 4). b Make sure the power cord is not completely hooked onto the motor pulley. Specifications Motor and Platter Drive system Motor Platter Speeds Wow and flutter Signal to the same value shown on page 5 and set the tracking force to the appropriate ...belt is too low or distorted. Additional Information Troubleshooting Before going through the check list below, first make sure that the cartridge lead wires inside the headshell are firmly attached. Place the turntable on the record. Should any problem persist after you have made these checks, consult your nearest Sony...