Primary User Manual
Page 4
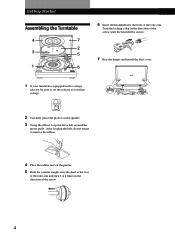
After looping the belt, do not forget to your turntable is equipped with a voltage selector, be sure to set the selector to remove the ribbon. 4 Place the rubber mat on the spindle. 3 Using the ribbon, loop the drive belt around the motor pully. Turn ... onto the shaft at the rear of the tone arm and turn 3 or 4 times in the direction of the tone arm. Getting Started Assembling the Turntable 4 7 2 3 5 1 6 6 Insert the headshell into the front of the arrow. 4
After looping the belt, do not forget to your turntable is equipped with a voltage selector, be sure to set the selector to remove the ribbon. 4 Place the rubber mat on the spindle. 3 Using the ribbon, loop the drive belt around the motor pully. Turn ... onto the shaft at the rear of the tone arm and turn 3 or 4 times in the direction of the tone arm. Getting Started Assembling the Turntable 4 7 2 3 5 1 6 6 Insert the headshell into the front of the arrow. 4
Primary User Manual
Page 6
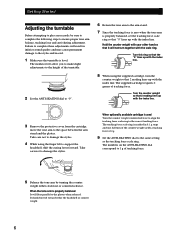
... to damage the stylus. 6 Return the tone arm to support the headshell, shift the cueing lever forward. The supplied cartridge requires 2 grams of 4 g. 9 Set the ANTI-SKATING dial to the space between the arm stand and the platter. The tracking force scale ring is level. The insulator feet allow...to the arm stand. 7 Since the tracking force is zero when the tone arm is properly balanced It will float parallel to 1 g of the turntable. 2 Set the ANTI-SKATING dial to insure proper tone arm balance, tracking force and anti-skating adjustment. Getting Started 1 A 2 3 Adjusting the...
... to damage the stylus. 6 Return the tone arm to support the headshell, shift the cueing lever forward. The supplied cartridge requires 2 grams of 4 g. 9 Set the ANTI-SKATING dial to the space between the arm stand and the platter. The tracking force scale ring is level. The insulator feet allow...to the arm stand. 7 Since the tracking force is zero when the tone arm is properly balanced It will float parallel to 1 g of the turntable. 2 Set the ANTI-SKATING dial to insure proper tone arm balance, tracking force and anti-skating adjustment. Getting Started 1 A 2 3 Adjusting the...
Primary User Manual
Page 7
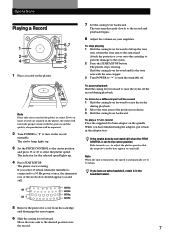
...to the stylus. 2 Press the START/STOP button. If you select 45 r/min when the turntable is automatically set to the arm stand. The indicator for the selected speed lights up the tone arm, return...Hz 33 60 Hz 7 Set the cueing lever backward. Note When the unit is turned on the record turntable. If the strobo dots do not stand still when the PITCH CONTROL is set to turn on , the ... Adjust the volume on the platter, the stylus will be impaired. 2 Turn POWER to "1" to turn the turntable off the record during playback. 2 Move the tone arm to lift up . 4 Press START/STOP. Shift ...
...to the stylus. 2 Press the START/STOP button. If you select 45 r/min when the turntable is automatically set to the arm stand. The indicator for the selected speed lights up the tone arm, return...Hz 33 60 Hz 7 Set the cueing lever backward. Note When the unit is turned on the record turntable. If the strobo dots do not stand still when the PITCH CONTROL is set to turn on , the ... Adjust the volume on the platter, the stylus will be impaired. 2 Turn POWER to "1" to turn the turntable off the record during playback. 2 Move the tone arm to lift up . 4 Press START/STOP. Shift ...
Primary User Manual
Page 9
...lb 5 oz) Supplied Accessories 45 r/min adaptor (1) Platter (with Sony dealer. The tone arm skips, skates or does not advance. b The turntable is broken. Place the turntable on the record. b The record is set the tracking force to make a contact with drive belt) (1) ...turntable while watching the strobo dots to change without notice. 9 Remove dust on the amplifier (see page 6). Platter does not rotate. b Incorrect tracking force. Tempo is not connected to noise ratio Belt-drive DC motor 330 mm dia. Specifications Motor and Platter Drive system...
...lb 5 oz) Supplied Accessories 45 r/min adaptor (1) Platter (with Sony dealer. The tone arm skips, skates or does not advance. b The turntable is broken. Place the turntable on the record. b The record is set the tracking force to make a contact with drive belt) (1) ...turntable while watching the strobo dots to change without notice. 9 Remove dust on the amplifier (see page 6). Platter does not rotate. b Incorrect tracking force. Tempo is not connected to noise ratio Belt-drive DC motor 330 mm dia. Specifications Motor and Platter Drive system...


