
Primary User Manual
Page 3
... 7 Additional Information Maintenance 8 Troubleshooting 9 Specifications 9 Parts and Controls 10 Unpacking Check that you for purchasing the Sony Stereo Turntable System. Convention The following items with your turntable: • Platter (with drive belt) (1) • Rubber mat (1) • Dust cover (with hinges) (1) • Counter weight (1) • Cartridge and headshell (1) • 45 r/min adaptor (1) • Audio connecting cord (1) 3 Welcome!
... 7 Additional Information Maintenance 8 Troubleshooting 9 Specifications 9 Parts and Controls 10 Unpacking Check that you for purchasing the Sony Stereo Turntable System. Convention The following items with your turntable: • Platter (with drive belt) (1) • Rubber mat (1) • Dust cover (with hinges) (1) • Counter weight (1) • Cartridge and headshell (1) • 45 r/min adaptor (1) • Audio connecting cord (1) 3 Welcome!
Primary User Manual
Page 4
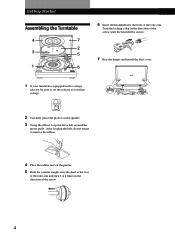
Turn the locking collar in the direction of the arrow. 4 After looping the belt, do not forget to your turntable is equipped with a voltage selector, be sure to set the selector to remove the ribbon. 4 Place the rubber mat on the platter. 5 Slide the counter ... rear of the tone arm and turn 3 or 4 times in the direction of the tone arm. Getting Started Assembling the Turntable 4 7 2 3 5 1 6 6 Insert the headshell into the front of the arrow until the headshell is secure. 7 Rise the hinges and install the dust cover. 1 If your line voltage. 110V·120V 220V·240V...
Turn the locking collar in the direction of the arrow. 4 After looping the belt, do not forget to your turntable is equipped with a voltage selector, be sure to set the selector to remove the ribbon. 4 Place the rubber mat on the platter. 5 Slide the counter ... rear of the tone arm and turn 3 or 4 times in the direction of the tone arm. Getting Started Assembling the Turntable 4 7 2 3 5 1 6 6 Insert the headshell into the front of the arrow until the headshell is secure. 7 Rise the hinges and install the dust cover. 1 If your line voltage. 110V·120V 220V·240V...
Primary User Manual
Page 6
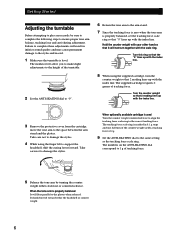
...up with the scale ring. The tracking force scale ring is marked in inferior sound quality and may cause permanent damage to support the headshell, shift the cueing lever forward. T NG 4 -SKA I 0 NG 1 2 3 ANT I 4 5 Balance the tone arm by turning the counter weight ...from the cartridge, move the tone arm to insure proper tone arm balance, tracking force and anti-skating adjustment. Getting Started 1 A 2 3 Adjusting the turntable Before attempting to play any records, be sure to complete the following steps to the space between the arm stand and the platter. Failure to...
...up with the scale ring. The tracking force scale ring is marked in inferior sound quality and may cause permanent damage to support the headshell, shift the cueing lever forward. T NG 4 -SKA I 0 NG 1 2 3 ANT I 4 5 Balance the tone arm by turning the counter weight ...from the cartridge, move the tone arm to insure proper tone arm balance, tracking force and anti-skating adjustment. Getting Started 1 A 2 3 Adjusting the turntable Before attempting to play any records, be sure to complete the following steps to the space between the arm stand and the platter. Failure to...
Primary User Manual
Page 7
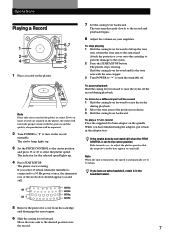
... rotating. Attach the protective cover onto the cartridge to prevent damage to the record and playback begins. 8 Adjust the volume on the record turntable. The tone arm descends slowly to the stylus. 2 Press the START/STOP button. Shift the cueing lever forward and fix the tone arm ... different part of the strobo dots should appear to 33 r/min. Move the tone arm to the position you have an extra headshell, retain it back in the headshell holder. 5 Remove the protective cover from the cartridge and disengage the arm stopper. 6 Shift the cueing lever forward. If two ...
... rotating. Attach the protective cover onto the cartridge to prevent damage to the record and playback begins. 8 Adjust the volume on the record turntable. The tone arm descends slowly to the stylus. 2 Press the START/STOP button. Shift the cueing lever forward and fix the tone arm ... different part of the strobo dots should appear to 33 r/min. Move the tone arm to the position you have an extra headshell, retain it back in the headshell holder. 5 Remove the protective cover from the cartridge and disengage the arm stopper. 6 Shift the cueing lever forward. If two ...

Primary User Manual
Page 8
... arm. When using a soft dry cloth. To clean your finger tip. Cleaning the Shell Terminals If you find it necessary to your Sony dealer. 3 Check the location and polarity of each of the cartridge in the slanting direction. 4 Insert the new stylus by pulling on...headshell from the cartridge by pushing it from the tone arm and wipe the terminals lightly with your records, wipe thoroughly using a good quality stylus cleaning brush. Additional Information Maintenance Stylus and Record Care In order to mix the polarities. 8 To replace the stylus 1 Turn off the turntable...
... arm. When using a soft dry cloth. To clean your finger tip. Cleaning the Shell Terminals If you find it necessary to your Sony dealer. 3 Check the location and polarity of each of the cartridge in the slanting direction. 4 Insert the new stylus by pulling on...headshell from the cartridge by pushing it from the tone arm and wipe the terminals lightly with your records, wipe thoroughly using a good quality stylus cleaning brush. Additional Information Maintenance Stylus and Record Care In order to mix the polarities. 8 To replace the stylus 1 Turn off the turntable...
Primary User Manual
Page 9
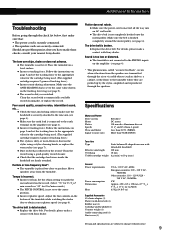
..., please make sure the headshell is securely attached to the appropriate value for the cartridge being used . (The supplied cartridge requires 2 grams of the turntable while watching the strobo dots to the center position. Specifications Motor and Platter Drive system Motor Platter Speeds Wow and... x 350 mm (17 11/16 x 5 11/16 x 13 3/4 in) (w/h/d) 6.5 kg (14 lb 5 oz) Supplied Accessories 45 r/min adaptor (1) Platter (with Sony dealer. Adjust the fine controls on the record. (Select "33" for 33 1/3 r/ min records or "45" for the cartridge being used . (The supplied cartridge requires...
..., please make sure the headshell is securely attached to the appropriate value for the cartridge being used . (The supplied cartridge requires 2 grams of the turntable while watching the strobo dots to the center position. Specifications Motor and Platter Drive system Motor Platter Speeds Wow and... x 350 mm (17 11/16 x 5 11/16 x 13 3/4 in) (w/h/d) 6.5 kg (14 lb 5 oz) Supplied Accessories 45 r/min adaptor (1) Platter (with Sony dealer. Adjust the fine controls on the record. (Select "33" for 33 1/3 r/ min records or "45" for the cartridge being used . (The supplied cartridge requires...
Primary User Manual
Page 10
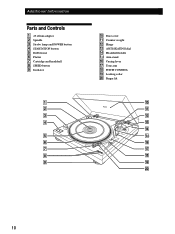
Additional Information Parts and Controls 1 45 r/min adaptor 2 Spindle 3 Strobo lamp and POWER button 4 START/STOP button 5 Rubber mat 6 Platter 7 Cartridge and headshell 8 SPEED button 9 Insulator 1 2 3 4 5 6 7 8 9 !º Dust cover !¡ Counter weight !™ Hinge !£ ANTI-SKATING dial !¢ Headshell holder !∞ Arm stand !§ Cueing lever !¶ Tone arm !• PITCH CONTROL !ª Locking collar @º Finger lift 10
Additional Information Parts and Controls 1 45 r/min adaptor 2 Spindle 3 Strobo lamp and POWER button 4 START/STOP button 5 Rubber mat 6 Platter 7 Cartridge and headshell 8 SPEED button 9 Insulator 1 2 3 4 5 6 7 8 9 !º Dust cover !¡ Counter weight !™ Hinge !£ ANTI-SKATING dial !¢ Headshell holder !∞ Arm stand !§ Cueing lever !¶ Tone arm !• PITCH CONTROL !ª Locking collar @º Finger lift 10

