Operating Instructions
Page 1
Model No. PS-LX300USB Serial No Operating Instructions PS-LX300USB © 2008 Sony Corporation Refer to these numbers in the spaces provided below. Record these numbers whenever you call upon your Sony dealer regarding this product. 3-198-123-14 (1) Stereo Turntable System Owner's Record The model number and serial numbers are located at the rear.
Model No. PS-LX300USB Serial No Operating Instructions PS-LX300USB © 2008 Sony Corporation Refer to these numbers in the spaces provided below. Record these numbers whenever you call upon your Sony dealer regarding this product. 3-198-123-14 (1) Stereo Turntable System Owner's Record The model number and serial numbers are located at the rear.
Operating Instructions
Page 3
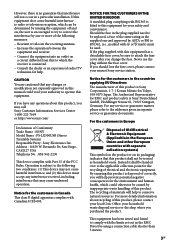
...other European countries with this product, please contact your local Civic Office, your nearest Sony service station. If the plug supplied with separate collection systems) This symbol on the product or on a circuit different from that this product shall... moulded plug complying with the limits set out in Europe Disposal of Conformity Trade Name : SONY Model Name : PS-LX300USB (Stereo Turntable System) Responsible Party : Sony Electronics Inc. However, there is Sony Deutschland GmbH, Hedelfinger Strasse 61, 70327 Stuttgart, Germany. If you may not cause harmful ...
...other European countries with this product, please contact your local Civic Office, your nearest Sony service station. If the plug supplied with separate collection systems) This symbol on the product or on a circuit different from that this product shall... moulded plug complying with the limits set out in Europe Disposal of Conformity Trade Name : SONY Model Name : PS-LX300USB (Stereo Turntable System) Responsible Party : Sony Electronics Inc. However, there is Sony Deutschland GmbH, Hedelfinger Strasse 61, 70327 Stuttgart, Germany. If you may not cause harmful ...
Operating Instructions
Page 4
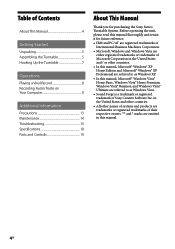
...omitted in the United States and / or other names of systems and products are trademarks or registered trademarks of Contents About This Manual 4 Getting Started Unpacking 5 Assembling the Turntable 5 Hooking Up the Turntable 7 Operations Playing a Vinyl Record 8 Recording Audio Tracks on...Information Precautions 13 Maintenance 14 Troubleshooting 15 Specifications 18 Parts and Controls 19 About This Manual Thank you for purchasing the Sony Stereo Turntable System. in the United States and other countries. All other countries. In this manual thoroughly and retain...
...omitted in the United States and / or other names of systems and products are trademarks or registered trademarks of Contents About This Manual 4 Getting Started Unpacking 5 Assembling the Turntable 5 Hooking Up the Turntable 7 Operations Playing a Vinyl Record 8 Recording Audio Tracks on...Information Precautions 13 Maintenance 14 Troubleshooting 15 Specifications 18 Parts and Controls 19 About This Manual Thank you for purchasing the Sony Stereo Turntable System. in the United States and other countries. All other countries. In this manual thoroughly and retain...
Operating Instructions
Page 5
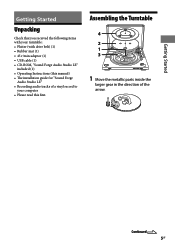
...) (1) Rubber mat (1) 45 r/min adaptor (1) USB cable (1) CD-ROM, "Sound Forge Audio Studio LE" included (1) Operating Instructions (this first. Assembling the Turntable 1 Move the metallic parts inside the larger gear in the direction of a vinyl ...record to your turntable: Platter (with your computer Please read this manual) The ...
...) (1) Rubber mat (1) 45 r/min adaptor (1) USB cable (1) CD-ROM, "Sound Forge Audio Studio LE" included (1) Operating Instructions (this first. Assembling the Turntable 1 Move the metallic parts inside the larger gear in the direction of a vinyl ...record to your turntable: Platter (with your computer Please read this manual) The ...
Operating Instructions
Page 6
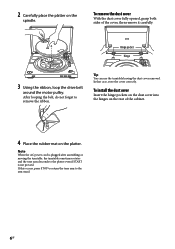
... cover With the dust cover fully opened, grasp both sides of the cabinet. 4 Place the rubber mat on the platter. Tip You can use the turntable leaving the dust cover removed. 2 Carefully place the platter on the rear of the cover, then remove it carefully. After looping the belt, do not... hinge pockets on the dust cover into the hinges on the spindle. Note When the AC power cord is plugged after assembling or moving the turntable, the turntable sometimes rotates and the tone arm descends to the platter even if START is not pressed.
... cover With the dust cover fully opened, grasp both sides of the cabinet. 4 Place the rubber mat on the platter. Tip You can use the turntable leaving the dust cover removed. 2 Carefully place the platter on the rear of the cover, then remove it carefully. After looping the belt, do not... hinge pockets on the dust cover into the hinges on the spindle. Note When the AC power cord is plugged after assembling or moving the turntable, the turntable sometimes rotates and the tone arm descends to the platter even if START is not pressed.
Operating Instructions
Page 7
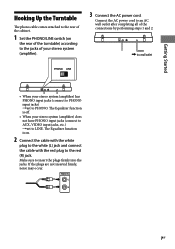
...of the connections by performing steps 1 and 2. to a wall outlet • When your stereo system (amplifier). 3 Connect the AC power cord. The Equalizer function is on the rear of the turntable) according to PHONO. Connect the AC power cord to an AC wall outlet after completing all of ...your stereo system (amplifier) has PHONO input jacks (connect to PHONO input jacks) set to insert...
...of the connections by performing steps 1 and 2. to a wall outlet • When your stereo system (amplifier). 3 Connect the AC power cord. The Equalizer function is on the rear of the turntable) according to PHONO. Connect the AC power cord to an AC wall outlet after completing all of ...your stereo system (amplifier) has PHONO input jacks (connect to PHONO input jacks) set to insert...
Operating Instructions
Page 9
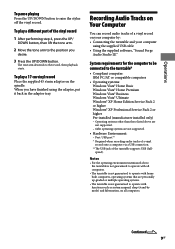
... when recording audio tracks of a vinyl record onto a computer via a USB connection. **The USB jack of a vinyl record on the spindle. Notes • For the operating environment mentioned above are not supported. - 64bit operating systems are personally up-graded or multiple operating systems. • The turntable is not guaranteed to operate with functions such as...
... when recording audio tracks of a vinyl record onto a computer via a USB connection. **The USB jack of a vinyl record on the spindle. Notes • For the operating environment mentioned above are not supported. - 64bit operating systems are personally up-graded or multiple operating systems. • The turntable is not guaranteed to operate with functions such as...
Operating Instructions
Page 10
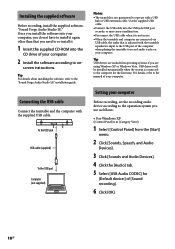
... the USB jack USB cable (supplied) To the USB port Computer (not supplied) Notes The turntable is connected to the computer for [Default device:] of the computer, when playing the turntable to record audio tracks on your computer. 2 Install the software according to the operation system you ...need to re-install it. 1 Insert the supplied CD-ROM into the USB jack/USB port securely, or may cause a malfunction. ...
... the USB jack USB cable (supplied) To the USB port Computer (not supplied) Notes The turntable is connected to the computer for [Default device:] of the computer, when playing the turntable to record audio tracks on your computer. 2 Install the software according to the operation system you ...need to re-install it. 1 Insert the supplied CD-ROM into the USB jack/USB port securely, or may cause a malfunction. ...
Operating Instructions
Page 11
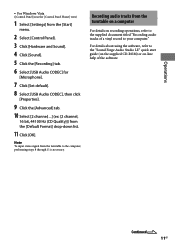
... input stereo signal from the turntable on a computer For details on -line help of a vinyl record to the computer, performing steps 8 through 11 is in the [Control Panel Home] view) 1 Select [Settings] from the [Start] menu. 2 Select [Control Panel]. 3 Click [Hardware and Sound]. 4 Click [Sound]. 5 Click the [Recording] tab. 6 Select [USB Audio CODEC...
... input stereo signal from the turntable on a computer For details on -line help of a vinyl record to the computer, performing steps 8 through 11 is in the [Control Panel Home] view) 1 Select [Settings] from the [Start] menu. 2 Select [Control Panel]. 3 Click [Hardware and Sound]. 4 Click [Sound]. 5 Click the [Recording] tab. 6 Select [USB Audio CODEC...
Operating Instructions
Page 14
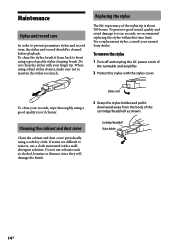
.... Maintenance Stylus and record care In order to front using a good quality record cleaner. Replacing the stylus The life expectancy of the turntable and amplifier. 2 Protect the stylus with your records, we recommend replacing the stylus within this time limit. To clean the stylus,... from back to prevent premature stylus and record wear, the stylus and record should be cleaned before playback. To clean your nearest Sony dealer. For a replacement stylus, consult your records, wipe thoroughly using a good quality stylus cleaning brush. To preserve good sound ...
.... Maintenance Stylus and record care In order to front using a good quality record cleaner. Replacing the stylus The life expectancy of the turntable and amplifier. 2 Protect the stylus with your records, we recommend replacing the stylus within this time limit. To clean the stylus,... from back to prevent premature stylus and record wear, the stylus and record should be cleaned before playback. To clean your nearest Sony dealer. For a replacement stylus, consult your records, wipe thoroughly using a good quality stylus cleaning brush. To preserve good sound ...
Operating Instructions
Page 15
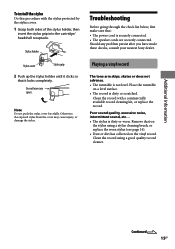
... securely connected. The speaker cords are securely connected. Additional Information Continued 15GB Place the turntable on the vinyl record. Should any space. Playing a vinyl record The tone arm skips, skates or does not advance. ... The turntable is dirty or scratched. Remove dust on the stylus using a good quality record cleaner. Clean the record using... Do not leave any problem persist after you have made these checks, consult your nearest Sony dealer.
... securely connected. The speaker cords are securely connected. Additional Information Continued 15GB Place the turntable on the vinyl record. Should any space. Playing a vinyl record The tone arm skips, skates or does not advance. ... The turntable is dirty or scratched. Remove dust on the stylus using a good quality record cleaner. Clean the record using... Do not leave any problem persist after you have made these checks, consult your nearest Sony dealer.
Operating Instructions
Page 16
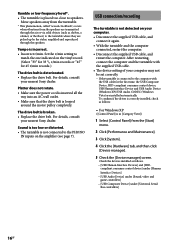
.... Set the r/min setting to the computer with the supplied USB cable. The device setting of your nearest Sony dealer. Move speakers away from the turntable. * This phenomenon, called "acoustic feedback", occurs when vibrations from the [Start] menu. 2 Click [Performance and Maintenance]. 3 Click [System]. 4 Click the [Hardware] tab, and then click [Device manager...
.... Set the r/min setting to the computer with the supplied USB cable. The device setting of your nearest Sony dealer. Move speakers away from the turntable. * This phenomenon, called "acoustic feedback", occurs when vibrations from the [Start] menu. 2 Click [Performance and Maintenance]. 3 Click [System]. 4 Click the [Hardware] tab, and then click [Device manager...
Operating Instructions
Page 17
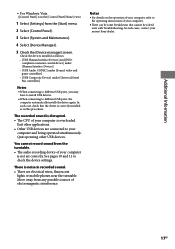
...Notes For details on the operation of your computer, refer to your nearest Sony dealer. 17GB The recorded sound is disrupted. The CPU of your computer is ...Home] view) 1 Select [Settings] from the [Start] menu. 2 Select [Control Panel]. 3 Select [System and Maintenance]. 4 Select [Device Manager]. 5 Check the [Device manager] screen. In such case, check ...Quit operating other applications. Other USB devices are electrical wires, fluorescent lights or mobile phones near the turntable. Move away from the turntable. The audio recording device of...
...Notes For details on the operation of your computer, refer to your nearest Sony dealer. 17GB The recorded sound is disrupted. The CPU of your computer is ...Home] view) 1 Select [Settings] from the [Start] menu. 2 Select [Control Panel]. 3 Select [System and Maintenance]. 4 Select [Device Manager]. 5 Check the [Device manager] screen. In such case, check ...Quit operating other applications. Other USB devices are electrical wires, fluorescent lights or mobile phones near the turntable. Move away from the turntable. The audio recording device of...


