Operating Instructions
Page 1
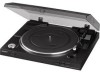
Model No. PS-LX300USB Serial No Operating Instructions PS-LX300USB © 2008 Sony Corporation Refer to these numbers in the spaces provided below. Record these numbers whenever you call upon your Sony dealer regarding this product. 3-198-123-14 (1) Stereo Turntable System Owner's Record The model number and serial numbers are located at the rear.
Model No. PS-LX300USB Serial No Operating Instructions PS-LX300USB © 2008 Sony Corporation Refer to these numbers in the spaces provided below. Record these numbers whenever you call upon your Sony dealer regarding this product. 3-198-123-14 (1) Stereo Turntable System Owner's Record The model number and serial numbers are located at the rear.
Operating Instructions
Page 3
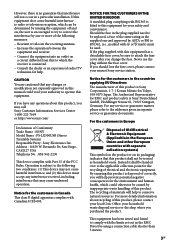
... ensuring this product is disposed of the same rating as household waste. For more of Conformity Trade Name : SONY Model Name : PS-LX300USB (Stereo Turntable System) Responsible Party : Sony Electronics Inc. If you change the fuse. If you purchased the product. Operation is subject to the following ... equipment does cause harmful interference to radio or television reception, which could void your nearest Sony service station. If the plug supplied with separate collection systems) This symbol on the product or on a circuit different from that any service or ...
... ensuring this product is disposed of the same rating as household waste. For more of Conformity Trade Name : SONY Model Name : PS-LX300USB (Stereo Turntable System) Responsible Party : Sony Electronics Inc. If you change the fuse. If you purchased the product. Operation is subject to the following ... equipment does cause harmful interference to radio or television reception, which could void your nearest Sony service station. If the plug supplied with separate collection systems) This symbol on the product or on a circuit different from that any service or ...
Operating Instructions
Page 4
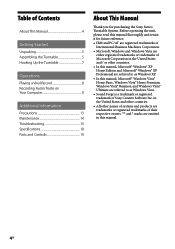
... read this manual thoroughly and retain it for purchasing the Sony Stereo Turntable System. in this manual, Microsoft® Windows Vista® Home Basic, Windows Vista® Home Premium, Windows Vista® Business, and Windows Vista® Ultimate are trademarks or registered trademarks of systems and products are referred to as Windows Vista. Sound...
... read this manual thoroughly and retain it for purchasing the Sony Stereo Turntable System. in this manual, Microsoft® Windows Vista® Home Basic, Windows Vista® Home Premium, Windows Vista® Business, and Windows Vista® Ultimate are trademarks or registered trademarks of systems and products are referred to as Windows Vista. Sound...
Operating Instructions
Page 7
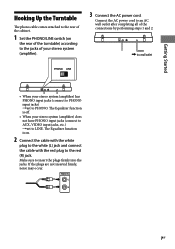
...the rear of the turntable) according to the jacks of your stereo system (amplifier). 3 Connect the AC power cord. Connect the AC power cord to an AC wall outlet after completing all of the connections by performing steps 1 and 2. to a wall outlet • When your stereo system (amplifier) does ... PHONO input jacks (connect to AUX, VIDEO input jacks, etc.) set to PHONO. The Equalizer function is off. • When your stereo system (amplifier) has PHONO input jacks (connect to PHONO input jacks) set to LINE. Make sure to insert the plugs firmly into the jacks...
...the rear of the turntable) according to the jacks of your stereo system (amplifier). 3 Connect the AC power cord. Connect the AC power cord to an AC wall outlet after completing all of the connections by performing steps 1 and 2. to a wall outlet • When your stereo system (amplifier) does ... PHONO input jacks (connect to AUX, VIDEO input jacks, etc.) set to PHONO. The Equalizer function is off. • When your stereo system (amplifier) has PHONO input jacks (connect to PHONO input jacks) set to LINE. Make sure to insert the plugs firmly into the jacks...
Operating Instructions
Page 11
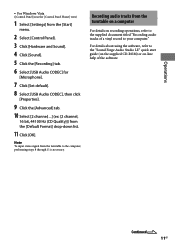
... CODEC] for [Microphone]. 7 Click [Set default]. 8 Select [USB Audio CODEC], then click [Properties]. 9 Click the [Advanced] tab. 10 Select [2 channel, ...] (ex: [2 channel, 16 bit, 44100 Hz (CD Quality)]) from the turntable to the computer, performing steps 8 through 11 is necessary. Recording audio tracks from the turntable on a computer For details on -line help... the "Sound Forge Audio Studio LE" quick start guide (on the supplied CD-ROM) or on recording operations, refer to your computer." Note To input stereo signal from the [Default Format] drop-down list. 11 Click [OK].
... CODEC] for [Microphone]. 7 Click [Set default]. 8 Select [USB Audio CODEC], then click [Properties]. 9 Click the [Advanced] tab. 10 Select [2 channel, ...] (ex: [2 channel, 16 bit, 44100 Hz (CD Quality)]) from the turntable to the computer, performing steps 8 through 11 is necessary. Recording audio tracks from the turntable on a computer For details on -line help... the "Sound Forge Audio Studio LE" quick start guide (on the supplied CD-ROM) or on recording operations, refer to your computer." Note To input stereo signal from the [Default Format] drop-down list. 11 Click [OK].


