
Operating Instructions
Page 4
... Menu Operation 24 Power Supply 26 Using a Battery Pack 26 Using AC Power (DC IN Power 27 Turning Power On 28 Turning Power Off 28 Setting the Clock 29 Adjusting the Viewfinder 30 Adjusting the Lens 33 Adjusting the Flange Focal Length 33 Replacing the Lens 34 Retrieving the Lens File...
... Menu Operation 24 Power Supply 26 Using a Battery Pack 26 Using AC Power (DC IN Power 27 Turning Power On 28 Turning Power Off 28 Setting the Clock 29 Adjusting the Viewfinder 30 Adjusting the Lens 33 Adjusting the Flange Focal Length 33 Replacing the Lens 34 Retrieving the Lens File...

Operating Instructions
Page 5
... Black Balance 53 Displaying the Markers and Zebra Patterns 53 Displaying the Markers 53 Displaying the Zebra Patterns 54 Setting the Gain 55 Recording With Fixed Gain 55 Recording in AGC Mode 56 Setting the Electronic Shutter 56 Shooting in a Fixed Shutter Mode 56 Shooting in EX Slow Shutter Mode 58 Shooting...
... Black Balance 53 Displaying the Markers and Zebra Patterns 53 Displaying the Markers 53 Displaying the Zebra Patterns 54 Setting the Gain 55 Recording With Fixed Gain 55 Recording in AGC Mode 56 Setting the Electronic Shutter 56 Shooting in a Fixed Shutter Mode 56 Shooting in EX Slow Shutter Mode 58 Shooting...

Operating Instructions
Page 6
...Mode 63 Using Macro Mode 64 Eliminating Picture Blurring (Steady Shot 64 Reducing Flickers 65 Setting the Time Data 65 Running Modes of the Timecode 65 Setting the Timecode 66 Setting the User Bits 66 Displaying the Time Data 67 Recording Audio Signals 67 Using the ...71 Changing Functions of the Assignable Buttons 72 Interval Recording 73 Preparatory Settings 73 Performing Interval Recording 73 Frame Recording 74 Preparatory Settings 74 Performing Frame Recording 75 Slow & Quick Motion Recording 76 Preparatory Settings 76 Recording in Slow & Quick Motion Mode 77 Freeze Mix: ...
...Mode 63 Using Macro Mode 64 Eliminating Picture Blurring (Steady Shot 64 Reducing Flickers 65 Setting the Time Data 65 Running Modes of the Timecode 65 Setting the Timecode 66 Setting the User Bits 66 Displaying the Time Data 67 Recording Audio Signals 67 Using the ...71 Changing Functions of the Assignable Buttons 72 Interval Recording 73 Preparatory Settings 73 Performing Interval Recording 73 Frame Recording 74 Preparatory Settings 74 Performing Frame Recording 75 Slow & Quick Motion Recording 76 Preparatory Settings 76 Recording in Slow & Quick Motion Mode 77 Freeze Mix: ...

Operating Instructions
Page 7
Resetting a Picture Profile 86 Picture Profile Items 87 Deleting Clips 91 Deleting the Last Recorded Clip 91 Deleting All Clips 91 Storing/Retrieving the Setting Data 92 Storing the Setup File 92 Retrieving the Setup File 92 Resetting to the Standard Values 92 Playback Playing Back Clips 93 Thumbnail Screen ... Camera Mode 107 In Media Mode 107 VIDEO Status Screen 108 BUTTON/REMOTE Status Screen 108 BATTERY/MEDIA Status Screen 109 Menu Configuration and Detailed Settings Overview of the Setup Menus 110 7
Resetting a Picture Profile 86 Picture Profile Items 87 Deleting Clips 91 Deleting the Last Recorded Clip 91 Deleting All Clips 91 Storing/Retrieving the Setting Data 92 Storing the Setup File 92 Retrieving the Setup File 92 Resetting to the Standard Values 92 Playback Playing Back Clips 93 Thumbnail Screen ... Camera Mode 107 In Media Mode 107 VIDEO Status Screen 108 BUTTON/REMOTE Status Screen 108 BATTERY/MEDIA Status Screen 109 Menu Configuration and Detailed Settings Overview of the Setup Menus 110 7

Operating Instructions
Page 8
Setup Menu Configuration 110 Setup Menu Layers 110 Basic Menu Operations 111 Setup Menu List 114 CAMERA SET Menu 114 AUDIO SET Menu 118 VIDEO SET Menu 119 VF SET Menu 120 TC/UB SET Menu 122 LENS Menu 122 OTHERS Menu 124 Connecting External Devices Connecting External Monitors 128 Operating Clips With a Computer 130 Connecting...
Setup Menu Configuration 110 Setup Menu Layers 110 Basic Menu Operations 111 Setup Menu List 114 CAMERA SET Menu 114 AUDIO SET Menu 118 VIDEO SET Menu 119 VF SET Menu 120 TC/UB SET Menu 122 LENS Menu 122 OTHERS Menu 124 Connecting External Devices Connecting External Monitors 128 Operating Clips With a Computer 130 Connecting...

Operating Instructions
Page 10
... (1) BP-U30 battery pack (1) BP-S30 BC-U1 battery charger (1) Infrared Remote Commander (1) It is attached to the camcorder at the factory. 1 SHOTMARK 2 T ZOOM W PUSH SET THUMBNAIL SUB CLIP PREV . PLAY/PAUSE u NEXT > FREV m FFWD M REC z REC PAUSE X STOP x PUSH AF Eyepiece (1) Eyecup (1) DC OUT CHARGE 0% BBCA-TUT1ERY 80 CHARGER 100...
... (1) BP-U30 battery pack (1) BP-S30 BC-U1 battery charger (1) Infrared Remote Commander (1) It is attached to the camcorder at the factory. 1 SHOTMARK 2 T ZOOM W PUSH SET THUMBNAIL SUB CLIP PREV . PLAY/PAUSE u NEXT > FREV m FFWD M REC z REC PAUSE X STOP x PUSH AF Eyepiece (1) Eyecup (1) DC OUT CHARGE 0% BBCA-TUT1ERY 80 CHARGER 100...

Operating Instructions
Page 12
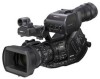
...64-frame accumulation period. The lens has versatile functions for flexible use of a conventional Sony 1/2-inch Bayonet Mount lenses, a lens adaptor is started and stopped on an empty area of Sony's legendary CineAlta1) family, though compact offers native 23.98P recording capability. Overview 1080...8226; One-push Auto Focus • MF Assist • Optical Image Stabilizer (Steady Shot) Creative Recording Modes and Settings 23.98P native recording The PMW-EX3 camcorder, a new member of the card. This is equipped with full HD resolution. 12 Features Newly developed lens mount ...
...64-frame accumulation period. The lens has versatile functions for flexible use of a conventional Sony 1/2-inch Bayonet Mount lenses, a lens adaptor is started and stopped on an empty area of Sony's legendary CineAlta1) family, though compact offers native 23.98P recording capability. Overview 1080...8226; One-push Auto Focus • MF Assist • Optical Image Stabilizer (Steady Shot) Creative Recording Modes and Settings 23.98P native recording The PMW-EX3 camcorder, a new member of the card. This is equipped with full HD resolution. 12 Features Newly developed lens mount ...

Operating Instructions
Page 13
... settings In addition to the electric shutter speed controls, the PMW-EX3 also has a "shutter angle" control, which is pressed. The operator can program start /stop operations enabled both on XDCAM EX, visit the following web sites: United States http://www.sony.com/xdcamex Canada http://www.sony....8226; Color viewfinder incorporated with a 3.5-inch color LCD inside: Flipping up customized picturetonal settings to easily call up the eyepiece, you can be operated from the RM-B750/B150 Remote Control Unit. 1) Sony, XDCAM, XDCAM EX, SxS, i.LINK, Exmor, CineAlta, and Remote Commander are ...
... settings In addition to the electric shutter speed controls, the PMW-EX3 also has a "shutter angle" control, which is pressed. The operator can program start /stop operations enabled both on XDCAM EX, visit the following web sites: United States http://www.sony.com/xdcamex Canada http://www.sony....8226; Color viewfinder incorporated with a 3.5-inch color LCD inside: Flipping up customized picturetonal settings to easily call up the eyepiece, you can be operated from the RM-B750/B150 Remote Control Unit. 1) Sony, XDCAM, XDCAM EX, SxS, i.LINK, Exmor, CineAlta, and Remote Commander are ...
Operating Instructions
Page 16
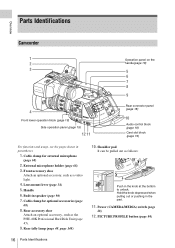
...an optional accessory, such as a video light. 4. Shoulder pad It can be pulled out as follows: AULEDVIOEL S CH-2 AUMTAONUAL EX PMW-EX3 OPEN TC OUT REMOTE MEDIA Push in speaker (page 96) 7. Lens mount lever (page 34) 5. Built-in the knob at the... + FRAMEFULL AUTO WHITE BAL ATW BARS/CAM B A PRST STATUS MENU SEL/SET CANCEL PPIRCOTFUIRLEE CAMERA OFF MEDIA SDI OUT HDV SLOT SELECT IN CAHUL-E1DVIOELCH-2ASAUUEMDTLAIOEONCUTALAUMTAAONUUDEAIINXLOT IN EXT GENLOCK IN TC IN TC OUT PMW-EX3 OPEN REMOTE Side operation panel (page 19) 12 11 Operation panel on the ...
...an optional accessory, such as a video light. 4. Shoulder pad It can be pulled out as follows: AULEDVIOEL S CH-2 AUMTAONUAL EX PMW-EX3 OPEN TC OUT REMOTE MEDIA Push in speaker (page 96) 7. Lens mount lever (page 34) 5. Built-in the knob at the... + FRAMEFULL AUTO WHITE BAL ATW BARS/CAM B A PRST STATUS MENU SEL/SET CANCEL PPIRCOTFUIRLEE CAMERA OFF MEDIA SDI OUT HDV SLOT SELECT IN CAHUL-E1DVIOELCH-2ASAUUEMDTLAIOEONCUTALAUMTAAONUUDEAIINXLOT IN EXT GENLOCK IN TC IN TC OUT PMW-EX3 OPEN REMOTE Side operation panel (page 19) 12 11 Operation panel on the ...

Operating Instructions
Page 17
... 19) 18 19 20 21 22 23 24 CONTRAST PEAKING MIRROR IMAGE ON DISPLAY/BATT INFO OFF BRIGHT ZEBRA HOLD H L OFF L MONITOR VOL THUMNAIL SEL/SET F REV j PREV l PLAY/PAUSEG/S J STOP NEXT L s SRTEACRT/STOP F FWD CANCEL R CH-1 AUDIO IN CH-2 LINE MIC MIC+48V LINE MIC MIC+48V 25 26 27...
... 19) 18 19 20 21 22 23 24 CONTRAST PEAKING MIRROR IMAGE ON DISPLAY/BATT INFO OFF BRIGHT ZEBRA HOLD H L OFF L MONITOR VOL THUMNAIL SEL/SET F REV j PREV l PLAY/PAUSEG/S J STOP NEXT L s SRTEACRT/STOP F FWD CANCEL R CH-1 AUDIO IN CH-2 LINE MIC MIC+48V LINE MIC MIC+48V 25 26 27...

Operating Instructions
Page 18
...switch (page 60) 9. It is called "the joystick" in the subsequent operating instructions. 11. Overview Operation panel on the handle L R MONITOR 1 VOL 2 THUMBNAIL SEL/SET CANCEL 9 3 F REV PLAY/PAUSE F FWD 10 4 j G/S J 11 PREV STOP NEXT 5 l s L 12 6 REC START/STOP 13 7 HOLD 14 8... H L OFF 1. F REV (fast reverse) button (page 95) 5. SEL/SET (selection/set) button (Joystick) (page 111) It functions accordingly when you move it up (forward), down (rearward), left, or right, or you push along the axis. ...
...switch (page 60) 9. It is called "the joystick" in the subsequent operating instructions. 11. Overview Operation panel on the handle L R MONITOR 1 VOL 2 THUMBNAIL SEL/SET CANCEL 9 3 F REV PLAY/PAUSE F FWD 10 4 j G/S J 11 PREV STOP NEXT 5 l s L 12 6 REC START/STOP 13 7 HOLD 14 8... H L OFF 1. F REV (fast reverse) button (page 95) 5. SEL/SET (selection/set) button (Joystick) (page 111) It functions accordingly when you move it up (forward), down (rearward), left, or right, or you push along the axis. ...

Operating Instructions
Page 19
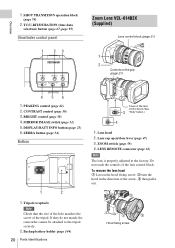
... BRT DISP HISTOGRAM ASSIGN 1 2 3 ND FILTER 2 1 GAIN - FULL AUTO FRAME + WHITE BAL BARS/CAM OFF L M ATW B A H PRST STATUS MENU SEL/SET CANCEL 11 1 2 3 4 5 6 7 8 9 10 1. ACCESS lamps (page 41) 3. SEL/SET (selection/set) dial (Jog dial) (page 111) It functions accordingly when you turn it up or down, or you push it horizontally. MENU...
... BRT DISP HISTOGRAM ASSIGN 1 2 3 ND FILTER 2 1 GAIN - FULL AUTO FRAME + WHITE BAL BARS/CAM OFF L M ATW B A H PRST STATUS MENU SEL/SET CANCEL 11 1 2 3 4 5 6 7 8 9 10 1. ACCESS lamps (page 41) 3. SEL/SET (selection/set) dial (Jog dial) (page 111) It functions accordingly when you turn it up or down, or you push it horizontally. MENU...
Operating Instructions
Page 20
... MACRO OFF ON FOCUS MANPUUSHAUATFO C 16 8 Controls on the grip (page 21) 4 56 1. BRIGHT control (page 30) 4. MIRROR IMAGE switch (page 31) 5. MONITOR VOL SEL/SET IL CANCEL PAUSE NEXT L EC STOP F FWD J R A TRANSSIHTIOTON CH-1 AUDIO IN CH-2 LINE MIC MIC+48V LINE MIC MIC+48V 2 STARSTT/OP EXPAFNODCEUDS RREECVIEW RELEASE...
... MACRO OFF ON FOCUS MANPUUSHAUATFO C 16 8 Controls on the grip (page 21) 4 56 1. BRIGHT control (page 30) 4. MIRROR IMAGE switch (page 31) 5. MONITOR VOL SEL/SET IL CANCEL PAUSE NEXT L EC STOP F FWD J R A TRANSSIHTIOTON CH-1 AUDIO IN CH-2 LINE MIC MIC+48V LINE MIC MIC+48V 2 STARSTT/OP EXPAFNODCEUDS RREECVIEW RELEASE...
Operating Instructions
Page 21
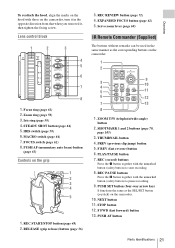
... the unmarked button (safety button) to start recording. 8. PUSH AF (momentary auto focus) button (page 63) Controls on the camcorder. 1 2 1 T PUSH SET SHOTMARK ZOOM 2 W 9 3 THUMBNAIL SUB CLIP 10 4 5 PREV . EXPANDED FOCUS button (page 62) 5. Servo zoom lever (page 60) IR Remote Commander ...on the hood with those on the camcorder, turn it , then tighten the fixing screw. FOCUS switch (page 62) 8. THUMBNAIL button 4. PUSH SET button (four-way arrow key) It functions the same as the corresponding buttons on the grip STARSTT/OP EXPAFNODCEUDS RREECVIEW RELEASE 1 2 3 4 ...
... the unmarked button (safety button) to start recording. 8. PUSH AF (momentary auto focus) button (page 63) Controls on the camcorder. 1 2 1 T PUSH SET SHOTMARK ZOOM 2 W 9 3 THUMBNAIL SUB CLIP 10 4 5 PREV . EXPANDED FOCUS button (page 62) 5. Servo zoom lever (page 60) IR Remote Commander ...on the hood with those on the camcorder, turn it , then tighten the fixing screw. FOCUS switch (page 62) 8. THUMBNAIL button 4. PUSH SET button (four-way arrow key) It functions the same as the corresponding buttons on the grip STARSTT/OP EXPAFNODCEUDS RREECVIEW RELEASE 1 2 3 4 ...

Operating Instructions
Page 23
... Recording in progress Standby for Interval Recording Frame Recording in progress Standby for recording), pressing the DISPLAY/BATT INFO button displays the statuses and settings of the DISPLAY/BATT INFO button. Media status indication Memory card in slot A is displayed. 3. Battery remaining/DC IN voltage indication [M]...or STBY) of the items named with this suffix can be turned on/off functions have been assigned (see page 72). [D]: The settings of the device is active. Remarks [M]: The indication of the items named with this suffix can be independently turned on/off with "...
... Recording in progress Standby for Interval Recording Frame Recording in progress Standby for recording), pressing the DISPLAY/BATT INFO button displays the statuses and settings of the DISPLAY/BATT INFO button. Media status indication Memory card in slot A is displayed. 3. Battery remaining/DC IN voltage indication [M]...or STBY) of the items named with this suffix can be turned on/off functions have been assigned (see page 72). [D]: The settings of the device is active. Remarks [M]: The indication of the items named with this suffix can be independently turned on/off with "...

Operating Instructions
Page 24
... the video level is too high or too low, a caution is mounted) 23. Joystick Jog dial MONITOR VOL THUMBNAIL SEL/SET CANCEL STATUS MENU SEL/SET CANCEL 16:9 WIDE SCREEN 10 15 30 3 5 10 ft mm R L MONITVOORL THUMNAIL SEL/SEFTREVCAPNLj CAEY/LPAUSEGPFR/SFEWV D... FRAMEFULL AUTO WHITE BAL ATW BARS/CAM B A PRST STATUS MENU SEL/SET CANCEL PPIRCOTFUIRLEE CAMERA OFF MEDIA SDI OUT HDV SLOT SELECT IN CAHUL-E1DVIOELCH-2ASAUUEMDTLAIOEONCUTALAUMTAAONUUDEAIINXLOT IN EXT GENLOCK IN TC IN TC OUT PMW-EX3 OPEN REMOTE 1 Press the joystick or the jog dial. Histogram indication ...
... the video level is too high or too low, a caution is mounted) 23. Joystick Jog dial MONITOR VOL THUMBNAIL SEL/SET CANCEL STATUS MENU SEL/SET CANCEL 16:9 WIDE SCREEN 10 15 30 3 5 10 ft mm R L MONITVOORL THUMNAIL SEL/SEFTREVCAPNLj CAEY/LPAUSEGPFR/SFEWV D... FRAMEFULL AUTO WHITE BAL ATW BARS/CAM B A PRST STATUS MENU SEL/SET CANCEL PPIRCOTFUIRLEE CAMERA OFF MEDIA SDI OUT HDV SLOT SELECT IN CAHUL-E1DVIOELCH-2ASAUUEMDTLAIOEONCUTALAUMTAAONUUDEAIINXLOT IN EXT GENLOCK IN TC IN TC OUT PMW-EX3 OPEN REMOTE 1 Press the joystick or the jog dial. Histogram indication ...

Operating Instructions
Page 25
... 3 Tilt the joystick or rotate the jog dial to be operated then press the joystick or the jog dial. The menu disappears, and the new setting is displayed. On-Screen Indications 25 The Direct menu of the selected items appears. Overview TLCS 7 On MF∗ 1 1.5 2 3 4 5 7 10 15 20 30 oo m ATW... 4300K PPOFF ND1 ++F1.9 18dB SHT:1/2000 2 Tilt the joystick or rotate the jog dial to set the cursor to the item to select the setting then press the joystick or the jog dial.
... 3 Tilt the joystick or rotate the jog dial to be operated then press the joystick or the jog dial. The menu disappears, and the new setting is displayed. On-Screen Indications 25 The Direct menu of the selected items appears. Overview TLCS 7 On MF∗ 1 1.5 2 3 4 5 7 10 15 20 30 oo m ATW... 4300K PPOFF ND1 ++F1.9 18dB SHT:1/2000 2 Tilt the joystick or rotate the jog dial to set the cursor to the item to select the setting then press the joystick or the jog dial.

Operating Instructions
Page 27
...of the BC-U1 to the DC OUT position. If the remaining further decreases to the Operating Instructions of the OTHERS menu. Temporarily set to OFF and connect a power source via the DC IN connector or replace the battery pack with "Battery Alarm" (page 126...B TC/U-BIT/DURATION A TRANSSIHTIOTON RREECVIEW RELEASE STARSTT/OP EXPAFNODCEUDS CONTRAST PEAKING MIRROR IMAGE ON DISPLAY/BATT INFO OFF BRIGHT ZEBRA H L OFF L MONITOR VOL THUMNAIL SEL/SET F REV j PREV l s PLAY/PAUSEG/S J F FWD CANCEL R CH-1 AUDIO IN CH-2 LINE MIC MIC+48V LINE MIC MIC+48V VIDEO S MONOITUOTR IN...
...of the BC-U1 to the DC OUT position. If the remaining further decreases to the Operating Instructions of the OTHERS menu. Temporarily set to OFF and connect a power source via the DC IN connector or replace the battery pack with "Battery Alarm" (page 126...B TC/U-BIT/DURATION A TRANSSIHTIOTON RREECVIEW RELEASE STARSTT/OP EXPAFNODCEUDS CONTRAST PEAKING MIRROR IMAGE ON DISPLAY/BATT INFO OFF BRIGHT ZEBRA H L OFF L MONITOR VOL THUMNAIL SEL/SET F REV j PREV l s PLAY/PAUSEG/S J F FWD CANCEL R CH-1 AUDIO IN CH-2 LINE MIC MIC+48V LINE MIC MIC+48V VIDEO S MONOITUOTR IN...

Operating Instructions
Page 28
...+ FRAMEFULL AUTO WHITE BAL ATW BARS/CAM B A PRST STATUS MENU SEL/SET CANCEL PPIRCOTFUIRLEE CAMERA OFF MEDIA SDI OUT HDV SLOT SELECT IN CAHUL-E1DVIOELCH-2ASAUUEMDTLAIOEONCUTALAUMTAAONUUDEAIINXLOT IN EXT GENLOCK IN TC IN TC OUT PMW-EX3 OPEN REMOTE Power switch CAMERA OFF MEDIA To operate in Camera mode, turn ...the power on by setting the power switch to the MEDIA position. Remove the battery ...
...+ FRAMEFULL AUTO WHITE BAL ATW BARS/CAM B A PRST STATUS MENU SEL/SET CANCEL PPIRCOTFUIRLEE CAMERA OFF MEDIA SDI OUT HDV SLOT SELECT IN CAHUL-E1DVIOELCH-2ASAUUEMDTLAIOEONCUTALAUMTAAONUUDEAIINXLOT IN EXT GENLOCK IN TC IN TC OUT PMW-EX3 OPEN REMOTE Power switch CAMERA OFF MEDIA To operate in Camera mode, turn ...the power on by setting the power switch to the MEDIA position. Remove the battery ...

Operating Instructions
Page 29
... AUTO WHITE BAL ATW BARS/CAM B A PRST STATUS MENU SEL/SET CANCEL PPIRCOTFUIRLEE CAMERA OFF MEDIA SDI OUT HDV SLOT SELECT IN CAHUL-E1DVIOELCH-2ASAUUEMDTLAIOEONCUTALAUMTAAONUUDEAIINXLOT IN EXT GENLOCK IN TC IN TC OUT PMW-EX3 OPEN REMOTE INITIAL SETTING Time Zone: UTC +09:00 TOKYO Date / Time: 20098/01.../01 00:00:00 SET F i n i sh 2 Tilt the joystick or turn the camcorder on ...
... AUTO WHITE BAL ATW BARS/CAM B A PRST STATUS MENU SEL/SET CANCEL PPIRCOTFUIRLEE CAMERA OFF MEDIA SDI OUT HDV SLOT SELECT IN CAHUL-E1DVIOELCH-2ASAUUEMDTLAIOEONCUTALAUMTAAONUUDEAIINXLOT IN EXT GENLOCK IN TC IN TC OUT PMW-EX3 OPEN REMOTE INITIAL SETTING Time Zone: UTC +09:00 TOKYO Date / Time: 20098/01.../01 00:00:00 SET F i n i sh 2 Tilt the joystick or turn the camcorder on ...


