
Operating Instructions
Page 2
... open the cabinet. For the customers in Europe This product with the CE marking complies with the instruction manual, may apply, See www.dtsc.ca.gov/ hazardouswaste/perchlorate Perchlorate Material : Lithium battery contains perchlorate. special... : Electromagnetic Interference (Emission) • EN55103-2 : Electromagnetic Susceptibility (Immunity) This product is Sony Corporation, 1-7-1 Konan, Minato-ku, Tokyo, Japan. Operation of this equipment in a residential area is operated in cabinet. TV studio) The manufacturer of this product is intended for a Class A digital...
... open the cabinet. For the customers in Europe This product with the CE marking complies with the instruction manual, may apply, See www.dtsc.ca.gov/ hazardouswaste/perchlorate Perchlorate Material : Lithium battery contains perchlorate. special... : Electromagnetic Interference (Emission) • EN55103-2 : Electromagnetic Susceptibility (Immunity) This product is Sony Corporation, 1-7-1 Konan, Minato-ku, Tokyo, Japan. Operation of this equipment in a residential area is operated in cabinet. TV studio) The manufacturer of this product is intended for a Class A digital...

Operating Instructions
Page 4
Table of Contents Overview Preparations 4 Package Configuration 10 Features 11 Using the CD-ROM 14 Reading the CD-ROM Manuals 14 System Requirements for Using the Applications ....... 14 Software Installation 15 Parts Identifications 16 Camcorder 16 Zoom Lens VCL-614B2X (Supplied 20 IR Remote ...Commander (Supplied 21 On-Screen Indications 23 Indications in Camera Mode 23 Direct Menu Operation 24 Power Supply 26 Using a Battery Pack 26 Using AC Power (DC IN Power 27 Turning Power On 28 Turning Power Off 28 Setting ...
Table of Contents Overview Preparations 4 Package Configuration 10 Features 11 Using the CD-ROM 14 Reading the CD-ROM Manuals 14 System Requirements for Using the Applications ....... 14 Software Installation 15 Parts Identifications 16 Camcorder 16 Zoom Lens VCL-614B2X (Supplied 20 IR Remote ...Commander (Supplied 21 On-Screen Indications 23 Indications in Camera Mode 23 Direct Menu Operation 24 Power Supply 26 Using a Battery Pack 26 Using AC Power (DC IN Power 27 Turning Power On 28 Turning Power Off 28 Setting ...

Operating Instructions
Page 5
...the PHU Connection Cable ..... 45 Formatting the PHU-60K 45 Checking the Remaining Time Available for Recording 46 Restoring the PHU-60K 46 Basic Operation Procedure 47 Selecting the Video Format 49 Selectable Formats 49 Changing the Format 50 Switching the ND Filters 50 Adjusting the White Balance 51 ... in Auto Shutter Mode 58 Adjusting the Iris 58 Recording in Auto Iris Mode 58 Adjusting the Iris Manually 59 Adjusting the Zoom 59 Switching the Zoom Mode 59 Operating the Zoom Manually 60 Using the Power Zoom 60 Adjusting the Focus 61 Adjusting in Full MF Mode 61 Adjusting in ...
...the PHU Connection Cable ..... 45 Formatting the PHU-60K 45 Checking the Remaining Time Available for Recording 46 Restoring the PHU-60K 46 Basic Operation Procedure 47 Selecting the Video Format 49 Selectable Formats 49 Changing the Format 50 Switching the ND Filters 50 Adjusting the White Balance 51 ... in Auto Shutter Mode 58 Adjusting the Iris 58 Recording in Auto Iris Mode 58 Adjusting the Iris Manually 59 Adjusting the Zoom 59 Switching the Zoom Mode 59 Operating the Zoom Manually 60 Using the Power Zoom 60 Adjusting the Focus 61 Adjusting in Full MF Mode 61 Adjusting in ...

Operating Instructions
Page 11
... pad (3) DC cable clamp and fixing screw (1 each with long recording time by efficiently compressing the data. Operating Instructions (This manual) (1) SxS Device Driver Software End-User License Agreement (1) Features The PMW-EX3 is mounted in the PMW-EX3 camcorder are included. The imaging devices used in the camcorder at the factory. Selectable bit rates The...
... pad (3) DC cable clamp and fixing screw (1 each with long recording time by efficiently compressing the data. Operating Instructions (This manual) (1) SxS Device Driver Software End-User License Agreement (1) Features The PMW-EX3 is mounted in the PMW-EX3 camcorder are included. The imaging devices used in the camcorder at the factory. Selectable bit rates The...

Operating Instructions
Page 14
...Microsoft Windows Vista, or Mac OS X v10.4.9 or later For support information on the driver, refer to the following URL: http://www.sony.net/SxS-Support/ XDCAM EX Clip Browsing Software OS Microsoft Windows XP SP2 or later (32-bit version), Microsoft Windows Vista (32-... Using the CD-ROM The supplied CD-ROM includes the following files: PMW-EX3 Operating Instructions The Operating Instructions for the PMW-EX3 (Japanese, English, French, German, Italian, Spanish and Chinese) are provided in order to read the operation manuals contained on the CD-ROM. If it does not appear automatically in ...
...Microsoft Windows Vista, or Mac OS X v10.4.9 or later For support information on the driver, refer to the following URL: http://www.sony.net/SxS-Support/ XDCAM EX Clip Browsing Software OS Microsoft Windows XP SP2 or later (32-bit version), Microsoft Windows Vista (32-... Using the CD-ROM The supplied CD-ROM includes the following files: PMW-EX3 Operating Instructions The Operating Instructions for the PMW-EX3 (Japanese, English, French, German, Italian, Spanish and Chinese) are provided in order to read the operation manuals contained on the CD-ROM. If it does not appear automatically in ...

Operating Instructions
Page 18
On-handle ZOOM button (page 60) 8. It is called "the joystick" in the subsequent operating instructions. 11. F FWD (fast forward) button (page 95) 12. REC HOLD lever (page 48) 18 Parts Identifications Rear connector panel The connectors ... 14. REMOTE connector (8-pin) (page 138) Audio control block Cover CH-1 AUTO INT MANUAL EXT AUDIO LEVEL CH-2 AUDIO SELECT AUDIO IN AUTO INT MANUAL EXT 1 23 1. CANCEL button (page 111) 10. SDI OUT connector (BNC type) (page 129) 5. Overview Operation panel on the handle L R MONITOR 1 VOL 2 THUMBNAIL SEL/SET CANCEL 9 3 F...
On-handle ZOOM button (page 60) 8. It is called "the joystick" in the subsequent operating instructions. 11. F FWD (fast forward) button (page 95) 12. REC HOLD lever (page 48) 18 Parts Identifications Rear connector panel The connectors ... 14. REMOTE connector (8-pin) (page 138) Audio control block Cover CH-1 AUTO INT MANUAL EXT AUDIO LEVEL CH-2 AUDIO SELECT AUDIO IN AUTO INT MANUAL EXT 1 23 1. CANCEL button (page 111) 10. SDI OUT connector (BNC type) (page 129) 5. Overview Operation panel on the handle L R MONITOR 1 VOL 2 THUMBNAIL SEL/SET CANCEL 9 3 F...
Operating Instructions
Page 33
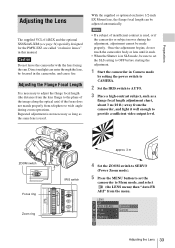
... can be sure to set the camcorder to the plane of insufficient contrast is used , or if the camcorder or subject moves during zoom operations. With the supplied or optional exclusive 1/2-inch EX Mount lens, the flange focal length can enter through the lens, be made properly. LENS... Preparations VIDEO S MONOITUOTR IN DC Adjusting the Lens The supplied VCL-614B2X and the optional XS8X4AS-XB8 (see page 34) specially designed for the PMW-EX3 are called "exclusive lenses" in the camcorder, and cause fire. Once the adjustment begins, do not touch the camcorder body or lens until it...
... can be sure to set the camcorder to the plane of insufficient contrast is used , or if the camcorder or subject moves during zoom operations. With the supplied or optional exclusive 1/2-inch EX Mount lens, the flange focal length can enter through the lens, be made properly. LENS... Preparations VIDEO S MONOITUOTR IN DC Adjusting the Lens The supplied VCL-614B2X and the optional XS8X4AS-XB8 (see page 34) specially designed for the PMW-EX3 are called "exclusive lenses" in the camcorder, and cause fire. Once the adjustment begins, do not touch the camcorder body or lens until it...

Operating Instructions
Page 34
...8226; When a non-exclusive lens is mounted for the PMW-EX3 is displayed. For details on menu operations, see "Basic Menu Operations" on page 111. If the adjustment fails Check the... switch to remove. The adjustment begins. For non-exclusive but usable lenses, consult your Sony service representative. Removing the supplied lens To remove the supplied lens, proceed as follows: ...FULL AUTO - When the adjustment finished The completion message is used, adjust the flange focal length manually. Replacing the Lens In addition to the supplied VCL-614B2X standard zoom lens, a wide zoom ...
...8226; When a non-exclusive lens is mounted for the PMW-EX3 is displayed. For details on menu operations, see "Basic Menu Operations" on page 111. If the adjustment fails Check the... switch to remove. The adjustment begins. For non-exclusive but usable lenses, consult your Sony service representative. Removing the supplied lens To remove the supplied lens, proceed as follows: ...FULL AUTO - When the adjustment finished The completion message is used, adjust the flange focal length manually. Replacing the Lens In addition to the supplied VCL-614B2X standard zoom lens, a wide zoom ...
Operating Instructions
Page 48
... restarted after you are set the lever to the HOLD position to adjust them manually, turn Full Auto mode off, and see page 63. 7 Press the REC START/STOP button. Note Recording cannot be deleted, operate the camcorder in Media mode. See"Deleting All Clips" on page 101. 48... Basic Operation Procedure Use the All Clips DEL function when you wish to lock the button. You can delete the...
... restarted after you are set the lever to the HOLD position to adjust them manually, turn Full Auto mode off, and see page 63. 7 Press the REC START/STOP button. Note Recording cannot be deleted, operate the camcorder in Media mode. See"Deleting All Clips" on page 101. 48... Basic Operation Procedure Use the All Clips DEL function when you wish to lock the button. You can delete the...

Operating Instructions
Page 55
...PPIRCOTFUIRLEE CAMERA OFF MEDIA SDI OUT HDV SLOT SELECT IN CAHUL-E1DVIOELCH-2ASAUUEMDTLAIOEONCUTALAUMTAAONUUDEAIINXLOT IN EXT GENLOCK IN TC IN TC OUT PMW-EX3 OPEN REMOTE The gain value at each of the switch positions are set at the factory are as follows: L: ... to the brightness of the subject. Select the setting mode required by the shooting conditions. Fixed gain mode (manual gain adjustment) Select the gain of the video amplifier, using the GAIN switch. GAIN switch - Setting the Gain...level set with the switch Select the gain, using the switch or a menu operation.
...PPIRCOTFUIRLEE CAMERA OFF MEDIA SDI OUT HDV SLOT SELECT IN CAHUL-E1DVIOELCH-2ASAUUEMDTLAIOEONCUTALAUMTAAONUUDEAIINXLOT IN EXT GENLOCK IN TC IN TC OUT PMW-EX3 OPEN REMOTE The gain value at each of the switch positions are set at the factory are as follows: L: ... to the brightness of the subject. Select the setting mode required by the shooting conditions. Fixed gain mode (manual gain adjustment) Select the gain of the video amplifier, using the GAIN switch. GAIN switch - Setting the Gain...level set with the switch Select the gain, using the switch or a menu operation.

Operating Instructions
Page 56
... r B 00:00 EX S l ow Shu t t e r B Shot Tr ans i t ion B MF Ass i s t : Off Low : 0dB Mid : 9dB High : 18dB For details on menu operations, see "Direct Menu Operation" on page 111. TLCS . 7 On MF∗ 1 1.5 2 3 4 5 7 10 15 20 30 oo m ATW 4300K PPOFF ND1 ++F1.9 18dB SHT:1/2000 When the Direct menu.... When Full Auto mode is made with the Direct menu. Fixed Shutter (manual adjustment) modes Recording is off, you can select Speed mode or Angle mode. You can specify the shutter speed by operating the joystick or the jog dial. In Angle mode, you can switch between...
... r B 00:00 EX S l ow Shu t t e r B Shot Tr ans i t ion B MF Ass i s t : Off Low : 0dB Mid : 9dB High : 18dB For details on menu operations, see "Direct Menu Operation" on page 111. TLCS . 7 On MF∗ 1 1.5 2 3 4 5 7 10 15 20 30 oo m ATW 4300K PPOFF ND1 ++F1.9 18dB SHT:1/2000 When the Direct menu.... When Full Auto mode is made with the Direct menu. Fixed Shutter (manual adjustment) modes Recording is off, you can select Speed mode or Angle mode. You can specify the shutter speed by operating the joystick or the jog dial. In Angle mode, you can switch between...
Operating Instructions
Page 58
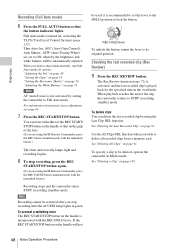
... menu. 58 Adjusting the Iris B Recording For details on the Direct menu, see "Direct Menu Operation" on the EX Slow Shutter setting. • The EX Slow Shutter On/Off setting cannot be...Mode When you can select the target level (to the brightness of the CAMERA SET menu. Manual Iris mode Adjust the iris opening according to make the picture brighter or darker) of the ...OUT HDV SLOT SELECT IN CAHUL-E1DVIOELCH-2ASAUUEMDTLAIOEONCUTALAUMTAAONUUDEAIINXLOT IN EXT GENLOCK IN TC IN TC OUT PMW-EX3 OPEN REMOTE Recording in Auto Iris Mode When the camcorder is in EX Slow Shutter Mode...
... menu. 58 Adjusting the Iris B Recording For details on the Direct menu, see "Direct Menu Operation" on the EX Slow Shutter setting. • The EX Slow Shutter On/Off setting cannot be...Mode When you can select the target level (to the brightness of the CAMERA SET menu. Manual Iris mode Adjust the iris opening according to make the picture brighter or darker) of the ...OUT HDV SLOT SELECT IN CAHUL-E1DVIOELCH-2ASAUUEMDTLAIOEONCUTALAUMTAAONUUDEAIINXLOT IN EXT GENLOCK IN TC IN TC OUT PMW-EX3 OPEN REMOTE Recording in Auto Iris Mode When the camcorder is in EX Slow Shutter Mode...

Operating Instructions
Page 59
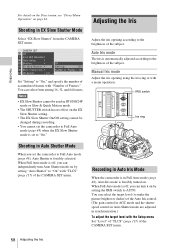
...can adjust the zoom in Manual mode or Power (Servo) mode on the supplied lens. Manual Zoom mode Rotate the zoom ring to adjust the iris manually. Adjusting the Zoom 59 Adjusting... the VF SET menu. 120min STBY A: 25min B: 50min W T STBY Switching the Zoom Mode Switching between Manual mode and Servo mode is displayed on the handle. When you press the DISPLAY/BATT INFO button. 120min ... Power Zoom (Servo) mode You can also be different among lenses. Adjusting the Iris Manually Set the IRIS switch to MANU to adjust the zoom. Recording To adjust the target level...
...can adjust the zoom in Manual mode or Power (Servo) mode on the supplied lens. Manual Zoom mode Rotate the zoom ring to adjust the iris manually. Adjusting the Zoom 59 Adjusting... the VF SET menu. 120min STBY A: 25min B: 50min W T STBY Switching the Zoom Mode Switching between Manual mode and Servo mode is displayed on the handle. When you press the DISPLAY/BATT INFO button. 120min ... Power Zoom (Servo) mode You can also be different among lenses. Adjusting the Iris Manually Set the IRIS switch to MANU to adjust the zoom. Recording To adjust the target level...

Operating Instructions
Page 60
...a wider angle or the T (telephoto) side for Servo mode activates the power zoom. Speed switch H L OFF ZOOM button operation Zoom changes with the speed set by "High" of "Zoom Speed" of CAMERA SET menu. (Default: 30) Disabled 60 ...OUT HDV SLOT SELECT IN CAHUL-E1DVIOELCH-2ASAUUEMDTLAIOEONCUTALAUMTAAONUUDEAIINXLOT IN EXT GENLOCK IN TC IN TC OUT PMW-EX3 OPEN REMOTE ZOOM MANU SERVO ZOOM switch: MANU Using the Power Zoom Setting the ZOOM ...IN DC Recording ZOOM MANU SERVO ZOOM switch Operating the Zoom Manually Setting the ZOOM switch to the MANU position for a closer angle.
...a wider angle or the T (telephoto) side for Servo mode activates the power zoom. Speed switch H L OFF ZOOM button operation Zoom changes with the speed set by "High" of "Zoom Speed" of CAMERA SET menu. (Default: 30) Disabled 60 ...OUT HDV SLOT SELECT IN CAHUL-E1DVIOELCH-2ASAUUEMDTLAIOEONCUTALAUMTAAONUUDEAIINXLOT IN EXT GENLOCK IN TC IN TC OUT PMW-EX3 OPEN REMOTE ZOOM MANU SERVO ZOOM switch: MANU Using the Power Zoom Setting the ZOOM ...IN DC Recording ZOOM MANU SERVO ZOOM switch Operating the Zoom Manually Setting the ZOOM switch to the MANU position for a closer angle.

Operating Instructions
Page 61
...Note The infinity position has some margin to compensate for focus change caused by rotating the ring. Note The focus instantly moves to the operation guide of three modes for assistance. Adjusting the Focus You can adjust the focus from an optional lens remote controller connected via the LENS...on the supplied lens. You can select any of the lens remote controller. Adjusting the Focus 61 Recording When adjusting with the focus ring manually. The ring rotates endlessly in Full MF Mode Pull the focus ring rearward (toward the camcorder body) to set the camcorder to the ...
...Note The infinity position has some margin to compensate for focus change caused by rotating the ring. Note The focus instantly moves to the operation guide of three modes for assistance. Adjusting the Focus You can adjust the focus from an optional lens remote controller connected via the LENS...on the supplied lens. You can select any of the lens remote controller. Adjusting the Focus 61 Recording When adjusting with the focus ring manually. The ring rotates endlessly in Full MF Mode Pull the focus ring rearward (toward the camcorder body) to set the camcorder to the ...

Operating Instructions
Page 78
...to shift the zoom in a shot transition, set the ZOOM switch to MF or AF (see page 59). In addition, you register the manual adjustment function for white balance, the scenes will develop smoothly between objects indoors and those of another Shot, resulting in a shot transition, set to... 1080/24P. • The Freeze Mix display cannot be obtained in Quick & Slow Motion mode or Slow Shutter mode. • You cannot operate the Setup menus and PICTURE PROFILE menu in a recording sequence. Your settings for Shot Transition. Shot Transition The Shot Transition function helps you can ...
...to shift the zoom in a shot transition, set the ZOOM switch to MF or AF (see page 59). In addition, you register the manual adjustment function for white balance, the scenes will develop smoothly between objects indoors and those of another Shot, resulting in a shot transition, set to... 1080/24P. • The Freeze Mix display cannot be obtained in Quick & Slow Motion mode or Slow Shutter mode. • You cannot operate the Setup menus and PICTURE PROFILE menu in a recording sequence. Your settings for Shot Transition. Shot Transition The Shot Transition function helps you can ...

Operating Instructions
Page 87
.... Set the width of the screen. You can adjust it for Color Correction. Select the built-in preset matrix provided for Color Correction. Manually adjust the center color for the target area for one area only.) Execute to +99 (±0) When Area Detection is executed, this function...area of the PICTURE PROFILE menu are shown in the center of color phase for the target area for convenience. Perform fine adjustment with matrix operations for the entire picture area. and lowercase alphabetics, numerics 0 to "Off" in the target area. You can use upper- Adjust the hue...
.... Set the width of the screen. You can adjust it for Color Correction. Select the built-in preset matrix provided for Color Correction. Manually adjust the center color for the target area for one area only.) Execute to +99 (±0) When Area Detection is executed, this function...area of the PICTURE PROFILE menu are shown in the center of color phase for the target area for convenience. Perform fine adjustment with matrix operations for the entire picture area. and lowercase alphabetics, numerics 0 to "Off" in the target area. You can use upper- Adjust the hue...

Operating Instructions
Page 133
... that device. 3 Set the camcorder to Camera mode by setting the power switch to the AUDIO OUT connectors. For operations of the nonlinear editing software, refer to the operation manual of that can be interrupted between the clip and the next clip. The input image is set the camcorder to "...Enable." Indication STBY HDV zREC HDV Status of the external device In HDV recording standby In HDV recording Notes • Operation may be different ...
... that device. 3 Set the camcorder to Camera mode by setting the power switch to the AUDIO OUT connectors. For operations of the nonlinear editing software, refer to the operation manual of that can be interrupted between the clip and the next clip. The input image is set the camcorder to "...Enable." Indication STBY HDV zREC HDV Status of the external device In HDV recording standby In HDV recording Notes • Operation may be different ...

Operating Instructions
Page 137
...-B750. For details on the menu. 1 Select "S&Q Motion" from the RM-B750 Set the camcorder to Camera mode by setting the power switch to the Operation Manual of the RM-B150. CAMERA SET Color Bar Type B F l i c ker Reduce B Zoom Speed B I n t e r val Rec B 00:00 Frame Rec B S&Q...from the CAMERA SET menu. Before starting Slow & Quick Motion recording, make the necessary settings on operations of the RM-B750, refer to the Operation Manual of the CAMERA SET menu to "On." Connecting External Devices B Operating From the RM-B750/B150 137 For details on B Rec Review : 3sec PP Setting : ...
...-B750. For details on the menu. 1 Select "S&Q Motion" from the RM-B750 Set the camcorder to Camera mode by setting the power switch to the Operation Manual of the RM-B150. CAMERA SET Color Bar Type B F l i c ker Reduce B Zoom Speed B I n t e r val Rec B 00:00 Frame Rec B S&Q...from the CAMERA SET menu. Before starting Slow & Quick Motion recording, make the necessary settings on operations of the RM-B750, refer to the Operation Manual of the CAMERA SET menu to "On." Connecting External Devices B Operating From the RM-B750/B150 137 For details on B Rec Review : 3sec PP Setting : ...

Operating Instructions
Page 139
... Setting Auto Knee Point Slope Knee SAT Level Level Select Operation on the RM-B150 yes yes yes yes yes yes yes yes yes Operation on the Remote Control Unit is not displayed. For details on operations of the RM-B150/ B750. Notes • The ... the Remote Control Unit are enabled when the menu of the camcorder is set to the Operation Manual of the Remote Control Unit, refer to Absolute mode, the corresponding items cannot be changed on the Picture Profile...yes yes yes yes yes yes yes yes yes yes yes yes yes yes yes Connecting External Devices Operating From the RM-B750/B150 139
... Setting Auto Knee Point Slope Knee SAT Level Level Select Operation on the RM-B150 yes yes yes yes yes yes yes yes yes Operation on the Remote Control Unit is not displayed. For details on operations of the RM-B150/ B750. Notes • The ... the Remote Control Unit are enabled when the menu of the camcorder is set to the Operation Manual of the Remote Control Unit, refer to Absolute mode, the corresponding items cannot be changed on the Picture Profile...yes yes yes yes yes yes yes yes yes yes yes yes yes yes yes Connecting External Devices Operating From the RM-B750/B150 139


