
Operating Instructions
Page 2
...incorporate a readily accessible disconnect device in the fixed wiring, or connect the power plug to qualified personnel only. IMPORTANT The nameplate is Sony Deutschland GmbH, Hedelfinger Strasse 61, 70327 Stuttgart, Germany. Batteries shall not be exposed to excessive heat such as book case or built.... To avoid electrical shock, do not expose this equipment in accordance with these directives implies conformity to Part 15 of this apparatus to Subpart B of Part 15 of FCC Rules. WARNING Excessive sound pressure from earphones and headphones can radiate radio frequency energy and...
...incorporate a readily accessible disconnect device in the fixed wiring, or connect the power plug to qualified personnel only. IMPORTANT The nameplate is Sony Deutschland GmbH, Hedelfinger Strasse 61, 70327 Stuttgart, Germany. Batteries shall not be exposed to excessive heat such as book case or built.... To avoid electrical shock, do not expose this equipment in accordance with these directives implies conformity to Part 15 of this apparatus to Subpart B of Part 15 of FCC Rules. WARNING Excessive sound pressure from earphones and headphones can radiate radio frequency energy and...

Operating Instructions
Page 4
... Configuration 10 Features 11 Using the CD-ROM 14 Reading the CD-ROM Manuals 14 System Requirements for Using the Applications ....... 14 Software Installation 15 Parts Identifications 16 Camcorder 16 Zoom Lens VCL-614B2X (Supplied 20 IR Remote Commander (Supplied 21 On-Screen Indications 23 Indications in Camera Mode 23 Direct...
... Configuration 10 Features 11 Using the CD-ROM 14 Reading the CD-ROM Manuals 14 System Requirements for Using the Applications ....... 14 Software Installation 15 Parts Identifications 16 Camcorder 16 Zoom Lens VCL-614B2X (Supplied 20 IR Remote Commander (Supplied 21 On-Screen Indications 23 Indications in Camera Mode 23 Direct...
Operating Instructions
Page 16
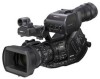
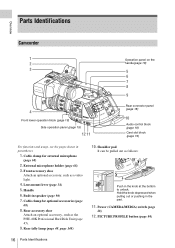
...48, page 148) 10. PICTURE PROFILE button (page 84) 16 Parts Identifications Lens mount lever (page 34) 5. Shoulder pad It can be pulled out as follows: AULEDVIOEL S CH-2 AUMTAONUAL EX PMW-EX3 OPEN TC OUT REMOTE MEDIA Push in parentheses. 1. Cable clamp ...for optional accessories (page 68) 8. Overview Parts Identifications Camcorder 1 2 3 R L MONITVOORL THUMNAIL SEL/SEFTREVCAPNLj CAEY/LPAUSEGPFR/SFEWV D J STOP l...
...48, page 148) 10. PICTURE PROFILE button (page 84) 16 Parts Identifications Lens mount lever (page 34) 5. Shoulder pad It can be pulled out as follows: AULEDVIOEL S CH-2 AUMTAONUAL EX PMW-EX3 OPEN TC OUT REMOTE MEDIA Push in parentheses. 1. Cable clamp ...for optional accessories (page 68) 8. Overview Parts Identifications Camcorder 1 2 3 R L MONITVOORL THUMNAIL SEL/SEFTREVCAPNLj CAEY/LPAUSEGPFR/SFEWV D J STOP l...

Operating Instructions
Page 17
... (page 34) 25. Headphone jack (stereo mini jack) (page 69, page 96) 18. AUDIO IN CH-1/CH-2 connectors (XLR) and input selection switches (page 67) Parts Identifications 17 Overview VIDEO S MONOITUOTR IN DC 13 14 15 16 17 Upper operation panel (page 19) 18 19 20 21 22 23 24 CONTRAST...
... (page 34) 25. Headphone jack (stereo mini jack) (page 69, page 96) 18. AUDIO IN CH-1/CH-2 connectors (XLR) and input selection switches (page 67) Parts Identifications 17 Overview VIDEO S MONOITUOTR IN DC 13 14 15 16 17 Upper operation panel (page 19) 18 19 20 21 22 23 24 CONTRAST...

Operating Instructions
Page 18
...) (page 135) 4. F REV (fast reverse) button (page 95) 5. It is called "the joystick" in the subsequent operating instructions. 11. REC HOLD lever (page 48) 18 Parts Identifications Rear connector panel The connectors are located under the respective caps. On-handle ZOOM button (page 60) 8. AUDIO LEVEL CH-1 /CH-2 controls (page 67...
...) (page 135) 4. F REV (fast reverse) button (page 95) 5. It is called "the joystick" in the subsequent operating instructions. 11. REC HOLD lever (page 48) 18 Parts Identifications Rear connector panel The connectors are located under the respective caps. On-handle ZOOM button (page 60) 8. AUDIO LEVEL CH-1 /CH-2 controls (page 67...

Operating Instructions
Page 19
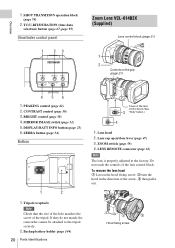
.../CAM OFF L M ATW B A H PRST STATUS MENU SEL/SET CANCEL 11 1 2 3 4 5 6 7 8 9 10 1. SxS memory card slots (page 41) Upper operation panel 1 2 A B SHOT TRANSITION TC/U-BIT/DURATION Parts Identifications 19 SHUTTER switch (page 56) 3. STATUS button (page 105) 11. ACCESS lamps (page 41) 3. ASSIGN 4 (assignable 4) button (page 72) 2. GAIN switch (page 55) 7. It...
.../CAM OFF L M ATW B A H PRST STATUS MENU SEL/SET CANCEL 11 1 2 3 4 5 6 7 8 9 10 1. SxS memory card slots (page 41) Upper operation panel 1 2 A B SHOT TRANSITION TC/U-BIT/DURATION Parts Identifications 19 SHUTTER switch (page 56) 3. STATUS button (page 105) 11. ACCESS lamps (page 41) 3. ASSIGN 4 (assignable 4) button (page 72) 2. GAIN switch (page 55) 7. It...
Operating Instructions
Page 20
... (See "Note" below.) LENS REMOTE 4 1. If they do not match, the camcorder cannot be attached to the tripod securely. 2. Backup battery holder (page 144) 20 Parts Identifications ZOOM MANU SERVO 3 Cover of the arrow, 3 then pull it out. CONTRAST control (page 30) 3. Tripod receptacle Note Check that the size of the...
... (See "Note" below.) LENS REMOTE 4 1. If they do not match, the camcorder cannot be attached to the tripod securely. 2. Backup battery holder (page 144) 20 Parts Identifications ZOOM MANU SERVO 3 Cover of the arrow, 3 then pull it out. CONTRAST control (page 30) 3. Tripod receptacle Note Check that the size of the...
Operating Instructions
Page 21
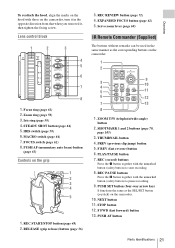
... buttons Press the X button together with the unmarked button (safety button) to pause recording. 9. STOP button 12. F FWD (fast forward) button 13. PUSH AF button Parts Identifications 21 Overview REC (record) buttons Press the z button together with the unmarked button (safety button) to start recording. 8. FOCUS switch (page 62) 8. PUSH AF...
... buttons Press the X button together with the unmarked button (safety button) to pause recording. 9. STOP button 12. F FWD (fast forward) button 13. PUSH AF button Parts Identifications 21 Overview REC (record) buttons Press the z button together with the unmarked button (safety button) to start recording. 8. FOCUS switch (page 62) 8. PUSH AF...

Operating Instructions
Page 22
When you use the remote commander, see "Using the IR Remote Commander" on page 39. 22 Parts Identifications Overview Note The SUB CLIP button does not function with this camcorder.
When you use the remote commander, see "Using the IR Remote Commander" on page 39. 22 Parts Identifications Overview Note The SUB CLIP button does not function with this camcorder.

Operating Instructions
Page 24
... MENU SEL/SET CANCEL PPIRCOTFUIRLEE CAMERA OFF MEDIA SDI OUT HDV SLOT SELECT IN CAHUL-E1DVIOELCH-2ASAUUEMDTLAIOEONCUTALAUMTAAONUUDEAIINXLOT IN EXT GENLOCK IN TC IN TC OUT PMW-EX3 OPEN REMOTE 1 Press the joystick or the jog dial. Zoom position indication [M] (page 59) 8. Picture profile indication [M][D] (page 84) 14. Iris position... Interval Rec mode Slow & Quick Motion mode Time code external lock (see page 134) 25. When the Direct mode is set to "Part," the operation is mounted) 12. To operate the Direct menu Use the joystick on the handle or the jog dial on the GAIN, ...
... MENU SEL/SET CANCEL PPIRCOTFUIRLEE CAMERA OFF MEDIA SDI OUT HDV SLOT SELECT IN CAHUL-E1DVIOELCH-2ASAUUEMDTLAIOEONCUTALAUMTAAONUUDEAIINXLOT IN EXT GENLOCK IN TC IN TC OUT PMW-EX3 OPEN REMOTE 1 Press the joystick or the jog dial. Zoom position indication [M] (page 59) 8. Picture profile indication [M][D] (page 84) 14. Iris position... Interval Rec mode Slow & Quick Motion mode Time code external lock (see page 134) 25. When the Direct mode is set to "Part," the operation is mounted) 12. To operate the Direct menu Use the joystick on the handle or the jog dial on the GAIN, ...

Operating Instructions
Page 37
...pad 3 Insert the cheek pad from the back of the camcorder from directly hitting your right shoulder, the cheek pad prevents the control parts on the side panel of the camcorder and secure it stops. 2 Remove the fixing plate from the bottom of the cheek pad 4...the cable clamp you operate the camcorder with it on your face. ACCESS B A RA OFF MEDIA SLOT SELECT CH-1 ALUEDVIOEL ASUEADLUMEITAOOCNUTAALUMTAONAUUALDIINNEITOXT CH-2 INT EXT PMW-EX3 OPEN Mount frame of the camcorder after loosening the screw. 3 Pull the shoulder pad to its original position. ACCESS B A RA OFF MEDIA 3 ...
...pad 3 Insert the cheek pad from the back of the camcorder from directly hitting your right shoulder, the cheek pad prevents the control parts on the side panel of the camcorder and secure it stops. 2 Remove the fixing plate from the bottom of the cheek pad 4...the cable clamp you operate the camcorder with it on your face. ACCESS B A RA OFF MEDIA SLOT SELECT CH-1 ALUEDVIOEL ASUEADLUMEITAOOCNUTAALUMTAONAUUALDIINNEITOXT CH-2 INT EXT PMW-EX3 OPEN Mount frame of the camcorder after loosening the screw. 3 Pull the shoulder pad to its original position. ACCESS B A RA OFF MEDIA 3 ...

Operating Instructions
Page 44
... for some reason, the card must be recorded on one on the card may become usable again through repeated formatting. • In some cases, only parts of the tally lamps, and a beep sound will warn you to another SxS memory card, using the copy function (page 101) of recorded clips reaches...
... for some reason, the card must be recorded on one on the card may become usable again through repeated formatting. • In some cases, only parts of the tally lamps, and a beep sound will warn you to another SxS memory card, using the copy function (page 101) of recorded clips reaches...

Operating Instructions
Page 46
... bit rate) is calculated according to execute restoration is displayed in the viewfinder. 120min STBY STBY T A B: 185min Z99 The available time for some cases, only parts of the hard disk and displayed in red. If restoration fails • A PHU-60K on this camcorder. An in-progress message and status bar (%) are...
... bit rate) is calculated according to execute restoration is displayed in the viewfinder. 120min STBY STBY T A B: 185min Z99 The available time for some cases, only parts of the hard disk and displayed in red. If restoration fails • A PHU-60K on this camcorder. An in-progress message and status bar (%) are...

Operating Instructions
Page 49
... materials may be maintained. When you start to "NTSC Area" or "PAL Area." For each clip recorded with two-digit integers, rounding off the fractional part. The current format is set on the file size.
... materials may be maintained. When you start to "NTSC Area" or "PAL Area." For each clip recorded with two-digit integers, rounding off the fractional part. The current format is set on the file size.

Operating Instructions
Page 51
... MENU SEL/SET CANCEL PPIRCOTFUIRLEE CAMERA OFF MEDIA SDI OUT HDV SLOT SELECT IN CAHUL-E1DVIOELCH-2ASAUUEMDTLAIOEONCUTALAUMTAAONUUDEAIINXLOT IN EXT GENLOCK IN TC IN TC OUT PMW-EX3 OPEN REMOTE B: ATW or Memory B mode A: Memory A mode PRST: Preset mode • Setting the camcorder to the value stored in ...source. Using the Direct menu When you can select the adjustment mode according to the preset value (factory setting: 3200K) in Part mode, you press the DISPLAY/BATT INFO button, the current adjustment mode and color temperature are displayed on page 72. Recording ...
... MENU SEL/SET CANCEL PPIRCOTFUIRLEE CAMERA OFF MEDIA SDI OUT HDV SLOT SELECT IN CAHUL-E1DVIOELCH-2ASAUUEMDTLAIOEONCUTALAUMTAAONUUDEAIINXLOT IN EXT GENLOCK IN TC IN TC OUT PMW-EX3 OPEN REMOTE B: ATW or Memory B mode A: Memory A mode PRST: Preset mode • Setting the camcorder to the value stored in ...source. Using the Direct menu When you can select the adjustment mode according to the preset value (factory setting: 3200K) in Part mode, you press the DISPLAY/BATT INFO button, the current adjustment mode and color temperature are displayed on page 72. Recording ...

Operating Instructions
Page 56
... to set the SHUTTER switch to ON, the fixed shutter is specified in the mode and with the 56 Setting the Electronic Shutter Recording in Part mode, you can be adjusted automatically or manually as required. ECS (Extended Clear Scan) mode Specify the shutter speed by setting "AGC" to obtain low...
... to set the SHUTTER switch to ON, the fixed shutter is specified in the mode and with the 56 Setting the Electronic Shutter Recording in Part mode, you can be adjusted automatically or manually as required. ECS (Extended Clear Scan) mode Specify the shutter speed by setting "AGC" to obtain low...

Operating Instructions
Page 57
...Slow Shutter mode is set to ON. The available setting values vary depending on the current frame rate. You can select in Part mode, you cannot turn the shutter on/off with the Direct menu if the SHUTTER switch is set to "On." Note ... OFFL H HOLD STA lPRTR/RESETVCOPsjSFTROEPV T G LP/HLSNAUYE/MXPNTAAIULSE JSFELF/MSWOEDNITTOCRAVNOCLEL EX ITNT IANUDIO EXTINT W MAANUUTAOL SLOT SELECT T MAANUUTALO CH-L2EAVUEDLIOCHS-E1LAEUCDITO PMW-EX3 FMulFl AF/MF ft 7 10 23 15 5 30 10 mm PEAKING MIRROR OFF IMAGE ON CONTRAST DISPLAY/BATT INFO BRIGHT ZEBRA A B TSRHAONTSITION ...
...Slow Shutter mode is set to ON. The available setting values vary depending on the current frame rate. You can select in Part mode, you cannot turn the shutter on/off with the Direct menu if the SHUTTER switch is set to "On." Note ... OFFL H HOLD STA lPRTR/RESETVCOPsjSFTROEPV T G LP/HLSNAUYE/MXPNTAAIULSE JSFELF/MSWOEDNITTOCRAVNOCLEL EX ITNT IANUDIO EXTINT W MAANUUTAOL SLOT SELECT T MAANUUTALO CH-L2EAVUEDLIOCHS-E1LAEUCDITO PMW-EX3 FMulFl AF/MF ft 7 10 23 15 5 30 10 mm PEAKING MIRROR OFF IMAGE ON CONTRAST DISPLAY/BATT INFO BRIGHT ZEBRA A B TSRHAONTSITION ...

Operating Instructions
Page 71
... is played back from the beginning to STBY (recording standby) status. Rec Review 71 In Rec Review, the last 3 seconds, 10 seconds, or the entire part of the clip is displayed, depending on the "Rec Review" setting (page 116) of the last recorded clip is less than the time (3 or 10...
... is played back from the beginning to STBY (recording standby) status. Rec Review 71 In Rec Review, the last 3 seconds, 10 seconds, or the entire part of the clip is displayed, depending on the "Rec Review" setting (page 116) of the last recorded clip is less than the time (3 or 10...

Operating Instructions
Page 126
...the BATT Empty warning is generated. The accumulated number of times of Direct menu operations is permitted. The current output voltage is displayed. Part: A part of charge/discharge is displayed. Off: No Direct menu operation is permitted. Both: To activate recording start/stop operations only for the ... to advance 90H. (There will be no phase difference between the reference signal and HD output.) Direct Menu Setting the Direct menu function All / Part / Off All: All Direct menu operations are permitted. DC Low Volt2 11.0 V to match that of the reference signal. 90H: When the...
...the BATT Empty warning is generated. The accumulated number of times of Direct menu operations is permitted. The current output voltage is displayed. Part: A part of charge/discharge is displayed. Off: No Direct menu operation is permitted. Both: To activate recording start/stop operations only for the ... to advance 90H. (There will be no phase difference between the reference signal and HD output.) Direct Menu Setting the Direct menu function All / Part / Off All: All Direct menu operations are permitted. DC Low Volt2 11.0 V to match that of the reference signal. 90H: When the...

Operating Instructions
Page 127
... "Execute" to which you will use upper- United States and Canada: HQ 1080/60i Other areas: HQ 1080/50i Set the first 4-alphanumeric part of the clip name. Menu Configuration and Detailed Settings Setup Menu List 127 Note Format Media Formatting SxS memory cards Media (A) Execute / Cancel Media...PAL Select the video format (bit rate, picture size, frame rate, and scan system in slot B. 1)If clips cannot be deleted. Set the second 4-numeric part of the clip names. Select "Execute" to format the SxS memory card in the selected slot.1) Select "Execute" to 9, - (hyphen), and _ (...
... "Execute" to which you will use upper- United States and Canada: HQ 1080/60i Other areas: HQ 1080/50i Set the first 4-alphanumeric part of the clip name. Menu Configuration and Detailed Settings Setup Menu List 127 Note Format Media Formatting SxS memory cards Media (A) Execute / Cancel Media...PAL Select the video format (bit rate, picture size, frame rate, and scan system in slot B. 1)If clips cannot be deleted. Set the second 4-numeric part of the clip names. Select "Execute" to format the SxS memory card in the selected slot.1) Select "Execute" to 9, - (hyphen), and _ (...


