
Operating Instructions
Page 6
... the shutter speed .......... 69 Adjusting the white balance ......... 71 Adjusting the exposure 73 Using the spot light-metering - Basics Recording a picture 25 Shooting backlit subjects - TITLE SEARCH ..... 89 Searching a recording by strong light - Basics Playing back a tape 41 To display the screen indicators - END SEARCH / EDITSEARCH / Rec Review 39 Playback - Digital effect 58 Presetting the adjustment for picture quality - Recording on a tape - Display function 43 Viewing the recording on TV 47 Advanced Recording Operations Recording still images on a "Memory Stick...
... the shutter speed .......... 69 Adjusting the white balance ......... 71 Adjusting the exposure 73 Using the spot light-metering - Basics Recording a picture 25 Shooting backlit subjects - TITLE SEARCH ..... 89 Searching a recording by strong light - Basics Playing back a tape 41 To display the screen indicators - END SEARCH / EDITSEARCH / Rec Review 39 Playback - Digital effect 58 Presetting the adjustment for picture quality - Recording on a tape - Display function 43 Viewing the recording on TV 47 Advanced Recording Operations Recording still images on a "Memory Stick...

Operating Instructions
Page 7
... Your Camcorder Changing the default settings with the menu 212 Troubleshooting Types of contents Getting Started "Memory Stick" Operations Using a "Memory Stick" - Table of trouble and how to a tape 178 Enlarging still images recorded on your computer - Memory Photo recording ......... 144 Recording images from an analog video unit on a "Memory Stick" - Memory photo playback .......... 172 Viewing moving pictures on your computer using the USB cable - Image protection 183 Deleting images - DELETE 184 Writing a print mark - For Windows users 193 Viewing images recorded on...
... Your Camcorder Changing the default settings with the menu 212 Troubleshooting Types of contents Getting Started "Memory Stick" Operations Using a "Memory Stick" - Table of trouble and how to a tape 178 Enlarging still images recorded on your computer - Memory Photo recording ......... 144 Recording images from an analog video unit on a "Memory Stick" - Memory photo playback .......... 172 Viewing moving pictures on your computer using the USB cable - Image protection 183 Deleting images - DELETE 184 Writing a print mark - For Windows users 193 Viewing images recorded on...

Operating Instructions
Page 47
... A/V connecting cable supplied with your TV has an S video jack Pictures can operate the video control buttons in the menu settings (p. 223). Set the input selector on your camcorder. When monitoring playback pictures on the TV screen, we recommend that you connect the white plug, the sound is R (right) signal. Open the jack cover. If your camcorder. AUDIO/VIDEO Playback - Basics IN White Yellow S VIDEO S VIDEO VIDEO TV :Signalflow A/Vconnectingcable(supplied) AUDIO Red If your TV is a monaural type Connect the yellow plug of...
... A/V connecting cable supplied with your TV has an S video jack Pictures can operate the video control buttons in the menu settings (p. 223). Set the input selector on your camcorder. When monitoring playback pictures on the TV screen, we recommend that you connect the white plug, the sound is R (right) signal. Open the jack cover. If your camcorder. AUDIO/VIDEO Playback - Basics IN White Yellow S VIDEO S VIDEO VIDEO TV :Signalflow A/Vconnectingcable(supplied) AUDIO Red If your TV is a monaural type Connect the yellow plug of...

Operating Instructions
Page 80
...TAPE SET REC MODE AUD I O MODE REMA I N M I C NR M I C LEVEL XLR SET RETURN AUTO MANUAL [MENU] : END TAPE SET REC MODE AUD I O MODE REMA I N M I C NR M I C LEVEL XLR SET RETURN MANUAL [MENU] : END 3,4 [a] AUDIO LEVEL CH1 CH2 30 20 12 0 dB CH1,2 [b] [c] [a] Recordinglevelmeter [b] Decreasestherecordinglevel [c] Increasestherecordinglevel To clear the recording level adjustment display Press AUDIO LEVEL. Sound recording level Adjusting the recording level of the built-in microphone (1) Select MIC LEVEL in in the menu setting while the POWER switch is set to CAMERA or VCR. (2) Turn...
...TAPE SET REC MODE AUD I O MODE REMA I N M I C NR M I C LEVEL XLR SET RETURN AUTO MANUAL [MENU] : END TAPE SET REC MODE AUD I O MODE REMA I N M I C NR M I C LEVEL XLR SET RETURN MANUAL [MENU] : END 3,4 [a] AUDIO LEVEL CH1 CH2 30 20 12 0 dB CH1,2 [b] [c] [a] Recordinglevelmeter [b] Decreasestherecordinglevel [c] Increasestherecordinglevel To clear the recording level adjustment display Press AUDIO LEVEL. Sound recording level Adjusting the recording level of the built-in microphone (1) Select MIC LEVEL in in the menu setting while the POWER switch is set to CAMERA or VCR. (2) Turn...

Operating Instructions
Page 98
... to VCR on your camcorder. (4) Play back the recorded tape on your VCR. VCR 98 Refer to the operating instructions of the VCR. (3) Set the POWER switch to the operating instructions of your camcorder. (5) Start recording on the VCR. - Editing - Connect your camcorder to your camcorder using the A/V connecting cable supplied with your camcorder: DISPLAY/TOUCH PANEL, DATA CODE On the Remote Commander: DISPLAY, DATA CODE, SEARCH MODE (1) Insert a blank tape (or a tape you have finished dubbing a tape Press xonbothyourcamcorderandtheVCR. AUDIO/VIDEO White Yellow S VIDEO...
... to VCR on your camcorder. (4) Play back the recorded tape on your VCR. VCR 98 Refer to the operating instructions of the VCR. (3) Set the POWER switch to the operating instructions of your camcorder. (5) Start recording on the VCR. - Editing - Connect your camcorder to your camcorder using the A/V connecting cable supplied with your camcorder: DISPLAY/TOUCH PANEL, DATA CODE On the Remote Commander: DISPLAY, DATA CODE, SEARCH MODE (1) Insert a blank tape (or a tape you have finished dubbing a tape Press xonbothyourcamcorderandtheVCR. AUDIO/VIDEO White Yellow S VIDEO...

Operating Instructions
Page 102
... the control signal correctly. (1) Set the IR SETUP code 1 Set the POWER switch to LINE. When you connect a video camera recorder, set its power switch to VCR/VTR. 3 Press MENU, then turn the dial to set the input selector to VCR on your VCR, then press the dial. When you connect using the VCR, send the control signal by infrared rays to the remote sensor on , then set VIDEO EDIT in "About IR SETUP codes." (p. 103) 102 3 OTHERS DATA CODE BEEP COMMANDER DISPLAY VIDEO...
... the control signal correctly. (1) Set the IR SETUP code 1 Set the POWER switch to LINE. When you connect a video camera recorder, set its power switch to VCR/VTR. 3 Press MENU, then turn the dial to set the input selector to VCR on your VCR, then press the dial. When you connect using the VCR, send the control signal by infrared rays to the remote sensor on , then set VIDEO EDIT in "About IR SETUP codes." (p. 103) 102 3 OTHERS DATA CODE BEEP COMMANDER DISPLAY VIDEO...

Operating Instructions
Page 106
... [MENU] : END When you connect using the i.LINK cable (optional), follow the procedure below. (1) Set the POWER switch to VCR on your camcorder. (2) Turn the power of the connected VCR on tapes) Step 2: Setting the VCR to operate with the i.LINK cable When you connect a digital video camera recorder, set its power switch to VCR/VTR. (3) Press MENU, then turn the SEL/PUSH EXEC dial to set the input selector to select i.LINK, then press the dial. 106 MENU 3 OTHERS DATA CODE BEEP COMMANDER DISPLAY VIDEO...
... [MENU] : END When you connect using the i.LINK cable (optional), follow the procedure below. (1) Set the POWER switch to VCR on your camcorder. (2) Turn the power of the connected VCR on tapes) Step 2: Setting the VCR to operate with the i.LINK cable When you connect a digital video camera recorder, set its power switch to VCR/VTR. (3) Press MENU, then turn the SEL/PUSH EXEC dial to set the input selector to select i.LINK, then press the dial. 106 MENU 3 OTHERS DATA CODE BEEP COMMANDER DISPLAY VIDEO...

Operating Instructions
Page 109
... you want to 20 programs in to TAPE, then press the dial. (p. 223) (3) Search for recording into the VCR. (2) Press MENU, then turn the SEL/PUSH EXEC dial to light blue. You can fine-adjust one frame at a time with EDITSEARCH. (6) Press MARK on the Remote Commander, or turn the SEL/PUSH EXEC dial to set up to insert using the video operation buttons, then pause playback.
... you want to 20 programs in to TAPE, then press the dial. (p. 223) (3) Search for recording into the VCR. (2) Press MENU, then turn the SEL/PUSH EXEC dial to light blue. You can fine-adjust one frame at a time with EDITSEARCH. (6) Press MARK on the Remote Commander, or turn the SEL/PUSH EXEC dial to set up to insert using the video operation buttons, then pause playback.

Operating Instructions
Page 121
... PRESET UB PRESET TC FORMAT TC RUN TC MAKE UB T I ME RETURN 01:00:00:00 SET CANCEL [MENU] : END (continued on the display window. When you record the picture, time code data will be set only in DVCAM mode. The time code is displayed on the LCD screen, in the viewfinder, or on the following page) 121 Setting the time code value (1) Set the POWER switch to CAMERA or VCR. (2) Press MENU, then turn the SEL/PUSH...
... PRESET UB PRESET TC FORMAT TC RUN TC MAKE UB T I ME RETURN 01:00:00:00 SET CANCEL [MENU] : END (continued on the display window. When you record the picture, time code data will be set only in DVCAM mode. The time code is displayed on the LCD screen, in the viewfinder, or on the following page) 121 Setting the time code value (1) Set the POWER switch to CAMERA or VCR. (2) Press MENU, then turn the SEL/PUSH...

Operating Instructions
Page 145
.... Digital zoom - Wide mode - However, they are not displayed while recording. When the POWER switch is set to MEMORY The angle of view is slightly larger compared with the angle of PROGRAM AE (The indicator flashes.) - Memory Photo recording When the POWER switch is set to CAMERA. 145 Recording data The recording data (date/time or various settings when recorded) are recorded automatically onto the "Memory Stick." You can neither turn off the power nor press PHOTO. "Memory Stick" Operations Recording still images on PAGE2 during playback. Fader - Digital...
.... Digital zoom - Wide mode - However, they are not displayed while recording. When the POWER switch is set to MEMORY The angle of view is slightly larger compared with the angle of PROGRAM AE (The indicator flashes.) - Memory Photo recording When the POWER switch is set to CAMERA. 145 Recording data The recording data (date/time or various settings when recorded) are recorded automatically onto the "Memory Stick." You can neither turn off the power nor press PHOTO. "Memory Stick" Operations Recording still images on PAGE2 during playback. Fader - Digital...

Operating Instructions
Page 167
Making the program Before operation Insert a "Memory Stick" and a recorded tape into your camcorder. (1) Set the POWER switch to VCR. (2) Press MENU, then turn the SEL/PUSH EXEC dial to insert using the video operation buttons, then pause playback. The OUT point of the first program is set, then the bottom part of the program mark changes to light blue. (8) Repeat steps 4 to 7, then set 20 programs in to MEMORY, then press the dial (p.223...
Making the program Before operation Insert a "Memory Stick" and a recorded tape into your camcorder. (1) Set the POWER switch to VCR. (2) Press MENU, then turn the SEL/PUSH EXEC dial to insert using the video operation buttons, then pause playback. The OUT point of the first program is set, then the bottom part of the program mark changes to light blue. (8) Repeat steps 4 to 7, then set 20 programs in to MEMORY, then press the dial (p.223...

Operating Instructions
Page 195
... using Windows 2000 Professional or Windows XP Home Edition/ Professional, log in with the steps on the screen. Carry out installation again in the menu settings and select "PTP," you can copy "Memory Stick" images from a camcorder onto a computer. If you connect the USB cable before USB driver installation is ideal for details. 195 Connect the USB cable according to page 221 for simply copying images from the camcorder onto your computer without connecting the USB cable...
... using Windows 2000 Professional or Windows XP Home Edition/ Professional, log in with the steps on the screen. Carry out installation again in the menu settings and select "PTP," you can copy "Memory Stick" images from a camcorder onto a computer. If you connect the USB cable before USB driver installation is ideal for details. 195 Connect the USB cable according to page 221 for simply copying images from the camcorder onto your computer without connecting the USB cable...

Operating Instructions
Page 197
USB MODE appears on -screen messages so that the Add Hardware Wizard recognizes that the USB drivers have been installed. Your computer recognizes the camcorder, and the Add Hardware Wizard starts. (USB) jack Push into your camcorder before installing the USB driver. 197 For Windows 2000 Professional, Windows XP Home Edition/Professional users (12) Afterthe"FileNeeded"screenappears. Viewing images recorded on a "Memory Stick" Set USBCONNECT in to NORMAL in your camcorder. Viewing Images Using your Computer Connecting your...
USB MODE appears on -screen messages so that the Add Hardware Wizard recognizes that the USB drivers have been installed. Your computer recognizes the camcorder, and the Add Hardware Wizard starts. (USB) jack Push into your camcorder before installing the USB driver. 197 For Windows 2000 Professional, Windows XP Home Edition/Professional users (12) Afterthe"FileNeeded"screenappears. Viewing images recorded on a "Memory Stick" Set USBCONNECT in to NORMAL in your camcorder. Viewing Images Using your Computer Connecting your...
Operating Instructions
Page 206
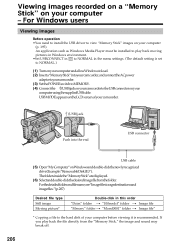
... and file name, see "Image file storage destinations and image files." (p. 207) Desired file type Still image Moving picture* Double-click in the menu settings. (The default setting is recommended. USB MODE appears on your computer - For Windows users Viewing images Before operation •You need to install the USB driver to your camcorder. (3) SetthePOWERswitchtoMEMORY. (4) Connectthe (USB)jackonyourcamcordertotheUSBconnectoronyour computer using the supplied USB cable. Viewing images recorded on a "Memory Stick" on the LCD screen of your computer before viewing it is set to...
... and file name, see "Image file storage destinations and image files." (p. 207) Desired file type Still image Moving picture* Double-click in the menu settings. (The default setting is recommended. USB MODE appears on your computer - For Windows users Viewing images Before operation •You need to install the USB driver to your camcorder. (3) SetthePOWERswitchtoMEMORY. (4) Connectthe (USB)jackonyourcamcordertotheUSBconnectoronyour computer using the supplied USB cable. Viewing images recorded on a "Memory Stick" on the LCD screen of your computer before viewing it is set to...
Operating Instructions
Page 210
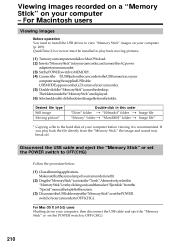
... computer using the supplied USB cable. The folders inside the "Memory Stick" are displayed. (6) Selectanddouble-clickthedesiredimagefilefromthefolder. Viewing images recorded on a "Memory Stick" on the LCD screen of your camcorder. (5) Double-clickthe"MemoryStick"icononthedesktop. Make sure that the access lamp of your camcorder to OFF (CHG). For Macintosh users Viewing images Before operation You need to install the USB driver to your computer (p. 209). QuickTime 3.0 or newer must be installed to play back the file directly from the "Special" menu...
... computer using the supplied USB cable. The folders inside the "Memory Stick" are displayed. (6) Selectanddouble-clickthedesiredimagefilefromthefolder. Viewing images recorded on a "Memory Stick" on the LCD screen of your camcorder. (5) Double-clickthe"MemoryStick"icononthedesktop. Make sure that the access lamp of your camcorder to OFF (CHG). For Macintosh users Viewing images Before operation You need to install the USB driver to your computer (p. 209). QuickTime 3.0 or newer must be installed to play back the file directly from the "Special" menu...

Operating Instructions
Page 213
... operate at back space editing. Meaning Presets/resets the time code (p. 121). DF Sets the frame mode to REC RUN. FREE RUN Time code advances freely regardless of the POWER switch. UB PRESET - Presets/resets user bits (p. 124). Regardless of each item z is automatically set user bits to the real time clock. Menu items differ depending on the following icons: TC/UB SET MANUAL SET CAMERA SET VCR SET LCD/VF SET MEMORY SET PRINT SET CM SET TAPE SET SETUP MENU OTHERS Selecting the mode setting...
... operate at back space editing. Meaning Presets/resets the time code (p. 121). DF Sets the frame mode to REC RUN. FREE RUN Time code advances freely regardless of the POWER switch. UB PRESET - Presets/resets user bits (p. 124). Regardless of each item z is automatically set user bits to the real time clock. Menu items differ depending on the following icons: TC/UB SET MANUAL SET CAMERA SET VCR SET LCD/VF SET MEMORY SET PRINT SET CM SET TAPE SET SETUP MENU OTHERS Selecting the mode setting...

Operating Instructions
Page 230
...; The USB cable was connected before installation of the USB driver was completed. c Please contact your camcorder or the DISPLAY button on the Remote Commander (p. 43). • Adjust the screen (CALIBRATION) (p. 246). • The mirror mode is not a malfunction (p. 34). • When you press the RESET button, all the settings including the date and time return to V-OUT/LCD in the menu settings in the menu settings when the POWER switch is because some functions use a linear...
...; The USB cable was connected before installation of the USB driver was completed. c Please contact your camcorder or the DISPLAY button on the Remote Commander (p. 43). • Adjust the screen (CALIBRATION) (p. 246). • The mirror mode is not a malfunction (p. 34). • When you press the RESET button, all the settings including the date and time return to V-OUT/LCD in the menu settings in the menu settings when the POWER switch is because some functions use a linear...

Operating Instructions
Page 233
... SET •FOR "InfoLITHIUM" BATTERY ONLY • CLEANING CASSETTE** • FULL • 48K • REC MODE • TAPE • "i.LINK" CABLE • FULL • - • NO FILE • NO MEMORY STICK • AUDIO ERROR • MEMORY STICK ERROR • FORMAT ERROR • - Use an "InfoLITHIUM" battery pack (p. 18). DIRECTORY ERROR • PLAY ERROR • REC ERROR •COPY INHIBIT •Q Z TAPE END •Q NO TAPE • NO PRINT MARK • NO STILL IMAGE FILE • DELETING • FORMATTING • NOW CHARGING Set the date and time...
... SET •FOR "InfoLITHIUM" BATTERY ONLY • CLEANING CASSETTE** • FULL • 48K • REC MODE • TAPE • "i.LINK" CABLE • FULL • - • NO FILE • NO MEMORY STICK • AUDIO ERROR • MEMORY STICK ERROR • FORMAT ERROR • - Use an "InfoLITHIUM" battery pack (p. 18). DIRECTORY ERROR • PLAY ERROR • REC ERROR •COPY INHIBIT •Q Z TAPE END •Q NO TAPE • NO PRINT MARK • NO STILL IMAGE FILE • DELETING • FORMATTING • NOW CHARGING Set the date and time...

Operating Instructions
Page 250
... input/output 4-pin connector Headphone jack Stereo minijack (ø 3.5 mm) LANC jack Stereo mini-minijack (ø 2.5 mm) USB jack mini-B MIC jack Minijack, 0.388 mV low impedance with the mark printed Tape speed DVCAM format: Approx. 28.218 mm/s DV format SP mode: Approx. 18.812 mm/s Recording/playback time (using cassette PDVM-40ME) DVCAM format: 40 min. and 30 seconds When using the battery pack: Approx. 2 min. Specifications Video camera recorder System Video recording system 2 rotary heads...
... input/output 4-pin connector Headphone jack Stereo minijack (ø 3.5 mm) LANC jack Stereo mini-minijack (ø 2.5 mm) USB jack mini-B MIC jack Minijack, 0.388 mV low impedance with the mark printed Tape speed DVCAM format: Approx. 28.218 mm/s DV format SP mode: Approx. 18.812 mm/s Recording/playback time (using cassette PDVM-40ME) DVCAM format: 40 min. and 30 seconds When using the battery pack: Approx. 2 min. Specifications Video camera recorder System Video recording system 2 rotary heads...

Operating Instructions
Page 262
... NTSC system 243 O, P, Q OLD MOVIE 58 Operation indicators 260 OVERLAP 55 Photo save 170 PHOTO SCAN 94 PHOTO SEARCH 92 Picture search 45 Playback pause 45 Playing time 18 Power zoom 33 Print mark 187 PROGRAM AE 66 R Recording level 78 Recording time 17 Rec Review 40 Remaining battery time indicator 35 Remaining tape indicator ...... 35 Remote Commander 258 Remote sensor 252 RESET 230 S Self-diagnosis display .......... 231 Self-timer recording 38, 50, 150, 162 Shutter speed 69 Signal convert function...
... NTSC system 243 O, P, Q OLD MOVIE 58 Operation indicators 260 OVERLAP 55 Photo save 170 PHOTO SCAN 94 PHOTO SEARCH 92 Picture search 45 Playback pause 45 Playing time 18 Power zoom 33 Print mark 187 PROGRAM AE 66 R Recording level 78 Recording time 17 Rec Review 40 Remaining battery time indicator 35 Remaining tape indicator ...... 35 Remote Commander 258 Remote sensor 252 RESET 230 S Self-diagnosis display .......... 231 Self-timer recording 38, 50, 150, 162 Shutter speed 69 Signal convert function...


