Operating Instructions
Page 7
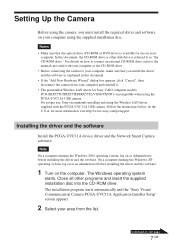
... PCGA-UVC11A USB camera. For proper use on as Administrator before installing the driver and the software. 1 Turn on next page 7 GB The installation program starts automatically and the "Sony Visual Communication Camera PCGA-UVC11A ...Application Installer Setup" screen appears. 2 Select your area from your computer and reinstall it. • The preinstalled Wireless LAN driver for more information visit http://www.sony.com/pcsupport. On a computer running the Windows 2000 operating system, log on your computer. In the U.S.A, for Sony VAIO...
... PCGA-UVC11A USB camera. For proper use on as Administrator before installing the driver and the software. 1 Turn on next page 7 GB The installation program starts automatically and the "Sony Visual Communication Camera PCGA-UVC11A ...Application Installer Setup" screen appears. 2 Select your area from your computer and reinstall it. • The preinstalled Wireless LAN driver for more information visit http://www.sony.com/pcsupport. On a computer running the Windows 2000 operating system, log on your computer. In the U.S.A, for Sony VAIO...
Operating Instructions
Page 9
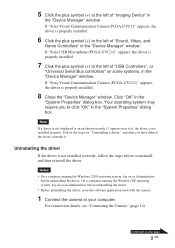
...Continued on as Administrator before uninstalling the driver. • Before uninstalling the driver, close the software application used with the camera. 1 Connect the camera to your computer. If "Sony USB Microphone (PCGA-UVC11)" appears, the driver is properly installed. 7 Click the plus symbol (+) to the left of "Imaging Device" ... a driver," and after you to the left of "Sound, Video, and Game Controllers" in the "Device Manager" window. If "Sony Visual Communication Camera PCGA-UVC11" appears, the driver is properly installed. 8 Close the "Device Manager" window.
...Continued on as Administrator before uninstalling the driver. • Before uninstalling the driver, close the software application used with the camera. 1 Connect the camera to your computer. If "Sony USB Microphone (PCGA-UVC11)" appears, the driver is properly installed. 7 Click the plus symbol (+) to the left of "Imaging Device" ... a driver," and after you to the left of "Sound, Video, and Game Controllers" in the "Device Manager" window. If "Sony Visual Communication Camera PCGA-UVC11" appears, the driver is properly installed. 8 Close the "Device Manager" window.
Operating Instructions
Page 10
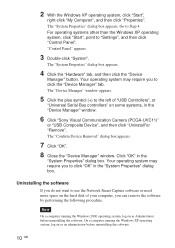
... to use the Network Smart Capture software or need more space on some systems, in the "Device Manager" window. 6 Click "Sony Visual Communication Camera (PCGA-UVC11)" or "USB Composite Device", and then click "Uninstall"or "Remove". Note On a computer running the Windows XP operating system, log on as...button. "Control Panel" appears. 3 Double-click "System". The "Device Manager" window appears. 5 Click the plus symbol (+) to the left of "USB Controllers", or "Universal Serial Bus controllers" on the hard disk of your computer, you do not want to click "OK" in the "System Properties...
... to use the Network Smart Capture software or need more space on some systems, in the "Device Manager" window. 6 Click "Sony Visual Communication Camera (PCGA-UVC11)" or "USB Composite Device", and then click "Uninstall"or "Remove". Note On a computer running the Windows XP operating system, log on as...button. "Control Panel" appears. 3 Double-click "System". The "Device Manager" window appears. 5 Click the plus symbol (+) to the left of "USB Controllers", or "Universal Serial Bus controllers" on the hard disk of your computer, you do not want to click "OK" in the "System Properties...
Operating Instructions
Page 14
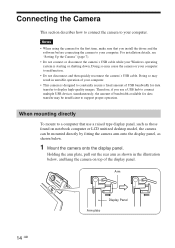
...installation details, see "Setting Up the Camera" (page 7). • Do not connect or disconnect the camera's USB cable while your computer. Notes • When using the camera for the first time, make sure that use a USB hub to connect multiple USB devices simultaneously, the amount of the ...mounted directly by fitting the camera arm onto the display panel, as shown in unstable operation of USB bandwidth for data transfer may cause the camera or your computer to malfunction. • Do not disconnect and then quickly reconnect the camera's USB cable. When mounting directly To...
...installation details, see "Setting Up the Camera" (page 7). • Do not connect or disconnect the camera's USB cable while your computer. Notes • When using the camera for the first time, make sure that use a USB hub to connect multiple USB devices simultaneously, the amount of the ...mounted directly by fitting the camera arm onto the display panel, as shown in unstable operation of USB bandwidth for data transfer may cause the camera or your computer to malfunction. • Do not disconnect and then quickly reconnect the camera's USB cable. When mounting directly To...
Operating Instructions
Page 15
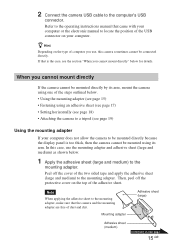
...with your computer or the electronic manual to locate the position of the USB connector on the top of the adhesive sheet. When you cannot mount directly If the camera cannot be mounted directly by its arm, mount the camera using one of computer you cannot mount directly" below . 1 Apply... on the type of the steps outlined below. • Using the mounting adapter (see page 15) • Fastening using its arm. 2 Connect the camera USB cable to a tripod (see page 19) Using the mounting adapter If your computer. Refer to the mounting adapter. z Hint Depending on next page 15 ...
...with your computer or the electronic manual to locate the position of the USB connector on the top of the adhesive sheet. When you cannot mount directly If the camera cannot be mounted directly by its arm, mount the camera using one of computer you cannot mount directly" below . 1 Apply... on the type of the steps outlined below. • Using the mounting adapter (see page 15) • Fastening using its arm. 2 Connect the camera USB cable to a tripod (see page 19) Using the mounting adapter If your computer. Refer to the mounting adapter. z Hint Depending on next page 15 ...
Operating Instructions
Page 16
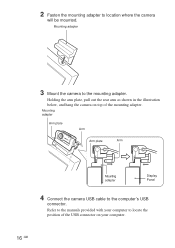
Mounting adapter Arm plate Arm Arm plate Arm Mounting adapter Display Panel 4 Connect the camera USB cable to location where the camera will be mounted. Refer to the manuals provided with your computer to the mounting adapter. 2 Fasten the mounting adapter to the computer's USB connector. Mounting adapter 3 Mount the camera to locate the position of the USB connector on top of the mounting adapter. Holding the arm plate, pull out the rear arm as shown in the illustration below, and hang the camera on your computer. 16 GB
Mounting adapter Arm plate Arm Arm plate Arm Mounting adapter Display Panel 4 Connect the camera USB cable to location where the camera will be mounted. Refer to the manuals provided with your computer to the mounting adapter. 2 Fasten the mounting adapter to the computer's USB connector. Mounting adapter 3 Mount the camera to locate the position of the USB connector on top of the mounting adapter. Holding the arm plate, pull out the rear arm as shown in the illustration below, and hang the camera on your computer. 16 GB
Operating Instructions
Page 17
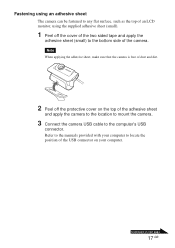
...the protective cover on the top of the adhesive sheet and apply the camera to the location to mount the camera. 3 Connect the camera USB cable to the computer's USB connector. Note When applying the adhesive sheet, make sure that the camera is free of dust and dirt. 2 Peel off the cover of the... two sided tape and apply the adhesive sheet (small) to locate the position of the USB connector on...
...the protective cover on the top of the adhesive sheet and apply the camera to the location to mount the camera. 3 Connect the camera USB cable to the computer's USB connector. Note When applying the adhesive sheet, make sure that the camera is free of dust and dirt. 2 Peel off the cover of the... two sided tape and apply the adhesive sheet (small) to locate the position of the USB connector on...
Operating Instructions
Page 18
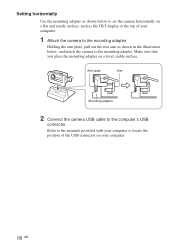
... the rear arm as shown in the illustration below to set the camera horizontally on your computer. 1 Attach the camera to the computer's USB connector. Setting horizontally Use the mounting adapter as shown below , and attach the camera to the mounting adapter. Refer to the manuals provided with your computer... to locate the position of the USB connector on a flat and steady surface, such as the CRT display or the top of your...
... the rear arm as shown in the illustration below to set the camera horizontally on your computer. 1 Attach the camera to the computer's USB connector. Setting horizontally Use the mounting adapter as shown below , and attach the camera to the mounting adapter. Refer to the manuals provided with your computer... to locate the position of the USB connector on a flat and steady surface, such as the CRT display or the top of your...
Operating Instructions
Page 19
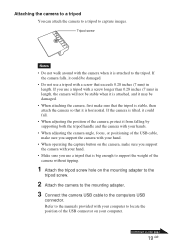
... handle and the camera with your hands. • When adjusting the camera angle, focus, or positioning of the camera without tipping. 1 Attach the tripod screw hole on the mounting adapter to the tripod screw. 2 Attach the camera to the mounting adapter. 3 Connect the camera USB cable to capture ...images. Continued on the camera, make sure you support the camera with a screw longer than 0.28 inches (7 mm) in length. Tripod screw Notes ...
... handle and the camera with your hands. • When adjusting the camera angle, focus, or positioning of the camera without tipping. 1 Attach the tripod screw hole on the mounting adapter to the tripod screw. 2 Attach the camera to the mounting adapter. 3 Connect the camera USB cable to capture ...images. Continued on the camera, make sure you support the camera with a screw longer than 0.28 inches (7 mm) in length. Tripod screw Notes ...
Operating Instructions
Page 20
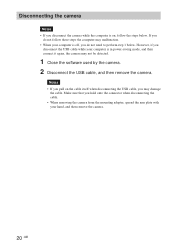
... • If you disconnect the camera while the computer is on the cable itself when disconnecting the USB cable, you may damage the cable. Make sure that you disconnect the USB cable while your computer is off, you pull on , follow these steps the computer may not be detected. 1 Close ...the software used by the camera. 2 Disconnect the USB cable, and then remove the camera. If you do not need to perform step 1 below . However, if you hold onto the connector when disconnecting the cable. ...
... • If you disconnect the camera while the computer is on the cable itself when disconnecting the USB cable, you may damage the cable. Make sure that you disconnect the USB cable while your computer is off, you pull on , follow these steps the computer may not be detected. 1 Close ...the software used by the camera. 2 Disconnect the USB cable, and then remove the camera. If you do not need to perform step 1 below . However, if you hold onto the connector when disconnecting the cable. ...
Operating Instructions
Page 21
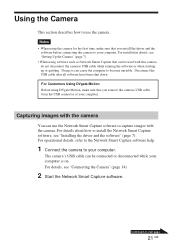
...to install the Network Smart Capture software, see "Connecting the Camera" (page 14). 2 Start the Network Smart Capture software. The camera's USB cable can be connected or disconnected while your computer. Capturing images with the camera You can cause the computer to become unstable. For installation... "Installing the driver and the software" (page 7). Using the Camera This section describes how to use the Network Smart Capture software to capture images with this camera, do not disconnect the cameras USB cable while running the software or when starting up or quitting. Doing...
...to install the Network Smart Capture software, see "Connecting the Camera" (page 14). 2 Start the Network Smart Capture software. The camera's USB cable can be connected or disconnected while your computer. Capturing images with the camera You can cause the computer to become unstable. For installation... "Installing the driver and the software" (page 7). Using the Camera This section describes how to use the Network Smart Capture software to capture images with this camera, do not disconnect the cameras USB cable while running the software or when starting up or quitting. Doing...
Operating Instructions
Page 26
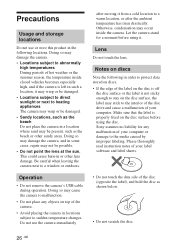
...high temperatures During periods of hot weather or the summer season, the temperature inside the camera. Let the camera stand for any objects on the disc surface, the label may stick to sudden temperature changes. Sony assumes no liability for a moment before using it. Precautions Usage and storage locations ...sand may be possible. • Do not point the lens at the sun. Operation • Do not remove the camera's USB cable during operation. Doing so may damage the camera, and in the following in or other sandy areas. Do not use or store this product in some cases, repair may...
...high temperatures During periods of hot weather or the summer season, the temperature inside the camera. Let the camera stand for any objects on the disc surface, the label may stick to sudden temperature changes. Sony assumes no liability for a moment before using it. Precautions Usage and storage locations ...sand may be possible. • Do not point the lens at the sun. Operation • Do not remove the camera's USB cable during operation. Doing so may damage the camera, and in the following in or other sandy areas. Do not use or store this product in some cases, repair may...

Operating Instructions
Page 29
... computer and the application you are subject to country and region. Camera rotational range Approx. 220° Power consumption Approx. 0.5 W Interface USB (powered directly from the VAIO computer) Connector USB type A Dimensions Approx. 2.4 × 1.4 × 1.3 ...PCGA-UVC11A installation disc (CD-ROM × 1) • Mounting adapter (1) • Adhesive sheet (3) • Operating instructions (1) • Warranty (1)* • End User Software License Agreement (1) * The accessories included vary according to change without notice. 29 GB Specifications Visual Communication Camera...
... computer and the application you are subject to country and region. Camera rotational range Approx. 220° Power consumption Approx. 0.5 W Interface USB (powered directly from the VAIO computer) Connector USB type A Dimensions Approx. 2.4 × 1.4 × 1.3 ...PCGA-UVC11A installation disc (CD-ROM × 1) • Mounting adapter (1) • Adhesive sheet (3) • Operating instructions (1) • Warranty (1)* • End User Software License Agreement (1) * The accessories included vary according to change without notice. 29 GB Specifications Visual Communication Camera...
Operating Instructions
Page 30
...and install it is recognized properly. • If the camera is connected to the information provided in the Network Smart Capture finder Cause/Remedy • The USB cable is capable of the image. c Use a USB hub that is not connected properly. Images appear grainy ...device does not display properly, install the driver. c Reinstall your nearest Sony dealer. However, this section. If the problem persists, consult your Windows operating system properly. • USB cannot be used. Symptom The camera is not installed. When a fast-moving subject is displayed in the finder...
...and install it is recognized properly. • If the camera is connected to the information provided in the Network Smart Capture finder Cause/Remedy • The USB cable is capable of the image. c Use a USB hub that is not connected properly. Images appear grainy ...device does not display properly, install the driver. c Reinstall your nearest Sony dealer. However, this section. If the problem persists, consult your Windows operating system properly. • USB cannot be used. Symptom The camera is not installed. When a fast-moving subject is displayed in the finder...
Operating Instructions
Page 32
...with your computer appears dark or enters power-saving mode while you press the CAPTURE button. (An image occurring after disconnecting the USB cable from the camera appear white. Operating the computer's touch pad, mouse, or keyboard returns the computer from the video standby mode. c You ... The LCD on your computer screen. When downloading still images, the image does not download immediately after you are using the camera. c If you connect the USB cable, the "Add New Hardware Wizard" dialog box appears on your computer. For details, refer to the manuals provided with...
...with your computer appears dark or enters power-saving mode while you press the CAPTURE button. (An image occurring after disconnecting the USB cable from the camera appear white. Operating the computer's touch pad, mouse, or keyboard returns the computer from the video standby mode. c You ... The LCD on your computer screen. When downloading still images, the image does not download immediately after you are using the camera. c If you connect the USB cable, the "Add New Hardware Wizard" dialog box appears on your computer. For details, refer to the manuals provided with...

Operating Instructions
Page 114
6 USB DVgate Motion DVgate Motion USB USB Network Smart Capture Network Smart Capture 6 Network Smart Capture 1 USB 13 2 Network Smart Capture 20 KR
6 USB DVgate Motion DVgate Motion USB USB Network Smart Capture Network Smart Capture 6 Network Smart Capture 1 USB 13 2 Network Smart Capture 20 KR

Operating Instructions
Page 123
Sony 27 Network Smart Capture • USB c c 6 c 8 6 USB c Windows • USB c USB USB c 포트에 500 mA USB USB USB USB c c c 29 KR
Sony 27 Network Smart Capture • USB c c 6 c 8 6 USB c Windows • USB c USB USB c 포트에 500 mA USB USB USB USB c c c 29 KR