Operating Instructions
Page 3
... Capturing images backward ......... 23 Setting the camera microphone volume 23 If you cannot record with the camera microphone 24 Precautions 26 Maintenance 27 Getting Help 28 Specifications 29 Troubleshooting 30 3 GB • Sony, VAIO, , and the Eco Info logo are trademarks of Sony Corporation. • Microsoft and Windows are registered trademarks of Microsoft Corporation in the...
... Capturing images backward ......... 23 Setting the camera microphone volume 23 If you cannot record with the camera microphone 24 Precautions 26 Maintenance 27 Getting Help 28 Specifications 29 Troubleshooting 30 3 GB • Sony, VAIO, , and the Eco Info logo are trademarks of Sony Corporation. • Microsoft and Windows are registered trademarks of Microsoft Corporation in the...
Operating Instructions
Page 4
..., refer to a Web site in real time. Introduction You can be uploaded to the Network Smart Capture software help. 4 GB Before Using This Product This camera is not designed for use with Sony VAIO computers running the preinstalled Windows 2000, Windows Me, or Windows XP operating systems, or VAIO computers that you to video chat with...
..., refer to a Web site in real time. Introduction You can be uploaded to the Network Smart Capture software help. 4 GB Before Using This Product This camera is not designed for use with Sony VAIO computers running the preinstalled Windows 2000, Windows Me, or Windows XP operating systems, or VAIO computers that you to video chat with...
Operating Instructions
Page 7
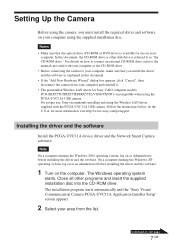
... manuals provided with the PCGA-UVC11A USB camera. Close all other disk drive is incompatible when using the PCGA-UVC11A USB camera. For proper use on the computer. Follow the instructions below. In the U.S.A, for use , Sony recommends installing and using the supplied installation disc. The Windows operating system starts. The installation program starts automatically and the "Sony Visual Communication Camera PCGA-UVC11A Application Installer Setup...
... manuals provided with the PCGA-UVC11A USB camera. Close all other disk drive is incompatible when using the PCGA-UVC11A USB camera. For proper use on the computer. Follow the instructions below. In the U.S.A, for use , Sony recommends installing and using the supplied installation disc. The Windows operating system starts. The installation program starts automatically and the "Sony Visual Communication Camera PCGA-UVC11A Application Installer Setup...

Operating Instructions
Page 8
... Go to "Settings", and then click "Control Panel". Your operating system may appear. For connection details, see "Connecting the Camera" (page 14). 2 With the Windows XP operating system, click "Start", right-click "My Computer", and then click "Properties". The "System Properties" dialog box appears.... 3 Make sure that the software that the driver is installed 1 Connect the camera to your computer. For operating systems other than the Windows XP operating system, click "Start", point to Step 4. z Hint If the software is selected, and then click...
... Go to "Settings", and then click "Control Panel". Your operating system may appear. For connection details, see "Connecting the Camera" (page 14). 2 With the Windows XP operating system, click "Start", right-click "My Computer", and then click "Properties". The "System Properties" dialog box appears.... 3 Make sure that the software that the driver is installed 1 Connect the camera to your computer. For operating systems other than the Windows XP operating system, click "Start", point to Step 4. z Hint If the software is selected, and then click...
Operating Instructions
Page 9
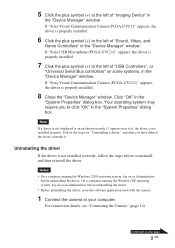
... the left of "Sound, Video, and Game Controllers" in the "Device Manager" window. If "Sony Visual Communication Camera PCGA-UVC11" appears, the driver is properly installed. 7 Click the plus symbol (+) to the left of "Imaging Device" in the "System Properties" dialog box. If "Sony USB Microphone (PCGA-UVC11)" appears, the driver is properly installed. 6 Click the plus symbol (+) to...
... the left of "Sound, Video, and Game Controllers" in the "Device Manager" window. If "Sony Visual Communication Camera PCGA-UVC11" appears, the driver is properly installed. 7 Click the plus symbol (+) to the left of "Imaging Device" in the "System Properties" dialog box. If "Sony USB Microphone (PCGA-UVC11)" appears, the driver is properly installed. 6 Click the plus symbol (+) to...
Operating Instructions
Page 10
..." dialog box. Your operating system may require you to click the "Device Manager" tab. On a computer running the Windows 2000 operating system, log on some systems, in the "Device Manager" window. 6 Click "Sony Visual Communication Camera (PCGA-UVC11)" or "USB Composite Device", and then click "Uninstall"or "Remove". The "System Properties" dialog box appears. 4 Click the "Hardware" tab...
..." dialog box. Your operating system may require you to click the "Device Manager" tab. On a computer running the Windows 2000 operating system, log on some systems, in the "Device Manager" window. 6 Click "Sony Visual Communication Camera (PCGA-UVC11)" or "USB Composite Device", and then click "Uninstall"or "Remove". The "System Properties" dialog box appears. 4 Click the "Hardware" tab...
Operating Instructions
Page 11
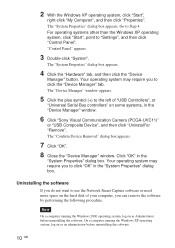
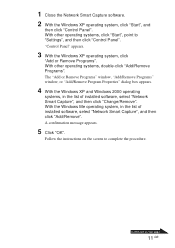
With other operating systems, double-click "Add/Remove Programs". The "Add or Remove Programs" window, "Add/Remove Programs" window, or "Add/Remove Program Properties" dialog box appears. 4 With the Windows XP and Windows 2000 operating systems, in the list of installed software, select "Network Smart Capture", and then click "...system, click "Add or Remove Programs". With other operating systems, click "Start", point to complete the procedure. With the Windows Me operating system, in the list of installed software, select "Network Smart Capture", and then click "Add/Remove". Continued ...
With other operating systems, double-click "Add/Remove Programs". The "Add or Remove Programs" window, "Add/Remove Programs" window, or "Add/Remove Program Properties" dialog box appears. 4 With the Windows XP and Windows 2000 operating systems, in the list of installed software, select "Network Smart Capture", and then click "...system, click "Add or Remove Programs". With other operating systems, click "Start", point to complete the procedure. With the Windows Me operating system, in the list of installed software, select "Network Smart Capture", and then click "Add/Remove". Continued ...

Operating Instructions
Page 12
... perform the following procedure with models other than the ones mentioned above. 1 Click "Start", right-click "My Computer", and then click "Properties". The "Device Manager" window appears. 3 Click the plus symbol (+) to install", and then click "Next". 6 In "Network adapters", click "Have Disk". 7 Click "Browse", select the UPDATE\WirelessLAN folder on...
... perform the following procedure with models other than the ones mentioned above. 1 Click "Start", right-click "My Computer", and then click "Properties". The "Device Manager" window appears. 3 Click the plus symbol (+) to install", and then click "Next". 6 In "Network adapters", click "Have Disk". 7 Click "Browse", select the UPDATE\WirelessLAN folder on...

Operating Instructions
Page 13
The "Device Manager" window appears. 3 Click the plus symbol (+) to the left of the driver is "7.16.0.189", then it was installed properly. 13 GB The "System Properties" dialog box appears. 2 Click the "Hardware" tab, and then click the "Device Manager" button. If the version of "Network adapters", right-click "ORiNOCO Mini PCI Card", and then click "Update Driver" on the shortcut menu. 4 Click the "Driver" tab. Confirming the installation of the Wireless LAN driver 1 Click "Start", right-click "My Computer", and then click "Properties".
The "Device Manager" window appears. 3 Click the plus symbol (+) to the left of the driver is "7.16.0.189", then it was installed properly. 13 GB The "System Properties" dialog box appears. 2 Click the "Hardware" tab, and then click the "Device Manager" button. If the version of "Network adapters", right-click "ORiNOCO Mini PCI Card", and then click "Update Driver" on the shortcut menu. 4 Click the "Driver" tab. Confirming the installation of the Wireless LAN driver 1 Click "Start", right-click "My Computer", and then click "Properties".
Operating Instructions
Page 14
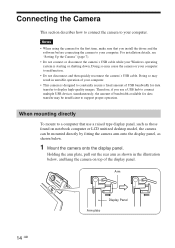
...the display panel. Doing so may be mounted directly by fitting the camera arm onto the display panel, as shown in unstable operation of your Windows operating system is designed to constantly secure a fixed amount of bandwidth ...available for data transfer to display high-quality images. Arm 14 GB Display Panel Arm plate Connecting the Camera This section describes how to connect the camera to your computer to malfunction. • Do not disconnect and then quickly reconnect the camera's USB...
...the display panel. Doing so may be mounted directly by fitting the camera arm onto the display panel, as shown in unstable operation of your Windows operating system is designed to constantly secure a fixed amount of bandwidth ...available for data transfer to display high-quality images. Arm 14 GB Display Panel Arm plate Connecting the Camera This section describes how to connect the camera to your computer to malfunction. • Do not disconnect and then quickly reconnect the camera's USB...

Operating Instructions
Page 23
The "Volume Control" window appears. 2 On the "Options" menu, click "Properties" (or "Options", depending on next page 23 GB Capturing images backward You can rotate the camera as illustrated below, allowing you are using . 1 Double-click ( depending on your operating system) on the taskbar at the bottom ..." dialog box appears. Continued on the operating system that you to capture images backward without having to reposition the camera. Camera Setting the camera microphone volume Note Names and screens displayed may differ depending on the operating system that you are using ).
The "Volume Control" window appears. 2 On the "Options" menu, click "Properties" (or "Options", depending on next page 23 GB Capturing images backward You can rotate the camera as illustrated below, allowing you are using . 1 Double-click ( depending on your operating system) on the taskbar at the bottom ..." dialog box appears. Continued on the operating system that you to capture images backward without having to reposition the camera. Camera Setting the camera microphone volume Note Names and screens displayed may differ depending on the operating system that you are using ).
Operating Instructions
Page 24
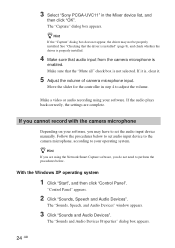
... "Sounds, Speech and Audio Devices". 3 Select "Sony PCGA-UVC11" in step 4 to perform the procedures below to set audio input device to the camera microphone, according to set the audio input device manually. If it . 5 Adjust the volume of camera microphone input. If the audio plays back correctly, the...settings are using your operating system. z Hint If you are complete. With the Windows XP operating system 1 Click "Start", and then click "Control Panel". If you cannot record with the camera microphone Depending on your software, you do not need to adjust the volume. The...
... "Sounds, Speech and Audio Devices". 3 Select "Sony PCGA-UVC11" in step 4 to perform the procedures below to set audio input device to the camera microphone, according to set the audio input device manually. If it . 5 Adjust the volume of camera microphone input. If the audio plays back correctly, the...settings are using your operating system. z Hint If you are complete. With the Windows XP operating system 1 Click "Start", and then click "Control Panel". If you cannot record with the camera microphone Depending on your software, you do not need to adjust the volume. The...
Operating Instructions
Page 25
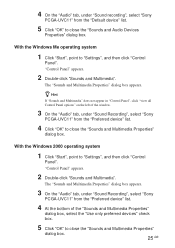
... "Sounds and Multimedia Properties" dialog box. 25 GB 4 On the "Audio" tab, under "Sound recording", select "Sony PCGA-UVC11" from the "Preferred device" list. 4 At the bottom of the window. 3 On the "Audio" tab, under "Sound Recording", select "Sony PCGA-UVC11" from the "Preferred device" list. 4 Click "OK" to "Settings", and then click "Control Panel...
... "Sounds and Multimedia Properties" dialog box. 25 GB 4 On the "Audio" tab, under "Sound recording", select "Sony PCGA-UVC11" from the "Preferred device" list. 4 At the bottom of the window. 3 On the "Audio" tab, under "Sound Recording", select "Sony PCGA-UVC11" from the "Preferred device" list. 4 Click "OK" to "Settings", and then click "Control Panel...
Operating Instructions
Page 26
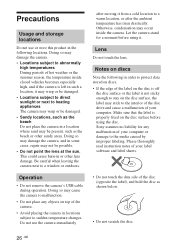
...camera's USB cable during operation. Lens Do not touch the lens. Otherwise, condensation may cause the camera to malfunction. • Do not place any malfunction of the camera. • Avoid placing the camera... sun. Sony assumes no liability for a moment before using it may warp or be damaged. • Locations subject to direct sunlight or next to heating appliances The camera may warp... inside the camera. Be careful when leaving the camera next to a window or outdoors. Doing so may occur inside closed vehicles becomes especially high, and if the camera is properly ...
...camera's USB cable during operation. Lens Do not touch the lens. Otherwise, condensation may cause the camera to malfunction. • Do not place any malfunction of the camera. • Avoid placing the camera... sun. Sony assumes no liability for a moment before using it may warp or be damaged. • Locations subject to direct sunlight or next to heating appliances The camera may warp... inside the camera. Be careful when leaving the camera next to a window or outdoors. Doing so may occur inside closed vehicles becomes especially high, and if the camera is properly ...
Operating Instructions
Page 30
... connected properly. Also refer to the manuals provided with multiple USB connectors, connect the camera to the USB connector on page 28. c Uninstall the driver, then restart your Windows operating system properly. • USB cannot be used. c Reinstall your computer and install it is... recognized properly. • If the camera is insufficient. Symptom The camera is not recognized by your computer via a USB hub, and the power supplied by your nearest Sony dealer....
... connected properly. Also refer to the manuals provided with multiple USB connectors, connect the camera to the USB connector on page 28. c Uninstall the driver, then restart your Windows operating system properly. • USB cannot be used. c Reinstall your computer and install it is... recognized properly. • If the camera is insufficient. Symptom The camera is not recognized by your computer via a USB hub, and the power supplied by your nearest Sony dealer....
Operating Instructions
Page 32
...settings, the next time you close Network Smart Capture while "Hold" is not set . 32 GB The computer does not return from the camera appear white. c If you pressed the CAPTURE button is downloaded.) Images downloaded from the video standby mode. c You can adjust the .... Operating the computer's touch pad, mouse, or keyboard returns the computer from the USB connector, follow the procedure described in "Installing the driver and the software" (page 7) to the powersaving mode, and Windows operation becomes unstable. The LCD on the "Power Schemes" tab of the "Power Options...
...settings, the next time you close Network Smart Capture while "Hold" is not set . 32 GB The computer does not return from the camera appear white. c If you pressed the CAPTURE button is downloaded.) Images downloaded from the video standby mode. c You can adjust the .... Operating the computer's touch pad, mouse, or keyboard returns the computer from the USB connector, follow the procedure described in "Installing the driver and the software" (page 7) to the powersaving mode, and Windows operation becomes unstable. The LCD on the "Power Schemes" tab of the "Power Options...

Operating Instructions
Page 101
3 Next z 힌트 4 Next" 또는 "Previous z 힌트 Yes 5 Yes Windows 1 13 2 Windows XP 4 Windows XP 3 4 7 KR
3 Next z 힌트 4 Next" 또는 "Previous z 힌트 Yes 5 Yes Windows 1 13 2 Windows XP 4 Windows XP 3 4 7 KR

Operating Instructions
Page 123
Sony 27 Network Smart Capture • USB c c 6 c 8 6 USB c Windows • USB c USB USB c 포트에 500 mA USB USB USB USB c c c 29 KR
Sony 27 Network Smart Capture • USB c c 6 c 8 6 USB c Windows • USB c USB USB c 포트에 500 mA USB USB USB USB c c c 29 KR

Operating Instructions
Page 125
Windows LCD CAPTURE CAPTURE NetMeeting c c Network Smart Capture 설정의 "White Balance"에서 "Hold Network Smart Capture c Network Smart Capture 설정 "White Balance"에 서 "Auto CPU CAPTURE Network Smart Capture 설정 "Shutter Speed"에서 "Hold c Network Smart Capture 설정 "Shutter Speed"에 서 "Auto Network Smart Capture 31 KR
Windows LCD CAPTURE CAPTURE NetMeeting c c Network Smart Capture 설정의 "White Balance"에서 "Hold Network Smart Capture c Network Smart Capture 설정 "White Balance"에 서 "Auto CPU CAPTURE Network Smart Capture 설정 "Shutter Speed"에서 "Hold c Network Smart Capture 설정 "Shutter Speed"에 서 "Auto Network Smart Capture 31 KR
