Operating Instructions
Page 3
... Parts 6 Setting Up the Camera 7 Installing the driver and the software 7 Installing the Wireless LAN driver 12 Connecting the Camera 14 When mounting directly 14 When you cannot record with the camera 21 Capturing images backward ......... 23 Setting the camera microphone volume 23 If you... 19 Disconnecting the camera 20 Using the Camera 21 Capturing images with the camera microphone 24 Precautions 26 Maintenance 27 Getting Help 28 Specifications 29 Troubleshooting 30 3 GB and Canada. • Sony, VAIO, , and the Eco Info logo are trademarks of Sony Corporation. •...
... Parts 6 Setting Up the Camera 7 Installing the driver and the software 7 Installing the Wireless LAN driver 12 Connecting the Camera 14 When mounting directly 14 When you cannot record with the camera 21 Capturing images backward ......... 23 Setting the camera microphone volume 23 If you... 19 Disconnecting the camera 20 Using the Camera 21 Capturing images with the camera microphone 24 Precautions 26 Maintenance 27 Getting Help 28 Specifications 29 Troubleshooting 30 3 GB and Canada. • Sony, VAIO, , and the Eco Info logo are trademarks of Sony Corporation. •...
Operating Instructions
Page 7
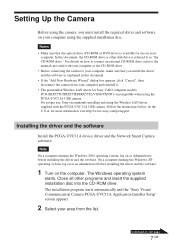
... or the CD-ROM drive. • Before connecting the camera to the manuals provided with the PCGA-UVC11A USB camera. Note On a computer running the Windows XP operating system, log on as an administrator before installing the driver and the software. The installation program starts automatically and the "Sony Visual Communication Camera PCGA-UVC11A Application Installer Setup" screen appears. 2 Select your area...
... or the CD-ROM drive. • Before connecting the camera to the manuals provided with the PCGA-UVC11A USB camera. Note On a computer running the Windows XP operating system, log on as an administrator before installing the driver and the software. The installation program starts automatically and the "Sony Visual Communication Camera PCGA-UVC11A Application Installer Setup" screen appears. 2 Select your area...

Operating Instructions
Page 8
... click "Start", right-click "My Computer", and then click "Properties". z Hint If the software is installed 1 Connect the camera to your computer. The necessary driver and software are automatically installed. z Hint When the installation is selected, and then click "Next". The "System Properties" dialog... box appears. Your operating system may appear. 3 Make sure that the software that the driver is already installed, the check box does not appear. 4 Follow the on-screen instructions. Click "Next" or "Previous" until the ...
... click "Start", right-click "My Computer", and then click "Properties". z Hint If the software is installed 1 Connect the camera to your computer. The necessary driver and software are automatically installed. z Hint When the installation is selected, and then click "Next". The "System Properties" dialog... box appears. Your operating system may appear. 3 Make sure that the software that the driver is already installed, the check box does not appear. 4 Follow the on-screen instructions. Click "Next" or "Previous" until the ...
Operating Instructions
Page 9
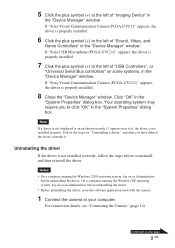
... operating system, log on as Administrator before uninstalling the driver. • Before uninstalling the driver, close the software application used with the camera. 1 Connect the camera to your computer. If "Sony Visual Communication Camera PCGA-UVC11" appears, the driver is not installed correctly, follow the steps below to the left of "USB Controllers", or "Universal Serial Bus controllers" on next page...
... operating system, log on as Administrator before uninstalling the driver. • Before uninstalling the driver, close the software application used with the camera. 1 Connect the camera to your computer. If "Sony Visual Communication Camera PCGA-UVC11" appears, the driver is not installed correctly, follow the steps below to the left of "USB Controllers", or "Universal Serial Bus controllers" on next page...

Operating Instructions
Page 12
... the left of "Network adapters", right-click "ORiNOCO Mini PCI Card", and then click "Update Driver" on the CD-ROM, and then click "OK". 8 Click "Next". 9 Click "Finish". 12 GB The "Device Manager" window appears. 3 Click the plus symbol (+) to install", ... wizard starts. 4 In the dialog box, select "Install from a list or specific location (Advanced)", and then click "Next". 5 Select "Don't search. Installing the Wireless LAN driver Only necessary for the PCG-SRX55TC/SRX55TH/SRX55TL/VX89/ VX89P. Note Do not perform the following procedure with models other than the ones mentioned above...
... the left of "Network adapters", right-click "ORiNOCO Mini PCI Card", and then click "Update Driver" on the CD-ROM, and then click "OK". 8 Click "Next". 9 Click "Finish". 12 GB The "Device Manager" window appears. 3 Click the plus symbol (+) to install", ... wizard starts. 4 In the dialog box, select "Install from a list or specific location (Advanced)", and then click "Next". 5 Select "Don't search. Installing the Wireless LAN driver Only necessary for the PCG-SRX55TC/SRX55TH/SRX55TL/VX89/ VX89P. Note Do not perform the following procedure with models other than the ones mentioned above...

Operating Instructions
Page 13
Confirming the installation of "Network adapters", right-click "ORiNOCO Mini PCI Card", and then click "Update Driver" on the shortcut menu. 4 Click the "Driver" tab. The "Device Manager" window appears. 3 Click the plus symbol (+) to the left of the Wireless LAN driver 1 Click "Start", right-click "My Computer", and then click "Properties". The "System Properties" dialog box appears. 2 Click the "Hardware" tab, and then click the "Device Manager" button. If the version of the driver is "7.16.0.189", then it was installed properly. 13 GB
Confirming the installation of "Network adapters", right-click "ORiNOCO Mini PCI Card", and then click "Update Driver" on the shortcut menu. 4 Click the "Driver" tab. The "Device Manager" window appears. 3 Click the plus symbol (+) to the left of the Wireless LAN driver 1 Click "Start", right-click "My Computer", and then click "Properties". The "System Properties" dialog box appears. 2 Click the "Hardware" tab, and then click the "Device Manager" button. If the version of the driver is "7.16.0.189", then it was installed properly. 13 GB
Operating Instructions
Page 14
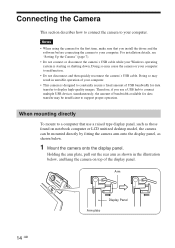
... unstable operation of your computer. • This camera is starting or shutting down. Therefore, if you install the driver and the software before connecting the camera to your computer to malfunction. • Do not disconnect and then quickly reconnect the camera's USB cable. Doing so may cause the camera or your computer. Doing so may result...
... unstable operation of your computer. • This camera is starting or shutting down. Therefore, if you install the driver and the software before connecting the camera to your computer to malfunction. • Do not disconnect and then quickly reconnect the camera's USB cable. Doing so may cause the camera or your computer. Doing so may result...
Operating Instructions
Page 21
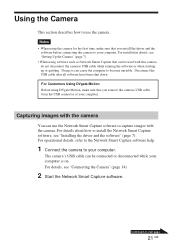
...Capture software. For details, see "Installing the driver and the software" (page 7). Continued on . For installation details, see "Setting Up the Camera" (page 7). • When using software such as Network Smart Capture that can use the camera. The camera's USB cable can cause the computer to your computer ...is on next page 21 GB Notes • When using DVgate Motion, make sure that you install the driver and the software before connecting the camera to become unstable. For...
...Capture software. For details, see "Installing the driver and the software" (page 7). Continued on . For installation details, see "Setting Up the Camera" (page 7). • When using software such as Network Smart Capture that can use the camera. The camera's USB cable can cause the computer to your computer ...is on next page 21 GB Notes • When using DVgate Motion, make sure that you install the driver and the software before connecting the camera to become unstable. For...
Operating Instructions
Page 24
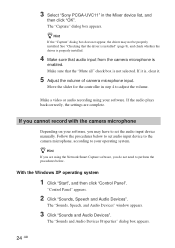
3 Select "Sony PCGA-UVC11" in step 4 to adjust the volume. z Hint If the "Capture" dialog box does not appear, the driver may have to set audio input device to the camera microphone, according to set the audio input device manually. Make sure that audio input from the camera microphone is enabled...8), and check whether the driver is properly installed. 4 Make sure that the "Mute all" check box is , clear it is not selected. Make a video or audio recording using the Network Smart Capture software, you are complete. If it . 5 Adjust the volume of camera microphone input. Move the ...
3 Select "Sony PCGA-UVC11" in step 4 to adjust the volume. z Hint If the "Capture" dialog box does not appear, the driver may have to set audio input device to the camera microphone, according to set the audio input device manually. Make sure that audio input from the camera microphone is enabled...8), and check whether the driver is properly installed. 4 Make sure that the "Mute all" check box is , clear it is not selected. Make a video or audio recording using the Network Smart Capture software, you are complete. If it . 5 Adjust the volume of camera microphone input. Move the ...
Operating Instructions
Page 30
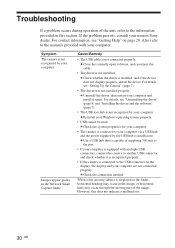
... nearest Sony dealer. c Check the connection method. If the problem persists, consult your Windows operating system properly. • USB cannot be used. Symptom The camera is not recognized by your computer. c Close the currently open software, and reconnect the cable. • The driver is ...with your computer. For details, see "Uninstalling the driver" (page 9) and "Installing the driver and the software" (page 7). • The USB root hub is connected to your computer. • The camera is connected to the USB connector on page 28. Troubleshooting If a problem occurs...
... nearest Sony dealer. c Check the connection method. If the problem persists, consult your Windows operating system properly. • USB cannot be used. Symptom The camera is not recognized by your computer. c Close the currently open software, and reconnect the cable. • The driver is ...with your computer. For details, see "Uninstalling the driver" (page 9) and "Installing the driver and the software" (page 7). • The USB root hub is connected to your computer. • The camera is connected to the USB connector on page 28. Troubleshooting If a problem occurs...
Operating Instructions
Page 31
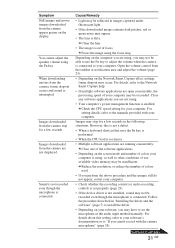
...• Check whether the recording control (or audio recording control) is set the microphone as other conditions of your computer. Images downloaded from the camera are not displayed. Cause/Remedy • Light may occur. c Check the CPU speed setting for a few seconds in the following situations. c... you may be able to use , available video memory may be reflected in "Installing the driver and the software" (page 7) to set properly (page 23). • If the device driver is not installed, sound may not be recorded even though the microphone is interrupted. Continued on...
...• Check whether the recording control (or audio recording control) is set the microphone as other conditions of your computer. Images downloaded from the camera are not displayed. Cause/Remedy • Light may occur. c Check the CPU speed setting for a few seconds in the following situations. c... you may be able to use , available video memory may be reflected in "Installing the driver and the software" (page 7) to set properly (page 23). • If the device driver is not installed, sound may not be recorded even though the microphone is interrupted. Continued on...
Operating Instructions
Page 32
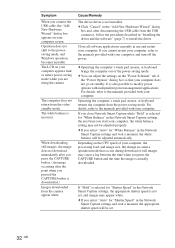
..., the next time you pressed the CAPTURE button is downloaded.) Images downloaded from the USB connector, follow the procedure described in the Network Smart Capture settings, the appropriate shutter ... also possible to the manuals provided with independent power management applications. Cause/Remedy The device driver is not set . 32 GB c Operating the computer's touch pad, mouse, or keyboard... balance will be adjusted automatically. c If you select "Auto" for "White Balance" in camera operation mode that your computer. Symptom When you press the CAPTURE button and the time the ...
..., the next time you pressed the CAPTURE button is downloaded.) Images downloaded from the USB connector, follow the procedure described in the Network Smart Capture settings, the appropriate shutter ... also possible to the manuals provided with independent power management applications. Cause/Remedy The device driver is not set . 32 GB c Operating the computer's touch pad, mouse, or keyboard... balance will be adjusted automatically. c If you select "Auto" for "White Balance" in camera operation mode that your computer. Symptom When you press the CAPTURE button and the time the ...


