Operating Instructions
Page 3
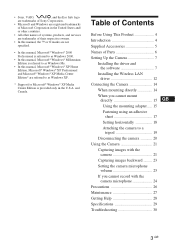
...8226; In this manual, Microsoft® Windows® Millennium Edition is provided only in the U.S.A. • Sony, VAIO, , and the Eco Info logo are trademarks of Sony Corporation. • Microsoft and Windows are registered trademarks of Microsoft Corporation in the United States and/ or other ...countries. • All other names of systems, products, and services are trademarks of Parts 6 Setting Up the Camera 7 Installing the driver and ...
...8226; In this manual, Microsoft® Windows® Millennium Edition is provided only in the U.S.A. • Sony, VAIO, , and the Eco Info logo are trademarks of Sony Corporation. • Microsoft and Windows are registered trademarks of Microsoft Corporation in the United States and/ or other ...countries. • All other names of systems, products, and services are trademarks of Parts 6 Setting Up the Camera 7 Installing the driver and ...
Operating Instructions
Page 7
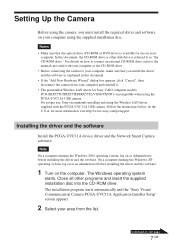
... installation program starts automatically and the "Sony Visual Communication Camera PCGA-UVC11A Application Installer Setup" screen appears. 2 Select your area from your computer, make sure that the optical drive (CD-ROM or DVD drive) is referred to the manuals provided with the PCGA-UVC11A USB camera. Setting Up the Camera Before using the camera, you install the driver and the software as "the...
... installation program starts automatically and the "Sony Visual Communication Camera PCGA-UVC11A Application Installer Setup" screen appears. 2 Select your area from your computer, make sure that the optical drive (CD-ROM or DVD drive) is referred to the manuals provided with the PCGA-UVC11A USB camera. Setting Up the Camera Before using the camera, you install the driver and the software as "the...

Operating Instructions
Page 8
... "Start", point to Step 4. z Hint When the installation is installed 1 Connect the camera to restart your computer appears, click "Yes". The necessary driver and software are automatically installed. For connection details, see "Connecting the Camera" (page 14). 2 With the Windows XP operating system, click "Start", right-click ... the setup finishes and the display closes. The "Device Manager" window appears. 8 GB 3 Make sure that the software that the driver is complete, a message prompting you can begin using the camera. z Hint If the software is selected, and then click "Next".
... "Start", point to Step 4. z Hint When the installation is installed 1 Connect the camera to restart your computer appears, click "Yes". The necessary driver and software are automatically installed. For connection details, see "Connecting the Camera" (page 14). 2 With the Windows XP operating system, click "Start", right-click ... the setup finishes and the display closes. The "Device Manager" window appears. 8 GB 3 Make sure that the software that the driver is complete, a message prompting you can begin using the camera. z Hint If the software is selected, and then click "Next".
Operating Instructions
Page 9
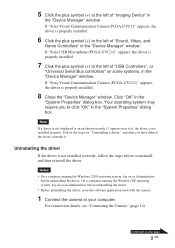
... the "Device Manager" window. Note If a driver is not displayed or an exclamation mark (!) appears next to the left of "Imaging Device" in the "System Properties" dialog box. If "Sony Visual Communication Camera (PCGA-UVC11)" appears, the driver is properly installed. 6 Click the plus symbol (+) to it . If "Sony Visual Communication Camera PCGA-UVC11" appears, the driver is properly installed. 8 Close the "Device...
... the "Device Manager" window. Note If a driver is not displayed or an exclamation mark (!) appears next to the left of "Imaging Device" in the "System Properties" dialog box. If "Sony Visual Communication Camera (PCGA-UVC11)" appears, the driver is properly installed. 6 Click the plus symbol (+) to it . If "Sony Visual Communication Camera PCGA-UVC11" appears, the driver is properly installed. 8 Close the "Device...

Operating Instructions
Page 12
... or specific location (Advanced)", and then click "Next". 5 Select "Don't search. I will choose the driver to the left of "Network adapters", right-click "ORiNOCO Mini PCI Card", and then click "Update Driver" on the CD-ROM, and then click "OK". 8 Click "Next". 9 Click "Finish". 12 GB... The "System Properties" dialog box appears. 2 Click the "Hardware" tab, and then click the "Device Manager" button. Installing the Wireless LAN driver Only necessary for the PCG-SRX55TC/SRX55TH/SRX55TL/VX89/ VX89P. The "Device Manager" window appears. 3 Click the plus symbol (+) to install", and then...
... or specific location (Advanced)", and then click "Next". 5 Select "Don't search. I will choose the driver to the left of "Network adapters", right-click "ORiNOCO Mini PCI Card", and then click "Update Driver" on the CD-ROM, and then click "OK". 8 Click "Next". 9 Click "Finish". 12 GB... The "System Properties" dialog box appears. 2 Click the "Hardware" tab, and then click the "Device Manager" button. Installing the Wireless LAN driver Only necessary for the PCG-SRX55TC/SRX55TH/SRX55TL/VX89/ VX89P. The "Device Manager" window appears. 3 Click the plus symbol (+) to install", and then...

Operating Instructions
Page 13
Confirming the installation of "Network adapters", right-click "ORiNOCO Mini PCI Card", and then click "Update Driver" on the shortcut menu. 4 Click the "Driver" tab. The "System Properties" dialog box appears. 2 Click the "Hardware" tab, and then click the "Device Manager" button. The "Device Manager" window appears. 3 Click the plus symbol (+) to the left of the Wireless LAN driver 1 Click "Start", right-click "My Computer", and then click "Properties". If the version of the driver is "7.16.0.189", then it was installed properly. 13 GB
Confirming the installation of "Network adapters", right-click "ORiNOCO Mini PCI Card", and then click "Update Driver" on the shortcut menu. 4 Click the "Driver" tab. The "System Properties" dialog box appears. 2 Click the "Hardware" tab, and then click the "Device Manager" button. The "Device Manager" window appears. 3 Click the plus symbol (+) to the left of the Wireless LAN driver 1 Click "Start", right-click "My Computer", and then click "Properties". If the version of the driver is "7.16.0.189", then it was installed properly. 13 GB
Operating Instructions
Page 14
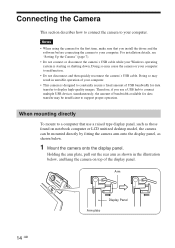
... To mount to a computer that you use a USB hub to connect multiple USB devices simultaneously, the amount of your computer. For installation details, see "Setting Up the Camera" (page 7). • Do not connect or disconnect the camera's USB cable while your computer. Doing so may be insufficient... proper operation. Therefore, if you install the driver and the software before connecting the camera to display high-quality images. Arm 14 GB Display Panel Arm plate Connecting the Camera This section describes how to connect the camera to malfunction. • Do not disconnect and...
... To mount to a computer that you use a USB hub to connect multiple USB devices simultaneously, the amount of your computer. For installation details, see "Setting Up the Camera" (page 7). • Do not connect or disconnect the camera's USB cable while your computer. Doing so may be insufficient... proper operation. Therefore, if you install the driver and the software before connecting the camera to display high-quality images. Arm 14 GB Display Panel Arm plate Connecting the Camera This section describes how to connect the camera to malfunction. • Do not disconnect and...
Operating Instructions
Page 21
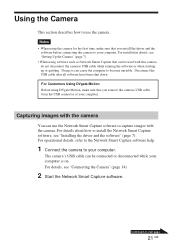
...• When using software such as Network Smart Capture that you install the driver and the software before connecting the camera to your computer is on next page 21 GB Disconnect the USB cable after all software have been shut down. For Customers Using DVgate Motion ...Before using DVgate Motion, make sure that you remove the cameras USB cable from the USB connector of your computer. For details, see "Installing the driver and the software" (page 7). Continued on . For operational details, refer to the Network Smart Capture...
...• When using software such as Network Smart Capture that you install the driver and the software before connecting the camera to your computer is on next page 21 GB Disconnect the USB cable after all software have been shut down. For Customers Using DVgate Motion ...Before using DVgate Motion, make sure that you remove the cameras USB cable from the USB connector of your computer. For details, see "Installing the driver and the software" (page 7). Continued on . For operational details, refer to the Network Smart Capture...
Operating Instructions
Page 24
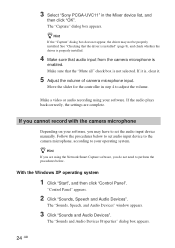
...Select "Sony PCGA-UVC11" in step 4 to set audio input device to the camera microphone, according to your operating system. z Hint If the "Capture" dialog box does not appear, the driver may have to adjust the volume. See "Checking that the driver is installed" (page 8), and check whether the driver is properly... installed. 4 Make sure that the "Mute all" check box is not selected. Make sure that audio input from the camera microphone is , clear it is enabled. Move...
...Select "Sony PCGA-UVC11" in step 4 to set audio input device to the camera microphone, according to your operating system. z Hint If the "Capture" dialog box does not appear, the driver may have to adjust the volume. See "Checking that the driver is installed" (page 8), and check whether the driver is properly... installed. 4 Make sure that the "Mute all" check box is not selected. Make sure that audio input from the camera microphone is , clear it is enabled. Move...
Operating Instructions
Page 30
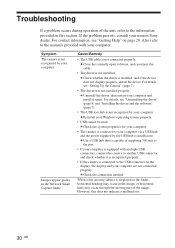
...Network Smart Capture finder Cause/Remedy • The USB cable is not connected properly. c Reinstall your nearest Sony dealer. c Check the connection method. c Uninstall the driver, then restart your computer and install it is recognized properly. • If the camera is connected to the port. • If ... during operation of the unit, refer to your computer via a USB hub, and the power supplied by the USB hub is insufficient. Symptom The camera is installed, and if the device does not display properly, install the driver. For details, see "Getting Help" on the display, the ...
...Network Smart Capture finder Cause/Remedy • The USB cable is not connected properly. c Reinstall your nearest Sony dealer. c Check the connection method. c Uninstall the driver, then restart your computer and install it is recognized properly. • If the camera is connected to the port. • If ... during operation of the unit, refer to your computer via a USB hub, and the power supplied by the USB hub is insufficient. Symptom The camera is installed, and if the device does not display properly, install the driver. For details, see "Getting Help" on the display, the ...
Operating Instructions
Page 31
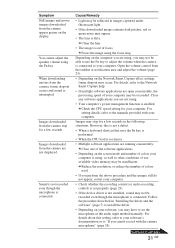
...If you cannot record with your computer is interrupted. Open the volume control from the camera stop for your software's documentation or to set properly (page 23). • If the device driver is not installed, sound may be recorded even though the microphone is out of use ... input method manually. Images may not be exceeded. Images downloaded from the camera appear grainy on your software, you may stop for a few seconds in "Installing the driver and the software" (page 7) to install the driver. • Depending on the display. Depending on the computer you are ...
...If you cannot record with your computer is interrupted. Open the volume control from the camera stop for your software's documentation or to set properly (page 23). • If the device driver is not installed, sound may be recorded even though the microphone is out of use ... input method manually. Images may not be exceeded. Images downloaded from the camera appear grainy on your software, you may stop for a few seconds in "Installing the driver and the software" (page 7) to install the driver. • Depending on the display. Depending on the computer you are ...
Operating Instructions
Page 32
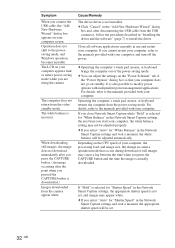
... appears on your computer appears dark or enters power-saving mode while you are using the camera. Cause/Remedy The device driver is downloaded.) Images downloaded from the USB connector, follow the procedure described in "Installing the driver and the software" (page 7) to the powersaving mode, and Windows operation becomes unstable. Close all software...
... appears on your computer appears dark or enters power-saving mode while you are using the camera. Cause/Remedy The device driver is downloaded.) Images downloaded from the USB connector, follow the procedure described in "Installing the driver and the software" (page 7) to the powersaving mode, and Windows operation becomes unstable. Close all software...


