Installation Manual
Page 1
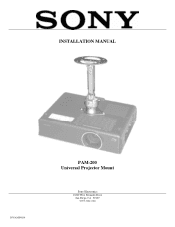
INSTALLATION MANUAL IN-PAM200.R0 PAM-200 Universal Projector Mount Sony Electronics 16540 West Bernardo Drive San Diego, CA 92127 www.sony.com
INSTALLATION MANUAL IN-PAM200.R0 PAM-200 Universal Projector Mount Sony Electronics 16540 West Bernardo Drive San Diego, CA 92127 www.sony.com
Installation Manual
Page 4
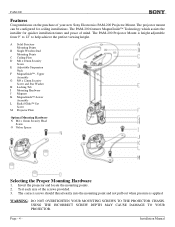
... J Magnets K MagnaGuide™-Lower Assembly L Radial Glide™ Set Screw M Projector Plate Optional Mounting Hardware N M4 x 12mm Security Head Screw O Nylon Spacer Selecting the Proper Mounting Hardware 1. The projector mount can be configured for quicker installation times and peace of the screws provided. 3. The PAM-200 Projector Mount is applied. PAM-200 Features Congratulations on the purchase of your new Sony Electronics PAM-200 Projector Mount.
... J Magnets K MagnaGuide™-Lower Assembly L Radial Glide™ Set Screw M Projector Plate Optional Mounting Hardware N M4 x 12mm Security Head Screw O Nylon Spacer Selecting the Proper Mounting Hardware 1. The projector mount can be configured for quicker installation times and peace of the screws provided. 3. The PAM-200 Projector Mount is applied. PAM-200 Features Congratulations on the purchase of your new Sony Electronics PAM-200 Projector Mount.
Installation Manual
Page 5
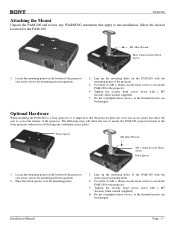
... recognition). 2. Nylon Spacer M5 Allen Wrench M4 x 16mm Security Head Screw Nylon Spacer 1. PAM-200 Attaching the Mount Unpack the PAM-200 and review any WARNING statements that allow the user to mount the PAM-200 projector bracket to the Sony projector without fear of blocking any access plates that apply to the installation. M5 Allen Wrench M4 x 10mm Security Head...
... recognition). 2. Nylon Spacer M5 Allen Wrench M4 x 16mm Security Head Screw Nylon Spacer 1. PAM-200 Attaching the Mount Unpack the PAM-200 and review any WARNING statements that allow the user to mount the PAM-200 projector bracket to the Sony projector without fear of blocking any access plates that apply to the installation. M5 Allen Wrench M4 x 10mm Security Head...
Installation Manual
Page 6
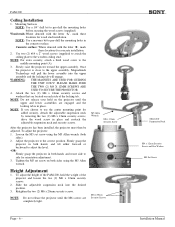
...masonry bit to the wooden ceiling stud. Slowly raise the projector toward the upper assembly. Firmly grasp the projector in both hands, and tilt either forward or backward to adjust the level. -ORFirmly grasp the projector in the concrete surface. PAM-200 Ceiling Installation 1. NOTE: For extra security, attach a ...x 20mm security screws. NOTE: If you choose to pre-drill the mounting holes before securing the wood screws (supplied). Loosen the M5 set screw on each side of the PAM-200, hold on the projector until the M6 screws are engaged and the locking tab is close to ...
...masonry bit to the wooden ceiling stud. Slowly raise the projector toward the upper assembly. Firmly grasp the projector in both hands, and tilt either forward or backward to adjust the level. -ORFirmly grasp the projector in the concrete surface. PAM-200 Ceiling Installation 1. NOTE: For extra security, attach a ...x 20mm security screws. NOTE: If you choose to pre-drill the mounting holes before securing the wood screws (supplied). Loosen the M5 set screw on each side of the PAM-200, hold on the projector until the M6 screws are engaged and the locking tab is close to ...
Installation Manual
Page 7
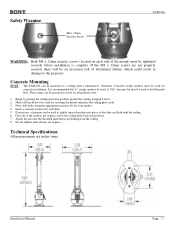
... lightly tap each anchor into position. 7. These items can be mounted to the projector. Do not tighten until all of the anchors are not properly secured, there will be an increased risk of the mount) must be tightened securely before installation is protruding from the ceiling....Attach the nut onto the threaded shaft that ¼" wedge anchors be used to be used for securing the mount and place the ceiling plate aside. 3. Concrete Mounting NOTE: The PAM-200 can be purchased at your anchor. 4. Insert a concrete anchor into position against the ceiling, keeping it level....
... lightly tap each anchor into position. 7. These items can be mounted to the projector. Do not tighten until all of the anchors are not properly secured, there will be an increased risk of the mount) must be tightened securely before installation is protruding from the ceiling....Attach the nut onto the threaded shaft that ¼" wedge anchors be used to be used for securing the mount and place the ceiling plate aside. 3. Concrete Mounting NOTE: The PAM-200 can be purchased at your anchor. 4. Insert a concrete anchor into position against the ceiling, keeping it level....

Installation Manual
Page 8
... Sony with any other source of impact. Warning and Caution statements. PAM-200 Warranty Limited Lifetime Warranty All Sony products carry a limited lifetime warranty from dropping or mishandling the projector Page... - 8 - THE FOREGOING WARRANTY IS IN LIEU OF ALL OTHER WARRANTIES, EXPRESS OR IMPLIED, INCLUDING BUT NOT LIMITED TO THE IMPLIED WARRANTIES OF MERCHANTABILITY AND FITNESS FOR A PARTICULAR PURPOSE. Indicates that is to the mounting...
... Sony with any other source of impact. Warning and Caution statements. PAM-200 Warranty Limited Lifetime Warranty All Sony products carry a limited lifetime warranty from dropping or mishandling the projector Page... - 8 - THE FOREGOING WARRANTY IS IN LIEU OF ALL OTHER WARRANTIES, EXPRESS OR IMPLIED, INCLUDING BUT NOT LIMITED TO THE IMPLIED WARRANTIES OF MERCHANTABILITY AND FITNESS FOR A PARTICULAR PURPOSE. Indicates that is to the mounting...

